

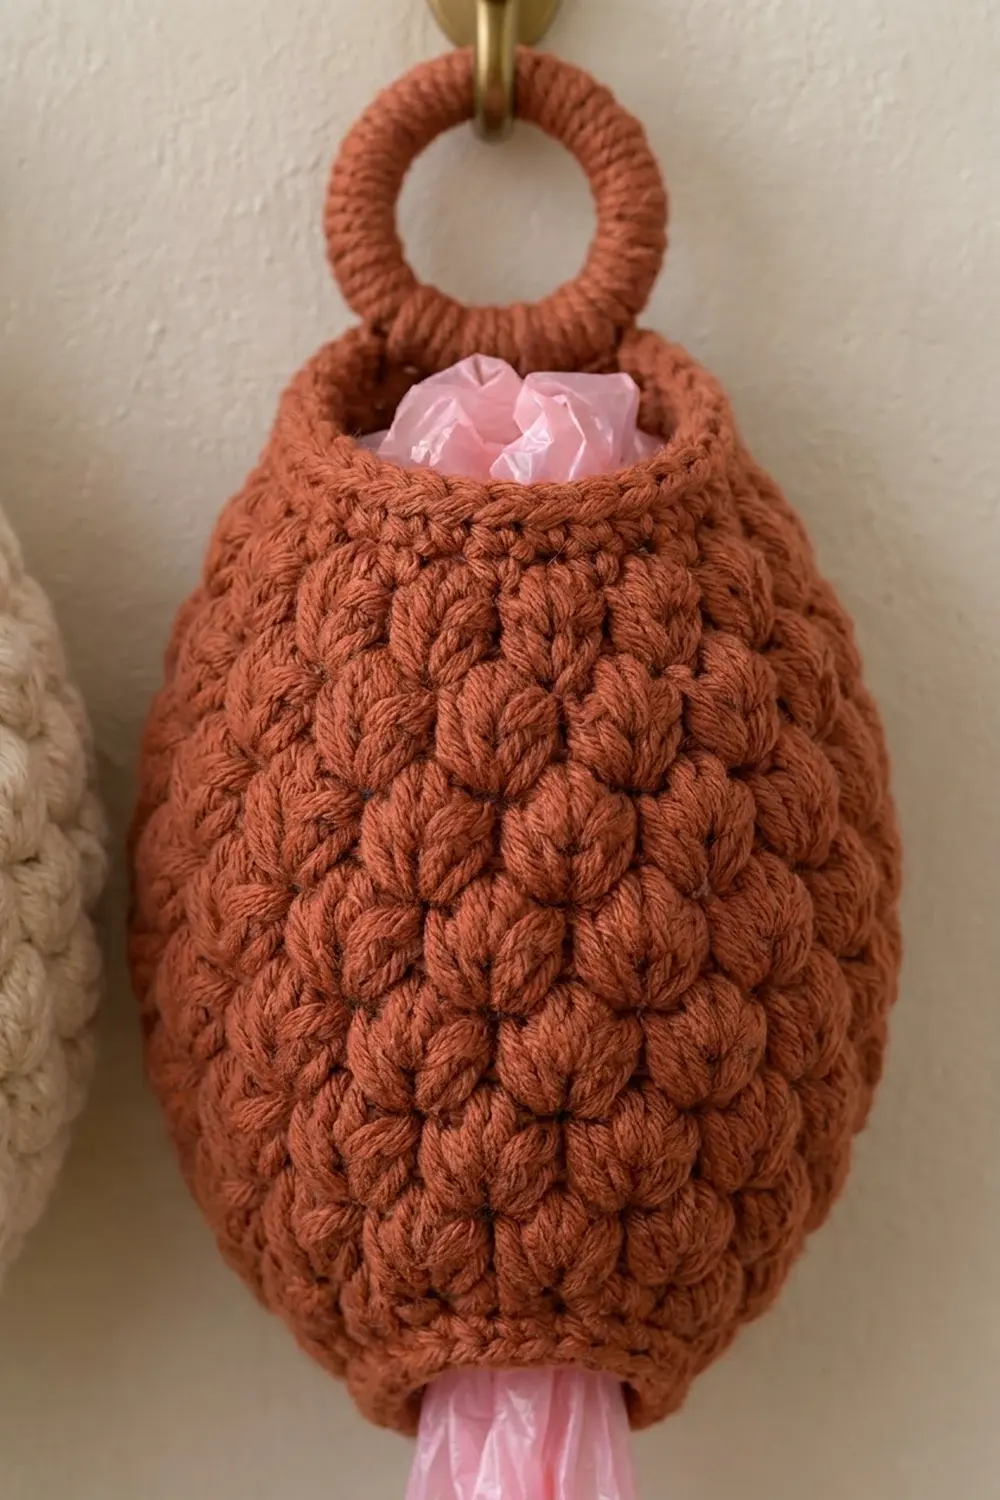
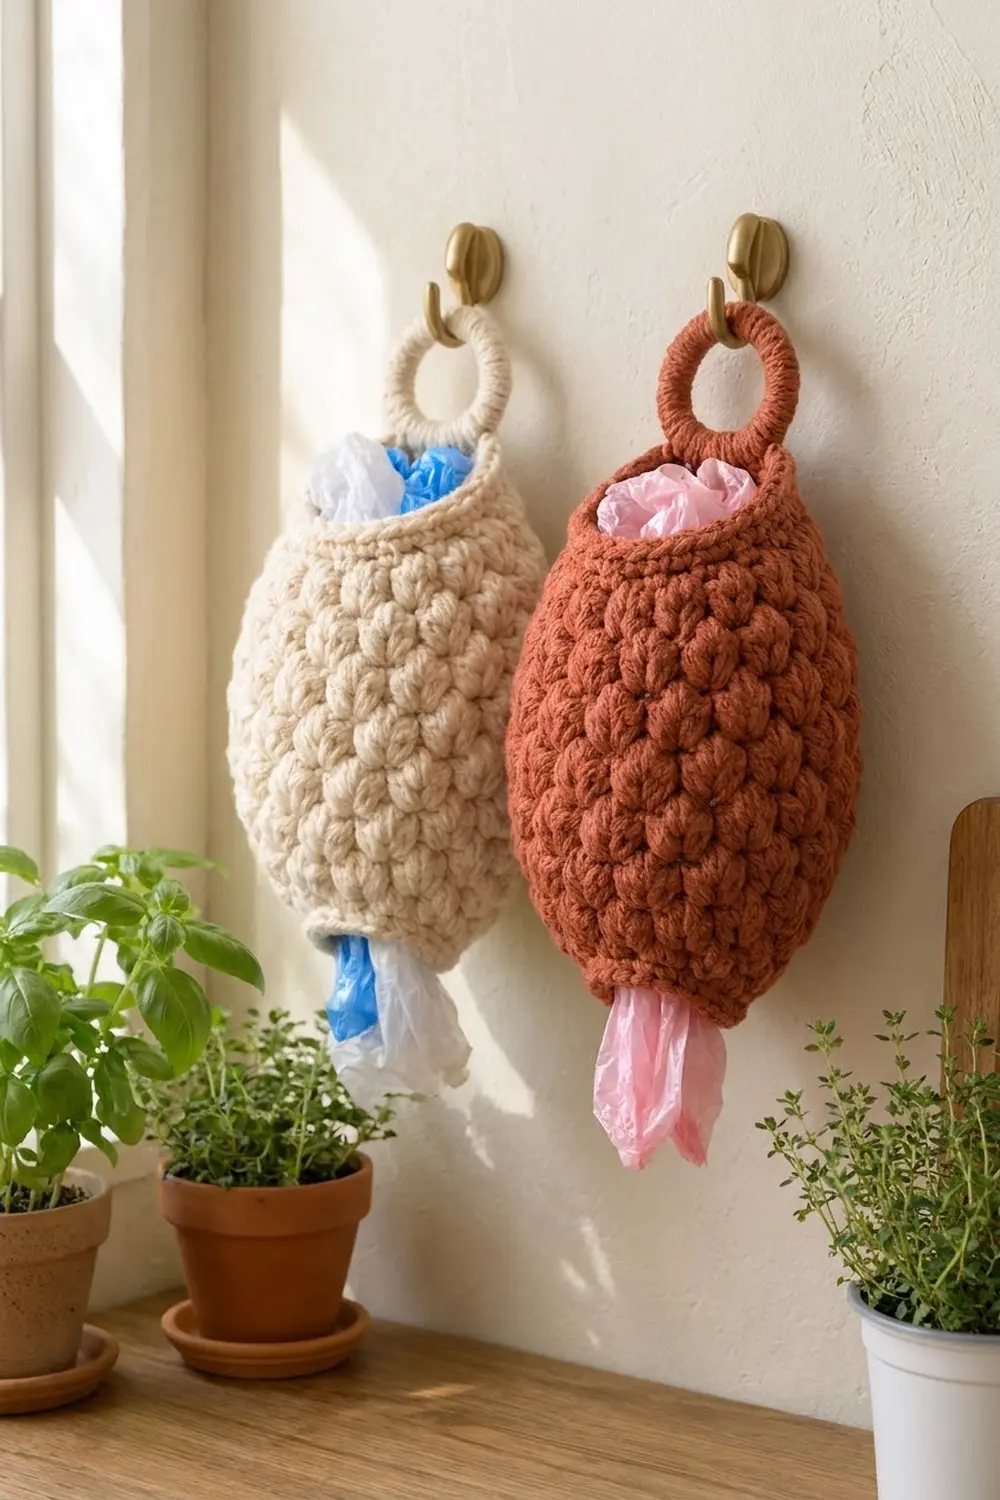
The Puff Pod is a hanging plastic bag holder with a soft, egg-shaped body covered in plump puff stitches. Vertical columns of puffs run from the narrow bottom to the gathered top rim, which gives the piece a quilted look. It hangs from a yarn-wrapped ring and looks just as tidy on a wall hook as on the back of a pantry door.
The sample is made in a warm cream, and a second holder in rust shows how well the stitch pattern works in a deeper shade. Each holder uses one solid color. You stuff used bags in through the wide top opening and pull them out one at a time through the small opening at the bottom.
This pattern uses US crochet terms. The finished body is about 7 in (17.8 cm) wide at its widest point and 10.5 in (26.7 cm) tall. With the hanging ring, the holder is about 13 in (33.0 cm) tall.
You work the body in joined rounds from the bottom opening up. Puff rounds alternate with single crochet rounds, and all shaping happens in the single crochet rounds. A short single crochet rim draws in the top, a slip-stitch edge finishes both openings, and a small tab attaches the covered ring.
Finished Size and Construction
- Finished size: 7 in (17.8 cm) wide x 10.5 in (26.7 cm) tall for the body; about 13 in (33.0 cm) tall with the ring
- Skill level: Easy to intermediate
- Terminology: US crochet terms
- Yarn weight: Bulky (#5)
- Hook: 6 mm (US J-10)
- Number of pieces: 1 body worked in one piece, plus 1 covered ring attached with a tab worked from the rim
- Layout: Single holder; no joining of motifs
- Body size before rim: 7 in (17.8 cm) wide x 9.75 in (24.8 cm) tall after Rnd 26
- Rim depth: 0.75 in (1.9 cm) at the top; the bottom slip-stitch edge adds no measurable height
- Bottom opening: about 1.9 in (4.8 cm) across
- Top opening: 4 in (10.2 cm) across when laid flat
Materials
Choose a smooth bulky cotton or cotton blend. Cotton gives crisp puffs and holds the egg shape well. Avoid fuzzy or loosely plied yarns: puff stitches split easily and the columns lose definition.
- Main color, Cream: 160 g / about 250 m (275 yd) for one holder
- Optional second holder, Rust: 160 g / about 250 m (275 yd)
These quantities include a margin of about 20%. Puff stitches use a lot of yarn, so don’t cut it close. A light neutral shows the texture most clearly, while a deep earthy shade hides wear in a busy kitchen.
Tools:
- 6 mm (US J-10) crochet hook
- One 2 in (5.1 cm) wooden or metal ring
- Stitch marker
- Tapestry needle
- Scissors
- Measuring tape
- Spray bottle and a small towel for blocking
Abbreviations (US Terms)
- ch: chain
- sl st: slip stitch
- sc: single crochet
- sc2tog: single crochet 2 together
- st(s): stitch(es)
- rnd(s): round(s)
- FLO / BLO: front loop only / back loop only
- puff: puff stitch (see below)
Puff stitch (puff): Yarn over, insert the hook in the stitch, yarn over, and pull up a loop to the height of a half double crochet. Repeat 2 more times in the same stitch (7 loops on the hook). Yarn over and pull through all 7 loops, then ch 1 to lock the puff. The locking ch-1 is not a stitch. In the next round, work into the top of the puff and skip the locking chain.
Gauge and Checkpoints
Gauge: 12 sts = 4 in (10.2 cm) in sc around the body. 4 rnds (2 puff rnds + 2 sc rnds) = 1.5 in (3.8 cm) tall.
A puff round is about 0.5 in (1.3 cm) tall and an sc round is about 0.25 in (0.6 cm) tall.
Since this is a single piece, the first 10 rounds are your test. Work them and check the measurements before you go on. If something is off, it’s much easier to restart now than at the top.
Checkpoints:
- After Rnd 1: 18 sts. The ring measures 6 in (15.2 cm) around and about 1.9 in (4.8 cm) across.
- After Rnd 10: 42 sts. Flat width 7 in (17.8 cm); height 3.75 in (9.5 cm).
- After Rnd 20: 42 sts. Height 7.5 in (19.1 cm).
- After Rnd 26: 30 sts. Height 9.75 in (24.8 cm).
- After Rnd 29: 24 sts. Height 10.5 in (26.7 cm); top flat width 4 in (10.2 cm).
If your piece is too big, go down one hook size to 5.5 mm (US I-9). If it is too small, go up to 6.5 mm (US K-10.5). If only the height is off, check your puff loops: pull them up evenly to half double crochet height, and no taller.
Body
Work in joined rounds. The ch 1 or ch 2 at the start of a round does not count as a stitch. Join each round with a sl st to the first st. Place a marker in the first st of each round and keep the joins lined up at the back of the holder.
Foundation: Ch 18. Sl st to the first ch to form a ring, taking care not to twist the chain.
Rnd 1: Ch 1, sc in each ch around, join. (18 sts)
Rnd 2 (puff): Ch 2, puff in next st, sc in next st; repeat from * to * around, join. (9 puffs + 9 sc = 18 sts)
Rnd 3 (increase): Ch 1, sc in next 2 sts, 2 sc in next st; repeat from * to * 6 times, join. (18 sts worked once each + 6 extra = 24 sts)
Rnd 4 (puff): Ch 2, puff in next st, sc in next st; repeat around, join. (12 puffs + 12 sc = 24 sts)
Rnd 5 (increase): Ch 1, sc in next 3 sts, 2 sc in next st; repeat 6 times, join. (24 sts worked once each + 6 extra = 30 sts)
Rnd 6 (puff): Repeat Rnd 4. (15 puffs + 15 sc = 30 sts)
Rnd 7 (increase): Ch 1, sc in next 4 sts, 2 sc in next st; repeat 6 times, join. (30 sts worked once each + 6 extra = 36 sts)
Rnd 8 (puff): Repeat Rnd 4. (18 puffs + 18 sc = 36 sts)
Rnd 9 (increase): Ch 1, sc in next 5 sts, 2 sc in next st; repeat 6 times, join. (36 sts worked once each + 6 extra = 42 sts)
Rnd 10 (puff): Repeat Rnd 4. (21 puffs + 21 sc = 42 sts)
Stop and check the Rnd 10 checkpoint. The base should flare out into a rounded bowl.
From Rnd 4 on, place each puff on top of a puff from the round below wherever you can. Each increase round shifts the repeat a little, so a few new columns start above the increases. Once the stitch count stops changing, the columns line up perfectly.
Rnd 11: Ch 1, sc in each st around, join. (42 sts)
Rnd 12 (puff): Repeat Rnd 4, placing each puff above a puff. (21 puffs + 21 sc = 42 sts)
Rnds 13–20: Repeat Rnds 11 and 12 four more times. (42 sts in each round)
This straight section is the widest part of the egg. Check the Rnd 20 checkpoint.
Rnd 21 (decrease): Ch 1, sc in next 5 sts, sc2tog; repeat 6 times, join. (6 x [5 sc + 1 sc2tog] = 36 sts)
Rnd 22 (puff): Repeat Rnd 4. (18 puffs + 18 sc = 36 sts)
Rnd 23 (decrease): Ch 1, sc in next 4 sts, sc2tog; repeat 6 times, join. (6 x [4 sc + 1 sc2tog] = 30 sts)
Rnd 24 (puff): Repeat Rnd 4. (15 puffs + 15 sc = 30 sts)
Rnd 25: Ch 1, sc in each st around, join. (30 sts)
Rnd 26 (puff): Repeat Rnd 4. (15 puffs + 15 sc = 30 sts)
This is the last puff round. Check the Rnd 26 checkpoint before you start the rim.
Rim and Edging
On this piece, the rims take the place of a border. They use the same gauge: 12 sts = 4 in (10.2 cm).
Top rim
Rnd 27 (decrease): Ch 1, sc in next 3 sts, sc2tog; repeat 6 times, join. (6 x [3 sc + 1 sc2tog] = 24 sts)
Rnds 28–29: Ch 1, sc in each st around, join. (24 sts)
Rnd 30 (edge): Working in FLO, loosely sl st in each st around. (24 sl sts) Fasten off and weave in the end.
The FLO slip stitches form a neat chain along the outside of the rim. They also leave the back loops of Rnd 29 free for the hanging tab.
Why the math works: At 3 sts per inch, 30 sts make a 10 in (25.4 cm) circumference, or 5 in (12.7 cm) flat. Rnd 27 removes 6 sts, bringing the top down to 24 sts: an 8 in (20.3 cm) circumference, or 4 in (10.2 cm) flat. This gentle draw-in rounds the shoulder without puckering, and the opening still fits a handful of bags. The three rim rounds add 0.75 in (1.9 cm), taking the body from 9.75 in (24.8 cm) to 10.5 in (26.7 cm).
Bottom edge
Rnd 1: With the bottom opening facing you, join yarn in any free loop of the foundation chain. Loosely sl st in each free loop around. (18 sl sts) Fasten off and weave in the end.
The 18 slip stitches match the 18 foundation chains one to one, so the opening keeps its 6 in (15.2 cm) circumference and doesn’t tighten. Keep these stitches loose so bags slide out easily.
Hanging tab
Turn the holder so the round joins face you. This side is the back.
Row 1: Join yarn in the BLO of the Rnd 29 stitch at the join. Ch 1, sc in the BLO of the same st and the next 3 sts. Turn. (4 sc)
Rows 2–8: Ch 1, sc in each st across. Turn. (4 sc per row)
The tab is about 2 in (5.1 cm) long. Leave a 12 in (30.5 cm) tail for sewing and fasten off.
Covered Ring
Join yarn around the ring with a sl st. Ch 1, then work sc around the ring, pushing the stitches together as you go. A 2 in (5.1 cm) ring takes about 30 to 34 sc. Full coverage matters more than the exact count: no metal or wood should show. Sl st to the first sc, fasten off, and weave the tail under the stitches.
Attaching: Pass the tab through the ring from front to back. Fold it down to the inside of the rim and whipstitch Row 8 to the base of Row 1. About 1 in (2.5 cm) of folded tab sits above the rim and holds the ring upright. Weave in all ends.
Final Blocking
- Turn the holder right side out and check that all the puffs face outward.
- Roll up a small towel and push it inside so the body fills out to its egg shape.
- Lightly mist the whole surface with water. Don’t soak the puffs.
- Shape the body by hand until it is 7 in (17.8 cm) wide flat and 10.5 in (26.7 cm) tall.
- Straighten the puff columns so they run vertically.
- Ease the top rim into a smooth, even circle, and open the bottom edge into a round opening about 1.9 in (4.8 cm) across.
- Leave the towel in place until the piece is completely dry, then take it out.
Final Quality-Control Checklist
- Rnd 10 and Rnd 20 each have 42 sts (21 puffs + 21 sc).
- The body measures 7 in (17.8 cm) wide and 10.5 in (26.7 cm) tall.
- The puff columns run straight up the body from Rnd 12 to Rnd 20.
- The round joins form a single line at the back, under the tab.
- The top rim has 24 sts and lies smooth, with a clean chain edge.
- The bottom opening is about 1.9 in (4.8 cm) across and stretches easily.
- The ring is fully covered, and the tab is sewn securely on the inside.
- All ends are woven in and none show on the outside.
Troubleshooting
Puffs look flat or messy. Pull each loop up to the same height, and lock every puff with the ch 1.
Columns drift sideways. Make sure you skip the locking chain and work into the top of the puff. Keep the round joins in one line as well.
Body is too short. Your puff loops may be too short. Pull them up taller, or add one more pair of Rnds 11–12 to the straight section.
Top rim ruffles. Check that Rnd 27 has 24 sts. If the count is right and the rim still ruffles, work Rnds 28–29 with a hook one size smaller.
Bottom opening too tight. Undo the bottom edge and work the slip stitches more loosely, or use a hook one size larger for that round.
Bottom opening too loose. If bags fall out on their own, work the bottom edge with a hook one size smaller.
Holder tilts forward when full. Center the tab over the round joins and sew it lower on the inside of the rim.
Care
Hand wash in cool water with mild soap. Press out the water in a towel, reshape the holder around a rolled towel, and let it dry.
Final Notes
The measurement chain is short and easy to follow. You start with 18 sts at 6 in (15.2 cm) around. By Rnd 10 you reach 42 sts, 7 in (17.8 cm) flat and 3.75 in (9.5 cm) tall. The body stays straight to 7.5 in (19.1 cm) at Rnd 20, then shapes in to 9.75 in (24.8 cm) at Rnd 26. The top rim finishes at 24 sts, 4 in (10.2 cm) flat, with the body 10.5 in (26.7 cm) tall. If each checkpoint matches, the finished holder will match too.
Make one in cream for a bright kitchen or one in rust for a warmer corner. Then hang it up and enjoy a tidier home.
Happy crocheting!