

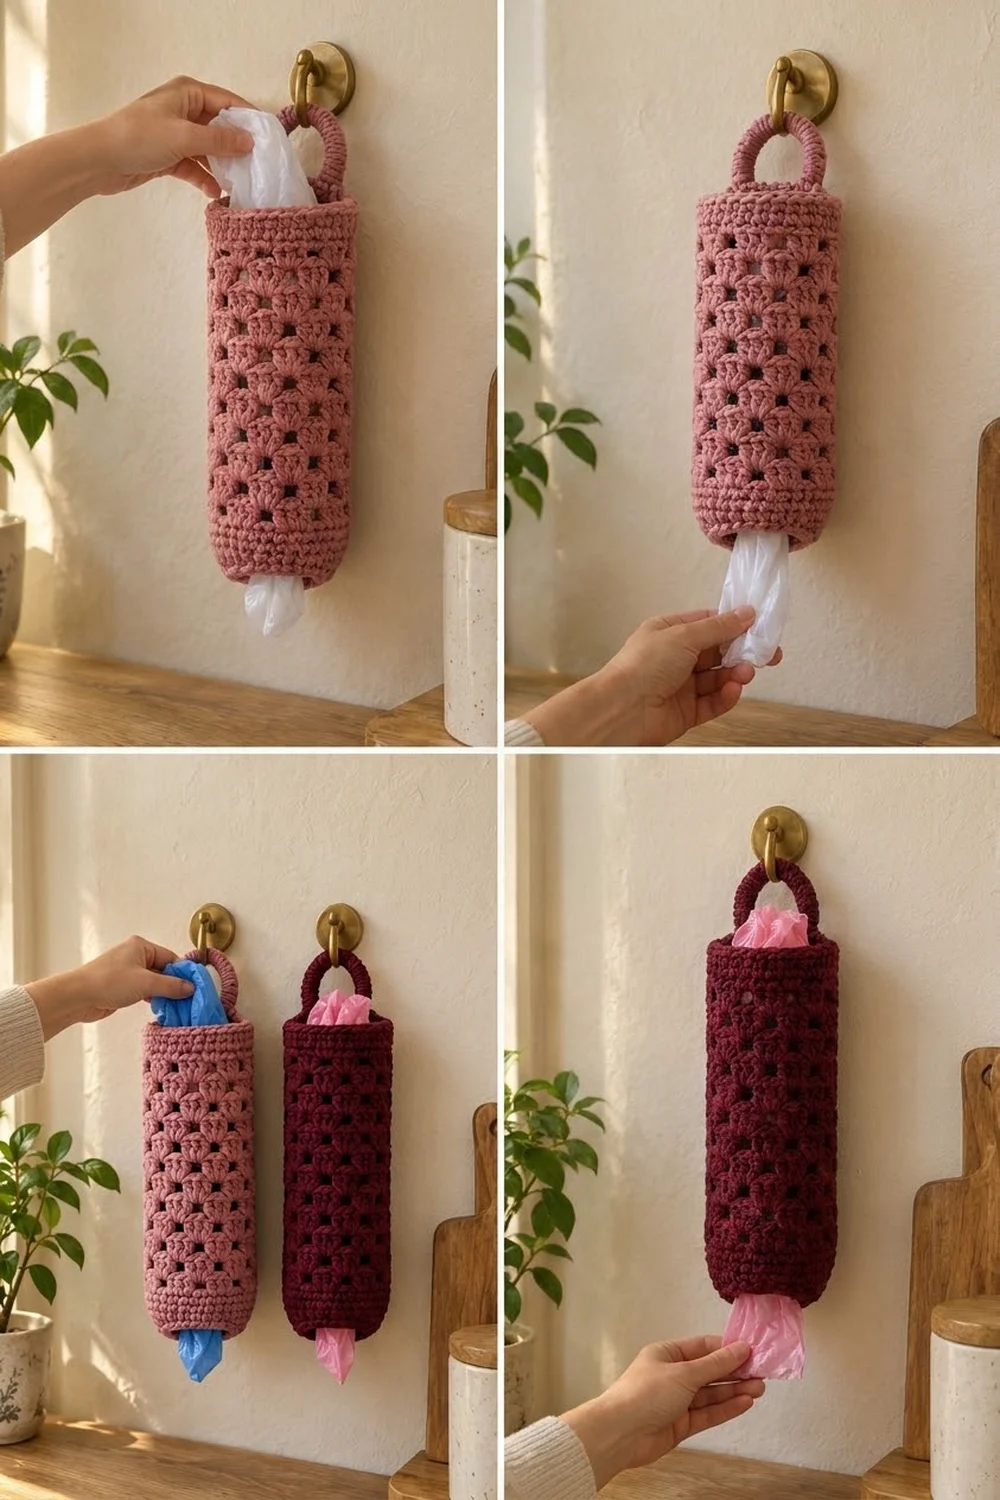
The Rosewood Granny Bag Holder is a simple tube that hangs on a hook and keeps plastic bags tidy. You push bags in at the top and pull them out one by one through the bottom. The body is an open granny-stitch mesh of staggered 3-double-crochet groups. The small windows let you see when it is time to refill.
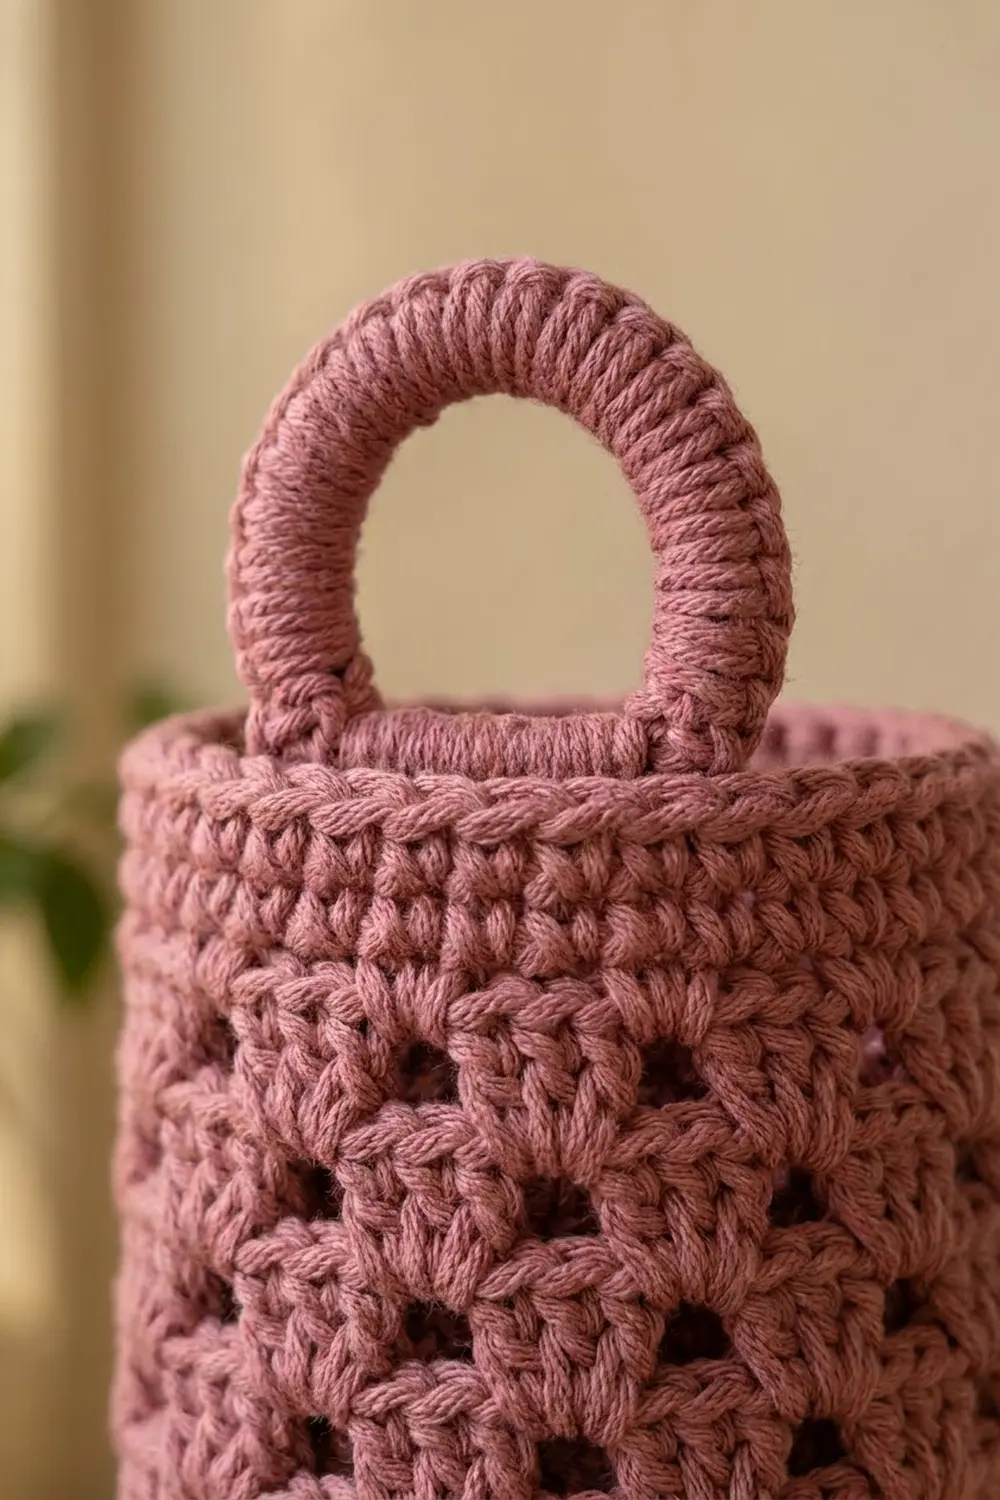
Solid single crochet bands finish the top and bottom openings. A rounded crocheted loop rises from the back of the rim for hanging. The sample is in a soft dusty rose, and the same pattern looks great in deep burgundy. Two holders in different colors make a nice matching pair.
The pattern uses US crochet terms. The finished holder measures about 12.6 in (32.0 cm) tall and 4.5 in (11.4 cm) across, with a body circumference of 14 in (35.6 cm). The hanging loop adds about 3 in (7.6 cm) above the rim.
Construction is straightforward. You work a flat granny-stitch rectangle in rows and seam the short side edges into a tube. Then you add the top and bottom bands in joined rounds. Last, you make a short strap, roll it into a cord, and sew it inside the back of the rim as the hanging loop.
Finished Size and Construction
- Finished size: 12.6 in (32.0 cm) tall x 4.5 in (11.4 cm) diameter, plus a 3 in (7.6 cm) loop
- Skill level: Easy
- Terminology: US crochet terms
- Yarn weight: Worsted / Aran cotton (#4 medium)
- Hook: 5.0 mm (H-8)
- Number of pieces: 1 holder made from 2 parts (body + hanging loop), sewn together
- Layout: flat panel seamed into a vertical tube, with the loop centered over the seam at the back
- Panel size (before seaming): 14 in (35.6 cm) wide x 10 in (25.4 cm) tall
- Size before border: tube 14 in (35.6 cm) around x 10 in (25.4 cm) tall
- Border depth: 1.3 in (3.3 cm) at the top and 1.3 in (3.3 cm) at the bottom
Materials
Choose a smooth, sturdy worsted-weight cotton or cotton blend. Cotton holds its shape when the tube is stuffed with bags and does not stretch out on the hook. Avoid very fuzzy or loosely plied yarns, because the windows look best with clear stitch definition.
- Main color (dusty rose): 130 g, about 220 m (240 yd)
- Optional second holder (burgundy): another 130 g, about 220 m (240 yd)
These quantities include a margin of roughly 25 percent for your gauge swatch and small differences in tension.
Tools:
- 5.0 mm (H-8) crochet hook
- Tapestry needle
- Scissors
- 4 stitch markers
- Measuring tape
- Spray bottle and blocking pins
- Rolled towel, or a bottle or cardboard tube 4.5 in (11.4 cm) wide, for blocking
Abbreviations (US Terms)
- ch – chain
- sc – single crochet
- dc – double crochet
- sl st – slip stitch
- sc2tog – single crochet 2 together
- sp – space
- st(s) – stitch(es)
- RS / WS – right side / wrong side
Special stitch – Granny group: 3 dc worked into the same stitch or space. A “half group” is 2 dc (the turning ch-3 plus 1 dc) worked at the edge of a row.
Gauge and Checkpoints
- Granny mesh: 4 groups and 8 rows = 4 in (10.2 cm)
- Single crochet bands: 13 sc and 15 rounds = 4 in (10.2 cm)
Work a test piece before starting the full panel. Chain 15 and follow Rows 1–9 below, but with 4 granny groups across instead of 14. Row 1 has 14 sc, and Row 2 has 4 groups plus 2 edge dc, for 14 sts. Lightly steam or wet the test piece, let it dry flat, and measure the center.
Checkpoints:
- After Row 9 of the panel: the work is 4.25 in (10.8 cm) tall, including the sc foundation row.
- After Row 21: the panel is 14 in (35.6 cm) wide and 10 in (25.4 cm) tall.
- After seaming: the tube measures 14 in (35.6 cm) around.
- After the bands: the holder is 12.6 in (32.0 cm) tall. The bottom opening is about 11 in (27.9 cm) around, or 3.5 in (8.9 cm) across.
If your piece is too big, go down one hook size (4.5 mm). If it is too small, go up one size (5.5 mm). You can change the hook for the granny panel and the sc bands separately if needed. The bands should feel firm, not floppy.
Main Panel
The panel is worked flat in rows. The rows run around the holder, so the width of the panel becomes the circumference of the tube.
Foundation: Ch 45.
Row 1 (RS): Sc in 2nd ch from hook and in each ch across, turn. (44 sc)
Row 2 (WS): Ch 3 (counts as dc throughout), skip next sc, 3 dc in next sc, skip 2 sc, 3 dc in next sc; repeat from * 12 more times, skip next sc, dc in last sc, turn. (14 groups + 2 edge dc = 44 sts)*
Check the placement: the groups land in sc numbers 3, 6, 9 and so on, up to 42. One sc is skipped at each edge, so the row is symmetrical.
Row 3 (RS, half-group row): Ch 3, dc in first dc (half group made), 3 dc in each sp between groups across (13 sps), 2 dc in top of turning ch, turn. (13 groups + 2 half groups = 43 sts)
Row 4 (WS, full-group row): Ch 3, 3 dc in each sp between groups across, dc in top of turning ch, turn. There are 14 sps: 1 between the half group and the first group, 12 between full groups, and 1 between the last group and the half group. (14 groups + 2 edge dc = 44 sts)
Rows 5–20: Repeat Rows 3 and 4 eight more times. Every odd row has 43 sts and every even row has 44 sts. You finish with Row 20, a full-group row of 44 sts.
That makes 19 granny rows (Rows 2–20). At 8 rows per 4 in, they measure 9.5 in (24.1 cm). Each group sits in the gap between two groups of the row below. This creates the staggered groups and small square windows you see on the finished holder.
Row 21 (RS): Ch 1, sc in each st across, working the last sc in the top of the turning ch. (44 sc) Fasten off, leaving a 20 in (50.8 cm) tail for seaming.
Checkpoint: Rows 1 and 21 each add about 0.25 in (0.6 cm). The panel is 0.25 + 9.5 + 0.25 = 10 in (25.4 cm) tall and 14 in (35.6 cm) wide.
Seaming the Tube
- Fold the panel with RS together so the two short side edges meet. Line up Row 1 with Row 1 and Row 21 with Row 21.
- Thread the long tail on a tapestry needle and whipstitch the edges together, catching the outer edge stitch of each row on both sides. Make 2 passes through each dc row end and 1 pass through each sc row end.
- Keep the seam flat and even. Do not pull it tight, or the tube will pucker along the seam.
- Secure the tail and turn the tube RS out.
The seam is now the center back of the holder. Place a marker on it.
Checkpoint: The tube measures 14 in (35.6 cm) around and 10 in (25.4 cm) tall.
Hanging Loop
Foundation: Ch 31.
Row 1: Sc in 2nd ch from hook and in each ch across, turn. (30 sc)
Rows 2–4: Ch 1, sc in each st across, turn. (30 sc)
Fasten off, leaving a 24 in (61.0 cm) tail.
The strap measures about 9.2 in (23.4 cm) long and 1.1 in (2.8 cm) wide. Fold it lengthwise so the Row 1 and Row 4 edges meet. Whipstitch them together to make a firm, round cord about 0.5 in (1.3 cm) wide. Keep the tail for attaching the loop later.
Border: Top and Bottom Bands
Border gauge: 13 sc and 15 rounds = 4 in (10.2 cm). The bands are worked in joined rounds so the seam stays straight.
Top Band
Join yarn with a sl st in the Row 21 sc at the seam.
Round 1: Ch 1, sc in each sc of Row 21 around, join with sl st to first sc. (44 sc)
Rounds 2–5: Ch 1, sc in each st around, join. (44 sc each round)
Fasten off and weave in the end.
Bottom Band
Turn the holder upside down. Join yarn with a sl st in the free loop of the foundation chain at the seam.
Round 1: Ch 1, sc in each free loop of the foundation ch around, join. (44 sc)
Round 2 (shaping): Ch 1, sc in next 9 sts, sc2tog; repeat from * 3 more times, join. (4 repeats x 10 sts = 40 sc)*
Round 3 (shaping): Ch 1, sc in next 8 sts, sc2tog; repeat from * 3 more times, join. (4 repeats x 9 sts = 36 sc)*
Rounds 4–5: Ch 1, sc in each st around, join. (36 sc each round)
Fasten off and weave in the end.
Why the Math Works
The tube has only one “side,” which is its circumference. Row 21 and the foundation chain each have exactly 44 sts. Round 1 of each band picks up 1 sc in each of those stitches, with nothing added at the seam. The seam only joins the edges and does not create extra stitches.
At 13 sc per 4 in, 44 sc measures 13.5 in (34.3 cm). That is 0.5 in (1.3 cm) less than the 14 in (35.6 cm) mesh, so the top band draws in slightly and gives the rim structure. The bottom band reduces to 36 sc, about 11 in (27.9 cm) around. This narrower opening holds the bags inside but still lets you pull them out one at a time.
Five rounds at 15 rounds per 4 in measure 1.3 in (3.3 cm). The total height is 1.3 + 10 + 1.3 = 12.6 in (32.0 cm).
Attaching the Loop
- Find the center back marker on the top band.
- Bend the cord into an arch. Place its ends inside the top band, 0.75 in (1.9 cm) on either side of the seam, so the ends sit 1.5 in (3.8 cm) apart.
- Let each end overlap the inside of the band by 0.75 in (1.9 cm). The rest of the cord, about 7.7 in (19.6 cm), forms an arch that stands about 3 in (7.6 cm) above the rim.
- Whipstitch each end securely through Rounds 2–5 of the band, going around the cord twice at the top edge. Weave in the end.
Final Blocking
- Weave in all remaining ends along the seam or inside the bands.
- Lightly mist the whole holder with water until it is damp but not soaked.
- Slide the holder over a rolled towel, bottle or cardboard tube about 4.5 in (11.4 cm) wide.
- Gently straighten the groups so the windows line up in neat columns and the seam runs straight up the back.
- Pat the bands smooth and shape the loop into a round arch.
- Let it dry completely, for at least 8 hours, before you take it off the form.
Final Quality-Control Checklist
- The body tube measures 14 in (35.6 cm) around.
- The top band has 44 sc, and the bottom band ends with 36 sc.
- The total height is 12.6 in (32.0 cm), not counting the loop.
- The groups are evenly staggered, with no missed spaces.
- The seam is flat, straight and centered at the back.
- The loop is centered over the seam and holds firm when tugged.
- All ends are woven in securely on the inside.
Troubleshooting
Panel slants or gets wider. You may be adding groups at the edges. Check that odd rows have 43 sts and even rows have 44 sts.
Windows are uneven. Make sure every group goes into a space, not into the top of a dc.
Top band ruffles. Your sc is too loose. Go down a hook size for the bands only.
Top band pulls in too much. Go up a hook size, or work Round 1 a little looser.
Bags fall out of the bottom. Add a sixth round of sc in next 7 sts, sc2tog, repeated 4 times (32 sc).
Bags are hard to pull out. Leave out Round 3 of the bottom band and work Rounds 4–5 over 40 sc.
Loop stretches. Make the strap with a hook one size smaller, or add a fifth row before rolling it.
Care
Hand wash in cool water with mild soap, gently press out the water, and dry flat over a form. Don’t hang the holder while it is wet, because wet cotton can stretch.
Final Notes
The measurement chain is simple. A gauge of 4 groups per 4 in (10.2 cm) gives a 14-group panel that is 14 in (35.6 cm) wide. Nineteen granny rows plus two sc rows make it 10 in (25.4 cm) tall. Seaming turns the panel into a tube 14 in (35.6 cm) around. A 5-round band of 44 sc at each end brings the height to 12.6 in (32.0 cm), and the bottom band narrows to 36 sc. The 30-stitch loop finishes it for hanging. Check each stage as you go, and your holder will hang straight and let bags out smoothly.
Happy crocheting!