

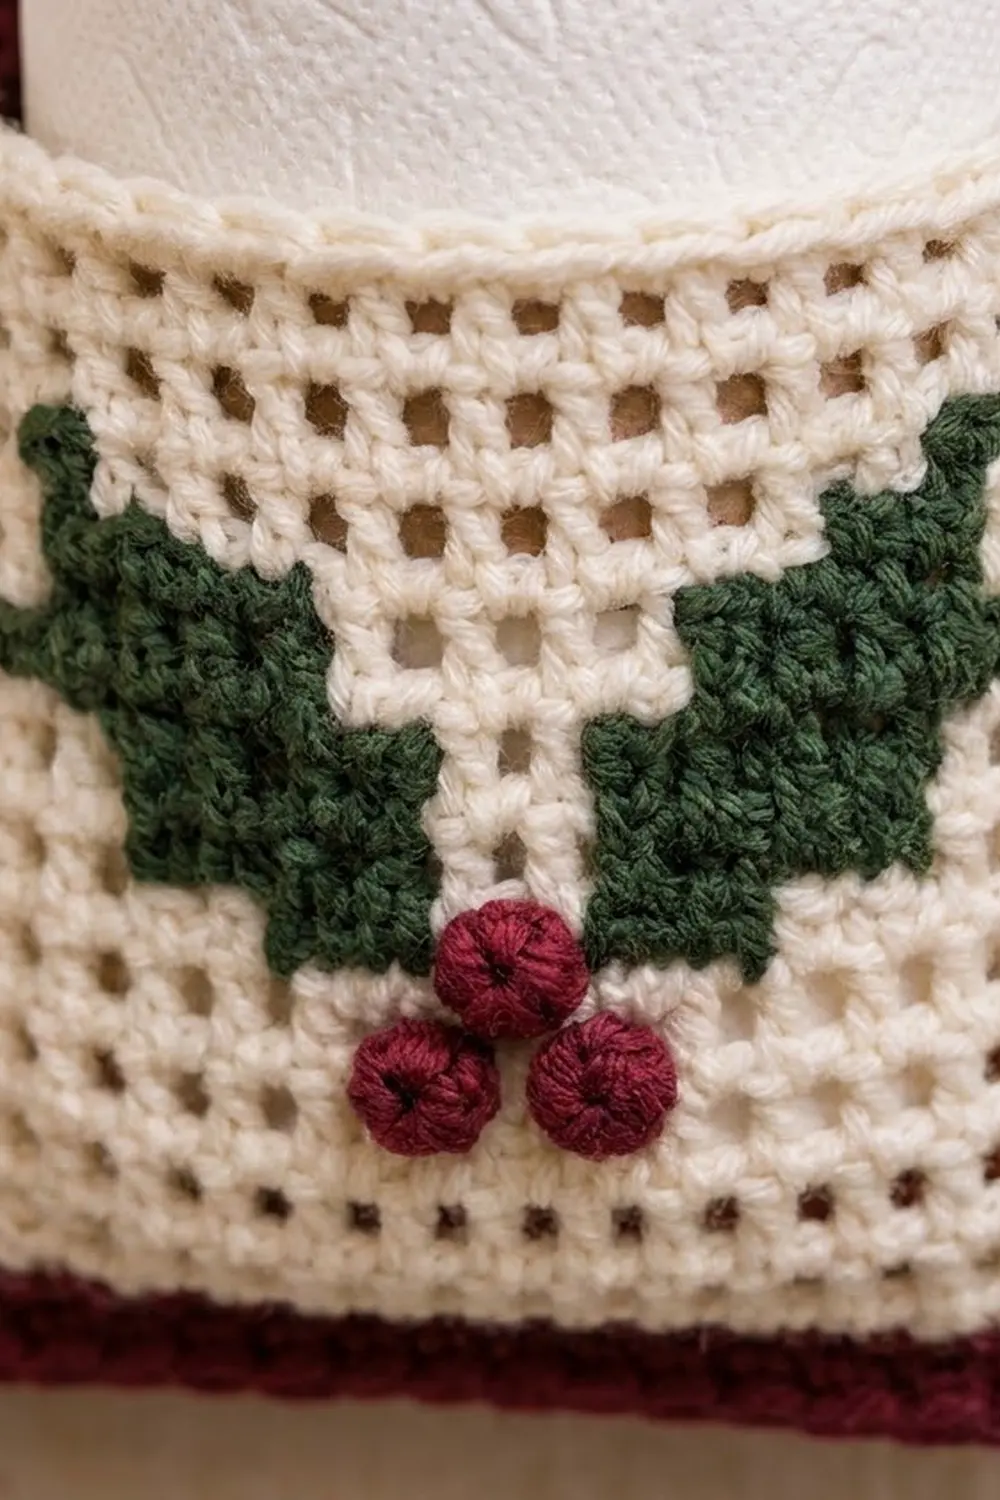
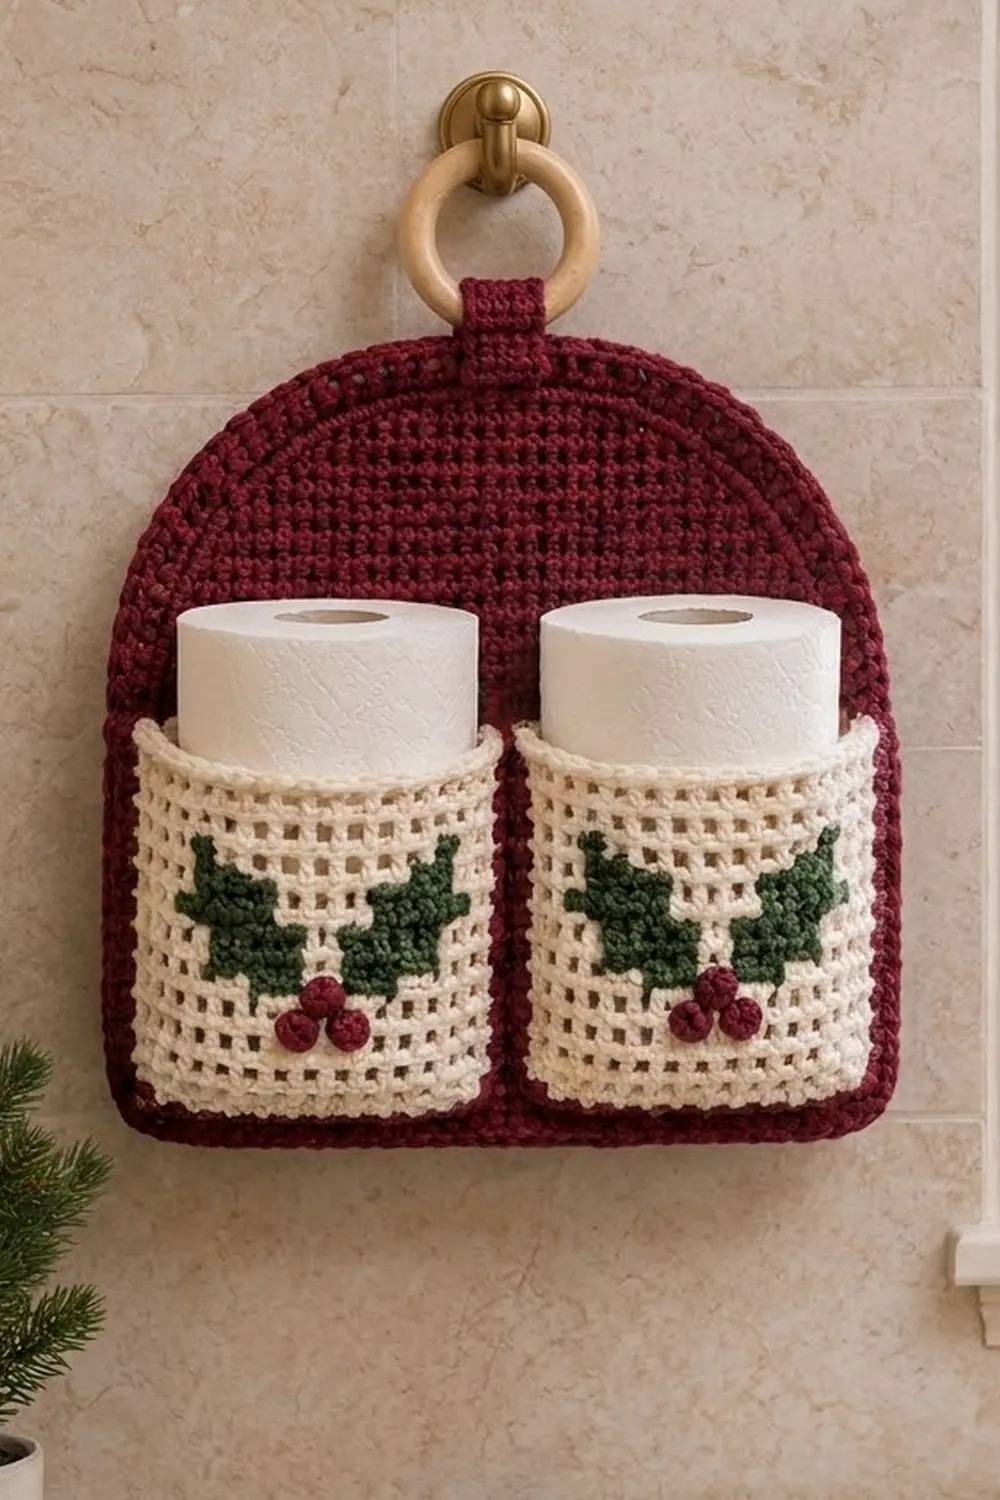
This wall-hanging toilet paper holder brings cozy holiday charm to the bathroom. A burgundy arched panel holds two cream filet pockets. Each pocket has green holly leaves and three round burgundy berries.
The style is classic cottage Christmas, with dense single crochet behind airy mesh. The leaves are filled filet blocks worked in green. The berries are tiny stuffed balls that you sew on afterward.
This pattern uses US terms. The finished holder measures 12 in (30.5 cm) wide x 11.5 in (29.2 cm) tall, not counting the tab and ring. Each pocket holds one standard roll upright.
You work the panel flat from the bottom up and shape the arch with decreases. Each pocket starts as a flat circle and becomes a filet cup worked in joined, turned rounds. You sew the pockets on, work a two-round border around the panel, and add a short tab to hold the ring.
Finished Size and Construction
- Finished size: 12 in (30.5 cm) wide x 11.5 in (29.2 cm) tall
- Skill level: Intermediate
- Terminology: US
- Yarn weight: Worsted (#4)
- Hook: 4.5 mm (US 7)
- Number of pieces: 1 panel, 2 pockets, 6 berries, 1 tab
- Layout: two pockets side by side on the lower part of the panel
- Panel size before border: 11 in (27.9 cm) x 10.5 in (26.7 cm)
- Pocket size: 4.75 in (12.1 cm) across, walls 3.5 in (8.9 cm) tall
- Border depth: 0.5 in (1.3 cm)
Materials
Choose a smooth worsted cotton or cotton blend. It holds its shape under the weight of the rolls and shows the mesh clearly.
- Burgundy: 80 g / 160 m
- Cream: 70 g / 140 m
- Dark green: 10 g / 20 m
Tools:
– 4.5 mm (US 7) hook
– 2.5 in (6.4 cm) wooden ring
– tapestry needle
– 4 stitch markers
– 2 small bobbins
– pins and a blocking board
All quantities include a small safety margin.
Abbreviations (US Terms)
- ch – chain
- sl st – slip stitch
- sc – single crochet
- dc – double crochet
- sc2tog – single crochet 2 together
- blo – back loop only
- MR – magic ring
- sp – space
- st(s) – stitch(es)
- RS/WS – right side/wrong side
Open square: dc, ch 1, skip 1 st. Counts as 2 sts.
Filled block: dc, then dc in the next st or ch-1 sp instead of chaining. Counts as 2 sts.
Gauge and Checkpoints
- Sc: 16 sts x 16 rows = 4 in (10.2 cm)
- Filet mesh: 8 squares (16 sts) x 8 rounds = 4 in (10.2 cm)
Your sc must be square, meaning 4 sts and 4 rows per 1 in (2.5 cm). The border math depends on it. Make one pocket first: it tests both gauges, and it must fit a roll.
- Pocket base, Rnd 10: 4.75 in (12.1 cm) across, lying flat
- Pocket, Rnd 18: walls 3.5 in (8.9 cm), circumference 15 in (38.1 cm)
- Panel, Row 28: 11 in (27.9 cm) x 7 in (17.8 cm)
- Panel, Row 42: 10.5 in (26.7 cm) tall, 4 in (10.2 cm) flat top
- After border: 12 in (30.5 cm) x 11.5 in (29.2 cm)
If your piece is too big, go down a hook size. If it is too small, go up a size. If only the row height is off, change how tall you pull up your loops.
Back Panel
Use burgundy. Ch 45.
Row 1 (RS): Sc in 2nd ch from hook and in each ch across, turn. (44 sts)
Rows 2–28: Ch 1 (does not count here or anywhere in the panel), sc in each st across, turn. (44 sts)
Checkpoint: 11 in (27.9 cm) x 7 in (17.8 cm).
Arch shaping (ch 1 and turn on every row):
- Row 29: Sc2tog, sc 40, sc2tog. (42 sts)
- Row 30: Sc across. (42 sts)
- Row 31: Sc2tog, sc 38, sc2tog. (40 sts)
- Row 32: Sc across. (40 sts)
- Row 33: Sc2tog, sc 36, sc2tog. (38 sts)
- Row 34: Sc across. (38 sts)
- Row 35: Sc2tog, sc 34, sc2tog. (36 sts)
- Row 36: Sc2tog, sc 32, sc2tog. (34 sts)
- Row 37: Sc2tog, sc 30, sc2tog. (32 sts)
- Row 38: Sc2tog, sc 28, sc2tog. (30 sts)
- Row 39: Sc2tog, sc 26, sc2tog. (28 sts)
- Row 40: (Sc2tog) twice, sc 20, (sc2tog) twice. (24 sts)
- Row 41: (Sc2tog) twice, sc 16, (sc2tog) twice. (20 sts)
- Row 42: (Sc2tog) twice, sc 12, (sc2tog) twice. (16 sts)
Fasten off. The panel is now 10.5 in (26.7 cm) tall. The arch rises 3.5 in (8.9 cm) to a 4 in (10.2 cm) flat top.
Pockets
Make 2 in cream.
Base
Join each round with a sl st to the first sc. Ch 1 does not count. Do not turn.
- Rnd 1: 6 sc in MR. (6)
- Rnd 2: 2 sc in each st. (12)
- Rnd 3: (Sc 1, 2 sc in next) around. (18)
- Rnd 4: (Sc 2, 2 sc in next) around. (24)
- Rnd 5: (Sc 3, 2 sc in next) around. (30)
- Rnd 6: (Sc 4, 2 sc in next) around. (36)
- Rnd 7: (Sc 5, 2 sc in next) around. (42)
- Rnd 8: (Sc 6, 2 sc in next) around. (48)
- Rnd 9: (Sc 7, 2 sc in next) around. (54)
- Rnd 10: (Sc 8, 2 sc in next) around. (60)
Rnd 11: Sc blo in each st. (60) Working in the back loops turns the wall up cleanly.
Filet Walls
From now on, join and turn every round. That way the green bobbins are always waiting where you need them.
Rnd 12 (RS, conversion round): Ch 4 (counts as dc + ch 1), skip next st, dc in next st, ch 1, skip next st; repeat from * 28 more times. Sl st in 3rd ch of the ch-4, turn. (30 dc + 30 ch-1 sps = 60 sts: 60 worked 1 per existing st + 0 added)
The join marks the back center of the pocket. Count squares 1–30 starting from the join. Mark the dc that starts square 10 and the dc that starts square 22. The holly motif fills squares 10–21, centered on the front. Move the markers up every round.
Rnds 13–17: Ch 4 (counts as dc + ch 1), dc in next dc, ch 1 around. Follow the chart between the markers: for a filled block, dc in the ch-1 sp instead of working ch 1. Join and turn. (60 sts each round)
Holly chart (squares 10–21; X = green filled block, o = open):
Rnd 17:  o o o o o o o o o o o o
Rnd 16:  o X X o o o o o o X X o
Rnd 15:  o o X X X o o X X X o o
Rnd 14:  o X X X X o o X X X X o
Rnd 13:  o o o X X o o X X o o o
Rnd 12:  o o o o o o o o o o o o
The chart is symmetrical, so it reads the same on RS and WS rounds. Green blocks per round are 4, 8, 6 and 4, for 22 per pocket.
Color changes: Use one bobbin for each leaf.
– Change to green on the last yarn-over before a green section.
– Carry the cream inside the green stitches.
– Change back to cream on the last yarn-over of the final green dc.
– Leave the bobbin at the edge of the leaf. Because you turn every round, the next round brings you back to it.
Rnd 18 (conversion round): Ch 1, sc in each dc and each ch-1 sp, join. (60 sc: 60 worked 1 per existing st + 0 added)
Fasten off, leaving a 24 in (61.0 cm) tail. The walls are 3.5 in (8.9 cm) tall.
Berries
Make 6 in burgundy.
- Rnd 1: 6 sc in MR. (6)
- Rnd 2: (Sc2tog) 3 times. (3)
Tuck the starting tail inside as stuffing and close the hole. Each berry is 0.5 in (1.3 cm) across.
On each pocket, sew two berries side by side over squares 15 and 16 of Rnd 12. Sew the third just above them, between the bottom points of the two leaves.
Hanging Tab
Use burgundy. Ch 6.
Row 1: Sc in 2nd ch from hook and across, turn. (5 sts)
Rows 2–16: Ch 1, sc across, turn. (5 sts)
Fasten off, leaving a long tail. The tab is 1.25 in (3.2 cm) x 4 in (10.2 cm).
Make All Pieces
- Burgundy: 1 panel, 6 berries, 1 tab
- Cream with green: 2 pockets
Layout on the panel before the border (11 in / 27.9 cm wide):
| 0.375 in | Pocket A          | 0.75 in | Pocket B          | 0.375 in |
| 1.0 cm   | 4.75 in / 12.1 cm | 1.9 cm  | 4.75 in / 12.1 cm | 1.0 cm   |
Pocket A footprint: panel sts 6–17
Pocket B footprint: panel sts 28–39
Both bases sit on Row 3, 0.5 in (1.3 cm) above the bottom edge
Joining
Sew the pockets on before you work the border. Each pocket attaches along a 3 in (7.6 cm) section at its back: squares 28, 29, 30, 1, 2 and 3. That is 12 sts, which match 12 panel sts.
Base seam: Lay Pocket A on Row 3 over panel sts 6–17. With cream, whipstitch the 12 back sts of Rnd 10 to those 12 panel sts, one to one.
Side seams: Whipstitch up the column of dc that starts square 28, then up the column that starts square 4.
– One mesh round is 0.5 in (1.3 cm), the same as 2 panel rows, so take 2 stitches per mesh round.
– Take 1 stitch per sc round.
– Each seam covers 14 panel rows, or 3.5 in (8.9 cm).
Repeat for Pocket B over sts 28–39. Keep the seams snug but not puckered, so the panel stays flat and the pocket fronts can curve out freely.
Checkpoint: With rolls inside, each pocket measures 4.75 in (12.1 cm) across, with a 0.75 in (1.9 cm) gap between the two.
Border
Border gauge: 4 sc and 4 rounds per 1 in (2.5 cm), the same as the panel.
Rnd 1 (trim round): With RS facing, join burgundy in the first foundation ch at the bottom right corner.
– Bottom: 3 sc in that ch, sc in next 42 ch, 3 sc in last ch. (48 sts, including corners)
– Rows 1–34 (going up the side): 1 sc in each row end. (34)
– Rows 35–39: 2 sc in the ends of Rows 35 and 37, and 1 sc in the ends of Rows 36, 38 and 39. (7)
– Rows 40–42: 2 sc, 3 sc, 2 sc in the row ends. (7)
– That side now has 48 sts.
– Top: sc in each of the 16 top sts.
– Other side: work it in reverse. (48)
– Join.
Count: 144 sts worked 1 per existing st or row end (44 + 42 + 42 + 16) + 4 corner extras + 12 arch extras = 160 sts.
Rnd 2: Ch 1, sc in each st, working 3 sc in the center sc of each bottom corner. Join and fasten off. (160 worked 1 per st + 4 added = 164 sts)
Why the math works:
– Your sc is square, so 1 sc per row end exactly matches the length of the straight edges.
– The arch edge runs on a diagonal. Where it steps in 1 st per row it is about 1.4 times longer than a straight edge, and where it steps in 2 sts it is about 2.2 times longer. The extra sc fill that length so the curve lies flat.
– Square corners need 2 extra sts per round.
– Two rounds add 0.5 in (1.3 cm) to each edge, giving 12 in (30.5 cm) x 11.5 in (29.2 cm).
Tab: Fold the tab over the ring. Sew one end to the front at top center, so it ends 0.75 in (1.9 cm) below the top edge. Sew the other end directly behind it on the back.
Final Blocking
- Mist the holder, or steam it lightly without pressing.
- Pin the panel to 12 in (30.5 cm) x 11.5 in (29.2 cm), keeping the arch symmetrical.
- Fill each pocket with a roll wrapped in a plastic bag.
- Straighten the mesh into even squares and arrange the berries in a neat triangle.
- Let it dry completely before you unpin it.
Final Quality-Control Checklist
- Panel measures 12 in (30.5 cm) x 11.5 in (29.2 cm), and the arch is symmetrical
- 60 sts in every pocket round, 22 green blocks per pocket
- Motifs centered on the pocket fronts
- Pockets level, 0.5 in (1.3 cm) above the bottom edge
- No cream showing through the mesh behind the leaves
- Tab secure, ring hanging straight
- All ends woven in on the WS
Troubleshooting
- Base cups: Your stitches are too tight. Go up a hook size for Rnds 1–10.
- Base ruffles: Your stitches are too loose. Go down a hook size for Rnds 1–10.
- Roll won’t fit: Your mesh is too small. Remake the walls with a 5.0 mm hook.
- Motif is off-center: Always join in the 3rd ch of the ch-4, and check the markers each round.
- Border ripples: Remove one arch extra on each side. If the border pulls in instead, add one.
- Panel sags: Tighten the side seams, or sew felt to the back.
Care
Hand wash in cool water and lay flat to dry, reshaping the pockets around a roll. Do not tumble dry.
Final Notes
Here is how the measurements build on each other:
– Square sc at 4 sts per 1 in (2.5 cm) gives a 44-st panel that is 11 in (27.9 cm) wide.
– 42 rows make the panel 10.5 in (26.7 cm) tall.
– 60 pocket stitches give a 15 in (38.1 cm) circumference, which fits a standard roll.
– The border grows from 160 to 164 sts and brings the holder to 12 in (30.5 cm) x 11.5 in (29.2 cm).
Check each checkpoint as you go.
Happy crocheting!