

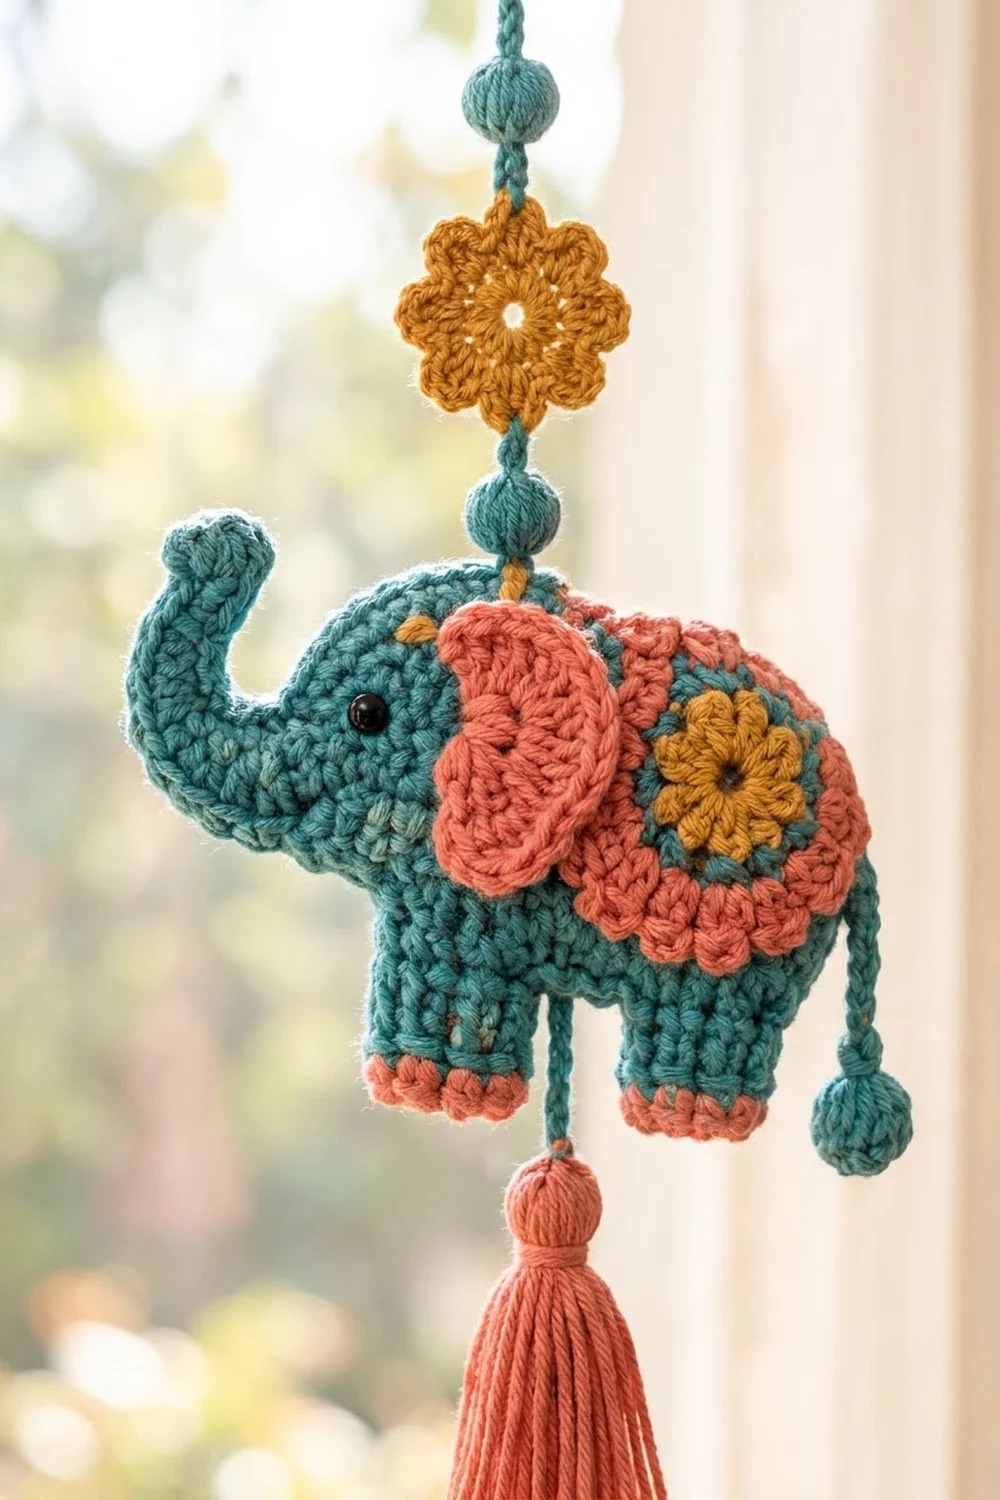
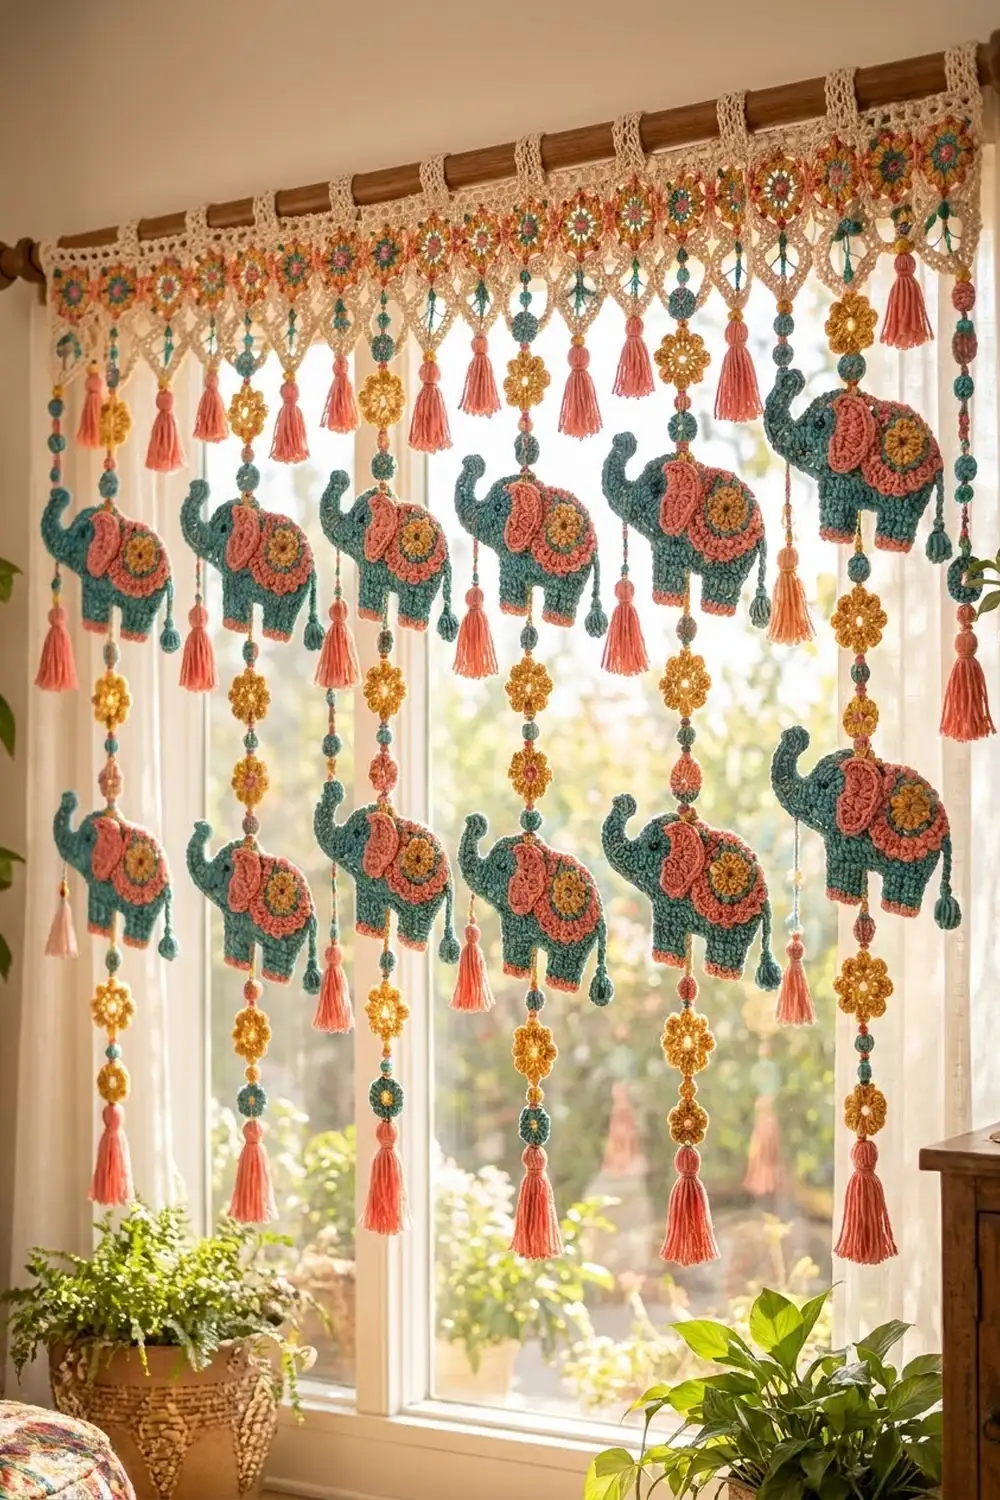
The Marigold Parade valance is a cheerful boho window topper. A cream lace header carries a row of small colorful squares. Below it, twelve strands hang down, each with teal beads, mustard flowers, a little teal elephant and a full coral tassel.
The palette uses four colors: teal, coral, mustard and cream. The elephants alternate between a high and a low position, so their parade looks staggered and never crowded. All instructions use US crochet terms.
The valance band is 30.4 in (77.2 cm) wide and 3.9 in (9.9 cm) deep. Each strand hangs 18.5 in (47.0 cm) below its lace point, so the total drop from the top of the band to the tassel tips is 22.4 in (56.9 cm).
Construction is modular. You make twelve squares and join them into a strip. Next, you work a border round, rod tabs and lace points. Finally, you make and assemble twelve strands and attach one to each point.
Finished Size and Construction
- Finished size: 30.4 in × 3.9 in (77.2 cm × 9.9 cm) band, plus 18.5 in (47.0 cm) strands
- Skill level: Intermediate
- Terminology: US
- Yarn weight: Worsted (#4) cotton
- Hook: 4.0 mm (G-6)
- Number of pieces: 12 squares, 12 strands (each with 1 elephant, 3 flowers, 3 beads and 1 tassel)
- Layout: 12 squares in one row, 1 strand under each square
- Piece size: each square is 2.5 in (6.4 cm), 10 sts per side
- Size before border: 30 in × 2.5 in (76.2 cm × 6.4 cm)
- Border depth: 0.2 in (0.5 cm) all around, plus 1 in (2.5 cm) lace points
Materials
Use a smooth, mercerized or matte worsted cotton of about 95 m per 50 g. Cotton holds the flat shapes well and hangs straight.
- Teal: 150 g / 285 m (elephants, beads, cords, dots, 4 square centers)
- Coral: 150 g / 285 m (tassels, ears, medallions, toes, 4 square centers)
- Mustard: 100 g / 190 m (flowers, medallion centers, 4 square centers)
- Cream: 100 g / 190 m (squares, border, tabs, points)
- Black: about 1 m (39 in) for eyes
Tools:
- 4.0 mm hook
- Tapestry needle
- Scissors
- Stitch markers
- A 3.5 in (8.9 cm) piece of card for tassels
- Blocking mat and pins
- Spray bottle
- Small amount of fiberfill or teal scraps for stuffing
All quantities include a safety margin of roughly 30%.
Abbreviations (US Terms)
- ch: chain
- sl st: slip stitch
- sc: single crochet
- hdc: half double crochet
- dc: double crochet
- sc2tog / sc3tog: single crochet 2 (or 3) together
- MR: magic ring
- st(s): stitch(es)
- sp: space
- sk: skip
- RS / WS: right side / wrong side
Bobble: [yarn over, insert hook, pull up a loop, yarn over, pull through 2 loops] 5 times in the same stitch, then yarn over and pull through all 6 loops.
Standing dc: with a slipknot already on the hook, yarn over and work a dc in the stitch indicated.
Gauge and Checkpoints
Gauge: 16 sc × 20 rows = 4 in (10.2 cm). Each sc is 0.25 in (0.6 cm) wide and each row is 0.2 in (0.5 cm) tall.
Make one square and one elephant before anything else. Check these measurements as you go:
- Square, after Rnd 4: 2.5 in (6.4 cm) per side
- Elephant body, after Rnd 4: about 3.25 in × 1.75 in (8.3 cm × 4.4 cm)
- Joined strip: 30 in × 2.5 in (76.2 cm × 6.4 cm)
- After border Rnd 1: 30.4 in × 2.9 in (77.2 cm × 7.4 cm)
If a square is too big, go down a hook size (0.5 mm). If it is too small, go up one size. A difference of just 0.1 in (0.3 cm) per square adds up to 1.2 in (3.0 cm) across the band.
Valance Squares (make 12)
Rnd 1 (center color): Make a MR, ch 3 (counts as dc), 11 dc in the ring. Join with a sl st to the top of ch-3 and fasten off. (12 sts)
Rnd 2 (cream): Join with a standing dc in any st, ch 2, dc in the same st, hdc in the next 2 sts. Then [(dc, ch 2, dc) in the next st, hdc in the next 2 sts] 3 times. Join. (16 sts + 4 ch-2 corner sps)
Rnd 3: Ch 1, sc in each st, 3 sc in each ch-2 sp. Join. (16 sts worked one per stitch + 12 sts in the corners = 28 sts; 8 per side, counting both corner center sts)
Rnd 4: Ch 1, sc in each st, 3 sc in each corner center st. Join and fasten off. (28 sts worked one per stitch + 8 extra = 36 sts; 10 per side, counting both corner center sts)
Check that the square measures 2.5 in (6.4 cm) per side.
Elephant (make 12)
Body (teal)
Rnd 1: Ch 10. Work 3 sc in the 2nd ch from hook, sc in the next 7 ch, 3 sc in the last ch. Working along the other side of the chain, sc in the next 7 ch. Join. (20 sts)
Rnd 2: Ch 1, [2 sc in each of the next 3 sts, sc in the next 7] twice. Join. (26 sts)
Rnd 3: Ch 1, [(sc in the next st, 2 sc in the next) 3 times, sc in the next 7] twice. Join. (32 sts)
Rnd 4: Ch 1, [(sc in the next 2 sts, 2 sc in the next) 3 times, sc in the next 7] twice. Join and fasten off. (38 sts)
In Rnd 4, the stitches fall into four sections:
- Sts 1–12: rear end
- Sts 13–19: belly
- Sts 20–31: front end
- Sts 32–38: back
Legs (teal with coral toes)
Work each leg across 3 sts of Rnd 4. Use these stitch groups:
- Back legs: sts 8–10 and 12–14
- Front legs: sts 19–21 and 23–25
This leaves single gap stitches (11 and 22) between the legs in each pair. Stitches 15–18 form a 4-st belly gap between the pairs.
Row 1: Join teal in the first st of the group, ch 1, sc in the same st and the next 2. (3 sts)
Rows 2–3: Ch 1, turn, sc 3. Change to coral in the last st of Row 3.
Row 4: Ch 1, turn, sc 3 in coral. Fasten off.
Each leg measures 0.75 in × 0.8 in (1.9 cm × 2.0 cm).
Head and Trunk (teal)
Rnd 1: Ch 1, 6 sc in a MR. (6 sts)
Rnd 2: 2 sc in each st. (12 sts)
Rnd 3: [Sc in the next st, 2 sc in the next] 6 times. (18 sts)
Rnd 4: [Sc in the next 2 sts, 2 sc in the next] 6 times. Join, but do not fasten off. (24 sts; 1.7 in / 4.3 cm across)
Trunk: Ch 9. Starting in the 2nd ch from hook, sc in the next 4 ch and hdc in the next 4 ch. Sl st in the next 2 sts of the head and fasten off. (8 sts)
During blocking, curl the trunk tip upward and tack it in place with one stitch.
Ear (coral)
Row 1: Make a MR, ch 2 (does not count as a st), 7 dc in the ring, and pull the ring closed. (7 sts)
Row 2: Ch 2 (does not count), turn, 2 dc in each st. (14 sts)
Row 3: Ch 1, turn, sc in each st. Fasten off. (14 sts)
The ear is a half-round about 1.5 in (3.8 cm) wide.
Saddle Medallion
Rnd 1 (mustard): Ch 1, 8 sc in a MR. Join. (8 sts)
Rnd 2: [Sc in the next st, ch 3] 8 times. Join and fasten off. (8 sc + 8 ch-3 loops)
Rnd 3 (coral): Work (sc, hdc, sc) in each ch-3 loop. Join. (24 sts)
Rnd 4: Sl st in the first st, then [sk 1, 5 dc in the next st, sk 1, sl st in the next st] 6 times. The last sl st lands in the first st. Fasten off. (6 scallops)
The medallion is about 1.8 in (4.6 cm) across.
Tail and Assembly
Tail: Join teal in st 3 of the body’s rear end. Ch 10, work a bobble in the 4th ch from hook, sl st in each of the remaining 6 ch, and sl st into the body.
Assembly:
- Sew the head over the upper front end so that about one third of the head overlaps the body.
- Sew the ear by its straight edge across the head-body join, with the curve hanging down.
- Center the medallion over the back half of the body so that its top scallops rise slightly above the back line.
- Embroider a black French knot eye on head Rnd 3, above the trunk.
The finished elephant is about 4.5 in × 3 in (11.4 cm × 7.6 cm).
Strand Components
Flower (mustard, make 36):
- Rnd 1: Ch 1, 8 sc in a MR. Pull the ring closed, but leave a small opening in the center. Join. (8 sts)
- Rnd 2: [(Sc, hdc, dc, hdc, sc) in the next st] 8 times. Join and fasten off. (40 sts, 8 petals; 1.25 in / 3.2 cm across)
Bead (teal, make 36):
- Rnd 1: 6 sc in a MR. (6 sts)
- Rnd 2: 2 sc in each st. (12 sts)
- Rnd 3: Sc in each st. (12 sts)
- Rnd 4: Sc2tog 6 times. (6 sts)
Stuff the bead firmly and close the opening. Each bead is 0.75 in (1.9 cm) across.
Cord (teal, make 12): Ch 70. Sl st in the back bump of the 2nd ch from hook and in each ch across. (69 sl sts) The cord should measure 15 in (38.1 cm); add or remove chains if needed.
Tassel (coral, make 12):
- Wrap yarn 40 times around the 3.5 in (8.9 cm) card.
- Tie the top with a 10 in (25.4 cm) strand.
- Cut the loops at the bottom.
- Wrap the neck 0.5 in (1.3 cm) below the top.
- Trim the ends to 3.5 in (8.9 cm).
Teal dot (make 12): Ch 1, 8 sc in a MR, and join. Each dot is 0.6 in (1.5 cm) across.
Strand Assembly
Measure from the top of the cord. Each position below marks the center of a piece:
- Strand A (elephant high): bead at 1 in (2.5 cm), flower at 2.5 in (6.4 cm), bead at 4 in (10.2 cm), elephant at 6.5 in (16.5 cm), bead at 9 in (22.9 cm), flower at 10.5 in (26.7 cm), bead at 12 in (30.5 cm), flower at 13.5 in (34.3 cm).
- Strand B (elephant low): bead at 1 in (2.5 cm), flower at 2.5 in (6.4 cm), bead at 4 in (10.2 cm), flower at 5.5 in (14.0 cm), bead at 7 in (17.8 cm), elephant at 9.5 in (24.1 cm), bead at 12 in (30.5 cm), flower at 12.5 in…
Correction for Strand B: place the second-to-last pieces as follows so nothing overlaps — bead at 1 in (2.5 cm), flower at 2.5 in (6.4 cm), bead at 4 in (10.2 cm), flower at 5.5 in (14.0 cm), bead at 7 in (17.8 cm), elephant at 9.5 in (24.1 cm), flower at 12.5 in (31.8 cm).
Sew each piece to the front of the cord. Run the cord behind the elephant’s center, from the medallion down to the belly gap. Tie a tassel to the bottom of each cord. Each strand hangs 15 in + 3.5 in = 18.5 in (47.0 cm).
Make All Pieces
- Squares: 4 coral-center, 4 teal-center and 4 mustard-center
- Elephants: 12
- Flowers: 36
- Beads: 36
- Cords: 12
- Tassels: 12
- Teal dots: 12
- Strands: 6 Strand A and 6 Strand B
Layout, left to right (C = coral, T = teal, M = mustard):
Squares:  C  T  M  C  T  M  C  T  M  C  T  M
Strands:  A  B  A  B  A  B  A  B  A  B  A  B
Joining
Place two squares RS together. With cream, sl st through the back loops of both layers, matching stitch to stitch across all 10 sts of the side, from corner center to corner center. Join all 12 squares in the order above, for 11 seams.
Keep your tension relaxed. A tight seam pulls the band shorter than 30 in (76.2 cm).
Checkpoint: the strip should measure 30 in × 2.5 in (76.2 cm × 6.4 cm). Each long side has 12 × 10 = 120 sts. The corner stitches at the seams are already included in each square’s 10, so don’t add any extra stitches at the seams.
Border
Border gauge: 4 sc = 1 in (2.5 cm), the same as the square edges.
Rnd 1 (cream): Sc in every st around the strip, including both corner sts at each seam. Work 3 sc in each of the 4 outer corner sts. Join.
- The strip has 256 different edge sts (2 × 120 + 2 × 10 − 4 shared corners).
- Count: 256 sts worked one per stitch + 8 extra = 264 sts.
- Each long side has 122 sts and each short side has 12 sts, counting the corner center sts.
The band now measures 30.4 in × 2.9 in (77.2 cm × 7.4 cm).
Tabs (top edge): Use the 120 top sts between the corner centers. Work 7 tabs over these sts: 4–9, 22–27, 40–45, 58–63, 76–81, 94–99 and 112–117. That gives 3 + 7 × 6 + 6 × 12 + 3 = 120.
For each tab:
- Join cream in the first st of its group, ch 1, and sc 6 across.
- Work 19 more rows of ch 1, turn, sc 6, for 20 rows total. The tab is 1.5 in × 4 in (3.8 cm × 10.2 cm).
- Fold the tab to the WS and sew the last row behind Rnd 1. This makes a loop that fits a rod up to 1.25 in (3.2 cm) across.
Points (bottom edge): The 120 bottom sts between the corner centers split into 12 sections of 10, one under each square. Work every point over its own 10-st section:
- Row 1: Join cream in the first st of the section, ch 1, sc2tog, sc 6, sc2tog. (8 sts)
- Row 2: Ch 1, turn, sc2tog, sc 4, sc2tog. (6 sts)
- Row 3: Ch 1, turn, sc 6. (6 sts)
- Row 4: Ch 1, turn, sc2tog 3 times. (3 sts)
- Row 5: Ch 1, turn, sc3tog. Do not fasten off. (1 st)
- Edging: Work 5 sc down the row ends to the tip, (sc, ch 3, sc) in the tip, then 5 sc up the other side. Sl st into the next section and fasten off. (12 sc + 1 ch-3 loop)
Why the math works: 12 squares × 10 sts = 120 sts, which splits exactly into 12 sections × 10 sts. Each point therefore sits centered under its own square.
Sew one teal dot to each point, centered over Rows 1–3. Tie or sew the top of each cord into a ch-3 tip loop, following the A/B order. The band is now 3.9 in (9.9 cm) deep.
Final Blocking
- Pin the band face up to 30.4 in × 2.9 in (77.2 cm × 7.4 cm), and pin each point to a sharp tip 1 in (2.5 cm) below the band.
- Lay out the strands straight, pin the elephants flat and curl each trunk tip upward.
- Spray everything until damp, but not soaked.
- Let it dry completely, then shake out the tassels and trim them to 3.5 in (8.9 cm).
Final Quality-Control Checklist
- Band is 30.4 in (77.2 cm) wide with straight edges
- 12 points, each centered under a square
- 7 tabs, evenly spaced every 4.5 in (11.4 cm)
- Square centers follow C, T, M across the band
- Strands alternate A, B, starting with A on the left
- Each strand has 3 beads, 3 flowers, 1 elephant and 1 tassel
- Every elephant has an eye, a curled trunk and a tail bobble
- All yarn ends are woven in securely
Troubleshooting
- Square cups: Your Rnd 2 is too tight. Loosen your hdc.
- Square ruffles: Check that Rnd 4 adds only 2 extra sts per corner.
- Band too short: Rework the seams more loosely.
- Points lean sideways: Make sure Row 1 starts in the first st of its section.
- Strands twist: Steam the cords straight and let them hang overnight.
- Elephant curls: Pin it and re-block it flat.
- Tassel looks thin: Increase to 50 wraps.
Care
Hand wash in cool water, roll the piece in a towel and dry it flat. Re-shape the tassels while they are still damp.
Final Notes
The measurements build on each other in a simple chain:
- Squares at 2.5 in (6.4 cm) per side
- 12 squares make a 30 in (76.2 cm) strip
- The border brings the band to 30.4 in (77.2 cm)
- 1 in (2.5 cm) points take the band to 3.9 in (9.9 cm) deep
- 18.5 in (47.0 cm) strands give a total drop of 22.4 in (56.9 cm)
If you check your gauge at the first square, everything after it falls into place.
Happy crocheting!