

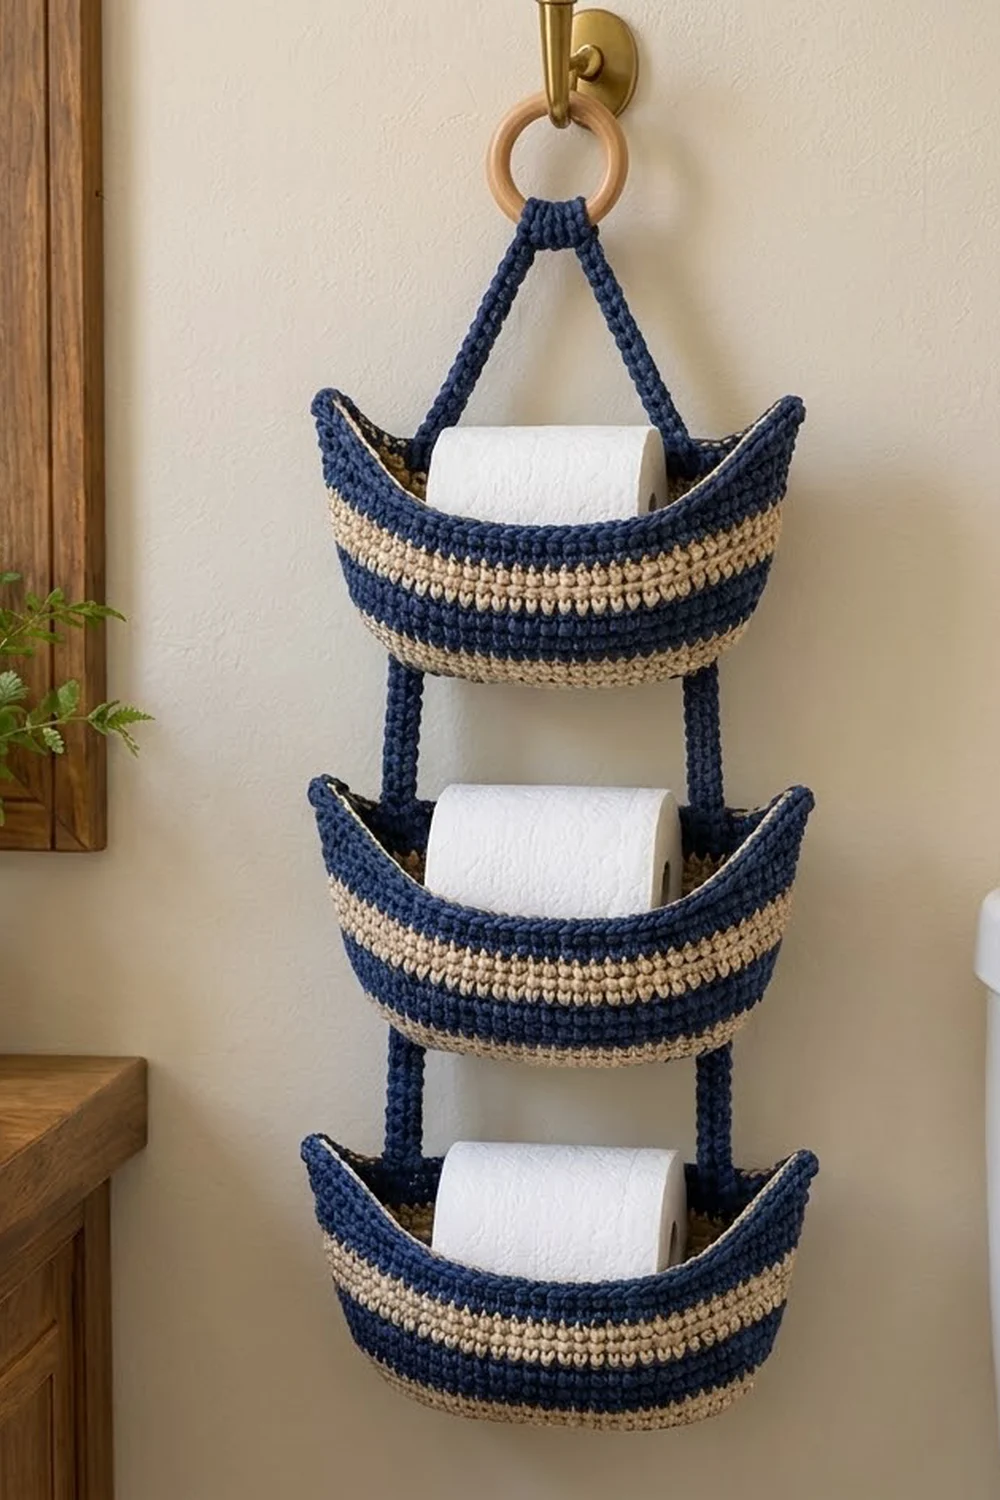
The Harbor Stripe holder is a three-tier wall organizer that holds one spare toilet roll in each of three boat-shaped baskets. The deep navy and natural beige stripes give it a calm, nautical look that suits a bathroom. The raised, pointed ends keep each roll from rolling out.
The fabric is dense single crochet worked in bulky cotton, so the baskets hold their shape without any stiffener. The stripes come from simple color changes, and short rows shape the pointed ends.
This pattern uses US crochet terms. Each basket measures about 9.25 in (23.5 cm) long and 4.5 in (11.4 cm) wide at the base. It is 3.75 in (9.5 cm) tall at the center and 5.25 in (13.3 cm) tall at the points. The assembled holder is about 26.5 in (67.3 cm) from the top of the ring to the bottom of the lowest basket.
Construction is straightforward. You work an oval base in joined rounds, turn the sides up through the back loops, and work even rounds for the stripes. Then you shape each pointed end with short rows and finish with a two-round rim. Last, you make slip-stitch cords and sew everything to a wooden ring.
Finished Size and Construction
- Finished size (assembled): about 26.5 in (67.3 cm) tall × 9.25 in (23.5 cm) wide
- Skill level: Intermediate (short rows, neat sewing)
- Terminology: US crochet terms
- Yarn weight: Bulky (#5) cotton or cotton blend
- Hook: 6.0 mm (US J-10)
- Number of pieces: 9 (3 baskets, 4 connector cords, 2 hanger cords), plus 1 purchased wooden ring
- Layout: 1 column of 3 baskets, hung from a ring
- Piece size (each basket): base 9.25 × 4.5 in (23.5 × 11.4 cm), height 3.75 in (9.5 cm) at center, 5.25 in (13.3 cm) at points
- Size before border (rim): 3.4 in (8.6 cm) at center, 4.9 in (12.4 cm) at points
- Border (rim) depth: about 0.35 in (0.9 cm)
Materials
Pick a firm, smooth bulky cotton, such as a cotton cord or a tightly plied cotton blend. These amounts assume about 110 m per 100 g. Soft acrylic will work, but the baskets will slump more under the rolls.
- Navy (Color A): 170 g (187 m)
- Natural beige (Color B): 50 g (55 m)
These quantities include a margin of about 20% for gauge differences and long sewing tails.
Tools:
– 6.0 mm (US J-10) crochet hook
– Wooden ring, 2.75 in (7.0 cm) diameter
– Tapestry needle
– 4 stitch markers
– Scissors and a measuring tape
– A wall hook rated for at least 5 lb (2.3 kg)
Abbreviations (US Terms)
- ch – chain
- sc – single crochet
- sc2tog – single crochet 2 together
- sl st – slip stitch
- BLO – back loop only
- st(s) – stitch(es)
- Rnd(s) – round(s)
- RS – right side
sc2tog: Insert hook in next st, yarn over, pull up a loop. Insert hook in following st, yarn over, pull up a loop (3 loops on hook). Yarn over, pull through all 3 loops. This turns 2 sts into 1.
Slip-stitch cord: Work a chain, then sl st into the back bump of each chain, starting in the 2nd ch from hook. This gives a firm, round-looking cord that does not stretch.
Gauge and Checkpoints
Gauge: 12 sc × 13 rnds = 4 in (10.2 cm) in joined rounds of sc.
Cord gauge: 3 sl sts = 1 in (2.5 cm) along the finished cord.
Make one full basket first and use it as your gauge piece. Measure at each checkpoint below:
- After Rnd 4: base about 7.25 × 2.5 in (18.4 × 6.4 cm)
- After Rnd 7: base about 9.25 × 4.5 in (23.5 × 11.4 cm)
- After Rnd 18: walls about 3.4 in (8.6 cm) tall, measured from the fold line
- After the end shaping: each point about 1.5 in (3.8 cm) above Rnd 18
- After the rim: 3.75 in (9.5 cm) at center, 5.25 in (13.3 cm) at points
If your base is too big: go down to a 5.5 mm hook. Loose bases cup unevenly and the walls lean outward.
If your base is too small: go up to a 6.5 mm hook. Check that a standard roll, about 4.5 in (11.4 cm) across, still lies flat inside.
The stitch counts never change. Only your hook size changes.
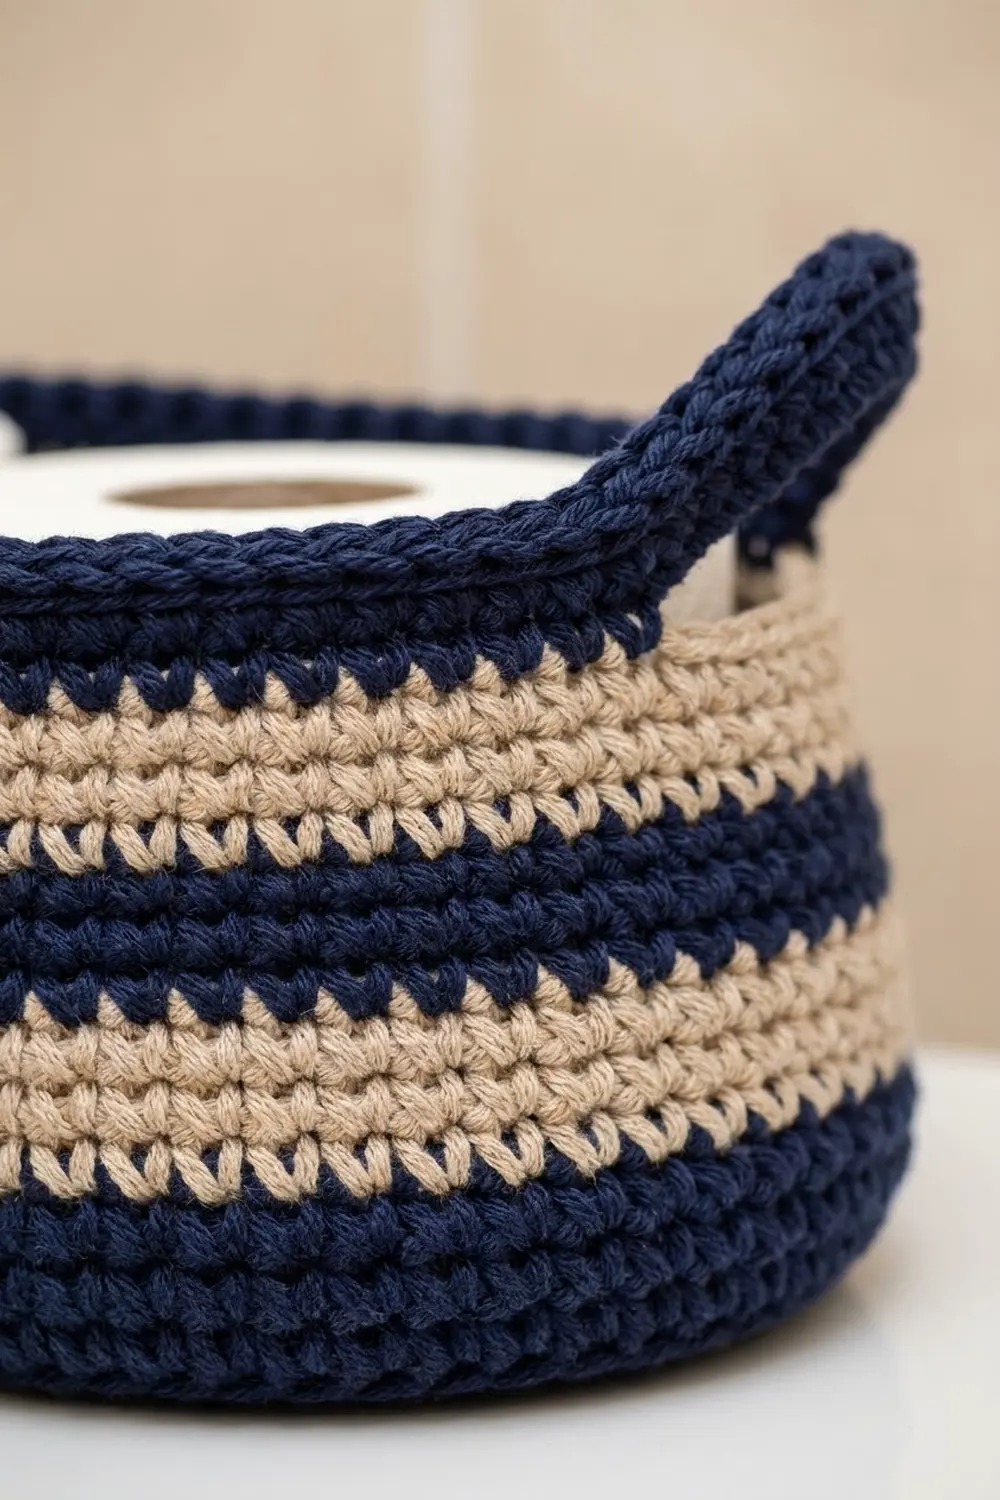
Basket (Make 3)
Work in joined rounds with the RS facing out. Ch 1 at the start of each round does not count as a stitch. Each round begins in the same stitch as its joining sl st.
Each round has 4 sections in this order: End A, Side 1, End B, Side 2. The sides stay at 14 sts throughout, and only the ends grow.
Base (Color A, Navy)
Foundation: With A, ch 17.
Rnd 1: 3 sc in 2nd ch from hook (End A). Sc in next 14 ch (Side 1). 3 sc in last ch (End B). Rotate and work along the other side of the chain: sc in next 14 ch (Side 2). Join with sl st to first sc. (34 sts: 3 per end, 14 per side)
Place markers in the first st of each end section and move them up as you go.
Rnd 2: Ch 1, [2 sc in next st] 3 times, sc in next 14 sts, [2 sc in next st] 3 times, sc in next 14 sts. Join. (40 sts: 6 per end)
Rnd 3: Ch 1, [sc in next st, 2 sc in next st] 3 times, sc in next 14 sts, [sc in next st, 2 sc in next st] 3 times, sc in next 14 sts. Join. (46 sts: 9 per end)
Rnd 4: Ch 1, [sc in next 2 sts, 2 sc in next st] 3 times, sc in next 14 sts, repeat bracket, sc in next 14 sts. Join. (52 sts: 12 per end)
Checkpoint: 7.25 × 2.5 in (18.4 × 6.4 cm).
Rnd 5: Ch 1, [sc in next 3 sts, 2 sc in next st] 3 times, sc in next 14 sts, repeat bracket, sc in next 14 sts. Join. (58 sts: 15 per end)
Rnd 6: Ch 1, [sc in next 4 sts, 2 sc in next st] 3 times, sc in next 14 sts, repeat bracket, sc in next 14 sts. Join. (64 sts: 18 per end)
Rnd 7: Ch 1, [sc in next 5 sts, 2 sc in next st] 3 times, sc in next 14 sts, repeat bracket, sc in next 14 sts. Join. (70 sts: 21 per end, 14 per side)
Checkpoint: 9.25 × 4.5 in (23.5 × 11.4 cm).
Stitch map for every round from here on:
– End A: sts 1–21
– Side 1 (front): sts 22–35
– End B: sts 36–56
– Side 2 (back, against the wall): sts 57–70
Walls (Striped)
Rnd 8 (turning round, A): Ch 1, sc in BLO of each st around. Join. (70 sts = 70 worked 1-per-st + 0 added)
The unworked front loops make a crisp fold line, and the walls rise from here.
Rnds 9–10 (A): Ch 1, sc in each st around. Join. (70 sts)
To change color, work the final join of the previous round with the new color. Cut the old color, leaving a 6 in (15.2 cm) tail.
Rnds 11–12 (B, Beige): Ch 1, sc in each st around. Join. (70 sts)
Rnds 13–14 (A): Ch 1, sc in each st around. Join. (70 sts)
Rnds 15–16 (B): Ch 1, sc in each st around. Join. (70 sts)
Rnds 17–18 (A): Ch 1, sc in each st around. Join. (70 sts) Do not fasten off.
Checkpoint: walls 3.4 in (8.6 cm) tall from the fold.
This gives 3 navy rounds above the base, a 2-round beige stripe, 2 navy, 2 beige, and 2 navy at the top.
Pointed Ends (Short Rows, A)
End A, Row 1: Ch 1, sc in sts 1–21, turn. (21 sts)
Row 2: Ch 1, sc2tog, sc in next 17 sts, sc2tog, turn. (19 sts)
Row 3: Ch 1, sc2tog, sc in next 15 sts, sc2tog, turn. (17 sts)
Row 4: Ch 1, sc2tog, sc in next 13 sts, sc2tog, turn. (15 sts)
Row 5: Ch 1, sc2tog, sc in next 11 sts, sc2tog. (13 sts) Fasten off.
End B: With RS facing, join A in st 36 of Rnd 18. Work Rows 1–5 the same way over sts 36–56. Fasten off.
The decreases at both edges of every row make the ends taper inward as they rise, which creates the boat curve.
Checkpoint: each point is 1.5 in (3.8 cm) above Rnd 18.
Make All Pieces
Baskets (make 3): each uses about 45 g (50 m) navy and 12 g (13 m) beige.
Connector cords (make 4), A: Ch 13. Sl st in back bump of 2nd ch from hook and each ch across. (12 sl sts = 4 in / 10.2 cm) Leave a 12 in (30.5 cm) tail at each end.
Hanger cords (make 2), A: Ch 31. Sl st in back bump of 2nd ch from hook and each ch across. (30 sl sts = 10 in / 25.4 cm) Leave a 12 in (30.5 cm) tail at each end.
All 6 cords together use about 6 g (7 m) navy.
Layout grid (front view):
            ( RING )
            /      \
       hanger      hanger
      /                  \
 [ Basket 1 - top        ]
      |                  |
  connector          connector
      |                  |
 [ Basket 2 - middle     ]
      |                  |
  connector          connector
      |                  |
 [ Basket 3 - bottom     ]
Joining
Method: Whipstitch with the cord tails, using a tapestry needle.
Attachment stitches: All cords attach to Side 2, the back wall, at st 57 and st 70. These are the outermost back-wall sts, right next to each pointed end. They sit 13 sts apart, which is about 4.25 in (10.8 cm). Lining the cords up on the same two sts on every basket keeps the stack straight.
Step 1 – Hanger cords to the ring: Wrap 1 in (2.5 cm) of one end of each hanger cord over the ring. Whipstitch it flat to itself with 3 stitches through both layers. Position the two cords side by side on the ring.
Step 2 – Hanger cords to Basket 1: Lay the other 1 in (2.5 cm) of each hanger cord inside Basket 1, against the back wall. Line it up over st 57 for one cord and st 70 for the other, covering the rim and Rnds 17–18. Whipstitch along both long edges of the cord. This leaves 8 in (20.3 cm) of free cord on each side.
Step 3 – Connectors, top ends: On the outside of Basket 1’s back wall, lay 0.75 in (1.9 cm) of a connector over Rnds 8–10 at st 57. Lay a second connector the same way at st 70. Whipstitch them in place.
Step 4 – Connectors, bottom ends: Sew the lower 0.75 in (1.9 cm) of each connector inside Basket 2’s back wall, at sts 57 and 70, over the rim and Rnds 17–18. This leaves 2.5 in (6.4 cm) of free cord.
Step 5: Repeat Steps 3–4 to hang Basket 3 from Basket 2.
Tension advice: Sew snugly, but don’t pull so hard that the wall puckers. Each stitch should catch one full sc post, not just a loop. Hold the holder up by the ring before your final knots and check that the baskets hang level.
Size checkpoint: The assembled holder measures about 26.5 in (67.3 cm) from ring top to the bottom of Basket 3. The free connector length between baskets should be 2.5 in (6.4 cm) on both sides.
Border (Rim)
Work the rim on each basket separately, before you join anything. The rim uses the same gauge as the body: 12 sc = 4 in (10.2 cm).
With RS facing, join A in st 22 (the first st of Side 1).
Rim Rnd 1:
– Side 1: ch 1, sc in sts 22–35. (14 sts)
– End B: work 5 sc evenly up the row ends (1 per row). Across Row 5, work 2 sc in first st, sc in next 11 sts, 2 sc in last st (15 sts). Work 5 sc down the other row ends. (25 sts)
– Side 2: sc in sts 57–70. (14 sts)
– End A: work the same as End B. (25 sts)
– Join to first sc. (78 sts = 14 + 25 + 14 + 25)
Rim Rnd 2: Ch 1, sl st loosely in each st around. Join and fasten off. (78 sts)
Why the math works:
– Each sc row end is close to one sc wide (0.31 in tall against 0.33 in wide), so 1 sc per row end lies flat without ruffling or pulling.
– The 13 top sts of Row 5 become 15 because the 2 extra sts sit at the two sharp corners of each point.
– The 14-st sides are worked 1-per-st, so the rim matches the wall exactly.
– Two ends of 25 sts plus two sides of 14 sts gives 78.
Final Blocking
- Weave in every tail along its own color stripe before blocking.
- Mist each basket lightly with water until it is damp, not soaked.
- Fill each basket with a toilet roll wrapped in a plastic bag, then pack a small towel around it to push the walls out.
- Pinch each point upright and smooth the rim so the center dips evenly.
- Press the base flat on a towel so the fold line at Rnd 8 is sharp.
- Let the baskets dry fully, usually 24 hours, before sewing on the cords.
Final Quality-Control Checklist
- Each basket base is 9.25 × 4.5 in (23.5 × 11.4 cm).
- Every wall round has 70 sts, and both rims have 78 sts.
- The stripes go navy (3 rounds above the base), beige 2, navy 2, beige 2, navy 2 on all three baskets.
- Both points on each basket are 5.25 in (13.3 cm) tall and look like mirror images.
- All cords sit at sts 57 and 70 on the back wall.
- All four connector gaps measure 2.5 in (6.4 cm).
- All tails are woven in, with no beige showing through navy.
- The holder hangs level, and each basket holds a roll without tipping forward.
Troubleshooting
The base curls up like a bowl: Your increases are too tight. Go up one hook size for Rnds 1–7 only.
The base ruffles: Recount the end sections. Each end should grow by exactly 3 sts per round.
The seam line drifts: Begin each round in the same st as the join, and don’t count the ch 1.
The color changes look jagged: Change color on the final sl st join, and keep the join pulled snug.
The points lean outward: Tighten your sc2tog edges, or work Rim Rnd 2 more firmly.
A basket tilts forward: The connectors are attached at different heights. Re-sew them over the same rounds on both sides.
The cords stretch: Work the slip stitches into the back bumps only, and keep your tension even.
Care
Spot clean with mild soap. If needed, hand wash the whole holder in cool water, press out the water in a towel, and reshape it around rolls to dry flat. Do not tumble dry.
Final Notes
The measurement chain runs like this:
– Gauge of 12 sc × 13 rnds = 4 in (10.2 cm)
– Base of 70 sts measuring 9.25 × 4.5 in (23.5 × 11.4 cm)
– Walls 3.4 in (8.6 cm) tall
– Points 1.5 in (3.8 cm) higher
– A 78-st rim that brings the basket to 3.75 in (9.5 cm) at center and 5.25 in (13.3 cm) at the points
– Cords at 3 sts per inch: 4 in (10.2 cm) connectors with 2.5 in (6.4 cm) gaps and 10 in (25.4 cm) hangers
– A finished holder about 26.5 in (67.3 cm) tall
If each checkpoint matches, the final piece will too. Happy crocheting!