

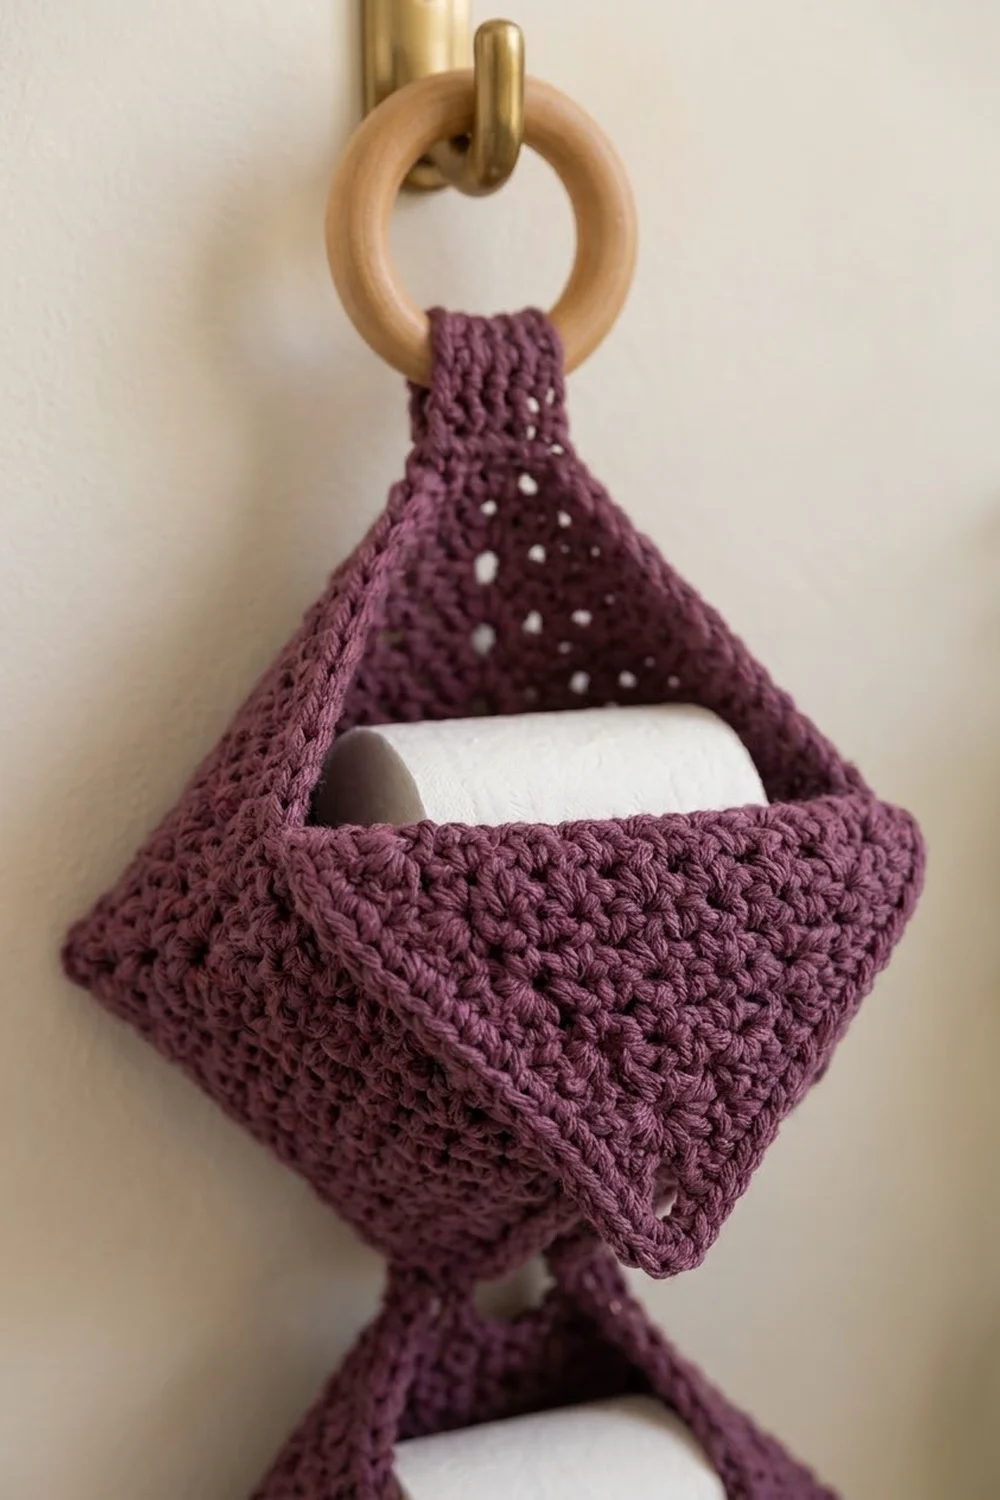
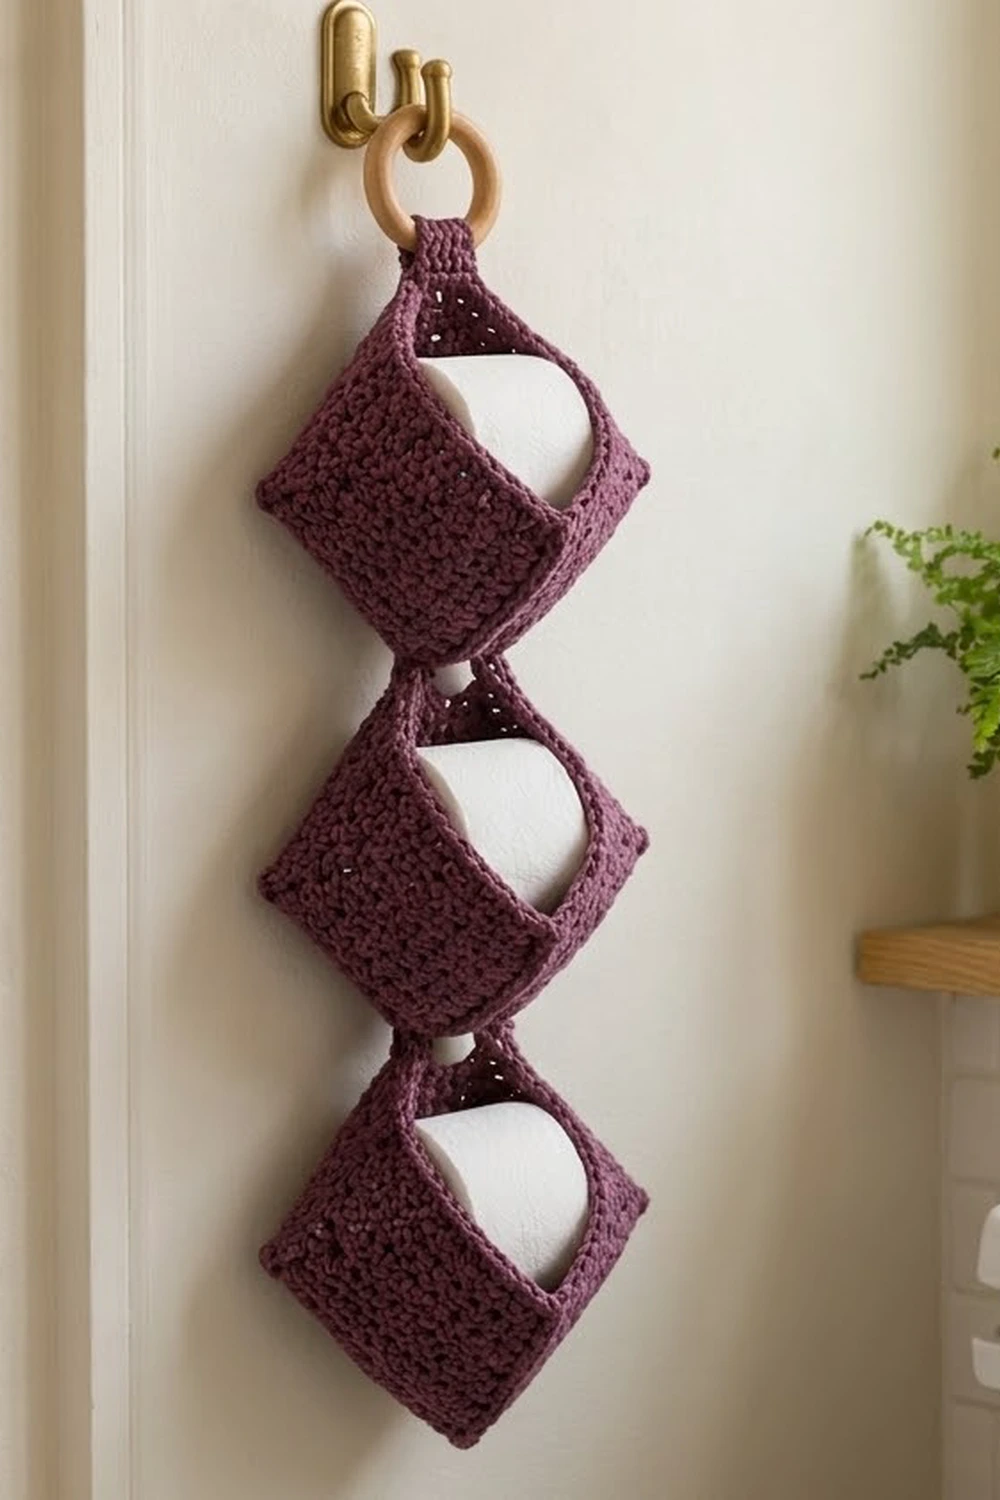
The Plum Diamond Trio is a hanging toilet paper holder made of three stacked pockets. Each pocket is a small square box hung on point, so from the front it reads as a diamond. Each one holds a standard roll, with the hole facing you.
The sample is worked in one deep plum cotton. The dense single crochet makes the pockets firm enough to keep their shape. The corner increases leave neat lines of eyelets that run from the center of each back square out to its points. A natural wooden ring at the top gives the piece a warm, minimal look that suits most bathrooms.
The pattern uses US crochet terms. The finished holder measures 7.1 in (18.0 cm) wide and 22.2 in (56.4 cm) long from the top tip to the bottom tip. Each pocket is 4.5 in (11.4 cm) deep. With the visible strap loop, the total length below the ring is 23.7 in (60.2 cm).
Construction is modular. For each pocket you work a square back in joined rounds and then work the walls straight up from it. Next you crochet a separate half-square triangle and sew it across the lower half of the opening. A short edging finishes the opening. Two small tabs link the pockets, and a strap fixes the stack to the ring.
Finished Size and Construction
- Finished size: 7.1 in (18.0 cm) wide × 22.2 in (56.4 cm) long, plus a 1.5 in (3.8 cm) strap loop
- Skill level: Easy–Intermediate
- Terminology: US
- Yarn weight: Worsted (#4) cotton or cotton blend
- Hook: 5.0 mm (H-8)
- Number of pieces: 9 (3 pockets, 3 front triangles, 2 connector tabs, 1 strap)
- Layout: 3 pockets stacked vertically on point (1 column × 3)
- Pocket back size: 5 in × 5 in (12.7 cm × 12.7 cm); 7.1 in (18.0 cm) corner to corner
- Pocket depth: 4.5 in (11.4 cm)
- Size before border: the same as the pocket size; the edging only finishes the opening
- Border depth: 2 rounds, about 0.25 in (0.6 cm)
Materials
Yarn: Use a smooth worsted-weight cotton or cotton blend. Cotton holds its shape, survives washing, and does not stretch much under the weight of a roll. Avoid soft acrylic, which lets the pockets sag.
- Plum (Color A): 250 g, about 475 m (519 yd), based on a yarn with roughly 190 m per 100 g
These quantities include a margin of about 20 percent for gauge swatching and differences in tension.
Tools:
- 5.0 mm (H-8) crochet hook
- 4 locking stitch markers
- Tapestry needle
- Wooden ring, 2.5 in (6.4 cm) diameter
- Measuring tape
- Pins or clips for seaming
- One toilet roll for test-fitting
Abbreviations (US Terms)
- ch – chain
- sc – single crochet
- sl st – slip stitch
- sp – space
- st(s) – stitch(es)
- BLO – back loop only
- rnd – round
- MR – magic ring
Special stitch: sc BLO. Insert the hook under the back loop of the stitch only and work a single crochet. The unused front loops form a crisp fold line where the walls turn up from the back square.
Gauge and Checkpoints
Gauge: 16 sc and 16 rows/rnds = 4 in (10.2 cm) in single crochet.
Make one complete pocket before you start the others. It is your real gauge test. Cotton single crochet usually works close to square, which this design depends on.
Checkpoints:
- After Rnd 5 of the back square: 2.5 in (6.4 cm) per side
- After Rnd 10: 5 in (12.7 cm) per side
- After Rnd 28 (walls): 4.5 in (11.4 cm) wall height
- After Row 10 of the triangle: each short side 5 in (12.7 cm)
If your square is too big, go down 0.5 mm in hook size. If it is too small, go up 0.5 mm. Don’t add or remove rounds, because every later count depends on 19 stitches per side.
Pocket (Make 3)
Work in joined rounds. Do not turn. Join each round with a sl st to the first sc, then ch 1. The ch 1 does not count as a stitch.
Back Square
Rnd 1: MR, ch 1, (sc, ch 2) 4 times in ring. Join. (4 sc, 4 ch-2 sps; 1 sc per side)
Rnd 2: Ch 1, sc in first sc, (sc, ch 2, sc) in next ch-2 sp, sc in next sc; repeat from * twice more, (sc, ch 2, sc) in last ch-2 sp. Join. (12 sc; 3 sc per side)
Rnds 3–10: Ch 1, sc in each sc to the next corner, (sc, ch 2, sc) in the ch-2 sp; repeat around. Join. Each round adds 2 sc per side.
Stitch counts per round (sc per side / total):
- Rnd 3: 5 / 20
- Rnd 4: 7 / 28
- Rnd 5: 9 / 36 (checkpoint: 2.5 in / 6.4 cm)
- Rnd 6: 11 / 44
- Rnd 7: 13 / 52
- Rnd 8: 15 / 60
- Rnd 9: 17 / 68
- Rnd 10: 19 / 76 (checkpoint: 5 in / 12.7 cm)
Every round also has 4 ch-2 corner sps. The ch-2 corners stack on top of each other, which forms the diagonal lines of eyelets.
Walls
Rnd 11 (conversion round): Ch 1, sc BLO in each sc, and work 1 sc in each ch-2 corner sp. Join.
Count: 76 sc worked one per stitch + 4 sc added in corner sps = 80 sc.
Put a marker in each of the 4 sc worked into a corner sp. Each side now has 1 corner st + 19 side sts = 20 sts.
Rnds 12–28: Ch 1, sc in each st around. Join. (80 sc) Move the markers up each round.
The walls run from Rnd 11 to Rnd 28, which is 18 rounds or 4.5 in (11.4 cm). Fasten off and weave in the ends. Keep the corner markers in place for seaming.
Checkpoint: The box should hold a roll with its hole facing out. A standard roll is about 4.5 in (11.4 cm) across and 4 in (10.2 cm) tall, so it should sit inside with a little ease.
Front Triangle (Make 3)
This piece is a half-square, worked in turned rows from the middle of its long edge. Its 2 short sides match the pocket’s 19-stitch sides.
Row 1: MR, ch 1, (sc, ch 2, sc) in ring. Turn. (2 sc, 1 ch-2 sp)
Row 2: Ch 1, 2 sc in first sc, (sc, ch 2, sc) in ch-2 sp, 2 sc in last sc. Turn. (6 sc; 3 per short side)
Rows 3–10: Ch 1, 2 sc in first sc, sc in each sc to the ch-2 sp, (sc, ch 2, sc) in the sp, sc in each sc to the last sc, 2 sc in the last sc. Turn.
Each row adds 4 sc: 1 at each end and 2 at the corner. The total for row n is 4n − 2.
- Row 3: 10 (5 per side)
- Row 4: 14 (7)
- Row 5: 18 (9)
- Row 6: 22 (11)
- Row 7: 26 (13)
- Row 8: 30 (15)
- Row 9: 34 (17)
- Row 10: 38 (19 per short side)
Fasten off, leaving a 24 in (61.0 cm) tail for sewing.
Checkpoint: Each short side measures 5 in (12.7 cm). The long edge measures about 7.1 in (18.0 cm).
Connector Tabs (Make 2)
Ch 6.
Row 1: Sc in 2nd ch from hook and in each ch across. Turn. (5 sc)
Rows 2–8: Ch 1, sc in each st across. Turn. (5 sc)
Each tab is 1.25 in × 2 in (3.2 cm × 5.1 cm). Leave a 12 in (30.5 cm) tail.
Strap (Make 1)
Ch 6.
Row 1: Sc in 2nd ch from hook and in each ch across. Turn. (5 sc)
Rows 2–24: Ch 1, sc in each st across. Turn. (5 sc)
The strap is 1.25 in × 6 in (3.2 cm × 15.2 cm). Leave a 12 in (30.5 cm) tail.
Make All Pieces
All pieces use Color A (plum):
- Pockets: 3
- Front triangles: 3
- Connector tabs: 2
- Strap: 1
Layout (front view, top to bottom):
        [ RING ]
        [STRAP ]
          /\
         /  \     Pocket 1
         \__/
         [TAB]
          /\
         /  \     Pocket 2
         \__/
         [TAB]
          /\
         /  \     Pocket 3
         \__/
Each pocket hangs with one corner pointing up and one pointing down. The back square sits flat against the wall, and the opening faces you.
Joining
Front Triangle to Pocket
Turn a pocket so one marked corner points down. That corner is the bottom corner, and the 2 sides that meet there are the lower rim sides.
Line up the ch-2 corner sp of the triangle’s Row 10 with the bottom corner st of the rim. Line up the 19 sc on each short side of the triangle with the 19 side sts of each lower rim side, one to one. The row ends at each end of the triangle’s long edge meet the left and right corner sts.
Whipstitch through both loops of the triangle and both loops of the rim with the tail. Place your seam stitches evenly and snug, but don’t pull hard enough to pucker the edge. The triangle’s long edge should run straight across between the left and right corners.
Tabs
Center a tab vertically on the back of Pocket 1’s bottom corner so it overlaps the back square by 0.75 in (1.9 cm). Whipstitch it in place through the back fabric only. Sew the other end of the tab to the back of Pocket 2’s top corner in the same way, which leaves a 0.5 in (1.3 cm) gap between the tips. Repeat with the second tab between Pockets 2 and 3.
Strap
Fold the strap in half over the wooden ring. Sew the 2 layers together just below the ring. Sew the lower 1 in (2.5 cm) of the doubled strap to the back of Pocket 1’s top corner. That leaves 1.5 in (3.8 cm) of strap showing between the ring and the pocket tip.
Size checkpoint: 3 pockets × 7.1 in (18.0 cm) + 2 gaps × 0.5 in (1.3 cm) = 22.2 in (56.4 cm) from top tip to bottom tip.
Border
The edging finishes the opening of each pocket: the upper 2 rim sides plus the triangle’s long edge.
Border gauge: 16 sc = 4 in (10.2 cm), the same as the body.
Rnd 1: Join yarn in the right corner st, where the triangle’s long edge meets the rim. Ch 1 and work these counts in order:
- 1 sc in the right corner st
- 19 sc along the upper right rim side
- 3 sc in the top corner st
- 19 sc along the upper left rim side
- 1 sc in the left corner st
- 29 sc across the triangle’s long edge: 14 sc across the 10 row ends of one half (1 sc in each row end, plus 1 more in rows 2, 4, 6 and 8), 1 sc into the ring at the center, and 14 sc across the other half in the same way
Join. (1 + 19 + 3 + 19 + 1 + 29 = 72 sc)
Rnd 2: Sl st in each st around. (72 sl sts) Fasten off and weave in.
Why the math works: Each rim side already has 19 side sts and 1 corner st, so you work 1 sc into each and add nothing extra. The 3 sc at the top corner keep that point crisp. The triangle’s long edge is 7.1 in (18.0 cm), and 7.1 in × 4 sts per inch ≈ 28.4, so 29 sc lies flat without ruffling or pulling. Along the diagonal, each row end covers about 1.4 stitch widths. The 4 extra sc on each half make up that difference.
Final Blocking
- Wet the whole holder in cool water and gently press the water out with a towel. Don’t wring it.
- Wrap 3 rolls in plastic bags and slide one into each pocket so the walls dry square.
- Lay the holder flat on its back. Straighten the diamonds so the tips line up on a vertical line.
- Pin or clip the triangle edges straight. Check that each pocket measures 7.1 in (18.0 cm) from point to point across.
- Let it dry completely, then take out the rolls.
- Check that the total length is 22.2 in (56.4 cm).
Final Quality-Control Checklist
- Each back square measures 5 in (12.7 cm) per side.
- Each pocket has walls 4.5 in (11.4 cm) deep with a clean BLO fold line.
- The eyelet lines run straight from the center to all 4 corners.
- Each triangle’s 19 sts per side line up with the rim’s 19 side sts.
- The border has 72 sts with no ruffles.
- The tabs and strap are centered, so the pockets hang straight.
- A roll slides in easily and doesn’t fall out.
- All ends are woven in securely.
Troubleshooting
- The square ruffles: Your tension is loose at the corners. Make sure there are exactly 2 chains in each corner, or go down a hook size.
- The square cups: Your gauge is too tight. Go up a hook size.
- The walls flare: Check that you have 80 sts in every wall round, and that Rnd 11 went into the back loops only.
- The triangle is shorter than the rim: Count Row 10. You should have 19 sts per side.
- A roll won’t go in: Stretch the triangle edge down while you insert the roll, or work Rnd 2 of the border more loosely.
- The holder twists on the wall: Re-center the tabs and strap exactly on the corner points.
- The strap stretches: Add a second line of stitching through both layers.
Care
Hand wash or machine wash on a gentle cycle in cool water. Reshape while damp and dry flat.
Final Notes
Each pocket depends on the same chain of measurements. The back square has 19 sts per side and measures 5 in (12.7 cm). The walls have 80 sts and stand 4.5 in (11.4 cm) tall. The triangle has 19 sts on each short side to match the rim, and the border has 72 sts. Each pocket hangs 7.1 in (18.0 cm) tall from point to point. Three pockets plus two gaps of 0.5 in (1.3 cm) give a finished length of 22.2 in (56.4 cm), or 23.7 in (60.2 cm) with the strap loop. Check your gauge on the first pocket and the other two will match.
Happy crocheting!