

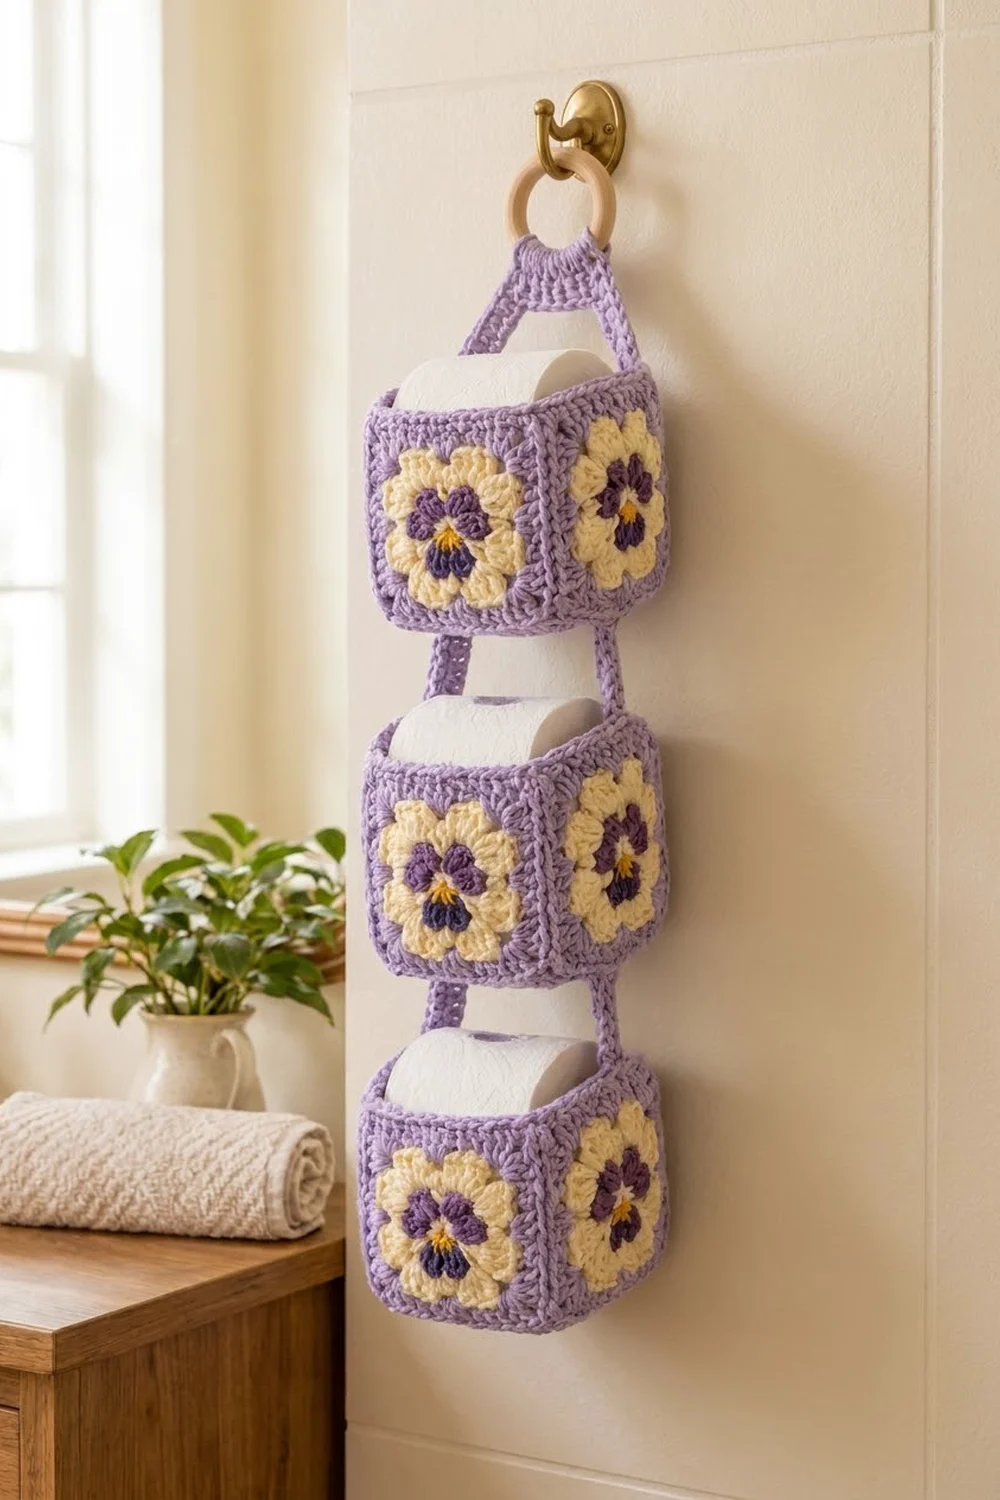
This hanging holder stores three spare rolls in a neat column of open-top pockets. Each pocket is built from four pansy granny squares and a plain base, so every side shows a cheerful flower.
The palette is soft and springlike: lavender frames and trim, buttery cream outer petals, deep purple inner petals, and a tiny golden-yellow center. A natural wooden ring at the top completes the cottage-bathroom look.
The pattern uses US crochet terms. The finished holder measures about 5 in (12.7 cm) wide and deep, and about 24.3 in (61.7 cm) long from the bottom of the lowest pocket to the top of the ring.
Construction is simple. You make 12 pansy squares and 3 solid base squares, seam each set of five into a box, add a rim, then connect the boxes with short straps and hang the top pocket from a ring with one long strap.
Finished Size and Construction
- Finished size: 5 in (12.7 cm) wide x 5 in (12.7 cm) deep x 24.3 in (61.7 cm) long, ring included
- Skill level: Intermediate
- Terminology: US crochet terms
- Yarn weight: Worsted (#4)
- Hook: 5.0 mm (H-8)
- Number of pieces: 12 pansy squares, 3 base squares, 4 connector straps, 1 hanger strap
- Layout: 3 pockets stacked vertically, each pocket = 4 wall squares + 1 base
- Piece size: 5 in (12.7 cm) square
- Size before border: each pocket is 5 in (12.7 cm) tall before the rim
- Border depth: pocket rim adds 0.5 in (1.3 cm), so each pocket is 5.5 in (14.0 cm) tall
Materials
Choose a smooth worsted cotton or cotton blend. Cotton holds the box shape well and copes with bathroom humidity. Acrylic works too but makes softer, slouchier pockets.
- Lavender (main color): 230 g, about 460 m
- Cream: 45 g, about 90 m
- Deep purple: 30 g, about 60 m
- Golden yellow: 10 g, about 20 m
Quantities are based on yarn of about 200 m per 100 g and include a safety margin of roughly 15%.
Tools:
- 5.0 mm (H-8) crochet hook
- Wooden ring, 3 in (7.6 cm) diameter
- Tapestry needle
- Stitch markers
- Scissors
- Measuring tape
- Blocking mat and rust-proof pins
Abbreviations (US Terms)
- ch – chain
- sl st – slip stitch
- sc – single crochet
- hdc – half double crochet
- dc – double crochet
- tr – treble crochet
- sp(s) – space(s)
- st(s) – stitch(es)
- BLO – back loop only
- RS / WS – right side / wrong side
Special stitch – Petal: (hdc, 3 dc, hdc) worked into the same stitch or space. One petal = 5 sts; its center st is the 2nd dc.
Gauge and Checkpoints
Gauge: 23 sc = 5 in (12.7 cm), which is 4.6 sc per inch, and 5 sc rows = 1 in (2.5 cm).
Make one complete pansy square before anything else. It is your true gauge swatch. Check it at each stage:
- After Round 4 (flower complete): about 3 in (7.6 cm) across
- After Round 6: about 3.75 in (9.5 cm) square
- After Round 7: about 4.5 in (11.4 cm) square
- After Round 8: 5 in (12.7 cm) square
Too big? Go down to a 4.5 mm hook. Too small? Go up to a 5.5 mm hook. A difference of 0.25 in (0.6 cm) per square adds up to 1 in (2.5 cm) around each pocket opening, so adjust before continuing.
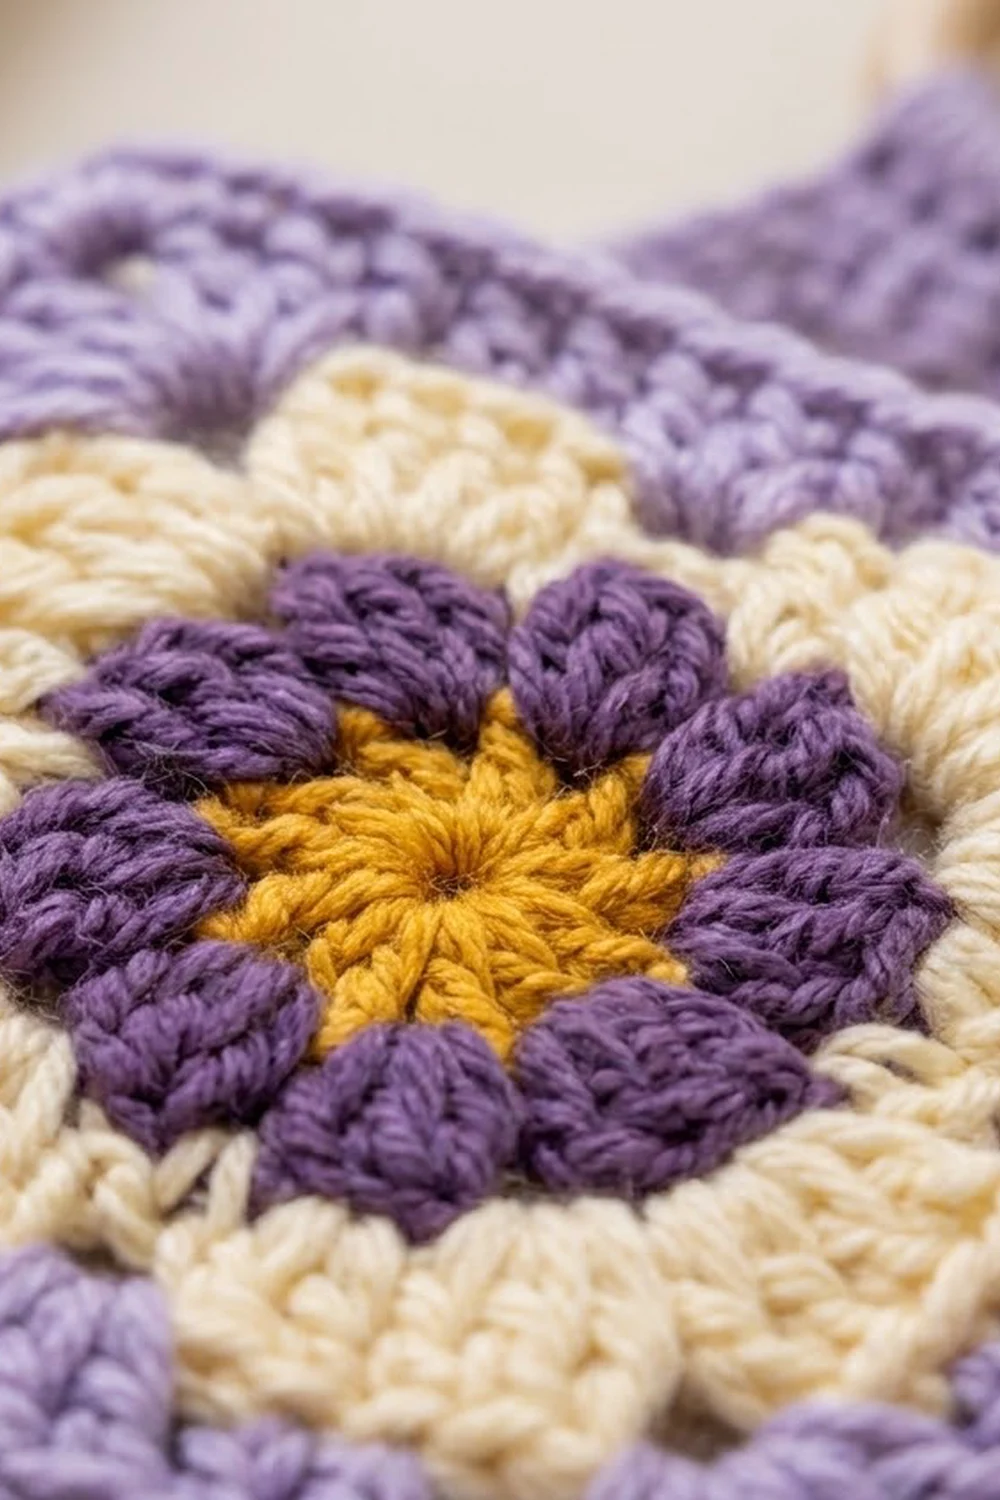
Pansy Square (make 12)
Round 1 (golden yellow): Make a magic ring, ch 1, 8 sc in ring, join with sl st to first sc. Pull ring closed. Fasten off. (8 sc)
Round 2 (deep purple): Join in any sc. Ch 1, sc in same st, Petal in next st, *sc in next st, Petal in next st; rep from * 2 more times, join to first sc. Fasten off. (4 sc + 4 Petals = 24 sts)
Round 3 (cream): Join with sc in any sc of Round 2. *Ch 5, keeping the chain behind the next petal, sc in next sc; rep from * 2 more times, ch 5, join to first sc. (4 sc + 4 ch-5 sps)
Round 4 (cream): Sl st into the next ch-5 sp. In each ch-5 sp work: sc, Petal, sc, Petal. Join to first sc. Fasten off. (8 sc + 8 Petals = 48 sts)
Each ch-5 sp now holds two cream petals, giving 8 cream petals in total. The 8 sc between them are the “dips.” Mark the first sc of any ch-5 group; call it a corner dip. Dips alternate corner dip, side dip, around the round.
Round 5 (lavender): Join with sl st in a corner dip. Ch 4 (counts as tr), (tr, ch 2, 2 tr) in same st. Ch 1, sc in center dc of next petal, ch 1, 3 dc in next side dip, ch 1, sc in center dc of next petal, ch 1*, (2 tr, ch 2, 2 tr) in next corner dip; rep from * 2 more times, then from * to ** once. Join to top of ch-4. (16 tr, 8 sc, 12 dc, 16 ch-1 sps, 4 ch-2 corner sps)
Each side now has 13 stitch positions between corner ch-2 sps: 2 tr, 4 ch-1 sps, 2 sc, 3 dc, 2 tr.
Round 6 (lavender): Sl st into the next tr and into the corner ch-2 sp. Ch 3 (counts as dc), (dc, ch 2, 2 dc) in same sp. *Dc in each st and each ch-1 sp across (13 dc), (2 dc, ch 2, 2 dc) in next corner sp; rep from * 2 more times, 13 dc across last side, join. (17 dc per side, 68 dc total)
Round 7 (lavender): Sl st into the next dc and into the corner sp. Ch 3, (dc, ch 2, 2 dc) in same sp. *Dc in each of next 17 dc, (2 dc, ch 2, 2 dc) in next corner sp; rep from * 2 more times, 17 dc, join. (21 dc per side, 84 dc total)
Round 8 (lavender): Ch 1. Sc in each dc around and work (sc, ch 1, sc) in each corner ch-2 sp. Join. Fasten off, leaving a short tail. (23 sc per side including both corner sc, 92 sc total + 4 corner ch-1 sps)
Weave in all color-change tails on the WS.
Base Square (make 3)
Work entirely in lavender.
Round 1: Magic ring, ch 5 (counts as dc + ch 2), (dc, ch 2) 3 times in ring, join to 3rd ch of ch-5. (4 dc, 1 per side)
Round 2: Sl st into corner sp. Ch 3, (dc, ch 2, 2 dc) in same sp, *dc in next dc, (2 dc, ch 2, 2 dc) in next corner sp; rep from * 2 more times, dc in last dc, join. (5 dc per side, 20 total)
Round 3: Work as Round 7 of the pansy square, dc in each st along sides. (9 dc per side, 36 total)
Round 4: Repeat Round 3. (13 dc per side, 52 total)
Round 5: Repeat Round 3. (17 dc per side, 68 total)
Round 6: Repeat Round 3. (21 dc per side, 84 total)
Round 7: Work as Round 8 of the pansy square. (23 sc per side, 92 sc total + 4 corner ch-1 sps)
Checkpoint: 5 in (12.7 cm) square. The base must match the pansy squares stitch for stitch, so the 23-per-side count is more important than a tiny size difference, which blocking will even out.
Make All Pieces
| Piece | Quantity | Colors |
|---|---|---|
| Pansy square | 12 | Yellow, purple, cream, lavender |
| Base square | 3 | Lavender |
| Connector strap | 4 | Lavender |
| Hanger strap | 1 | Lavender |
Each pocket uses 4 pansy squares and 1 base. Layout of one pocket, unfolded flat (P = pansy square, B = base):
      [P]
  [P] [B] [P]
      [P]
Stack order of the finished holder:
     (ring)
      /  \
  [Pocket 1]
   |      |
  [Pocket 2]
   |      |
  [Pocket 3]
Connector strap (make 4): Ch 5. Row 1: sc in 2nd ch from hook and in each ch across, turn. (4 sc) Rows 2–12: ch 1, sc in each st, turn. (4 sc) Fasten off, leaving a 10 in (25.4 cm) tail. The strap is about 0.9 in (2.3 cm) wide and 2.4 in (6.1 cm) long.
Hanger strap (make 1): Work as the connector strap, but continue to Row 64. (4 sc) Strap is about 12.8 in (32.5 cm) long.
Joining
Use lavender and an sc join worked on the RS. Holding two squares WS together and working through both layers creates the raised ridge you see on each pocket corner.
Walls: Hold two pansy squares WS together with flowers upright. Sl st through both corner ch-1 sps, then work 1 sc through each matching pair of stitches across the side: 23 sc. Sl st through the next pair of corner ch-1 sps. Fasten off. Add the third and fourth squares the same way, then close the ring with a fourth vertical seam. (4 seams x 23 sc)
Base: Turn the wall tube upside down. Hold the base square against the bottom edge, WS together. Starting at a corner, sl st through the three meeting corner ch-1 sps, then sc through each pair of stitches: 23 sc along each side. At each following corner, sl st through the meeting ch-1 sps without counting it. (92 sc)
The math is stitch to stitch: each wall bottom has 23 sts and each base side has 23 sts, so nothing is skipped or added.
Tension: Keep the seam sc the same size as your fabric sc. Tight seams pull the corners in and make the pocket narrower at the bottom than at the top.
Size checkpoint: Each assembled pocket should measure 5 in (12.7 cm) on every side and 20 in (50.8 cm) around the open top.
Border (Pocket Rim)
Border gauge matches main gauge: 4.6 sc per inch.
Work the rim on each pocket’s open top with lavender, RS facing.
Rim Round 1: Join in any stitch right after a seam. Ch 1, sc in each st around: 23 sc along each wall, 4 walls. Corner ch-1 sps are already closed inside the seams, so skip them and add nothing at the seams. Join. (92 sc, 23 per side)
Rim Round 2: Ch 2 (does not count), hdc in each st around, join. (92 hdc, 23 per side)
Rim Round 3: Sl st loosely in BLO of each st around, join. Fasten off. (92 sl st, 23 per side)
Why the math works: Each side of the opening is one square with 23 sts, and 1 x 23 = 23 sts per side. At 4.6 sc per inch, 23 sts = 5 in (12.7 cm), so 92 sts = 20 in (50.8 cm) around, which equals 4 sides of 5 in (12.7 cm). The rim lies flat with no ruffling or cinching. The three rounds add 0.5 in (1.3 cm) of height.
Assembling the Hanger
- Lay the three pockets in a column, each with a seam ridge at the front corners and a flower facing forward.
- Sew one connector strap to the center of the left side square of Pocket 1, overlapping the bottom edge by 0.5 in (1.3 cm) on the inside. Sew its other end to the outside of the left wall of Pocket 2, 0.5 in (1.3 cm) below the rim. Repeat on the right side.
- Join Pocket 2 to Pocket 3 the same way. The visible gap between pockets is about 1.4 in (3.6 cm).
- Pass the center of the hanger strap through the wooden ring. Stitch the two halves together for 1 in (2.5 cm) just below the ring.
- Sew each free end to the inside of Pocket 1’s rim, centered on the left and right side squares, with a 0.5 in (1.3 cm) overlap.
The V of the hanger rises about 5 in (12.7 cm) above the top rim, ring included.
Final Blocking
- Wet-block or steam each pocket after rims are done but before attaching straps.
- Stuff a pocket firmly with a toilet roll wrapped in a towel to give it a cube shape.
- Pin the walls straight and check each side at 5 in (12.7 cm).
- For cotton, spritz until damp; for acrylic, steam lightly without touching the yarn.
- Ease the cream petals forward with your fingers so they sit slightly raised.
- Let dry completely, about 24 hours, before assembling the hanger.
Final Quality-Control Checklist
- Every pansy square ends with 23 sc per side and 92 sc total.
- Every base ends with 23 sc per side and 92 sc total.
- All flowers face the same way up.
- Each pocket is 5 in (12.7 cm) square and 5.5 in (14.0 cm) tall.
- Each rim has 92 sts per round and lies flat.
- Seam ridges are even and all on the outside.
- Connector straps are level, so the pockets hang straight.
- Total length is about 24.3 in (61.7 cm).
- All ends are woven in securely.
Troubleshooting
Purple petals cupping: Round 1 is too tight. Work the 8 sc more loosely or go up a hook size for that round only.
Cream ch-5 loops showing through gaps: Keep the loops behind the purple petals and slightly snug, not slack.
Square won’t lie flat after Round 5: Check that corner groups land in corner dips and 3-dc groups in side dips.
Base smaller than walls: Base rounds are often tighter. Use a looser tension or a 5.5 mm hook for the base only.
Rim ruffles: You added stitches at the seams. Recount to 92.
Holder hangs crooked: Re-sew one connector strap so both overlaps are exactly 0.5 in (1.3 cm).
Care
Hand wash in cool water and lay flat to dry, reshaping each pocket around a roll. Remove the wooden ring before washing.
Final Notes
The measurement chain is short and predictable. Gauge of 4.6 sc per inch gives 23 sc = 5 in (12.7 cm) per square. Four squares plus a matching base make a 5 in (12.7 cm) cube with a 92-stitch, 20 in (50.8 cm) opening. The rim brings each pocket to 5.5 in (14.0 cm). Three pockets, two 1.4 in (3.6 cm) gaps and a 5 in (12.7 cm) hanger give about 24.3 in (61.7 cm) in total.
Check your first square carefully, and the rest of the holder follows from it.
Happy crocheting!