

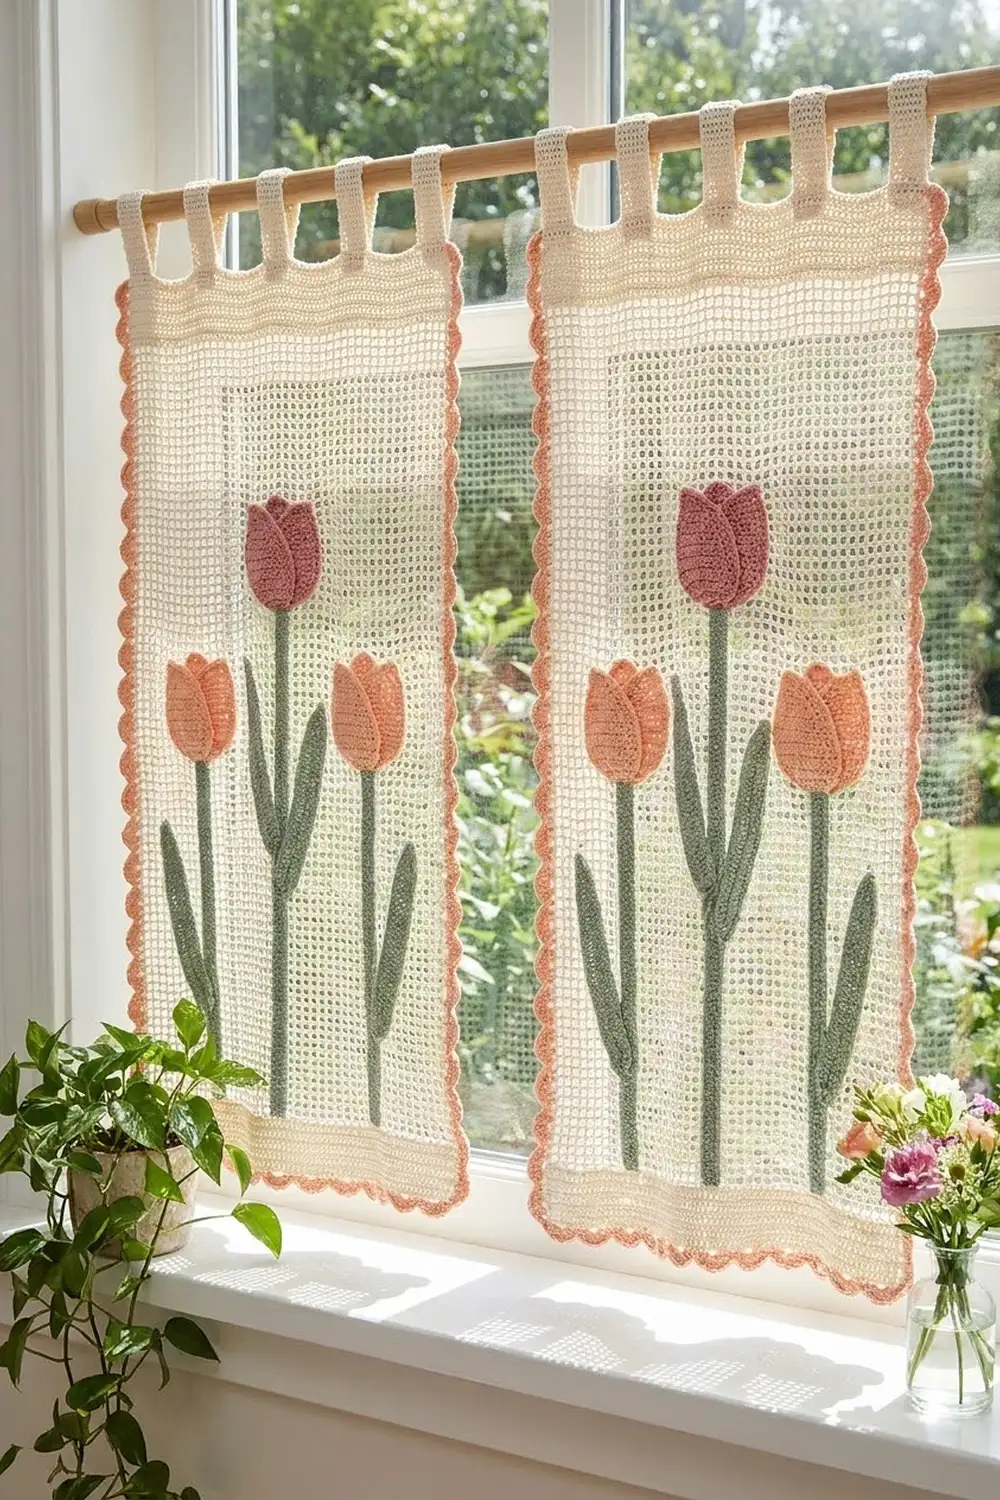
These soft café curtains are made from airy cream filet mesh, with a row of spring tulips sewn onto each panel. Light still comes through the mesh, and the tulips add color and texture at eye level.
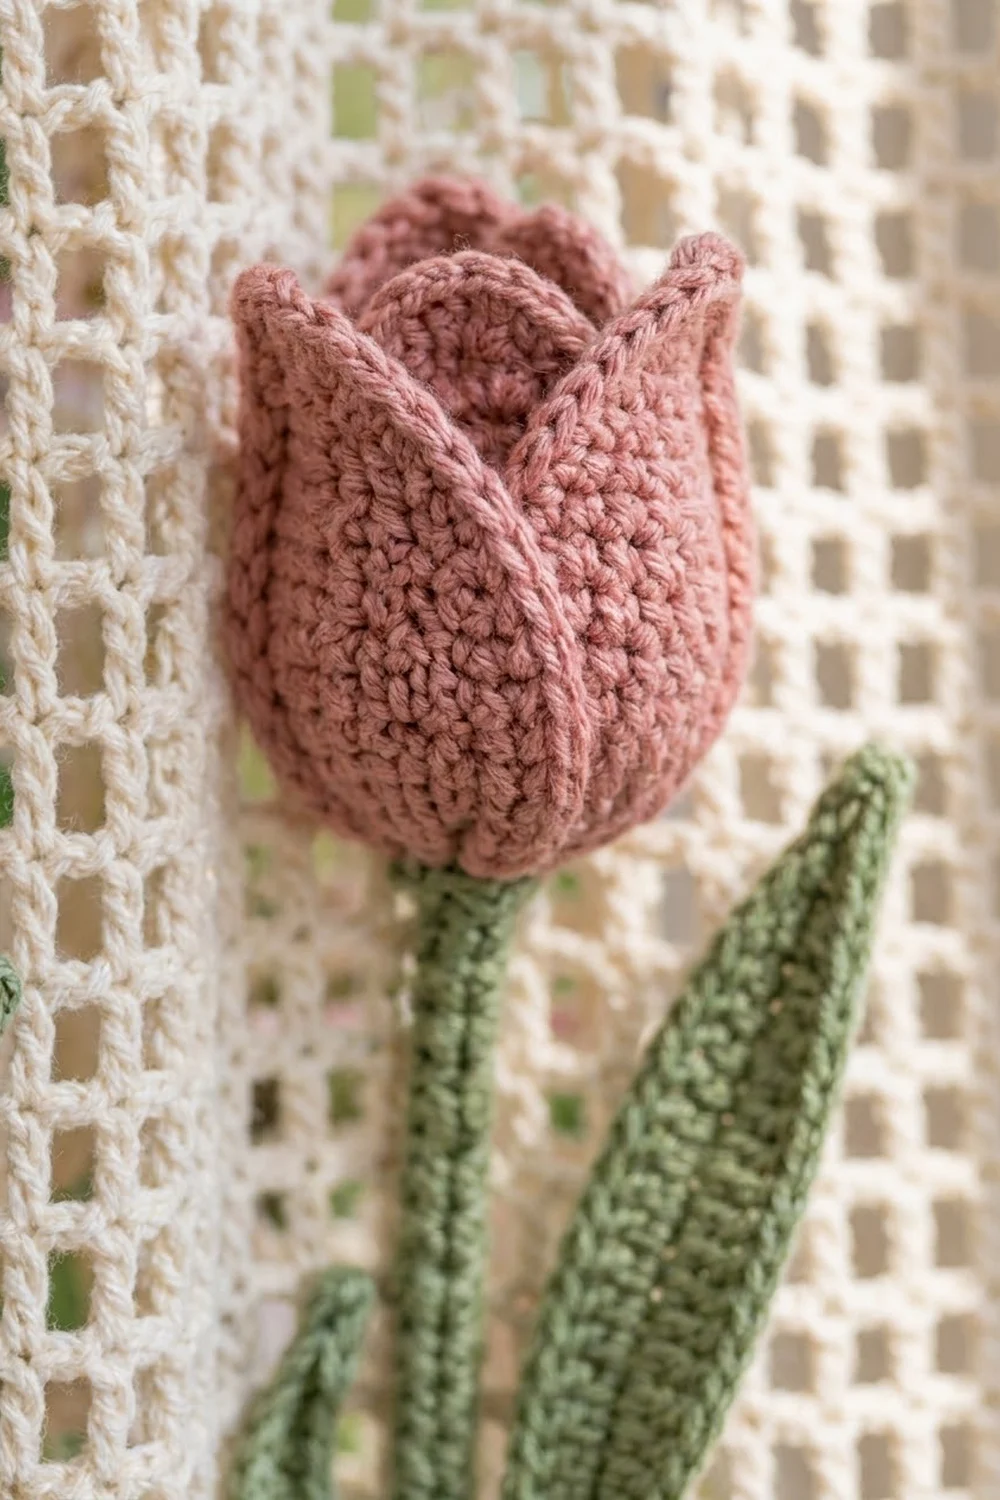
Each panel has four tulips, alternating peach and dusty rose, on long sage-green stems with two slender leaves each. Every tulip head is layered: a three-pointed back cup sits behind two outlined front petals that overlap and curve forward. A peach scalloped edge runs along the bottom, and tab loops at the top slide onto a curtain rod.
The pattern uses US crochet terms. Each finished panel measures 20.5 in (52.1 cm) wide by 32 in (81.3 cm) long, or 33.5 in (85.1 cm) from the top of the tab loops to the scallop tips.
You crochet each panel in rows from the bottom up, add the tabs, and work the border. Then you make the tulips, stems, and leaves and sew them onto the mesh. The instructions are for one panel. Make two for the pair.
Finished Size and Construction
- Finished panel size: 20.5 in x 32 in (52.1 cm x 81.3 cm), plus 1.5 in (3.8 cm) tab loops
- Skill level: Intermediate
- Terminology: US crochet terms
- Yarn weight: DK (#3) cotton
- Hook: 4.0 mm (US G-6)
- Number of pieces: 2 separate panels (not joined), each with 4 tulip heads, 4 stems, and 8 leaves sewn on
- Layout: 4 tulips per panel, centered 5 in (12.7 cm) apart
- Panel body: 40 mesh squares wide x 62 rows tall
- Size before border: 20 in x 31 in (50.8 cm x 78.7 cm)
- Border depth: 0.25 in (0.6 cm) on the sides, 1 in (2.5 cm) at the bottom
Materials
Use a smooth, mercerized or combed DK cotton. It shows the mesh clearly, blocks flat, and won’t sag in a sunny window. Avoid fuzzy or stretchy yarns.
Quantities for the pair of panels:
- Cream (A): 400 g / 920 m
- Peach (B): 80 g / 184 m
- Dusty rose (C): 40 g / 92 m
- Sage green (D): 125 g / 288 m
All quantities include a margin of about 10–15%.
Tools:
- 4.0 mm (US G-6) crochet hook
- Tapestry needle
- Locking stitch markers
- Rustproof pins
- Measuring tape
- Blocking mats
- Curtain rod up to 0.75 in (1.9 cm) in diameter
Abbreviations (US Terms)
- ch – chain
- sl st – slip stitch
- sc – single crochet
- hdc – half double crochet
- dc – double crochet
- sc2tog – single crochet 2 together
- sk – skip
- sp – space
- st(s) – stitch(es)
- RS / WS – right side / wrong side
Special stitch – Scallop: Sk 2 sts, 5 dc in next st, sk 2 sts, sc in next st.
Gauge and Checkpoints
Mesh gauge: 8 squares x 8 rows = 4 in (10.2 cm). Each square is 0.5 in (1.3 cm) wide and tall.
Solid gauge: 24 dc = 4 in (10.2 cm).
Appliqué gauge: 5 sc = 1 in (2.5 cm) in a flat stem strip.
Test with one tulip head first. The back cup should be about 2.5 in (6.4 cm) wide and 3 in (7.6 cm) tall.
Checkpoints:
- After Row 1: 20 in (50.8 cm) wide
- After Row 20: 10 in (25.4 cm) tall
- After Row 62: 31 in (78.7 cm) tall
- Each tab: 3 in (7.6 cm) long before folding
If your piece is too big, go down 0.5 mm in hook size. If it is too small, go up 0.5 mm. If Row 1 is off by more than 0.5 in (1.3 cm), change hooks and start again.
Panel (make 2)
With A, ch 123.
Row 1 (RS): Dc in 4th ch from hook (the skipped ch count as the first dc), dc in each ch across. (121 dc)
Row 2: Ch 5 (counts as dc + ch 2), turn. Sk next 2 dc, dc in next dc. Ch 2, sk 2 dc, dc in next dc. Repeat from * across, working the last dc into the top of the turning ch. (41 dc, 40 ch-2 sps)
Rows 3–60: Ch 5 (counts as dc + ch 2), turn. Dc in next dc. Ch 2, dc in next dc. Repeat from * across, working the last dc into the 3rd ch of the turning ch-5. (41 dc, 40 ch-2 sps)
Keep the dc posts vertical so the squares stay square.
Row 61 (conversion row): Ch 3 (counts as dc), turn. 2 dc in next ch-2 sp, dc in next dc. Repeat from * 40 times. (1 + 40 x 3 = 121 dc)
Row 62: Ch 3 (counts as dc), turn. Dc in each st across. (121 dc)
Fasten off. The panel now measures 20 in x 31 in (50.8 cm x 78.7 cm).
Tabs
There are 7 tabs, each 7 sts wide, with 12 unworked sts between them: 7 x 7 + 6 x 12 = 121. The tabs start on sts 1, 20, 39, 58, 77, 96, and 115 of Row 62.
Tab Row 1: With RS facing, join A in the first st of the tab. Ch 3 (counts as dc), dc in next 6 sts. (7 dc)
Tab Rows 2–6: Ch 3, turn, dc in next 6 sts. (7 dc)
Fasten off, leaving a 10 in (25.4 cm) tail. Repeat for all 7 tabs. Each tab is 3 in (7.6 cm) long. Fold each one to the WS and whipstitch its last row along Row 61, so it forms a 1.5 in (3.8 cm) loop.
Border
The border goes along both sides and the bottom. The top edge stays plain so the tabs sit cleanly on the rod.
Border gauge: 2 sc per dc row end on the sides, and 1 sc per foundation ch on the bottom.
Border Row 1 (A, RS facing): Join A at the top right corner.
- Right side: Working down the side, work 2 sc in each row end. (124 sc)
- First corner: 3 sc in the free loop of foundation st 121.
- Bottom: Sc in each free loop of foundation sts 120 to 2. (119 sc)
- Second corner: 3 sc in foundation st 1.
- Left side: Working up the side, work 2 sc in each row end. (124 sc)
Fasten off. Total: 124 + 3 + 119 + 3 + 124 = 373 sc.
Border Row 2 (B, RS facing): Join B in the 3rd sc of the first corner group. Sc in the same st, sc in each of the next 119 sc, and sc in the 1st sc of the next corner group. (121 sc)
Border Row 3 (B): Ch 1, turn. Sc in the first st. Scallop. Repeat from * 20 times. (20 scallops: 21 sc + 100 dc = 121 sts) Fasten off.
Why the math works: Each scallop uses 6 sts, and the edge needs 1 more st for the final sc, so Row 3 needs a multiple of 6, plus 1. Row 2 has 121 sts, which is 6 x 20 + 1, so the edging ends with a matching sc at each corner. On the sides, 124 sc over 62 rows keeps the 31 in (78.7 cm) edges flat without ruffling.
Tulip Heads (make 2 peach and 2 rose per panel)
Back Cup
Row 1: Ch 5, sc in 2nd ch from hook and in next 3 ch. (4 sc)
Row 2: Ch 1, turn. 2 sc in first st, sc across to last st, 2 sc in last st. (6 sc)
Row 3: Repeat Row 2. (8 sc)
Row 4: Repeat Row 2. (10 sc)
Row 5: Repeat Row 2. (12 sc)
Rows 6–11: Ch 1, turn. Sc in each st across. (12 sc)
First point:
- Row 12: Ch 1, turn. Sc in first 4 sts only. (4 sc)
- Row 13: Ch 1, turn. Sc2tog twice. (2 sc)
- Row 14: Ch 1, turn. Sc2tog. (1 sc) Fasten off.
Second and third points: Join yarn in the 5th st of Row 11 and work Rows 12–14 over sts 5–8. Then work them again over sts 9–12. The cup is 2.5 in (6.4 cm) wide and 3 in (7.6 cm) tall.
Front Petals (make 2 per tulip)
Rnd 1: Ch 11. Sc in 2nd ch from hook, hdc in next ch, dc in next 5 ch, hdc in next ch, sc in next ch, 3 sc in last ch. Working in the free loops on the other side of the chain: sc in next ch, hdc in next ch, dc in next 5 ch, hdc in next ch, 2 sc in last ch. Join with a sl st to the first sc. (22 sts)
Rnd 2 (trim round): Ch 1. Sc in each st around, and work (sc, ch 2, sc) in the center sc of the 3-sc end. Join. (22 sc + 1 extra sc = 23 sc, plus 1 ch-2 tip)
Fasten off, leaving a long tail. This round gives the petal its outlined edge. Each petal is 2.5 in (6.4 cm) long and 1.5 in (3.8 cm) wide.
Assemble the Head
Lay both petals over the lower part of the cup with their tips pointing up and out, overlapping 0.5 in (1.3 cm) in the center. The center point of the cup should peek out between them. Sew only the lower halves of the petals, so the upper edges cup forward.
Stems and Leaves
Tall stem (2 per panel, for the rose tulips): With D, ch 101. Sc in 2nd ch from hook and in each ch across. (100 sc) Do not turn. Rotate and sl st in each free loop of the foundation. (100 sl st) Fasten off. The stem is 20 in (50.8 cm) long and 0.4 in (1.0 cm) wide.
Short stem (2 per panel, for the peach tulips): Work as for the tall stem, starting with ch 86. (85 sc, 85 sl st) The stem is 17 in (43.2 cm) long.
Long leaf (4 per panel): With D, ch 51. Sl st in 2nd ch from hook, sc in next 4 ch, hdc in next 10 ch, dc in next 24 ch, hdc in next 6 ch, sc in next 4 ch, 3 sc in last ch. Working on the other side of the chain, repeat the same sequence in reverse (sc 4, hdc 6, dc 24, hdc 10, sc 4), then sl st in the last ch. (52 + 49 = 101 sts) The leaf is 10 in (25.4 cm) long.
Short leaf (4 per panel): With D, ch 36. Sl st in 2nd ch from hook, sc in next 3 ch, hdc in next 8 ch, dc in next 16 ch, hdc in next 4 ch, sc in next 2 ch, 3 sc in last ch. Working on the other side of the chain, repeat in reverse (sc 2, hdc 4, dc 16, hdc 8, sc 3), then sl st in the last ch. (37 + 34 = 71 sts) The leaf is 7 in (17.8 cm) long.
The foundation chain forms each leaf’s center ridge. The rounded 3-sc end is the base, and the sl st end is the pointed tip.
Make All Pieces
For the pair:
- Panels (A): 2
- Tulip heads: 4 in B (peach) and 4 in C (rose)
- Stems (D): 4 tall and 4 short
- Leaves (D): 8 long and 8 short
Layout for each panel, RS facing. Columns are dc posts counted from the left edge (post 0 to post 40).
Column:      post 5    post 15   post 25   post 35
From left:   2.5 in    7.5 in    12.5 in   17.5 in
             (6.4 cm)  (19.1 cm) (31.8 cm) (44.5 cm)
Tulip:       Peach     Rose      Peach     Rose
Stem:        Short     Tall      Short     Tall
Stem top:    18 in     21 in     18 in     21 in
             (45.7 cm) (53.3 cm) (45.7 cm) (53.3 cm)
Leaves:      1 long + 1 short per stem
Attaching the Appliqués
Center each stem over its dc column, with the bottom end at the top of Row 2, 1 in (2.5 cm) above the bottom of the panel body. Whipstitch it with D to every dc post and ch-2 bar it crosses. Keep the stitches snug but not tight.
Tuck the base of each leaf against the bottom of its stem, with the long leaf on one side and the short leaf on the other. Angle the tips about 1.5 in (3.8 cm) out from the stem, then sew around the edges.
Place each tulip head so it covers the top 0.5 in (1.3 cm) of its stem. Sew around the back cup only. The tops of the rose tulips should sit 23.5 in (59.7 cm) above the bottom of the panel body.
Final Blocking
- Weave in all ends along the dc posts.
- Soak the panel in cool water for 15 minutes.
- Roll it in a towel to press out the water. Don’t wring it.
- Pin it RS up to 20.5 in x 32 in (52.1 cm x 81.3 cm).
- Straighten the mesh columns with a long ruler, and pin each scallop open.
- Shape the petals so they cup forward.
- Let it dry completely before unpinning.
Final Quality-Control Checklist
- 40 squares across and 62 rows
- 121 dc in Rows 61 and 62
- 7 evenly spaced tabs, each forming a 1.5 in (3.8 cm) loop
- Exactly 20 scallops
- Stems centered on posts 5, 15, 25, and 35
- Both panels within 0.25 in (0.6 cm) of each other
Troubleshooting
- Squares look like tall rectangles: Pull up less on each dc.
- The panel narrows as it grows: You’re probably missing the last dc. Count 41 posts every few rows.
- The scallops ruffle: Work Border Rows 2–3 with a hook one size smaller.
- The mesh puckers behind the stems: Loosen the whipstitches, and sew with the panel lying flat.
Care
Hand wash in cool water, reshape, and dry flat. Don’t put the curtains in the dryer.
Final Notes
The measurement chain works like this. At 8 squares = 4 in (10.2 cm), 40 squares give a width of 20 in (50.8 cm), and 62 rows give a height of 31 in (78.7 cm). The border brings each panel to 20.5 in x 32 in (52.1 cm x 81.3 cm), and the tabs add 1.5 in (3.8 cm) loops at the top. Check each stage and both panels will hang evenly.
Happy crocheting!