
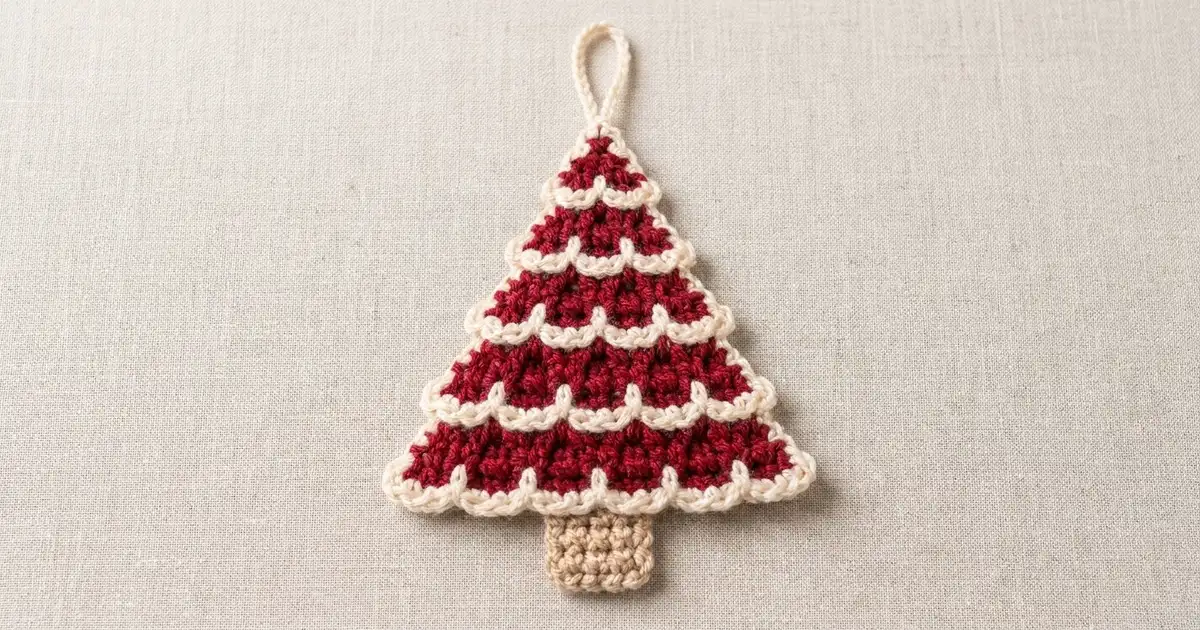
This tree ornament is a flat triangle in deep cranberry red. Five rows of creamy white scallops cross it like garland swags draped over the branches. A plain cream outline frames the shape, a short tan trunk sits below it, and a cream chain loop at the tip lets you hang it on a branch, a gift, or a mantel garland.
The colors are classic and cozy: cranberry red for the tree, ivory cream for the garland and outline, and warm light tan for the trunk. Dense single crochet keeps the red sections firm, and 3-stitch half double crochet shells make the scallops stand out. It’s a quick make that works well for gift toppers, advent decorations, or a handmade tree.
This pattern uses US crochet terms. The finished ornament is about 4.6 in (11.7 cm) wide and 5.5 in (14.0 cm) tall from the tip to the bottom of the trunk. The 1.5 in (3.8 cm) hanging loop is extra.
The construction is simple. You work the tree flat in rows from the tip down to the base, adding 2 stitches on every other row. Every fourth row is a cream shell row. Next, one cream round outlines the sides and forms a scalloped bottom edge. The trunk is a small tan square sewn behind the bottom edge, and the loop is a chain worked at the tip.
Finished Size and Construction
- Finished size: 4.6 in (11.7 cm) wide x 5.5 in (14.0 cm) tall, plus a 1.5 in (3.8 cm) loop
- Skill level: Easy+ (color changes and simple shells)
- Terminology: US crochet terms
- Yarn weight: Sport (#2), cotton or cotton blend
- Hook: 3.25 mm (US D/3)
- Number of pieces: 1 ornament (tree body plus a small sewn-on trunk)
- Layout: single flat triangle, worked from tip to base in 23 rows
- Tree body size before border: 4.2 in (10.7 cm) wide at the base x 4.25 in (10.8 cm) tall
- Border depth: about 0.2 in (0.5 cm) on the sides and tip, and about 0.25 in (0.6 cm) along the scalloped bottom
- Trunk: 1 in (2.5 cm) square, with 0.8 in (2.0 cm) showing below the tree
Materials
Choose a smooth sport weight cotton or cotton blend. Cotton gives the shells crisp edges and helps the triangle lie flat. Fuzzy or very splitty yarn will blur the scallops. Pick a cream that clearly contrasts with your red, so each garland line reads from across the room.
- Color A, cranberry red: 10 g, about 30 m
- Color B, ivory cream: 5 g, about 15 m
- Color C, light tan: 2 g, about 6 m
These amounts include a margin for checking gauge and weaving in ends, so one ornament uses a little less.
Tools:
- 3.25 mm (US D/3) crochet hook
- Tapestry needle
- Scissors
- 2 stitch markers
- Ruler or tape measure
- Blocking mat, rust-proof pins, and a spray bottle
Abbreviations (US Terms)
- ch: chain
- sc: single crochet
- hdc: half double crochet
- sl st: slip stitch
- st(s): stitch(es)
- RS / WS: right side / wrong side
- rep: repeat
Special stitch – Shell: Work 3 hdc in the same stitch.
Shell Row pattern (worked over a multiple of 4 sts + 1): Sc in first st, *skip 1 st, shell in next st, skip 1 st, sc in next st; rep from * to end. Each repeat uses 4 sts and makes 4 sts (3 hdc + 1 sc), so the stitch count stays the same.
Gauge and Checkpoints
Gauge: 24 sc and 24 rows = 4 in (10.2 cm) in sc worked flat. One shell row is about 1.5 times as tall as a sc row, or about 0.25 in (0.6 cm).
The ornament is a single piece, so it can serve as your test piece. Work through Row 11, measure, and only carry on if you match the checkpoint.
- After Row 3: 5 sts, about 0.8 in (2.0 cm) wide and 0.5 in (1.3 cm) tall
- After Row 11: 13 sts, about 2.2 in (5.6 cm) wide and 2.0 in (5.1 cm) tall
- After Row 23: 25 sts, about 4.2 in (10.7 cm) wide and 4.25 in (10.8 cm) tall
- After the border: about 4.6 in (11.7 cm) wide and 4.7 in (11.9 cm) tall
If your piece is too big, switch to a 3.0 mm hook. If it’s too small, switch to a 3.5 mm hook. Use the same hook for the shell rows as for the red rows. Changing hooks only for those rows makes the scallops flare or pucker.
Tree Body
Use Color A unless told otherwise. Turn at the end of every row. The ch 1 at the start of a row does not count as a stitch. Row 1 is the RS.
Color changes: Before each cream Shell Row, change to Color B in the last yarn-over of the row before it. Cut Color A, leaving a 4 in (10.2 cm) tail. At the end of the Shell Row, change to a new strand of Color A in the last yarn-over, then cut Color B with a 4 in (10.2 cm) tail. Each stripe is only 1 row tall, so the old red strand ends up at the wrong edge. That’s why you start a new one. Leave all tails at the side edges, where the border will cover them.
Row 1 (RS): Ch 2, 3 sc in 2nd ch from hook. (3 sts)
Row 2: Ch 1, sc in each st across. (3 sts)
Row 3: Ch 1, 2 sc in first st, sc in next st, 2 sc in last st. Change to Color B in the last st. (5 sts)
Row 4 (Color B, Shell Row): Ch 1, sc in first st, skip 1, shell in next st, skip 1, sc in last st. Change to Color A in the last st. (5 sts: 2 sc + 3 hdc; 1 shell)
Row 5: Ch 1, 2 sc in first st, sc in each st across to the last st (working into each hdc), 2 sc in last st. (7 sts)
Row 6: Ch 1, sc in each st across. (7 sts)
Row 7: Rep Row 5. Change to Color B in the last st. (9 sts)
Row 8 (Color B, Shell Row): Ch 1, work the Shell Row pattern across. Change to Color A in the last st. (9 sts; 2 shells)
Row 9: Rep Row 5. (11 sts)
Row 10: Rep Row 6. (11 sts)
Row 11: Rep Row 5. Change to Color B in the last st. (13 sts)
Checkpoint: about 2.2 in (5.6 cm) wide and 2.0 in (5.1 cm) tall.
Row 12 (Color B, Shell Row): Ch 1, work the Shell Row pattern. Change to Color A. (13 sts; 3 shells)
Row 13: Rep Row 5. (15 sts)
Row 14: Rep Row 6. (15 sts)
Row 15: Rep Row 5. Change to Color B in the last st. (17 sts)
Row 16 (Color B, Shell Row): Ch 1, work the Shell Row pattern. Change to Color A. (17 sts; 4 shells)
Row 17: Rep Row 5. (19 sts)
Row 18: Rep Row 6. (19 sts)
Row 19: Rep Row 5. Change to Color B in the last st. (21 sts)
Row 20 (Color B, Shell Row): Ch 1, work the Shell Row pattern. Change to Color A. (21 sts; 5 shells)
Row 21: Rep Row 5. (23 sts)
Row 22: Rep Row 6. (23 sts)
Row 23 (RS): Rep Row 5. (25 sts) Fasten off Color A.
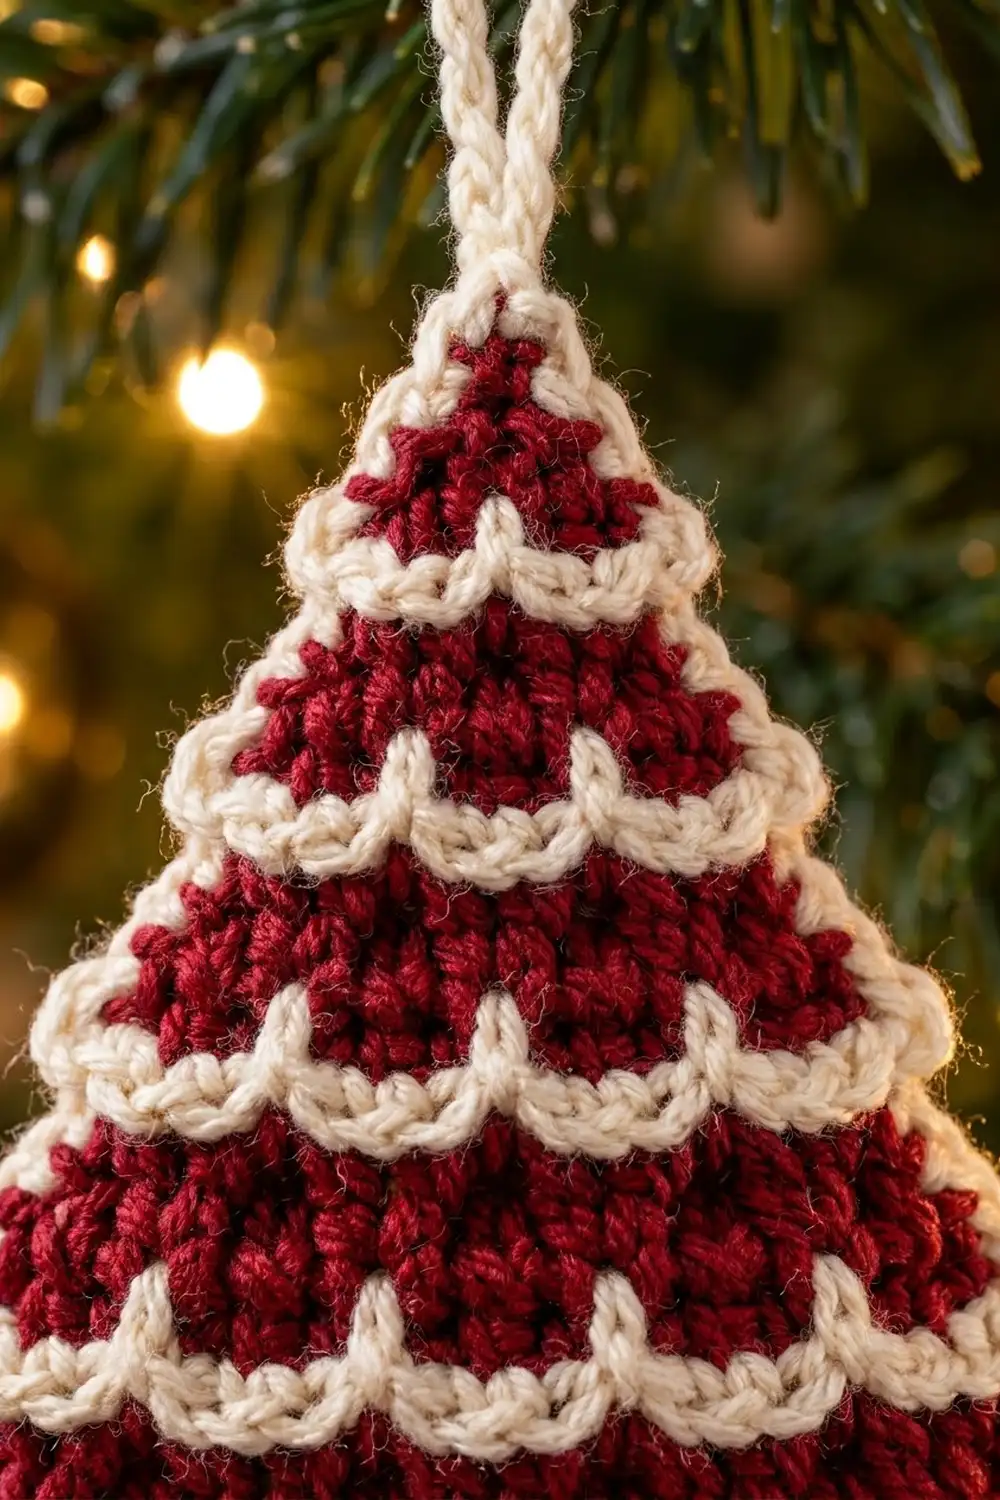
Each shell grows out of the row above it, so its fanned top points down toward the base. That’s what creates the draped, swag-like scallops. The body now has six red tiers of 3 rows each, with five cream scallop lines between them. Every Shell Row lands on an odd count that is a multiple of 4 + 1 (5, 9, 13, 17, 21), so the shells always center themselves.
Checkpoint: about 4.2 in (10.7 cm) wide at Row 23 and 4.25 in (10.8 cm) tall.
Trunk
Use Color C.
Row 1: Ch 7, sc in 2nd ch from hook and in each ch across. (6 sts)
Rows 2–6: Ch 1, turn, sc in each st across. (6 sts)
Fasten off, leaving a 10 in (25.4 cm) tail for sewing. The trunk is 1 in (2.5 cm) square. Set it aside until the border is done.
Border
Border gauge: Along the bottom, the border follows the Row 23 sts one for one. Along the slanted sides, work 1 sc into the end of each sc row and 2 sc into the end of each Shell Row. The taller hdc row end needs the extra stitch to stay flat.
Round 1 (Color B, RS facing): Join Color B in the first st of Row 23 (bottom corner).
- Bottom edge: 3 sc in the first st (corner), sc in the next st. Work the Shell Row pattern over the next 21 sts: sc in next st, *skip 1, shell in next st, skip 1, sc in next st; rep from * 4 more times. Sc in the next st, then 3 sc in the last st (corner).
- First side: Work along the row ends from Row 22 to Row 2, with 1 sc in each sc row end and 2 sc in each Shell Row end. Sc in the end of Row 1. (27 sc)
- Tip: 3 sc in the base of the foundation ch at the tip. Place a marker in the center sc of these 3.
- Second side: Sc in the end of Row 1, then work along the row ends from Row 2 to Row 22 as for the first side. (27 sc)
- Sl st to the first sc to join. Fasten off.
Counts:
- Bottom: (25 sts worked 1 per st) + (4 extra sts from the two 3-sc corners) = 29 sts, including 5 shells
- Each side: (16 sc row ends x 1) + (5 Shell Row ends x 2) + (1 for Row 1) = 27 sc
- Tip: 3 sc
- Round total: 29 + 27 + 3 + 27 = 86 sts
Why the math works: The bottom shell section covers 21 sts, which is a multiple of 4 + 1 (4 x 5 + 1). Its 5 shells sit evenly between the corners, just like the shell rows inside the tree, so the bottom edge becomes the sixth scallop line. Rows 2–22 give 21 row ends: 16 sc rows and 5 Shell Rows. Matching the border stitches to each row’s height keeps the slanted sides from rippling or pulling in. Each corner gets 3 sc so it can turn sharply without cupping.
Hanging loop: Join Color B in the marked tip sc. Ch 20, sl st in the same st, and fasten off. This makes a loop about 1.5 in (3.8 cm) tall.
Attach trunk: Center the trunk behind the bottom edge, with its top row behind the middle shell. Let the top row overlap the back of the border by about 0.2 in (0.5 cm). Using the Color C tail, whipstitch along that row through the back loops only, so no stitches show on the RS. This leaves 0.8 in (2.0 cm) of trunk showing below the tree.
Weave in all ends. Run each tail through the backs of stitches in its own color, and hide the red and cream tails inside the border stitches.
Final Blocking
- Mist the ornament with the spray bottle until it is just damp.
- Lay it RS up on the blocking mat.
- Pin the tip and the two bottom corners first. Aim for a base width of 4.6 in (11.7 cm) and a height of 4.7 in (11.9 cm) from the tip to the bottom scallops.
- Gently straighten each side between the pins until the cream outline runs in a straight line.
- Use your fingertip to shape each shell into a neat fan. Don’t pin through the shells.
- Pin the trunk straight and square, and lay the loop flat.
- Let it dry completely, about 6 hours, before you unpin it.
Final Quality-Control Checklist
- The base measures 4.6 in (11.7 cm), and the full height including the trunk is 5.5 in (14.0 cm).
- There are five cream scallop lines inside the tree, with 1, 2, 3, 4, and 5 shells from top to bottom.
- The bottom border has 5 shells, and both bottom corners are sharp.
- Each side has 27 sc and lies straight with no waves.
- Every red tier is 3 rows tall.
- The trunk is centered, and its stitching doesn’t show from the front.
- The loop is firmly attached at the exact center of the tip.
- No tails show on either side.
Troubleshooting
The triangle leans to one side. You probably missed an increase on one edge. Count each odd row. It should have 2 more sts than the row before it.
The shells don’t fit evenly. Check that the row before has the right count, a multiple of 4 + 1. Then check your skips: each repeat skips exactly 1 st before and 1 st after the shell.
The scallops flare or ruffle. Your hdc stitches are looser than your sc stitches. Pull each hdc loop up only to the height of an sc row.
The sides wave. The border has too many stitches. Work 1 sc instead of 2 in the two shortest Shell Row ends near the tip.
The sides pull in or curl. The border has too few stitches. Make sure every Shell Row end has 2 sc.
There are holes at the color changes. Snug the tails before weaving them in, and weave them diagonally across the join.
The ornament curls after blocking. Re-wet it, pin it flat again, and let it dry fully before you hang it.
Care
Hand wash in cool water, roll it in a towel to press out the water, and reshape it flat to dry. Store it flat or hang it by the loop so the shells keep their shape.
Final Notes
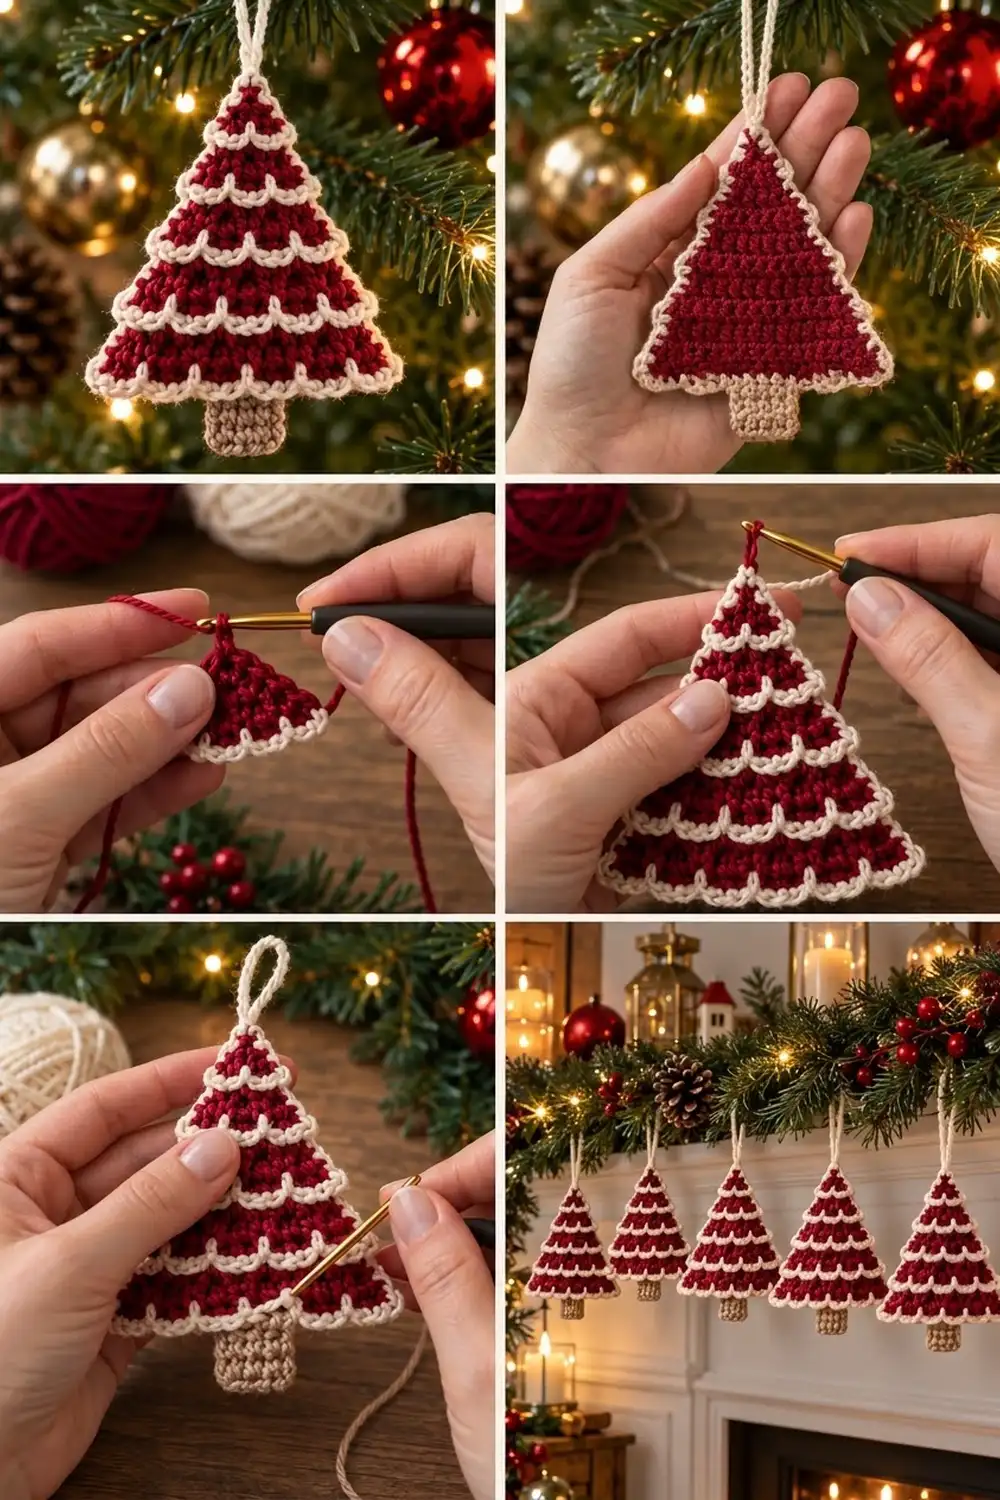
The measurements build on each other. A gauge of 24 sc and 24 rows to 4 in (10.2 cm) gives 25 sts at Row 23 and a tree body of 4.2 in (10.7 cm) x 4.25 in (10.8 cm). The border brings it to 4.6 in (11.7 cm) x 4.7 in (11.9 cm). The 1 in (2.5 cm) trunk adds 0.8 in (2.0 cm) below the tree, for a total height of 5.5 in (14.0 cm), plus the 1.5 in (3.8 cm) loop. If you match the checkpoints after Rows 3, 11, and 23, the finished ornament will match too.
Happy crocheting!