

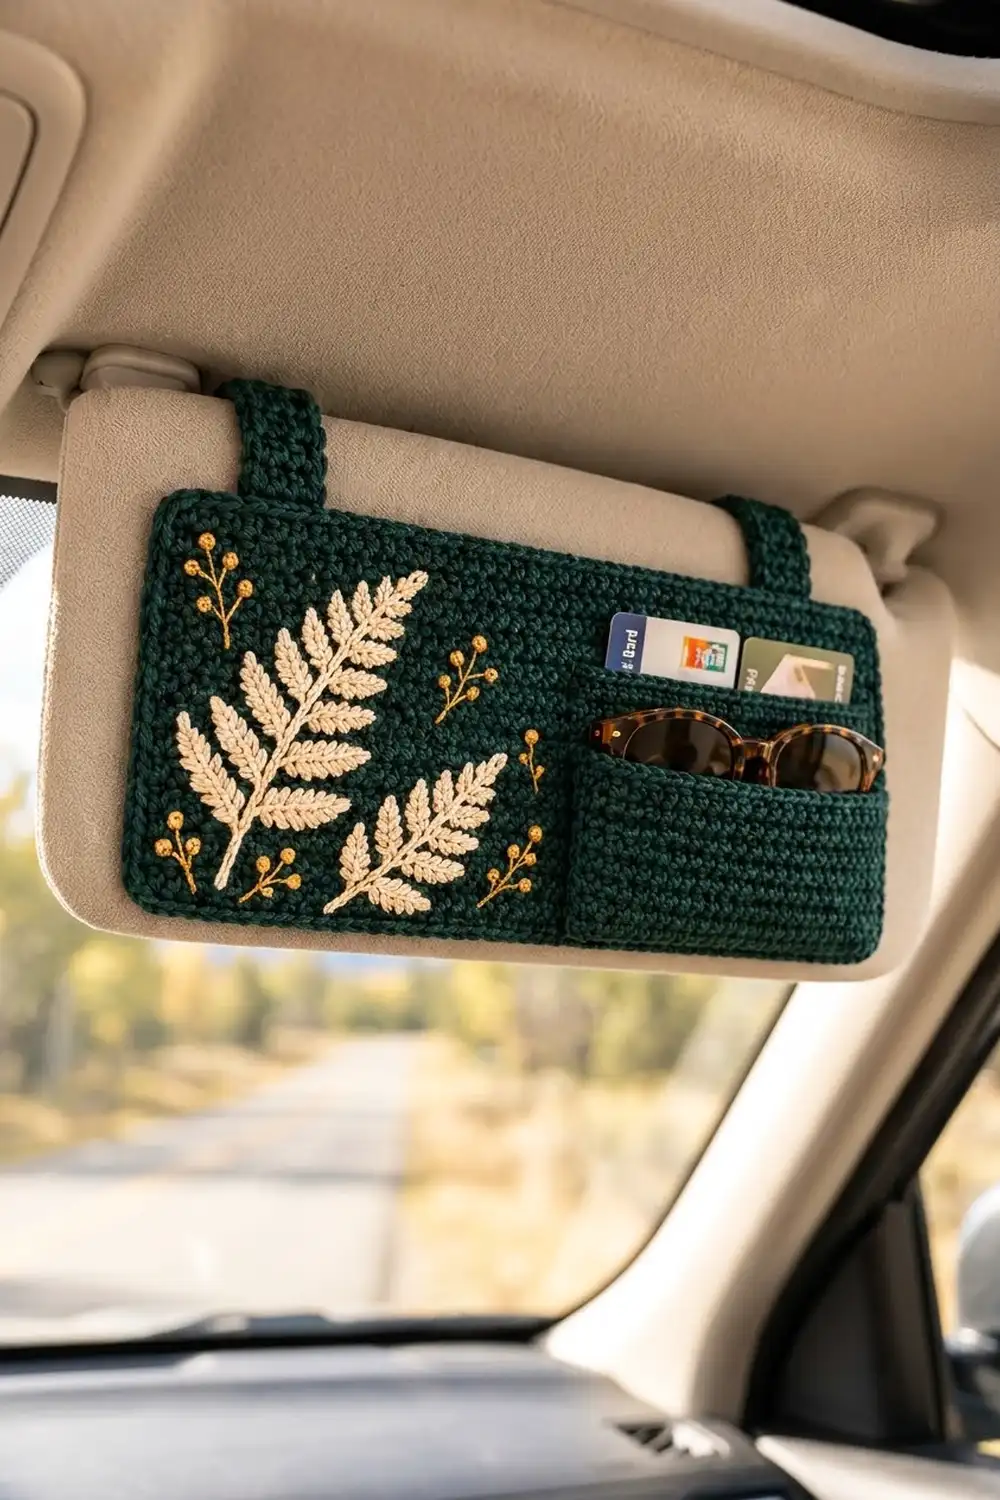
This car visor organizer is a simple, sturdy rectangle of deep forest-green single crochet. It has one open pocket on the right that holds sunglasses and a couple of cards, and two straps at the top that wrap around your sun visor. The left two-thirds of the panel carries a quiet botanical design: two cream fern sprigs and small gold berry sprigs, all added with simple embroidery after the crochet is done.
The palette is forest green, soft cream, and warm mustard gold. It looks calm and a little vintage, and it suits almost any car interior. The fabric is dense, so the organizer holds its shape and doesn’t sag when the pocket is full.
This pattern uses US crochet terms. The finished panel measures 12 in wide x 4.5 in tall (30.5 cm x 11.4 cm), including the border.
Construction is straightforward. You crochet a flat single crochet panel in rows, embroider the ferns and sprigs, and make a separate pocket and two straps. Then you sew the pocket to the front and the straps to the back, and finish the panel with a two-round border.
Finished Size and Construction
- Finished size: 12 in x 4.5 in (30.5 cm x 11.4 cm)
- Skill level: Easy–Intermediate (basic crochet plus simple embroidery)
- Terminology: US crochet terms
- Yarn weight: Worsted (#4) for the crochet and the fern embroidery; sport weight (#2) for the gold sprigs
- Hook: 4.5 mm (US 7)
- Number of pieces: 4 (1 panel, 1 pocket, 2 straps)
- Layout: pocket on the front right, straps on the back top edge
- Panel size before border: 11.5 in x 4 in (29.2 cm x 10.2 cm)
- Pocket size: 4.5 in x about 3 in (11.4 cm x 7.6 cm), edging included
- Strap size: 1.25 in x 10 in (3.2 cm x 25.4 cm)
- Border depth: about 0.25 in (0.6 cm) on each side
Materials
Pick a smooth, firm yarn. Cotton or a cotton blend works best because it holds its shape in a warm car and shows the stitch texture clearly. A soft acrylic works too, but the fabric will be a little stretchier.
- Forest green, worsted weight: 70 g / about 126 m (panel, pocket, straps, border)
- Cream, worsted weight: 10 g / about 18 m (fern stems and leaflets)
- Mustard gold, sport weight: 5 g / about 15 m (sprig stems and French knots)
These quantities include a margin of about 30 percent for your gauge swatch and for small adjustments to the strap length.
Tools:
- 4.5 mm (US 7) crochet hook
- Blunt tapestry needle with a large eye
- Sharp embroidery needle for the sport weight gold
- 6 locking stitch markers
- Water-soluble fabric marker or tailor’s chalk
- Ruler or measuring tape
- Scissors
- Pins and a blocking mat
Abbreviations (US Terms)
- ch – chain
- sc – single crochet
- sl st – slip stitch
- st(s) – stitch(es)
- RS – right side
- WS – wrong side
Embroidery stitches used:
- Chain stitch (embroidery): Bring the needle up, then go back down in the same hole, leaving a small loop. Come up again inside the loop, about 0.25 in (0.6 cm) further along, and pull snug. Repeat to make a raised line that looks like a row of tiny chains.
- Lazy daisy (detached chain): One single chain-stitch loop, anchored at its tip with a tiny straight stitch. Each lazy daisy forms one fern leaflet.
- French knot: Bring the needle up, wrap the yarn twice around the needle, then insert the needle right next to where it came up and pull through gently.
Gauge and Checkpoints
Gauge: 16 sc x 18 rows = 4 in (10.2 cm) in sc worked in rows.
This works out to 4 sts and 4.5 rows per inch. Make a swatch first: ch 17, work 16 sc for 18 rows, and measure it after a light steam. All the panel, pocket, and strap measurements depend on this gauge.
Checkpoints:
- Panel after Row 9: 11.5 in x 2 in (29.2 cm x 5.1 cm).
- Panel after Row 18: 11.5 in x 4 in (29.2 cm x 10.2 cm).
- Pocket before edging: 4 in (10.2 cm) wide x about 2.5 in (6.4 cm) tall.
- Each strap: 1.25 in (3.2 cm) wide x 10 in (25.4 cm) long.
- Finished panel after border: 12 in x 4.5 in (30.5 cm x 11.4 cm).
If your piece is too big, go down one hook size (to 4 mm). If it’s too small, go up one size (to 5 mm). Don’t add or remove stitches, because the pocket placement and border counts are calculated for 46 sts x 18 rows.

Main Panel
Use forest green.
Foundation: Ch 47.
Row 1 (RS): Sc in 2nd ch from hook and in each ch across, turn. (46 sc)
Rows 2–18: Ch 1 (does not count as a st), sc in each st across, turn. (46 sc in each row)
After Row 18, the panel should measure 11.5 in x 4 in (29.2 cm x 10.2 cm). Don’t fasten off. Place the live loop on a locking marker so you can pick it up later for the border.
Mark the RS with a stitch marker. The foundation chain edge is the bottom of the panel.
Embroidery
Work all embroidery before sewing the pocket and straps. That way you can reach the back of the panel easily and weave the ends in neatly.
With the water-soluble marker, lightly draw the guide lines on the RS. Every measurement below is taken from the bottom-left corner of the unbordered panel.
Large fern (cream):
- Draw a gently curved stem 4 in (10.2 cm) long. Start it 1 in (2.5 cm) from the left edge and 0.5 in (1.3 cm) above the bottom, and slant it up and to the right so the tip ends near the top edge.
- Work the stem in embroidery chain stitch along the line, with each chain about 0.25 in (0.6 cm) long.
- Leave the bottom 0.75 in (1.9 cm) of the stem bare.
- Starting there, work 9 pairs of lazy daisy leaflets, one on each side of the stem, angled toward the tip. Space the pairs about 0.33 in (0.8 cm) apart.
- Make the lowest pairs about 0.75 in (1.9 cm) long and shorten each pair a little, so the top pair is about 0.33 in (0.8 cm) long.
- Finish with one single lazy daisy at the very tip, pointing straight along the stem. The large fern has 19 leaflets in total.
Small fern (cream):
- Draw a stem 2.75 in (7.0 cm) long. Start it 4 in (10.2 cm) from the left edge and 0.5 in (1.3 cm) above the bottom, slanting up and to the right, roughly parallel to the large fern.
- Leave the bottom 0.5 in (1.3 cm) bare.
- Work 6 pairs of leaflets, from 0.5 in (1.3 cm) long at the bottom down to 0.25 in (0.6 cm) at the top, plus 1 tip leaflet. The small fern has 13 leaflets in total.
Gold sprigs (mustard gold):
- Embroider 8 small sprigs around the ferns: 2 above the large fern near the top-left corner, 1 between the two fern tips, 2 below the large fern, 1 below the small fern, and 2 to the right of the small fern. Keep everything within 6.5 in (16.5 cm) of the left edge so nothing ends up under the pocket.
- For each sprig, backstitch a short main stem 0.75 in (1.9 cm) long, then add 2 side branches about 0.33 in (0.8 cm) long, angled upward.
- Place 1 French knot at the end of each branch and at the top of the main stem, so each sprig has 3 berries. On larger sprigs you can add 1 or 2 extra knots along the branches.
Keep your tension relaxed. The embroidery should sit on the surface without puckering the sc fabric. Weave in all ends on the WS, going under the sc bumps.
Use forest green.
Foundation: Ch 17.
Row 1: Sc in 2nd ch from hook and in each ch across, turn. (16 sc)
Rows 2–11: Ch 1, sc in each st across, turn. (16 sc in each row)
At this point the pocket is 4 in (10.2 cm) wide x about 2.5 in (6.4 cm) tall. Don’t turn after Row 11.
Edging round: Ch 1. Work down the side with 1 sc in each row end, along the bottom with 1 sc in each foundation ch, up the other side with 1 sc in each row end, and across the top with 1 sc in each st. At each of the 4 corners, work 1 extra sc in the same place as the corner st, which gently rounds the corner. Join with a sl st to the first sc.
The count is 16 + 16 + 11 + 11 = 54 sc worked one per stitch or row end, plus 4 extra corner sc, for 58 sc in total.
Fasten off and leave a 24 in (61.0 cm) tail for sewing. After edging, the pocket measures 4.5 in x about 3 in (11.4 cm x 7.6 cm).
Straps (make 2)
Use forest green.
Foundation: Ch 6.
Row 1: Sc in 2nd ch from hook and in each ch across, turn. (5 sc)
Rows 2–45: Ch 1, sc in each st across, turn. (5 sc in each row)
Each strap measures 1.25 in x 10 in (3.2 cm x 25.4 cm). Fasten off and leave a 12 in (30.5 cm) tail.
Fit note: Measure around your visor, at the spot where the straps will sit, with a tape measure. Your strap length should be that measurement minus 4.5 in (11.4 cm) for the panel, plus 1 in (2.5 cm) for the two 0.5 in (1.3 cm) overlaps. A visor 13.5 in (34.3 cm) around needs 10 in (25.4 cm) straps. Every 2 rows you add or remove changes the length by about 0.44 in (1.1 cm).
Make All Pieces
| Piece | Qty | Color | Stitches x rows |
|---|---|---|---|
| Main panel | 1 | Forest green | 46 x 18 |
| 1 | Forest green | 16 x 11 + edging | |
| Strap | 2 | Forest green | 5 x 45 |
Layout grid (front view, RS facing):
   [strap]                         [strap]
+-------------------------------+----------+
|  sprigs   LARGE FERN   sprig  |          |
|     sprig      SMALL FERN     |  POCKET  |
|  sprigs                sprigs |          |
+-------------------------------+----------+
 <------ about 6.75 in -------->  <- 4.5 in ->
Joining
All joins are sewn with forest green yarn and a tapestry needle, using a whipstitch through matching stitches.
Pocket:
- Pin the pocket to the RS of the panel with its edged top facing up.
- Line up the pocket’s right edge 1 st (0.25 in / 0.6 cm) in from the panel’s right edge, and its bottom edge 1 row (about 0.25 in / 0.6 cm) above the panel’s bottom edge. The pocket top now sits 1 in (2.5 cm) below the top of the finished panel.
- Sew the right side, the bottom, and the left side, and leave the top open.
- Work stitch-to-row: each edging sc on the sides of the pocket matches 1 panel row, and each edging sc along the bottom matches 1 panel stitch. Catch the back loop of the pocket’s edging sc and one full sc of the panel underneath.
- Add 2 extra tacking stitches at each top corner of the pocket for strength.
Straps:
- Turn the panel to the WS.
- Center the first strap 3 in (7.6 cm) from the panel’s left edge, and the second strap 1.5 in (3.8 cm) from the right edge.
- Overlap one strap end 0.5 in (1.3 cm) onto the WS at the top edge, so the strap rises straight up from the panel. Whipstitch around all 4 sides of the overlap.
- Leave the other end loose for now. Fit the organizer on your visor, bring the strap over the top and down the back, and pin the end 0.5 in (1.3 cm) onto the WS at the bottom edge. Then sew it the same way.
Tension: Pull each sewing stitch until it just closes the gap, and no tighter. Tight sewing will pucker the panel and make the pocket too shallow for sunglasses.
Checkpoint: The panel should still measure 11.5 in x 4 in (29.2 cm x 10.2 cm) and lie flat.
Border
Use forest green. Pick up the live loop from the top-right corner of the panel, with the RS facing.
Border gauge: Same as the panel. Each sc round adds about 0.25 in (0.6 cm) on every side.
Round 1: Ch 1.
- Top edge: 1 sc in each st across, for 46 sc.
- Left side: 1 sc in each row end, for 18 sc.
- Bottom: 1 sc in each foundation ch, for 46 sc.
- Right side: 1 sc in each row end, for 18 sc.
- At each of the 4 corners, work 1 extra sc in the same place as the corner st.
Join with a sl st to the first sc.
The count is 46 + 18 + 46 + 18 = 128 sc worked one per existing stitch or row end, plus 4 extra corner sc, for 132 sc in total.
At the strap overlaps, work through both the panel and the strap, so the border locks the strap ends in place.
Round 2: Sl st loosely in each sc around (132 sl st), and join to the first sl st. This round gives the edge the neat, braided-looking finish you see on the finished piece, and it adds almost no width.
Fasten off and weave in the end.
Why the math works: The panel is 46 sts across at 4 sts per inch, which is 11.5 in (29.2 cm). One sc round adds 1 st (0.25 in / 0.6 cm) on each side, so the width becomes 12 in (30.5 cm). The 18 rows at 4.5 rows per inch give 4 in (10.2 cm), and the border’s added height on the top and bottom brings it to 4.5 in (11.4 cm). Using 2 sc per corner instead of 3 keeps the corners softly rounded rather than sharp and pointed.
Final Blocking
- Lightly spray the organizer with water, or hover a steam iron over it without touching the yarn.
- Lay it RS up on a blocking mat.
- Pin the four corners to 12 in x 4.5 in (30.5 cm x 11.4 cm).
- Pin the long edges straight and keep the straps flat and extended.
- Slip a folded cloth into the pocket so it keeps a slight opening while it dries.
- Gently press the fern leaflets with your fingertips so they lie in their slanted direction.
- Let it dry completely, then remove the pins.
Final Quality-Control Checklist
- Panel measures 12 in x 4.5 in (30.5 cm x 11.4 cm)
- Border Round 1 has 132 sc and Round 2 has 132 sl st
- Corners are softly rounded, with no cupping
- Pocket is 0.5 in (1.3 cm) from the finished right and bottom edges, and its top is open
- Large fern has 19 leaflets and small fern has 13
- 8 gold sprigs, none hidden under the pocket
- Straps are evenly spaced and firmly sewn at both ends
- All ends are woven in on the WS
Troubleshooting
- Panel waves along the edges: Your border is too tight or too loose. Redo Round 1 with a hook one size larger or smaller.
- Embroidery puckers the fabric: Remove it, re-steam, and redo it with looser stitches.
- Pocket is too shallow for sunglasses: Unpick the side seams and resew them, catching only the outer loop, so you gain a little depth.
- Straps slip on the visor: Shorten each strap by 2 rows (about 0.44 in / 1.1 cm).
- Gold knots pull through: Wrap 3 times instead of 2, or use a doubled strand.
Care
Hand wash in cool water, press out the water in a towel, and dry flat. Don’t leave it in a hot car for long periods if you used acrylic yarn.
Final Notes
The measurement chain is simple. 46 sts x 18 rows makes an 11.5 in x 4 in (29.2 cm x 10.2 cm) panel. The pocket and straps are sewn on without changing that size. Then a 132-st sc round plus a matching slip-stitch round brings it to 12 in x 4.5 in (30.5 cm x 11.4 cm). Check your gauge first, measure at each checkpoint, and the ferns will sit just right next to the pocket.
Happy crocheting!