

This cover turns plain over-ear headphones into something soft and playful. A lavender sleeve wraps the headband, and two upright bunny ears sit on top. Each ear has a cream inner ear and a lavender outer edge.
The palette is just two colors: soft lavender for the sleeve and ear edges, and warm cream for the inner ears. Everything is worked in dense single crochet and simple tall stitches, so the fabric is firm, tidy, and comfortable to wear for hours. This pattern uses US crochet terms.
The finished sleeve is about 4 in (10.2 cm) wide flat and 11.5 in (29.2 cm) long, and it wraps into a tube about 4 in (10.2 cm) around. Each ear is about 3.5 in (8.9 cm) tall and 2.25 in (5.7 cm) wide.
The construction is simple:
– Crochet the sleeve as a flat rectangle in rows and add one round of single crochet border.
– Wrap the sleeve around the headband and whipstitch the long edges together underneath.
– Work each ear in rounds around a foundation chain, cream first and then lavender.
– Sew the ears upright onto the top of the sleeve.
Finished Size and Construction
- Finished sleeve size: 4 in x 11.5 in (10.2 cm x 29.2 cm) flat, after the border
- Finished ear size: 3.5 in x 2.25 in (8.9 cm x 5.7 cm)
- Skill level: Easy
- Terminology: US crochet terms
- Yarn weight: Worsted (#4)
- Hook: 4.5 mm (US 7)
- Number of pieces: 3 (1 sleeve, 2 ears)
- Layout: sleeve wrapped around the headband; ears upright on top, each centered 2.5 in (6.4 cm) from the sleeve’s center
- Sleeve size before border: 3.5 in x 11 in (8.9 cm x 27.9 cm)
- Border depth: 1 round of sc, about 0.25 in (0.6 cm) on every edge
Materials
Choose a smooth worsted acrylic or cotton blend. A slightly fuzzy, matte yarn gives the cozy look shown, and cotton makes a crisper, cooler cover. Avoid very splitty yarn, because you will be whipstitching through tight single crochet.
- Lavender (Color A): about 30 g / 55 m (sleeve, border, ear rims)
- Cream (Color B): about 10 g / 18 m (inner ears)
These quantities include a margin of roughly 30 percent for your gauge swatch and seaming tails.
Tools:
– 4.5 mm (US 7) crochet hook
– Tapestry needle
– Scissors
– Stitch markers (at least 2)
– Measuring tape
– Pins or clips
– Spray bottle for blocking
Abbreviations (US Terms)
- ch – chain
- sl st – slip stitch
- sc – single crochet
- hdc – half double crochet
- dc – double crochet
- st(s) – stitch(es)
- rnd – round
- RS / WS – right side / wrong side
Special technique: working around a foundation chain. Work across one side of the chain, then rotate the piece and continue along the opposite side, into the bottom loops of the same chains. This makes an oval with stitches on both sides of the starting chain.
Gauge and Checkpoints
Gauge: 16 sc x 18 rows = 4 in (10.2 cm) square.
Make one ear first as your test piece. It is small, uses both colors, and quickly shows whether your tension is right.
Checkpoints:
– Ear after Rnd 2 (cream only): about 2.75 in x 1.5 in (7.0 cm x 3.8 cm)
– Ear after Rnd 4: about 3.5 in x 2.25 in (8.9 cm x 5.7 cm)
– Sleeve Row 1: 14 sc = 3.5 in (8.9 cm) wide
– Sleeve after Row 50: about 11 in (27.9 cm) long
– Sleeve after border: about 4 in x 11.5 in (10.2 cm x 29.2 cm)
If your pieces are too big, go down to a 4.0 mm hook. If they are too small, go up to a 5.0 mm hook. Recheck your test ear before starting the sleeve.
Also measure your own headphones:
– Thickness: Wrap a tape around the padded headband at its thickest point. This pattern fits bands up to about 4 in (10.2 cm) around.
– Length: Measure the arc between the two hinges. This pattern covers 11.5 in (29.2 cm). If your band is longer or shorter, adjust the sleeve length as described in the sleeve section.
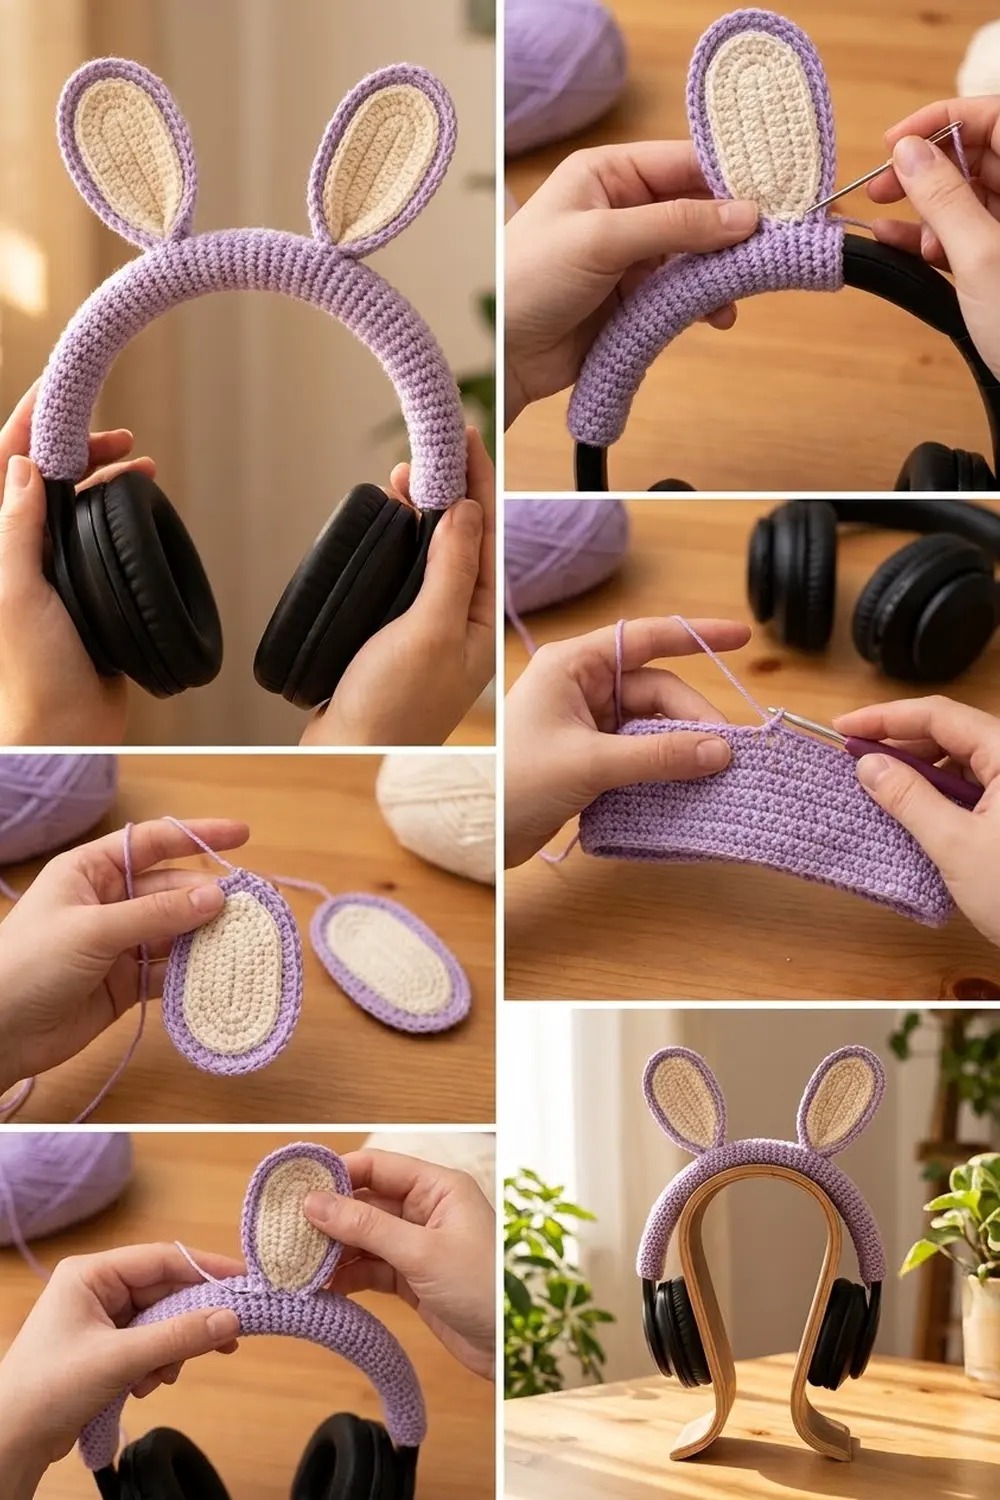
Ears (Make 2)
Each ear starts as a cream teardrop worked around a chain. The double crochet stitches at the top make it round and wide, and the single crochet stitches at the bottom keep it narrow.
With Color B (cream):
Ch 8.
Rnd 1: Sc in 2nd ch from hook, sc in next ch, hdc in next 2 ch, dc in next 2 ch, 6 dc in last ch. Rotate to work along the opposite side of the chain: dc in next 2 ch, hdc in next 2 ch, sc in next ch, 2 sc in the same ch as the first sc. Join with sl st to the first sc. (19 sts)
Count check: 6 sts on the first side + 6 dc at the top + 5 sts on the second side + 2 sc at the bottom = 19.
Place a marker in the first st of each round. The 6 top dc are sts 7-12.
Rnd 2: Ch 1, sc in first 6 sts, 2 sc in each of next 6 sts, sc in next 7 sts. Join. (25 sts)
Growth round: 6 + 12 + 7 = 25. All 6 increases sit on the rounded top.
Fasten off Color B. The cream teardrop should measure about 2.75 in x 1.5 in (7.0 cm x 3.8 cm).
With Color A (lavender):
Rnd 3: Join Color A in the first st. Ch 1, sc in first 7 sts, [2 sc in next st, sc in next st] 6 times, sc in next 6 sts. Join. (31 sts)
Growth round: 7 + 18 + 6 = 31.
Rnd 4: Ch 1, sc in first 9 sts, [2 sc in next st, sc in next 2 sts] 4 times, sc in next 10 sts. Join. (35 sts)
Growth round: 9 + 16 + 10 = 35.
Fasten off, leaving a 12 in (30.5 cm) tail for sewing. Weave in the cream tail only.
The ear should measure about 3.5 in x 2.25 in (8.9 cm x 5.7 cm). The lavender rim is wide around the top and narrower at the bottom. The lavender rounds have no increases at the base, so the base cups slightly. That is intentional, because it helps the ear stand upright once it is sewn on.
Sleeve (Make 1)
The sleeve is a flat rectangle of single crochet rows.
With Color A (lavender):
Ch 15.
Row 1 (RS): Sc in 2nd ch from hook and in each ch across. Turn. (14 sc)
Row 2: Ch 1 (does not count as a st), sc in each st across. Turn. (14 sc)
Rows 3-50: Repeat Row 2. (14 sc per row)
Do not fasten off. Continue directly to the border.
Checkpoint: 3.5 in x 11 in (8.9 cm x 27.9 cm).
Adjusting length: 9 rows equal 2 in (5.1 cm). Add or remove rows only in multiples of 9 so the border repeat still fits. Each 9 rows you add or remove changes each long-side border count by 8 sts.
Make All Pieces
Before assembly you should have:
- Color A only: 1 sleeve, 14 sc x 50 rows, bordered
- Color B + Color A: 2 ears, each with Rnds 1-2 in cream and Rnds 3-4 in lavender
Placement layout (top view of the flat sleeve):
|<----------------- 11.5 in (29.2 cm) ----------------->|
[end]..........[EAR]..........[center]..........[EAR]..........[end]
                 |<-- 2.5 in -->|<-- 2.5 in -->|
                 |<------ 5 in (12.7 cm) ------>|
The ears sit on top of the sleeve, centered 2.5 in (6.4 cm) on either side of the sleeve’s center. That puts them 5 in (12.7 cm) apart, center to center.
Border
The border is one round of sc around the flat sleeve. It firms up the edges and gives you a clean line of stitches for the seam.
Border gauge: The border matches the body gauge, 16 sc = 4 in (10.2 cm). Working 1 sc in every row end along a long side would give 50 sts. The 11 in (27.9 cm) edge only needs about 44-45 sts, so a few row ends are skipped.
Border Rnd: After Row 50, ch 1 and turn.
- Short side 1 (across Row 50): 3 sc in first st, sc in next 12 sts, 3 sc in last st. (18 sts)
- Long side 1: Rotate. [Sc in end of next 8 rows, skip next row end] 5 times, sc in end of last 5 rows. (45 sts)
- Short side 2 (bottom of the foundation chain): 3 sc in first ch, sc in next 12 ch, 3 sc in last ch. (18 sts)
- Long side 2: Rotate. Repeat the long-side instructions. (45 sts)
Join with sl st to the first sc. (126 sts)
Conversion count:
– Stitches worked one per existing stitch or row end: 14 + 14 + 45 + 45 = 118
– Extra stitches added: 2 at each of the 4 corners = 8
– Total: 118 + 8 = 126
The 3-sc corner groups are counted with the short sides, so each short side is 3 + 12 + 3 = 18 and each long side is exactly 45. No corner is counted twice: 18 + 45 + 18 + 45 = 126.
Why the math works: Each long side covers 50 row ends. The bracketed repeat uses 9 row ends, 5 times (45), and the last 5 row ends make 50. That places 8 x 5 + 5 = 45 sc. At 4 sc per inch, 45 sc lie flat over about 11.25 in (28.6 cm), which matches the 11 in (27.9 cm) edge with a little ease for the corners. On the short sides, each of the 14 sts gets 1 sc, and the corner increases keep the corners square.
Fasten off, leaving a 30 in (76.2 cm) tail for seaming.
Checkpoint: 4 in x 11.5 in (10.2 cm x 29.2 cm).
Joining
There are two joins: closing the sleeve around the headband, and sewing on the ears.
1. Pre-block. Lightly mist the sleeve and both ears, pin them flat, and let them dry completely before they go near the headphones. The full steps are in the Final Blocking section.
2. Seam the sleeve onto the headband.
– Lay the sleeve WS up and set the headband on it lengthwise, centered.
– Wrap both long sides around the band so the edges meet along the underside, the side that touches your head.
– Using the long tail, whipstitch the two long edges together through the back loops only.
– Work stitch to stitch. Start by pairing the center sc of one corner group with the center sc of the matching corner group on the other edge, then continue pair by pair.
Count the pairs: 1 corner center + 1 corner sc + 45 long-side sts + 1 corner sc + 1 corner center = 49 pairs. Both edges have exactly the same count, so the seam stays straight with no puckers.
Leave the short ends open so the headband can pass through them to the hinges.
Tension advice: Pull each stitch snug but not tight. The seam should lie flat and stretch as much as the fabric does. If you pull too hard, the sleeve will twist toward the seam.
Size checkpoint: The closed sleeve should be about 4 in (10.2 cm) around. It should sit smoothly on the band with no gaps or bunching.
3. Attach the ears.
– Measure 2.5 in (6.4 cm) from the sleeve’s center toward each end, and mark the top center line at each point.
– Pinch the base of each ear slightly so it curves forward. Pin it upright at the marker, cream side facing forward.
– With the lavender tail, sew the bottom 1 in (2.5 cm) of the ear’s edge to the top of the sleeve.
– Sew around the base twice, once along the front and once along the back. Sew through the sleeve fabric only, never through the headband.
Weave in all ends on the inside of the sleeve.
Final Blocking
The pieces are already pre-blocked, so this is a light shaping pass with the cover in place. Keep moisture away from the electronics.
- Hold each ear away from the headband and touch it with a barely damp cloth. Do not spray it.
- Flatten the cream center and smooth the lavender rim with your fingers.
- Keep the slight forward curve at the base of each ear.
- Smooth the sleeve along the band so the seam runs straight down the center of the underside.
- Let everything air dry for at least 6 hours before you wear the headphones.
Final Quality-Control Checklist
- Each ear has 35 sts in Rnd 4 and measures about 3.5 in x 2.25 in (8.9 cm x 5.7 cm).
- Both ears match in size and color placement.
- The sleeve has 14 sc per row and 50 rows.
- The border has 126 sts: 18 on each short side and 45 on each long side.
- The seam has 49 stitch pairs and runs straight along the underside.
- The ears are 5 in (12.7 cm) apart, center to center, and stand upright.
- No ends show on the outside.
- The headphones still fold and adjust freely at the hinges.
Troubleshooting
The ear top curls into a cup: Your dc stitches in Rnd 1 are too tight. Loosen your tension on those stitches and remake the ear.
The ear ruffles along the top: Your lavender rounds are too loose. Go down one hook size for Rnds 3-4 only.
The ears flop over: Sew the base twice and pinch it into a deeper curve. A light spray starch on the ears also helps.
The sleeve is too loose on the band: Work 13 sc per row and use 3 + 11 + 3 = 17 sts on each short side.
The sleeve is too tight to close: Work 15 sc per row and use 3 + 13 + 3 = 19 sts on each short side.
The long edges wave after the border: Skip one extra row end on each long side, then recount so both sides still match.
The seam twists: Unpick it back to the first corner, then match stitch to stitch and count to 49.
Care
Spot clean with a damp cloth and a little mild soap, keeping the headphones dry. Reshape the ears with your fingers while they are slightly damp.

Final Notes
Every measurement comes back to the gauge. With 16 sc x 18 rows = 4 in (10.2 cm), you get:
– Ears of 3.5 in x 2.25 in (8.9 cm x 5.7 cm)
– A sleeve of 3.5 in x 11 in (8.9 cm x 27.9 cm) before the border
– A sleeve of 4 in x 11.5 in (10.2 cm x 29.2 cm) after one round of sc
That sleeve wraps into a 4 in (10.2 cm) tube, closed with 49 matched stitch pairs. Check each stage against these numbers and the cover will fit snugly, with two bunny ears standing tall.
Happy crocheting!