

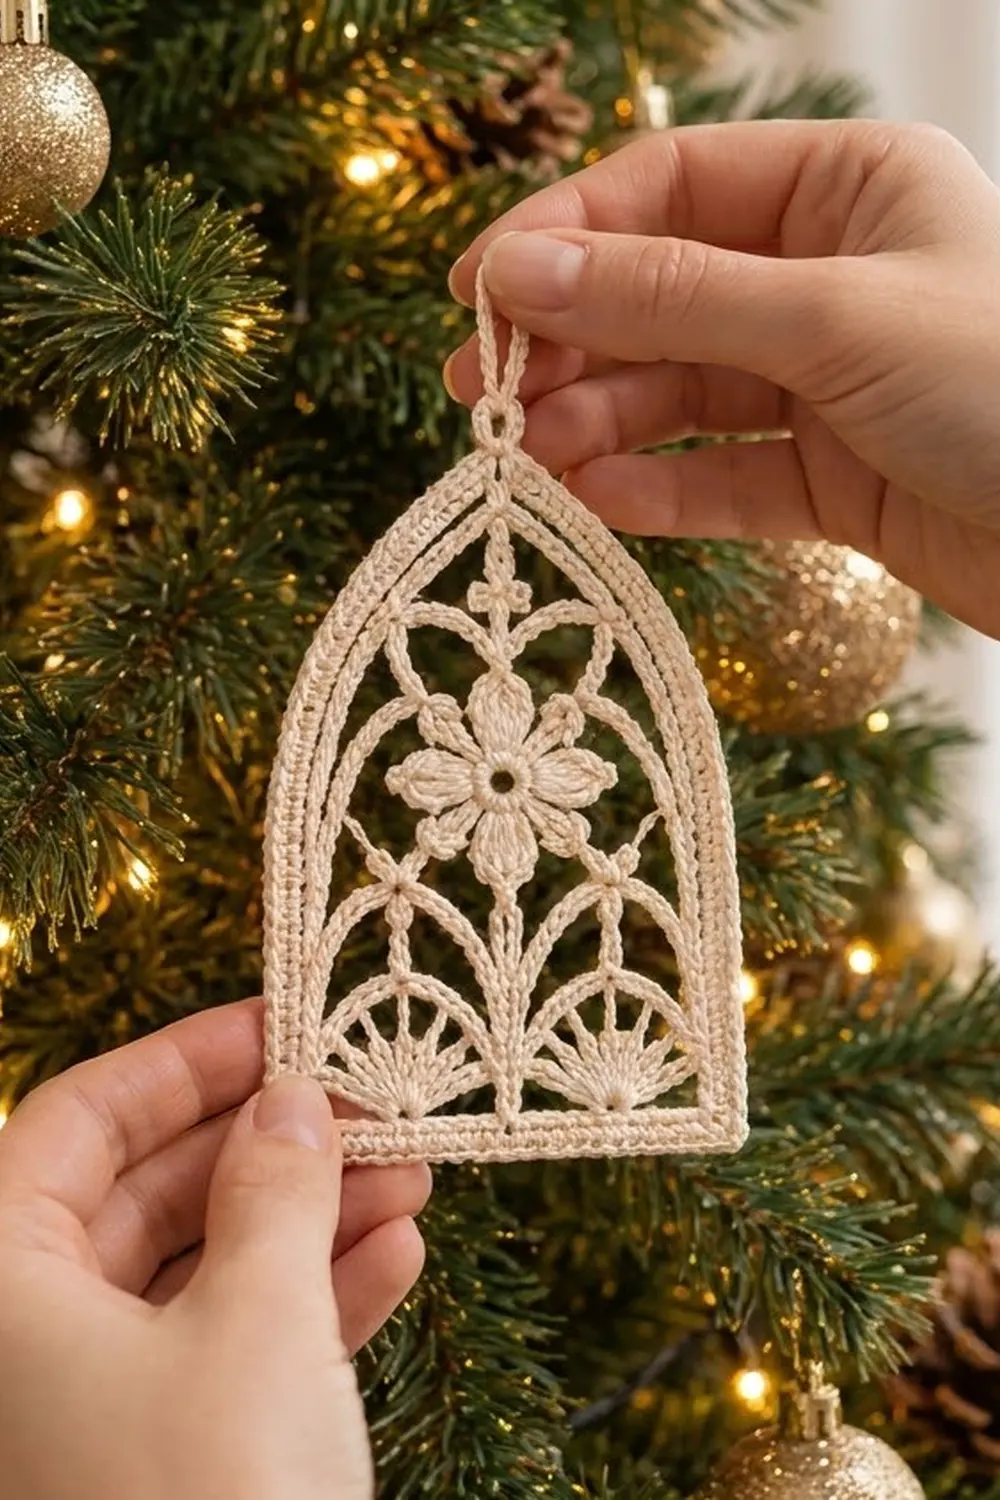
This small ornament looks like a Gothic church window made of thread. A pointed-arch frame holds a six-petal flower at the center. Corded bars run from the flower to the frame, a small fleur bud sits near the peak, and two half-circle fans rest on the bottom bar like lancet windows.
The whole piece uses one color, a soft cream or ivory cotton thread. After blocking, the lace is crisp, with a raised, rope-like outline all the way around. It glows against tree lights, and it also works in a window or tied to a gift.
This pattern uses US crochet terms. The finished ornament measures 3.5 in (8.9 cm) wide and 4.75 in (12.1 cm) tall, plus a 1 in (2.5 cm) hanging loop.
The construction is easy to follow. First you crochet the flower. Next you make the frame as one closed ring of foundation single crochet. Then you fill the inside with fans and corded bars that attach to numbered frame stitches. A three-round border and the hanging loop finish it. You end up with one single piece and no sewing.
Finished Size and Construction
- Finished size: 3.5 in (8.9 cm) wide x 4.75 in (12.1 cm) tall, plus a 1 in (2.5 cm) loop
- Skill level: Intermediate (thread lace, comfortable counting chains)
- Terminology: US
- Yarn weight: Size 10 cotton crochet thread (Lace, weight 0)
- Hook: 1.5 mm (US steel 8)
- Number of pieces: 1 (the flower is joined in as you go)
- Layout: One pointed-arch panel
- Piece size before border: 3 in (7.6 cm) x 4.25 in (10.8 cm)
- Border depth: 0.25 in (0.6 cm) on every side, 3 rounds
Materials
Thread: Use a mercerized cotton thread in size 10. Mercerized cotton holds starch well and shows the corded bars clearly. Avoid fuzzy or blended threads, which blur the lace.
- Cream / ivory: 10 g, about 40 m (44 yd)
This amount includes a generous margin. One ornament uses about 7 g. If you plan to make a set, one standard ball of size 10 thread is enough for many ornaments.
Tools:
- 1.5 mm (US steel 8) crochet hook
- Fine tapestry needle
- 5 locking stitch markers
- Small sharp scissors
- Blocking board or foam mat
- Rustproof pins
- Fabric stiffener or spray starch
- A printed or hand-drawn arch template, 3 in x 4.25 in (7.6 cm x 10.8 cm) at the inner frame
Abbreviations (US Terms)
- ch – chain
- sl st – slip stitch
- sc – single crochet
- hdc – half double crochet
- dc – double crochet
- tr – treble crochet
- sp – space
- st(s) – stitch(es)
- fsc – foundation single crochet
- rev sc – reverse single crochet (crab stitch)
Special stitches
- Picot: Ch 4, sl st in 4th ch from hook.
- Corded bar: Ch the stated number and sl st into the target. Then sc in each ch back to where you started and sl st into the starting point. Covering the chain with sc turns it into the thick, twisted-looking cords you see in the window.
Gauge and Checkpoints
Gauge: 10 sc = 1 in (2.5 cm) with size 10 thread and a 1.5 mm hook.
Make the flower first and use it as your swatch. Then check each stage:
- Flower: 1.1 in (2.8 cm) across from petal tip to petal tip, pressed flat.
- Frame: the 30 fsc along the bottom measure 3 in (7.6 cm).
- Before border: the pinned panel is 3 in (7.6 cm) x 4.25 in (10.8 cm).
- After border: 3.5 in (8.9 cm) x 4.75 in (12.1 cm).
If your flower is wider than 1.2 in (3 cm), go down to a 1.4 mm hook. If it is under 1 in (2.5 cm), go up to a 1.65 mm hook. Do not change the stitch counts, because every bar length is planned around this gauge.
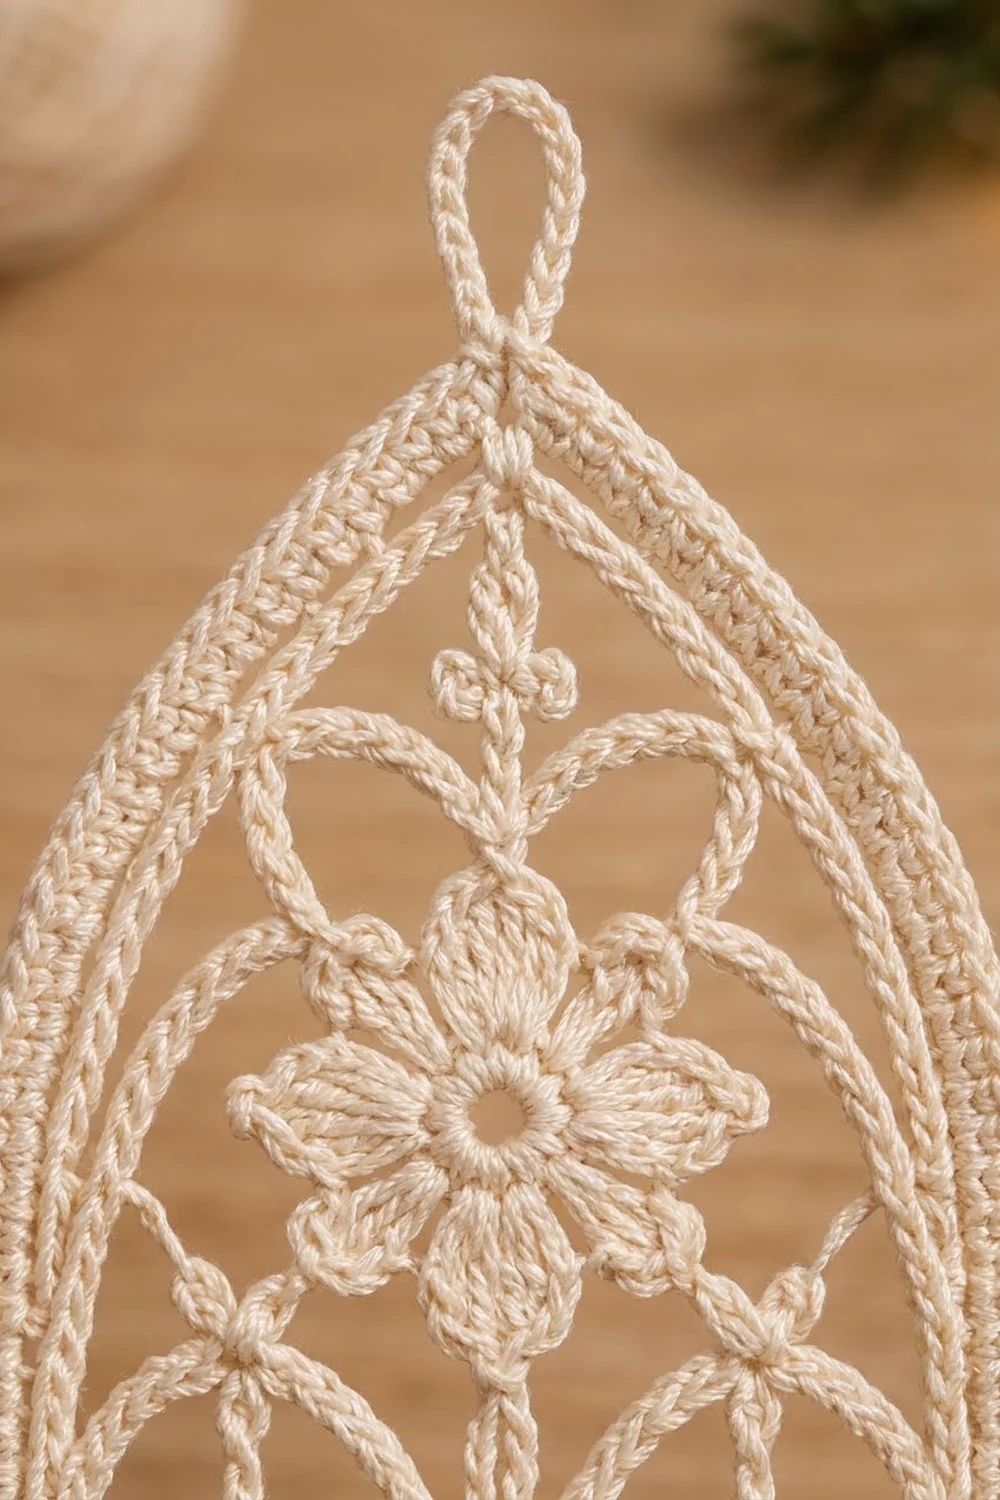
Flower
Work in the round. Do not turn.
Rnd 1: Ch 6, sl st in first ch to form a ring. Ch 1, 12 sc in ring, sl st in first sc. (12 sc)
The ring stays open and becomes the hole in the center of the flower.
Rnd 2: Ch 1, sc in first sc, ch 3, skip next sc, sc in next sc, ch 3, skip next sc; rep from * 4 more times, sl st in first sc. (6 sc, 6 ch-3 sps)*
Rnd 3: Sl st in first ch-3 sp. In each ch-3 sp work (sc, hdc, dc, tr, ch 2, tr, dc, hdc, sc). Sl st in first sc. (6 petals: 48 sts and 6 ch-2 tip sps)
Each petal has 8 sts and a ch-2 tip. The tips are your anchor points. Fasten off and weave in the center tail.
Checkpoint: 1.1 in (2.8 cm) across. Lay the flower with one petal pointing straight up. Name the tips top, upper right, lower right, bottom, lower left, upper left, and mark the top tip.
Frame
Rnd 1: Fsc 131. Join with sl st in first fsc, making sure the strip is not twisted. Fasten off. (131 sts)
Number the stitches starting from the first fsc. The frame segments are:
- Bottom: sts 1–30 (30 sts). Sts 1 and 30 are the two bottom corners and count as part of the bottom.
- Right side: sts 31–55 (25 sts)
- Right arch: sts 56–80 (25 sts)
- Peak: st 81 (1 st)
- Left arch: sts 82–106 (25 sts)
- Left side: sts 107–131 (25 sts)
Check: 30 + 25 + 25 + 1 + 25 + 25 = 131.
Place markers in sts 1, 30, 55, 81 and 107, then pin the ring onto your template. The bottom is 3 in (7.6 cm), each side is 2.5 in (6.4 cm), and the arch rises 1.75 in (4.4 cm) to a point at st 81. Counting is much easier if the ring stays pinned while you add the lace.
Checkpoint: 3 in (7.6 cm) x 4.25 in (10.8 cm).
Lace Fill
Start each section with a new join and fasten off when it’s done. Keep the chains relaxed, not tight. Pin the flower onto the template, centered left to right, with its center 2.3 in (5.8 cm) above the bottom bar.
Section 1: Center Stem
Join with sl st in bottom st 15. Ch 17, sl st in the bottom petal tip. Sc in each ch back down (17 sc), then sl st in st 16. Fasten off.
The flower is now anchored in the center.
Section 2: Left Fan
Row 1: Join with sl st in st 7, then sl st in st 8. Ch 3 (counts as dc), 11 dc in st 8, sl st in st 9. (12 dc)
Row 2: Turn. Ch 1, sc in first dc, ch 2, sc in next dc; rep from * across, sl st in st 6. (12 sc, 11 ch-2 sps)*
The 12 dc fan out from a single stitch, which leaves the small hole at the base of the fan.
Fan arch: Sl st in sts 5, 4 and 3. Ch 8, sl st in the 6th ch-2 sp of Row 2 (the center sp), ch 8, sl st in st 13. Turn. Work 10 sc in each ch-8 sp back to the start (20 sc), then sl st in st 3. Fasten off.
Checkpoint: the fan is 0.35 in (0.9 cm) tall, and the covered arch sits just outside it, spanning sts 3–13.
Section 3: Right Fan
Repeat Section 2, shifted 15 sts to the right. Row 1 starts with sl st in st 22, works 11 dc in st 23, and ends with sl st in st 24. Row 2 ends with sl st in st 21. The arch starts at st 18 and ends at st 28.
The fans are now centered on sts 8 and 23, with the stem between them at sts 15–16.
Section 4: Lancet Ribs
Left: Join in the lower left petal tip. Ch 16, sl st in left side st 122, which is 1 in (2.5 cm) above the bottom. Sc in each ch back (16 sc), then sl st in the petal tip. Fasten off.
Right: Join in the lower right petal tip. Ch 16, sl st in right side st 40. Sc in each ch back (16 sc), then sl st in the petal tip. Fasten off.
These ribs form the pointed lancet arches over the two fans.
Section 5: Upper Ribs
Left: Join in the upper left petal tip. Ch 11, sl st in st 107. Sc in each ch back (11 sc), then sl st in the petal tip. Fasten off.
Right: Join in the upper right petal tip. Ch 11, sl st in st 55. Sc in each ch back (11 sc), then sl st in the petal tip. Fasten off.
Section 6: Top Stem, Fleur and Heart Loops
Join in the top petal tip. Ch 14, sl st in the peak (st 81). Then work back down:
- Sc in next 7 ch.
- Fleur: Make 3 picots.
- Left loop: Ch 12, sl st in the upper left petal tip, then work 14 sc in the ch-12 sp back to the stem.
- Right loop: Ch 12, sl st in the upper right petal tip, then work 14 sc in the ch-12 sp back to the stem.
- Sc in remaining 7 ch. Sl st in the top petal tip.
Stem count: 7 + 7 = 14 sc, matching the ch 14. Loop count: 14 sc per loop, 28 sc total.
The fleur sits 0.7 in (1.8 cm) below the peak. The two loops curve down around the top petal and form the heart shape above the flower. Fasten off.
Border
Border gauge: 3 rounds (sc, hdc, rev sc) = 0.25 in (0.6 cm) deep.
Rnd 1: Join with sl st in st 2. Ch 1, sc in sts 2–29, 3 sc in st 30, sc in sts 31–62, 2 sc in st 63, sc in sts 64–71, 2 sc in st 72, sc in sts 73–80, 3 sc in st 81, sc in sts 82–89, 2 sc in st 90, sc in sts 91–98, 2 sc in st 99, sc in sts 100–131, 3 sc in st 1. Sl st in first sc.
Counts by segment:
- Bottom: (30 worked 1 per st) + (4 extra, 2 per corner) = 34
- Right side: 25
- Right arch: (25) + (2 extra) = 27
- Peak: (1) + (2 extra) = 3
- Left arch: (25) + (2 extra) = 27
- Left side: 25
- Total: 141
Rnd 2: Ch 2 (does not count). Hdc in each st around. Work 3 hdc in the center sc of each corner group and of the peak group, and 2 hdc in the 14th st of each arch segment. Sl st in first hdc.
- Bottom: (34) + (4 extra) = 38
- Sides: 25 each
- Arches: (27) + (1 extra) = 28 each
- Peak: (3) + (2 extra) = 5
- Total: 149
Rnd 3: Ch 1. Rev sc in each st around. At the center hdc of the peak group, rev sc in it, then ch 20, sl st in the same st, work 28 sc into the loop, and sl st in the same st again. Continue the rev sc to the end and sl st in the first st. (149 rev sc + loop) Fasten off.
Why the math works: The inner frame is fixed at 131 sts. Each new round sits farther out, so the outline gets longer. The sharp turns at the bottom corners and the peak need 2 extra sts per round to lie flat. The gentle arch curves need fewer: 2 per arch in Rnd 1 and 1 per arch in Rnd 2. The straight sides need none. Rev sc works 1 stitch into each stitch and rolls the edge into a firm cord, so Rnd 3 needs no increases.
Checkpoint: 3.5 in (8.9 cm) x 4.75 in (12.1 cm), with a 1 in (2.5 cm) loop.
Final Blocking
- Weave in all remaining tails along the corded bars, not across the open spaces.
- Soak the ornament in fabric stiffener, or wet it with plain water if you will starch it later.
- Press out the extra liquid in a towel. Do not wring.
- Pin the outer border to your template at 3.5 in (8.9 cm) x 4.75 in (12.1 cm). Pin the two bottom corners and the peak first, then the sides.
- Pin the flower center 2.3 in (5.8 cm) above the inner bottom bar, then pin each petal tip.
- Pin the top of each fan arch and the fleur.
- If you did not use stiffener, spray with starch now.
- Let it dry completely, at least 12 hours, before removing the pins.
Final Quality-Control Checklist
- Finished size is 3.5 in (8.9 cm) x 4.75 in (12.1 cm).
- The arch comes to a clean point at the hanging loop.
- The bottom bar is straight and both corners are square.
- The flower is centered, with one petal straight up and one straight down.
- Both fans are the same size and sit evenly on the bottom bar.
- All corded bars lie flat, and none pull the frame inward.
- The loop is centered at the peak and all tails are hidden.
Troubleshooting
- The frame pulls in at the sides: The bars are too tight. Redo the bar with 1 more ch and 1 more sc.
- A bar sags: It is too loose. Redo it with 1 fewer ch and 1 fewer sc.
- The fans ruffle: Your dc are too tall. Pull each yarn-over snug, or go down a hook size for the fans only.
- The border ruffles at the corners: Leave out one corner increase in Rnd 2.
- The border cups: Your rev sc is too tight. Loosen your tension in Rnd 3.
- The flower drifts off center: Re-pin it on the template before you work Sections 4–6.
Care
Hand wash in cool water only when needed, then re-block with starch. Store the ornament flat in a box so the arch keeps its shape.
Final Notes
The measurement chain is short. The flower checks your gauge at 1.1 in (2.8 cm). The 131-st frame sets the panel at 3 in (7.6 cm) x 4.25 in (10.8 cm). The lace fill attaches to numbered frame stitches. The three border rounds add 0.25 in (0.6 cm) on every side, for a finished size of 3.5 in (8.9 cm) x 4.75 in (12.1 cm). If every checkpoint matches, the finished window will too.
Happy crocheting!