

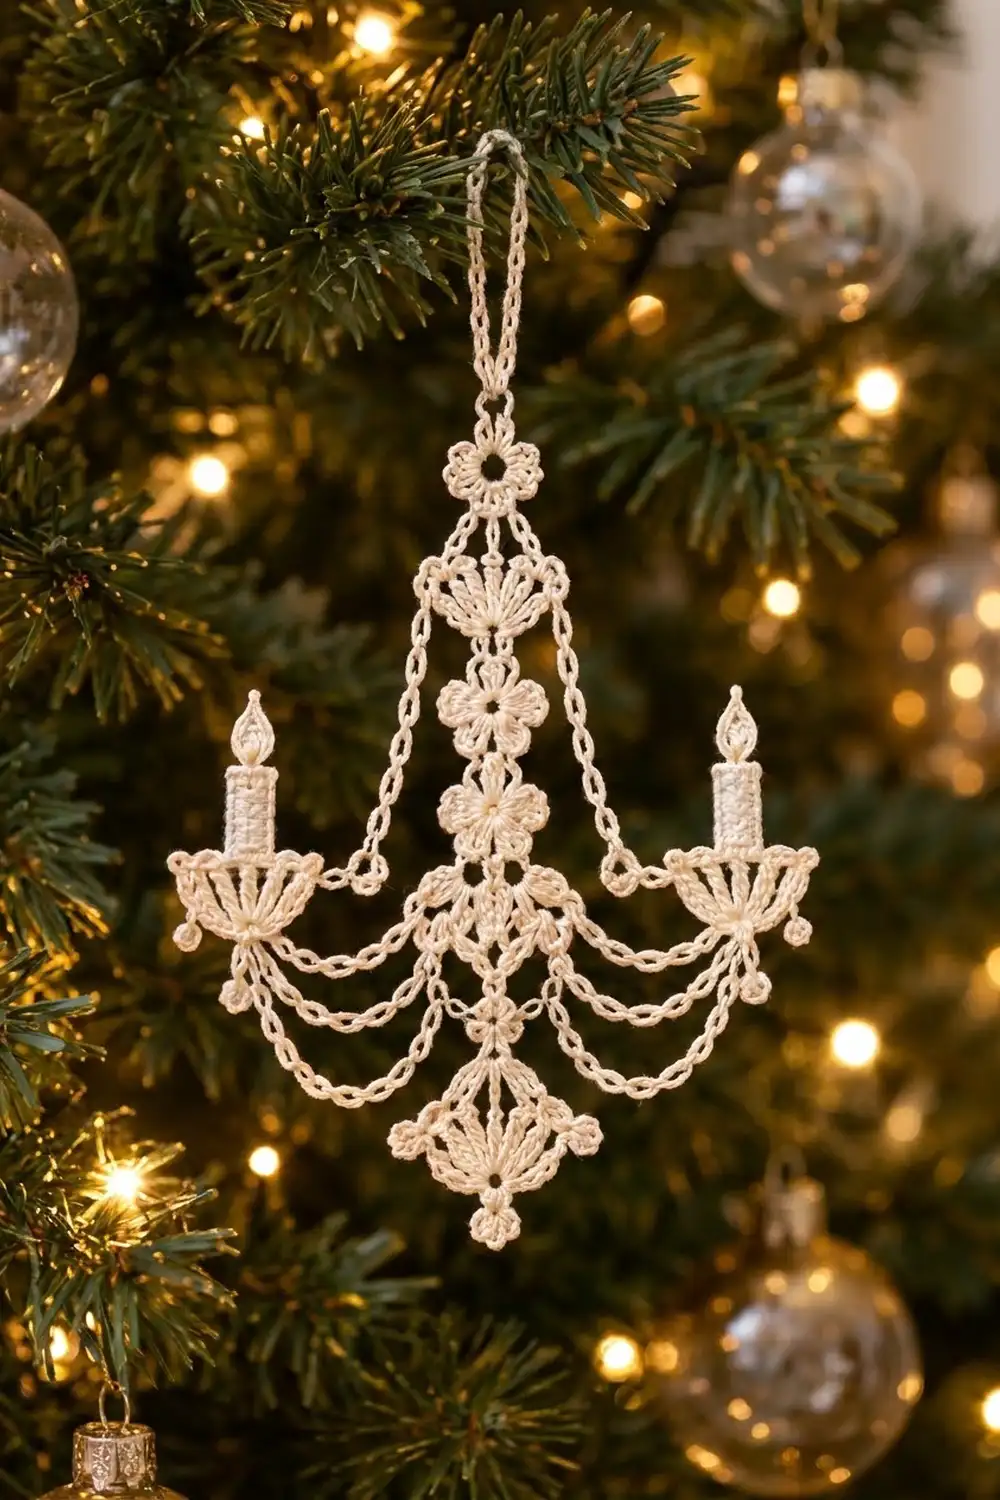
This little chandelier is a lacy thread ornament with a vintage feel. A central column of tiny six-petal flowers and ridged shells ends in a pointed drop. Two candle arms with ribbed candles and teardrop flames sit on scalloped cups, and draped chains swing from the column to the cups like crystal strands.
It is made in one cream crochet cotton, so the texture does all the work. Against warm tree lights, the open chains glow and the flowers look like cut glass.
The pattern uses US crochet terms. The finished ornament measures 4.5 in (11.4 cm) wide across the candle cups and 5.5 in (14.0 cm) tall, plus a 1 in (2.5 cm) hanging loop.
You build the center column from the top down, joining flowers and shells as you go. Then you make two candle units, hang them from the column with chains, add a picot edging to the bottom drop, and stiffen the ornament.
Finished Size and Construction
- Finished size: 4.5 in (11.4 cm) wide x 5.5 in (14.0 cm) tall, plus a 1 in (2.5 cm) loop
- Skill level: Intermediate
- Terminology: US crochet terms
- Yarn weight: Size 10 crochet cotton (lace, category 0)
- Hook: 1.5 mm (US steel 8)
- Number of pieces: 1 single ornament, built from small components that you join as you go
- Layout: Vertical center column with one candle arm on each side
- Piece size: 4.5 x 5.5 in (11.4 x 14.0 cm)
- Size before border: 4.5 x 5.3 in (11.4 x 13.5 cm)
- Border depth: 0.2 in (0.5 cm), on the lower edges of the bottom drop only
Materials
Thread: Use mercerized size 10 crochet cotton. Its tight twist keeps the tiny flowers crisp, and it holds stiffener well.
- Cream (one color only): 5 g, about 30 m (33 yd)
The quantity includes a margin of about 20% for tails, a test flower, and one restarted chain.
Tools:
- 1.5 mm (US steel 8) steel crochet hook
- Fine tapestry needle
- Small sharp scissors
- Fabric stiffener or thick starch
- Foam blocking board covered with plastic wrap
- Rust-proof pins (about 30)
- Ruler marked in inches and cm
Abbreviations (US Terms)
- ch – chain
- sl st – slip stitch
- sc – single crochet
- hdc – half double crochet
- dc – double crochet
- blo – back loop only
- sk – skip
- sp(s) – space(s)
- st(s) – stitch(es)
- rep – repeat
Special stitches:
- Picot: Ch 3, sl st in 3rd ch from hook.
- Trefoil: (Picot) 3 times, then sl st in the same st where the trefoil began.
- Joined tip: Ch 1, sl st in the named ch-2 tip or ch-3 loop of the earlier component, ch 1. This replaces the ch 2 at a petal tip.
- dc2tog: (Yarn over, insert hook in next st, pull up a loop, yarn over, pull through 2 loops) twice, yarn over, pull through all 3 loops.
- dc3tog: Same as dc2tog but worked over 3 sts; at the end, pull through all 4 loops.
Gauge and Checkpoints
Gauge decides whether the chain swags reach their anchor points, so make one test flower first.
- Sc gauge: 10 sc = 1 in (2.5 cm)
- Chain gauge: 12 ch = 1 in (2.5 cm)
Checkpoints:
- One flower: 0.6 in (1.5 cm) across opposite petal tips.
- One shell or cup: 0.8 in (2.0 cm) wide x 0.5 in (1.3 cm) tall.
- Candle: 0.5 in (1.3 cm) wide x 0.6 in (1.5 cm) tall, without the flame.
- Column, Top Flower through Flower 5: 4 in (10.2 cm).
- Column with Bottom Drop, before border: 5.3 in (13.5 cm).
If your flower is too big, use a hook 0.25 mm smaller. If it is too small, go 0.25 mm larger. If the flower is the right size but your chains are not, keep the hook. Change only the chain counts so each swag matches its length in inches.
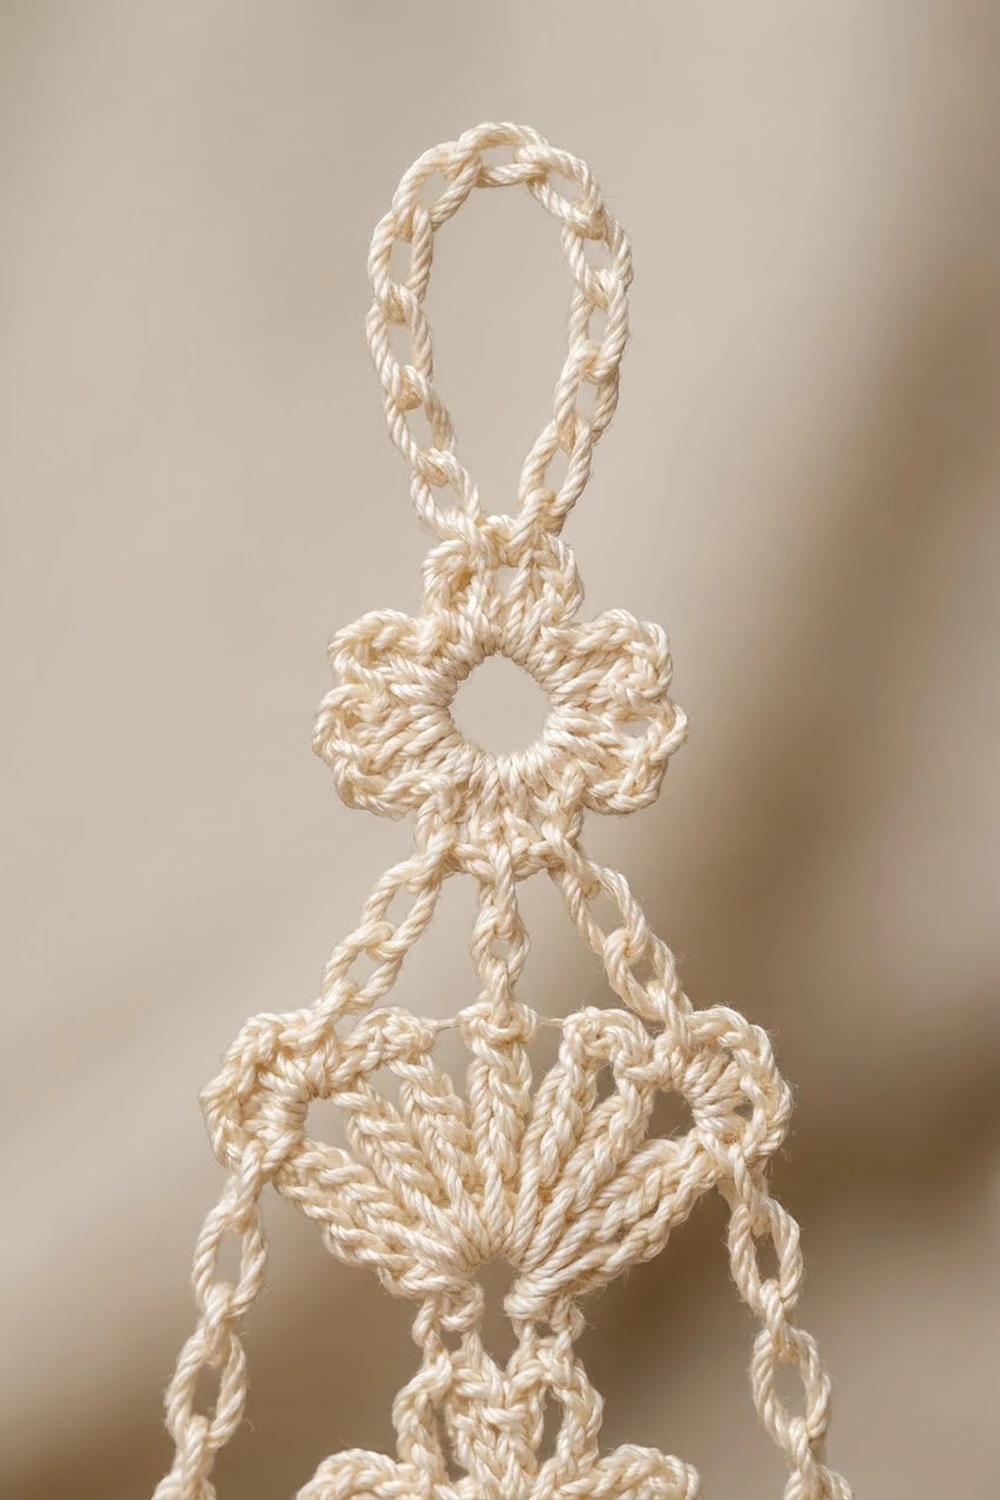
Center Column
Petals are numbered in the order you work them. Petal 1 points up and Petal 4 points straight down. Petals 3 and 5 sit on the lower sides, and Petals 2 and 6 sit on the upper sides.
Top Flower
Ch 5, sl st in first ch to form a ring.
Rnd 1: Ch 1, 12 sc in ring, sl st in first sc. (12 sc)
Rnd 2: *Ch 3, (dc, ch 2, dc) in next sc, ch 3, sl st in next sc; rep from * 5 more times, ending with the last sl st at the base of the first petal. (6 petals: 12 dc, 6 ch-2 tips, 12 ch-3 sps, 6 sl sts)
Fasten off. Checkpoint: 0.6 in (1.5 cm) across.
Top Shell
The shell hangs from the bottom petal by its narrow point, and its ridged fan opens downward.
Row 1: With the right side facing, join thread in the ch-2 tip of Petal 4. Ch 3 (counts as dc), 4 dc in same tip. (5 dc)
Row 2: Ch 3 (counts as dc), turn, dc in first st, 2 dc in each of next 3 dc, 2 dc in top of turning ch. (10 dc)
Row 3: Ch 1, turn, sc in first dc, *ch 3, sk 2 dc, sc in next dc; rep from * 2 more times. (4 sc, 3 ch-3 loops)
Fasten off. The 1st and 4th sc are the shell corners. Checkpoint: 0.8 in (2.0 cm) wide x 0.5 in (1.3 cm) tall.
Flowers 2 and 3
Flower 2: Work Rnd 1 as for the Top Flower. In Rnd 2, work Petal 1 as follows: ch 3, dc in next sc, joined tip into the center ch-3 loop of Top Shell Row 3, dc in same sc, ch 3, sl st in next sc. Finish the other 5 petals as usual. (6 petals)
Flower 3: Work as for Flower 2, but join Petal 1 to the ch-2 tip of Petal 4 of Flower 2.
Center Shell
Work as for the Top Shell, joining in the ch-2 tip of Petal 4 of Flower 3. (Row 1: 5 dc; Row 2: 10 dc; Row 3: 4 sc, 3 ch-3 loops)
Flowers 4 and 5
Flower 4: Join Petal 1 to the center ch-3 loop of Center Shell Row 3.
Flower 5: Join Petal 1 to the ch-2 tip of Petal 4 of Flower 4.
Checkpoint: 4 in (10.2 cm) from the top of the Top Flower to the bottom of Flower 5.
Bottom Drop
This diamond widens from a point, keeps its width for one row, then narrows again.
Row 1: Join thread in the ch-2 tip of Petal 4 of Flower 5. Ch 3 (counts as dc), 4 dc in same tip. (5 dc)
Row 2: Ch 3 (counts as dc), turn, dc in first st, 2 dc in each remaining st, including top of turning ch. (10 dc)
Row 3: Ch 3 (counts as dc), turn, dc in each of next 9 sts. (10 dc)
Row 4: Ch 2 (does not count), turn, dc2tog 5 times. (5 sts)
Row 5: Ch 2, turn, dc2tog, dc in next st, dc2tog. (3 sts)
Row 6: Ch 2, turn, dc3tog. (1 st)
Fasten off. Checkpoint: the drop is 1 in (2.5 cm) wide at Row 3 and 1.3 in (3.3 cm) tall. The column is now 5.3 in (13.5 cm).
Hanging Loop
Join thread in the ch-2 tip of Petal 1 of the Top Flower. Ch 24, sl st in same tip. Fasten off. The loop is 2 in (5.1 cm) around and hangs 1 in (2.5 cm) tall.
Candle Units (Make 2)
Cup
The cup is a shell turned upside down: the point faces down and the scalloped edge faces up to hold the candle.
Row 1: Ch 4, 4 dc in 4th ch from hook. (5 dc, counting the skipped ch as a dc)
Row 2: Ch 3 (counts as dc), turn, dc in first st, 2 dc in each of next 3 dc, 2 dc in top of beginning ch. (10 dc)
Row 3: Ch 1, turn, sc in first dc, picot, *ch 3, sk 2 dc, sc in next dc; rep from * 2 more times, picot. (4 sc, 3 ch-3 loops, 2 picots)
Fasten off. The picots form the bead drops at the cup corners. The point where all the Row 1 dc meet is the cup base. Checkpoint: 0.8 in (2.0 cm) wide x 0.5 in (1.3 cm) tall.
Candle
The candle is worked sideways, so the back-loop ridges run up and down.
Ch 7.
Row 1: Sc in 2nd ch from hook and in each ch across. (6 sc)
Rows 2–5: Ch 1, turn, sc blo in each st across. (6 sc)
Fasten off, leaving a 6 in (15.2 cm) tail. Turn the piece so the rows run up and down. It is 5 rows wide and 6 sts tall, or 0.5 x 0.6 in (1.3 x 1.5 cm).
Flame: Join thread in the row-end of Row 3 on the top edge. Ch 4, sc in 2nd ch from hook, hdc in next ch, dc in last ch, sl st in same row-end. Fasten off. The flame adds about 0.25 in (0.6 cm).
Assemble: Center the candle’s bottom edge (5 row-ends) over the middle ch-3 loop of Cup Row 3. Using the tail, whipstitch the candle to that loop and to the sc on each side so it stands upright.
Attaching the Candle Arms
Lay the column right side up. Place one candle unit on each side, with each candle center 1.85 in (4.7 cm) from the column’s center line and the cup tops level with Flower 3. The outer cup tips sit 2.25 in (5.7 cm) from center, for a total width of 4.5 in (11.4 cm). Work the two sides as mirror images. “Inner” means the side nearest the column.
Arm and Upper Swag (one thread per side)
- Join thread in the corner sc of Top Shell Row 3 on this side.
- Ch 18, about 1.5 in (3.8 cm). Sl st in the inner corner sc of Cup Row 3.
- Sl st in the inner row-ends of Cup Rows 2 and 1, then in the cup base.
- Ch 22, about 1.8 in (4.6 cm). Sl st in the corner sc of Center Shell Row 3 on this side. Fasten off.
Lower Swags (one thread per side)
- Join thread in the ch-2 tip of the lower-side petal of Flower 5 (Petal 3 on one side, Petal 5 on the other).
- Ch 34, about 2.8 in (7.1 cm). Sl st in the cup base.
- Ch 28, about 2.3 in (5.8 cm). Sl st in the ch-2 tip of the matching lower-side petal of Flower 4. Fasten off.
Each cup base now holds three swags of 22, 28, and 34 ch. Each swag is longer than the gap it spans, so it droops into a soft curve.
Border: Picot Edging on the Bottom Drop
The border is one edging row worked along the two lower sides of the Bottom Drop. The upper half is joined to Flower 5 and gets no edging.
Border gauge: 2 sc per dc row-end, at 10 sc = 1 in (2.5 cm).
Edging Row: With the right side facing, join thread in the Row 3 row-end on one side.
- Side corner: ch 1, (sc, picot, sc) in the Row 3 row-end. (2 sc, 1 picot)
- Lower side: 2 sc in the Row 4 row-end, 2 sc in the Row 5 row-end. (4 sc)
- Bottom point: (sc, trefoil, sc) in the top of the Row 6 dc3tog. (2 sc, 1 trefoil) These stitches cover the tiny Row 6 sides.
- Lower side: 2 sc in the Row 5 row-end, 2 sc in the Row 4 row-end. (4 sc)
- Side corner: (sc, picot, sc) in the Row 3 row-end. (2 sc, 1 picot)
Fasten off. Total: 14 sc, 2 picots, and 1 trefoil. That is 4 sc on each lower side, plus 2 sc at each corner and 2 sc at the point.
Why the math works: A dc row-end is about 0.2 in (0.5 cm) tall, the same height as 2 sc at 10 sc per inch. So 4 sc cover each 2-row lower side, and the edge lies flat. The trefoil adds the 0.2 in (0.5 cm) border depth, which takes the height from 5.3 in (13.5 cm) to 5.5 in (14.0 cm).
Final Blocking
- Weave in all tails and trim them close.
- Soak the ornament in stiffener for 1 minute. Blot off the excess in a towel; don’t wring it.
- Pin it face up on the plastic-covered board. Pin the column straight first, with a pin through every petal tip.
- Pin the candles upright and the cups level, 1.85 in (4.7 cm) from center on each side.
- Shape each swag into a smooth curve with a pin at its lowest point, and make the left and right sides match.
- Open the picots and trefoil, and pin the flames to points.
- Measure: 4.5 in (11.4 cm) wide and 5.5 in (14.0 cm) tall.
- Let it dry completely (12 to 24 hours) before unpinning.
Final Quality-Control Checklist
- Five flowers, each with 6 open petals and 0.6 in (1.5 cm) across
- Top Shell, Center Shell, and Bottom Drop all pointing the right way
- Both cups have 2 corner picots and an upright candle with a flame
- Swags of 18, 22, 28, and 34 ch on each side, with matching curves
- Bottom Drop edging: 14 sc, 2 picots, 1 trefoil
- Overall 4.5 x 5.5 in (11.4 x 14.0 cm), plus a 1 in (2.5 cm) loop
- All tails woven in, and the ornament hangs straight
Troubleshooting
Flowers cup or ruffle: If they cup, loosen the ch-3 sps. If they ruffle, check that Rnd 1 has exactly 12 sc.
Shell twists sideways: Work all 5 Row 1 dc into the ch-2 tip, not into a dc.
One candle hangs lower: Recount both ch-18 arms. At this scale, one extra chain is easy to see.
Swags pull tight: Your chains are tighter than 12 ch per inch. Rework them more loosely or add 2 ch to each swag.
Edging ruffles: Work only 2 sc in each dc row-end.
Care
Dust it with a soft brush and store it flat between sheets of tissue. If it gets dirty, hand-wash it in cool water, then stiffen and block it again.
Final Notes
A 0.6 in (1.5 cm) flower and a 0.8 in (2.0 cm) shell make the column 4 in (10.2 cm) long by Flower 5 and 5.3 in (13.5 cm) with the Bottom Drop. The 0.2 in (0.5 cm) edging brings it to 5.5 in (14.0 cm). Arms placed 1.85 in (4.7 cm) from center give a width of 4.5 in (11.4 cm). If each checkpoint matches, the swags will reach exactly where they should. Happy crocheting!