

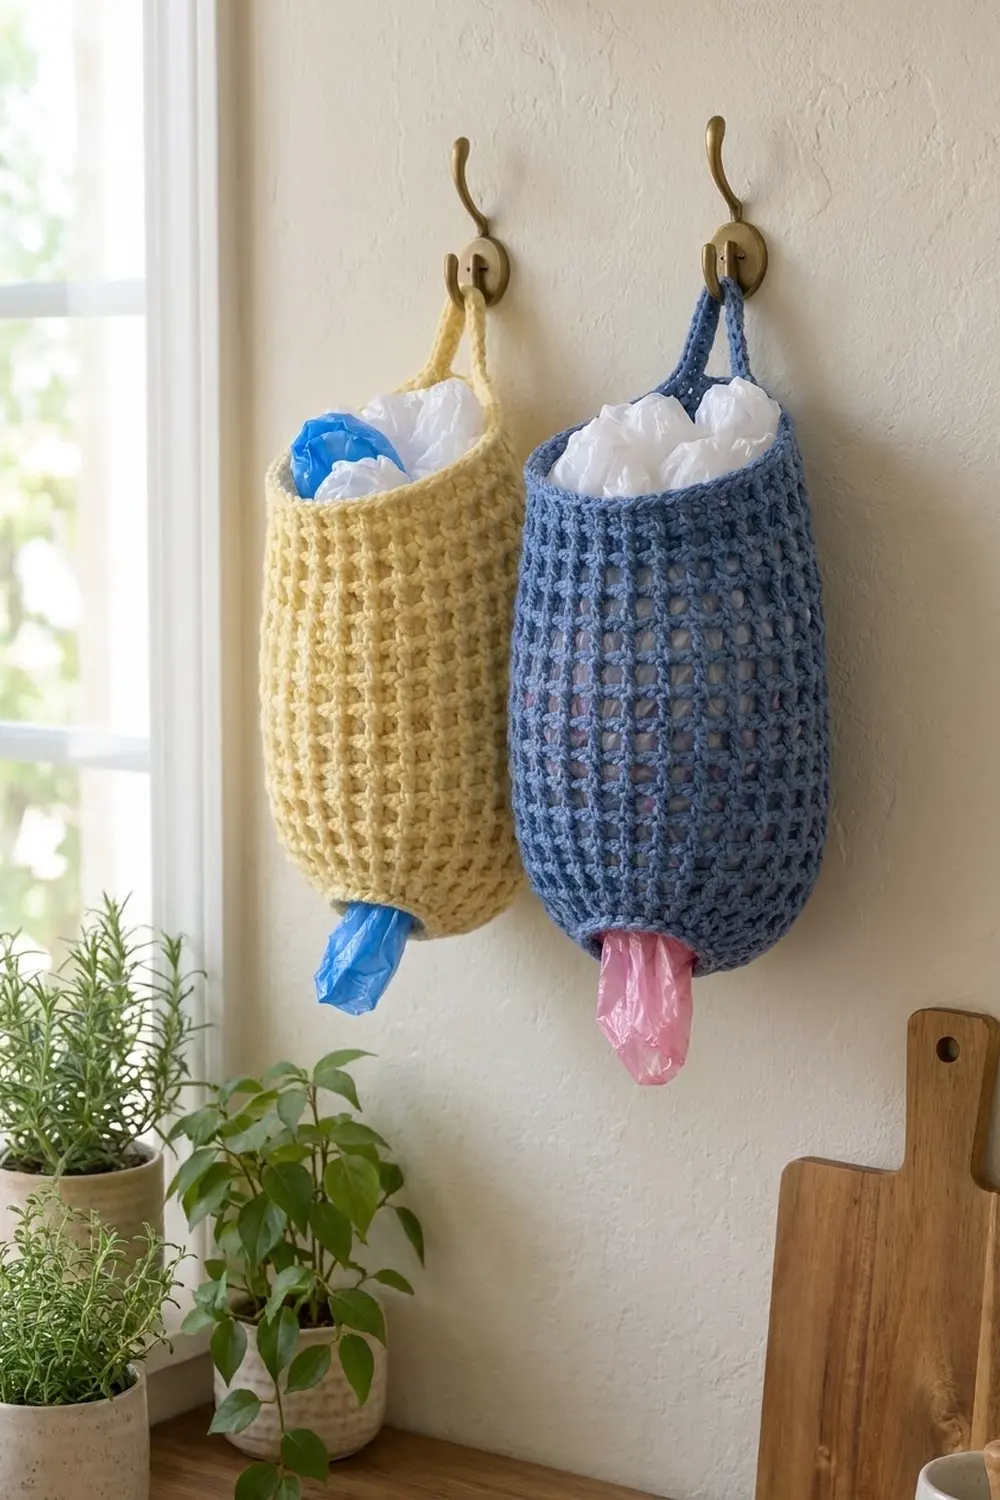
This soft, textured bag holder keeps loose grocery bags tidy. It hangs from a wall hook by a narrow strap. You stuff bags in through the wide top and pull them out one at a time through the small opening at the bottom.
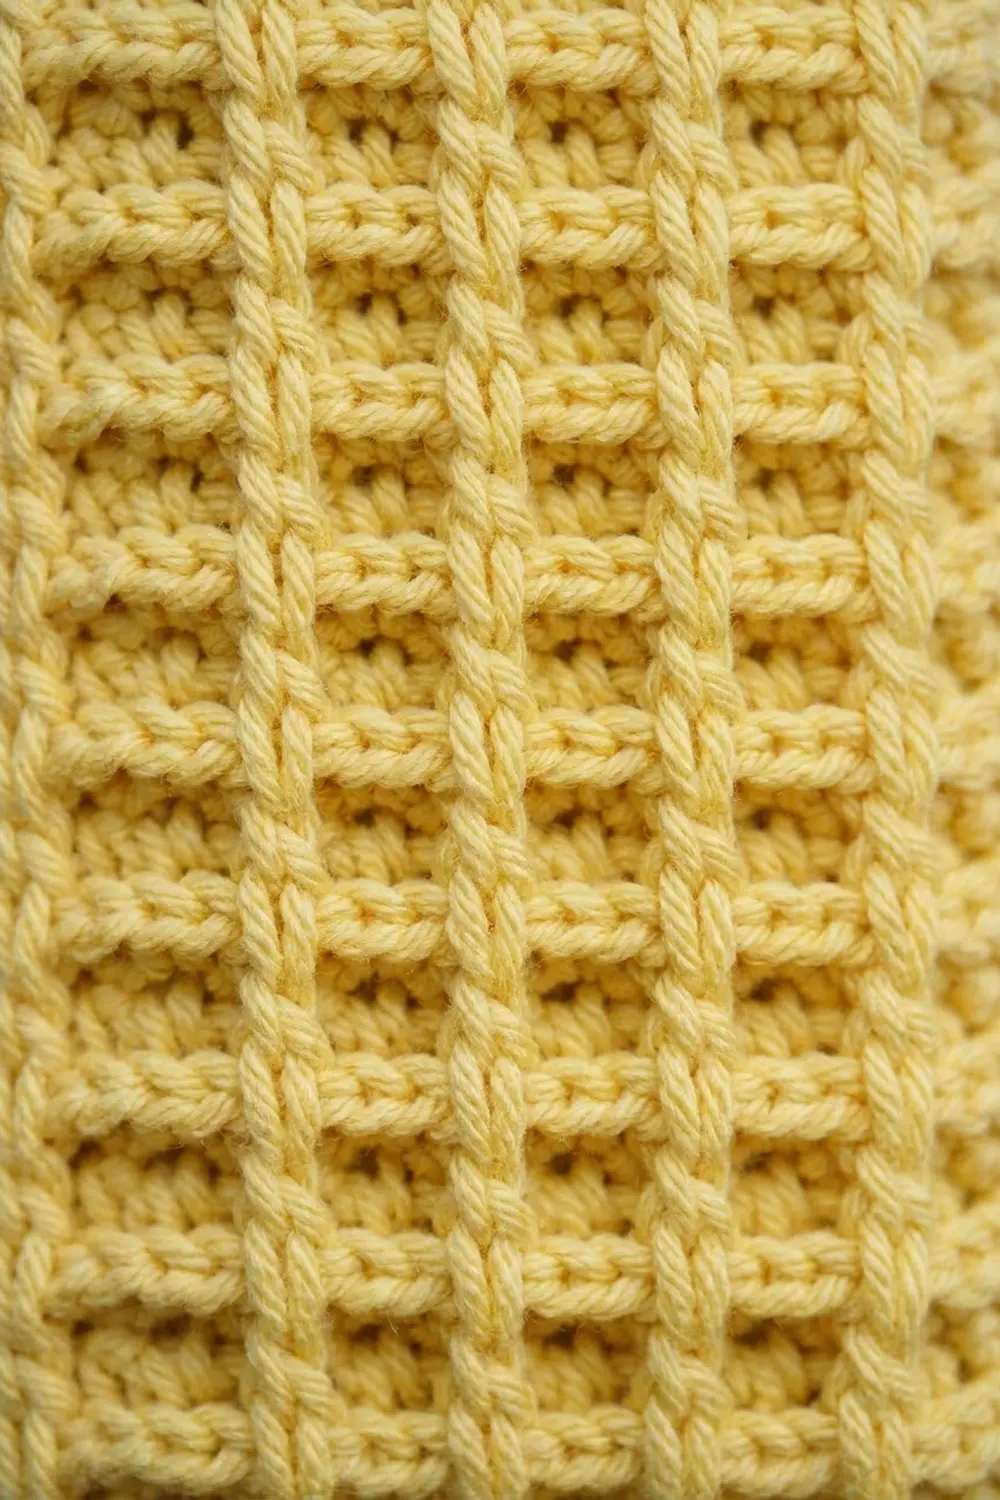
The sample is worked in a buttery pale yellow, and the same pattern looks just as good in denim blue. The waffle-grid texture comes from raised front post columns crossing calm single crochet bars. The fabric is sturdy but still flexible enough to squeeze bags through.
This pattern uses US crochet terms. The finished holder is 8 in (20.3 cm) wide at its widest point when laid flat and 13 in (33.0 cm) tall without the strap. With the strap it hangs about 17 in (43.2 cm) long.
The holder is one seamless piece. You start at the bottom opening with a chain ring and increase into the waffle body. Then you work straight, decrease slightly toward the top, add a short single crochet rim, and finish with a hanging strap worked directly onto the rim.
Finished Size and Construction
- Finished size: 8 in (20.3 cm) wide flat, 13 in (33.0 cm) tall, plus a strap that rises about 4 in (10.2 cm)
- Skill level: Easy-Intermediate (front post stitches, working in the round)
- Terminology: US
- Yarn weight: Worsted (category 4)
- Hook: 5.0 mm (H-8)
- Number of pieces: 1 (seamless tube)
- Layout: one vertical tube, open at both ends, with the strap at the back of the top rim
- Piece size: 16 in (40.6 cm) around at the widest part; bottom opening 9.1 in (23.1 cm) around
- Size before border: 12.5 in (31.8 cm) tall
- Border depth: top rim 0.5 in (1.3 cm); the bottom edge is a single slip stitch round
Materials
Choose a smooth worsted cotton or cotton blend. Cotton holds its shape when the holder is full, and it won’t stretch out over time the way soft acrylic can. Avoid fuzzy or very splitty yarn, because the post stitches need clear stitch definition.
- Main color (Butter Yellow): 130 g / 235 m
- Alternate colorway (Denim Blue): 130 g / 235 m, if you make the holder in blue instead
Each holder uses only one color. These amounts include a margin of about 15 percent for checking gauge and for small tension differences.
Tools:
– 5.0 mm (H-8) crochet hook
– Locking stitch markers (at least 2)
– Tapestry needle
– Scissors
– Measuring tape
– Rust-proof pins and a spray bottle for blocking
Abbreviations (US Terms)
- ch: chain
- sl st: slip stitch
- sc: single crochet
- dc: double crochet
- sc2tog: single crochet 2 together
- st(s): stitch(es)
- rnd(s): round(s)
- fpdc: front post double crochet
Special stitch (fpdc): Yarn over. Insert the hook from front to back to front around the post of the indicated stitch in the round below, yarn over and pull up a loop. Then (yarn over and pull through 2 loops) twice. The stitch sits on the front of the fabric as a raised column.
Grid pattern: This is a 2-round repeat worked over an even number of stitches. An A round is (fpdc, dc) all the way around. A B round is sc in every stitch. Stacking the fpdc columns on top of each other in every A round creates the waffle grid.
Gauge and Checkpoints
Gauge in grid pattern: 14 sts = 4 in (10.2 cm) across, and 10 rnds (5 A/B pairs) = 4 in (10.2 cm) tall. That means one A/B pair is 0.8 in (2.0 cm) tall.
Gauge in sc rounds: 14 sts and 16 rnds = 4 in (10.2 cm).
Since the holder is a single piece, the best gauge test is the first section itself. Work Rnds 1 through 9, then stop and measure before you continue. If you need to restart, you’ve only lost a short section.
Checkpoints:
– After Rnd 1: The flattened ring is about 4.6 in (11.7 cm) wide, which is 9.1 in (23.1 cm) around.
– After Rnd 8: The piece is about 2.9 in (7.4 cm) tall and 56 sts around. That’s 16 in (40.6 cm) around, or 8 in (20.3 cm) wide when flattened.
– After Rnd 28: About 10.9 in (27.7 cm) tall.
– After Rnd 32: 12.5 in (31.8 cm) tall and 6.9 in (17.5 cm) wide when flattened.
If your piece is too big: Switch to a 4.5 mm hook and restart. If it’s too small: Switch to a 5.5 mm hook. Check the height separately. If the width is right but the piece grows too fast or too slowly in height, add or remove one A/B pair in the straight section (Rnds 9 to 28) instead of changing hooks.
Pattern
Work in joined rounds with the right side always facing you. Don’t turn. The join seam will run up the back of the holder, under the strap. Place a marker in the first stitch of each round and move it up as you go.
The beginning ch 1 or ch 2 never counts as a stitch.
Bottom Band
Foundation: Ch 32. Sl st to the first ch to form a ring, taking care not to twist the chain.
Rnd 1: Ch 1, sc in each ch around, sl st to the first sc to join. (32 sts)
Rnd 2: Ch 1, sc in each st around, join. (32 sts)
These two rounds make the smooth, firm band around the bottom opening.
Increase Section
Rnd 3 (A): Ch 2, fpdc around next st, dc in next st; repeat from * around, join. (32 sts: 16 fpdc, 16 dc)
Rnd 4 (B): Ch 1, sc in next 3 sts, 2 sc in next st; repeat from * 7 more times, join. (40 sts)
Rnd 5 (A): Ch 2, fpdc around next st, dc in next st; repeat from * around, join. (40 sts: 20 fpdc, 20 dc)
Rnd 6 (B): Ch 1, sc in next 4 sts, 2 sc in next st; repeat from * 7 more times, join. (48 sts)
Rnd 7 (A): Ch 2, fpdc around next st, dc in next st; repeat from * around, join. (48 sts: 24 fpdc, 24 dc)
Rnd 8 (B): Ch 1, sc in next 5 sts, 2 sc in next st; repeat from * 7 more times, join. (56 sts)
The raised columns shift a little as you add stitches in this section. That’s normal. They settle into straight columns once the count stays at 56.
Straight Body
Rnd 9 (A): Ch 2, fpdc around next st, dc in next st; repeat from * around, join. (56 sts: 28 fpdc, 28 dc)
Rnd 10 (B): Ch 1, sc in each st around, join. (56 sts)
Rnds 11–28: Repeat Rnds 9 and 10 nine more times. (56 sts in each round)
From Rnd 11 on, line up each fpdc with the fpdc from the previous A round. Work each new fpdc around the sc that sits directly above an old fpdc. This keeps the vertical ribs in neat columns, while the sc rounds form the horizontal bars of the grid.
Rnds 9 to 28 give you 10 A/B pairs at 56 sts, which add 8 in (20.3 cm) of straight body.
Top Taper
Rnd 29 (A): Ch 2, fpdc around next st, dc in next st; repeat from * around, join. (56 sts: 28 fpdc, 28 dc)
Rnd 30 (B): Ch 1, sc in next 5 sts, sc2tog; repeat from * 7 more times, join. (48 sts)
Rnd 31 (A): Ch 2, fpdc around next st, dc in next st; repeat from * around, join. (48 sts: 24 fpdc, 24 dc)
Rnd 32 (B): Ch 1, sc in each st around, join. (48 sts)
This gentle decrease gives the holder a slightly rounded top, so the opening hugs the bags instead of gaping.
Border
The border has three parts: the top rim, the hanging strap, and a firm slip stitch edge around the bottom opening.
Border gauge: 14 sc and 16 sc rnds = 4 in (10.2 cm), so each sc round adds 0.25 in (0.6 cm).
Top Rim
Border Rnd 1: Ch 1, sc in each st around, join. (48 sts: 48 worked 1-per-existing-stitch + 0 added)
Border Rnd 2: Ch 1, sc in each st around, join. (48 sts: 48 worked 1-per-existing-stitch + 0 added)
With the holder flattened, each side of the rim holds 24 sts, or 6.9 in (17.5 cm). The full rim measures 13.7 in (34.8 cm) around.
Why the math works: The rim keeps exactly 48 sts, the same count as Rnd 32. Adding stitches would make the top flare and let bags spill out. Removing stitches would make the edge pucker. The two sc rounds add 0.5 in (1.3 cm), taking the height from 12.5 in (31.8 cm) to 13 in (33.0 cm).
Hanging Strap
Don’t fasten off after Border Rnd 2. Flatten the holder so the join seam runs down the center back.
- Sl st in the next 3 sts so the hook sits 3 sts past the seam. Call this point A.
- Ch 28.
- Without twisting the chain, bring it back across the seam. Sl st into the 7th rim st counting backward from A. Call this point B. There are now 6 rim sts between A and B.
- Strap Row 1: Turn, work 28 sc into the chain, then sl st into point A. (28 sts)
- Strap Row 2: Turn, sc in each sc across, then sl st into point B. (28 sts)
Fasten off. The 28-st strap is 8 in (20.3 cm) long and folds into a loop that rises about 4 in (10.2 cm) above the rim.
Bottom Edge
Turn the holder upside down. Join the yarn with a sl st in any free loop of the foundation chain.
Bottom Edge Rnd: Sl st loosely in each free loop around, join. (32 sts: 32 worked 1-per-existing-stitch + 0 added)
Each side of the flattened opening holds 16 sts, or 4.6 in (11.7 cm). The slip stitch round locks the opening at 9.1 in (23.1 cm) around. That’s snug enough to hold the bags in, but loose enough to let one out at a time.
Fasten off and weave in all ends on the inside.
Final Blocking
- Mist the holder lightly with water until it’s damp, not soaked.
- Stuff it loosely with a rolled towel or a few plastic bags so it takes its full rounded shape.
- Shape the widest point to 8 in (20.3 cm) across when flattened.
- Ease it gently lengthwise until it measures 13 in (33.0 cm) from the bottom edge to the top of the rim.
- Use your fingers to straighten the raised columns so they run vertically.
- Pin the strap in a neat arch and let the holder dry completely before you hang it.
Final Quality-Control Checklist
- The top rim has 48 sts and measures 13.7 in (34.8 cm) around.
- The widest section has 56 sts and measures 16 in (40.6 cm) around.
- The bottom opening has 32 sts and measures 9.1 in (23.1 cm) around.
- The total height is 13 in (33.0 cm), plus a strap loop about 4 in (10.2 cm) tall.
- The fpdc columns line up vertically through the straight body.
- The join seam sits at center back, under the strap.
- The strap is firmly anchored at both points with no gaps.
- All ends are woven in on the inside.
Troubleshooting
The waffle columns lean in a spiral. You’re probably starting the A round in the wrong stitch after the join. Always start in the first stitch after the join, and check that it sits on top of the previous column.
The bottom opening is too loose and bags fall out. Work the bottom edge slip stitches more tightly, or add a second slip stitch round in the back loops.
The bottom opening is too tight. Pull out the bottom edge round and rework it with a larger hook.
The top flares. Check that Rnd 30 decreased to 48 sts and that the rim stays at 48.
The raised columns look flat. Your fpdc may be catching the top loops instead of the post. Insert the hook around the whole post of the stitch below.
The holder is too short. Add one or two more A/B pairs to the straight body. Each pair adds 0.8 in (2.0 cm).
The strap twists. Make sure the chain isn’t twisted before Strap Row 1.
Care
Hand wash in cool water, or machine wash on a gentle cycle inside a laundry bag. Reshape while damp and lay flat to dry.
Final Notes
Here’s how the measurements build up. The bottom band is 32 sts, or 9.1 in (23.1 cm) around. Three increase rounds widen the body to 56 sts, which is 16 in (40.6 cm) around and 8 in (20.3 cm) wide. The bottom band plus fifteen A/B pairs bring the body to 12.5 in (31.8 cm) tall. The taper brings the top back to 48 sts, and the two-round rim finishes the holder at 13 in (33.0 cm) tall.
Check your gauge after Rnd 9, and the rest of the measurements will follow. Make one in yellow and another in blue, and hang them side by side.
Happy crocheting!