

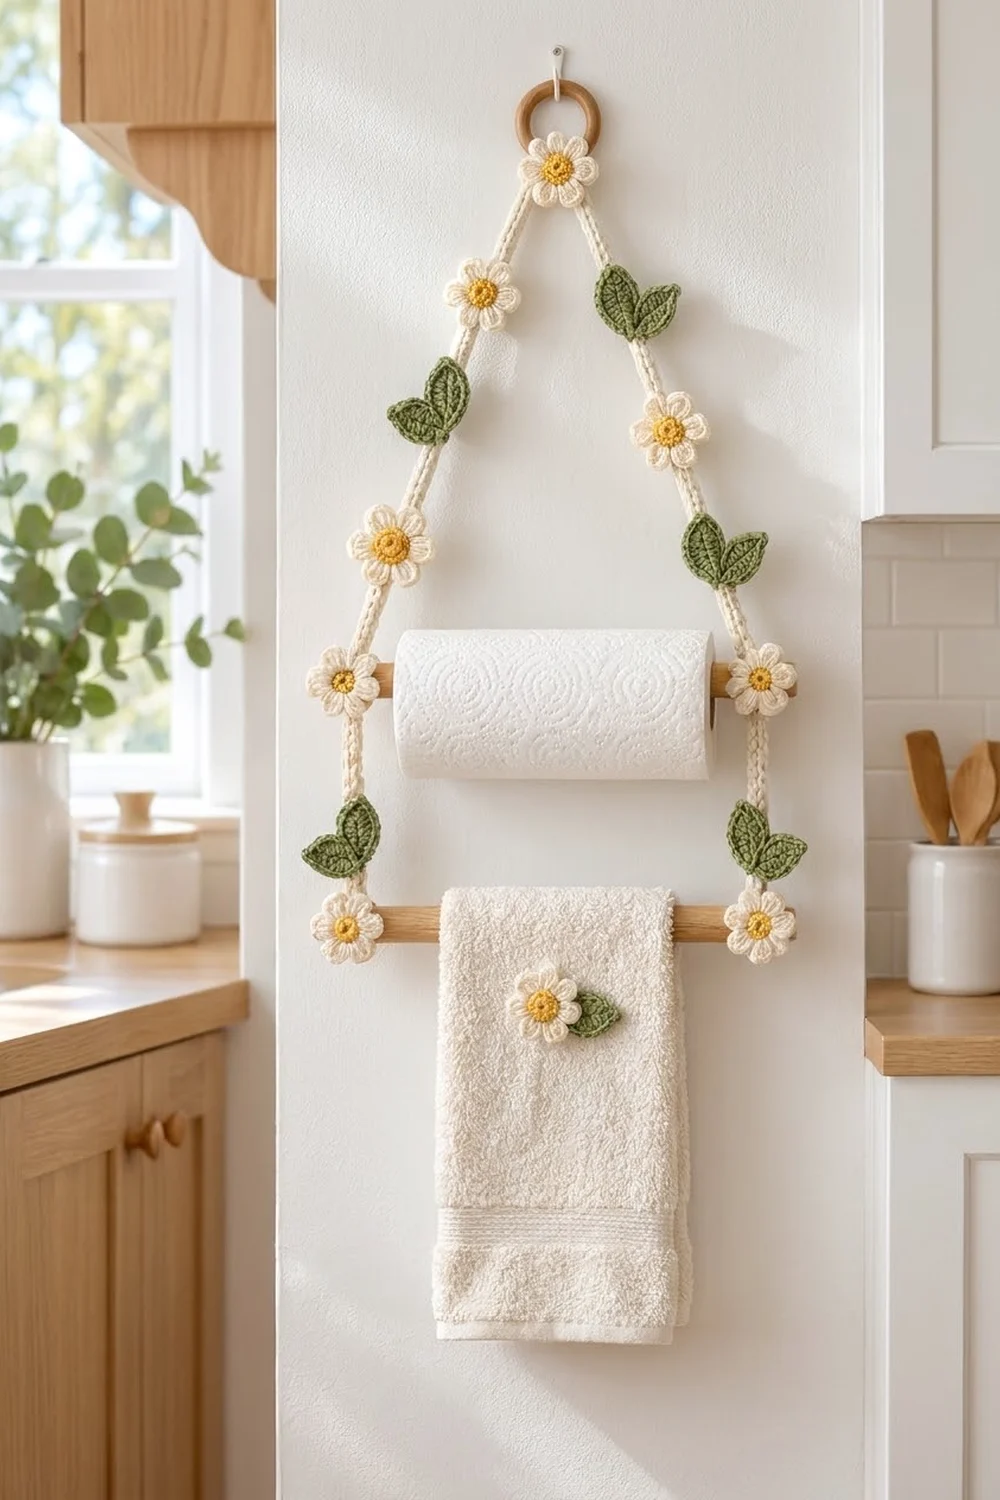
The Daisy Meadow Hanging Paper Towel Holder brings a little garden to your kitchen wall. Two cream rope cords drop from a wooden ring in a soft A-shape. They hold a paper towel roll on an upper dowel and end at a hand towel bar below. Small daisies and sage green leaf pairs climb along both cords.
The colors are calm and fresh: cream for the cords and petals, golden yellow for the daisy centers, and sage green for the leaves. It suits farmhouse, Scandinavian, and cottage kitchens equally well.
This pattern uses US crochet terms. The finished hanger measures about 14 in (35.6 cm) wide and 25 in (63.5 cm) tall from the top of the ring to the bottom daisies.
Construction is simple. You make two slip stitch cords with the yarn held double, then a set of small daisies and leaves with a single strand. The cords loop around the ring and the two dowels, and you sew the appliqués on at marked stitch positions. A matching daisy and leaf go on the hand towel.
Finished Size and Construction
- Finished size: about 14 in (35.6 cm) wide x 25 in (63.5 cm) tall
- Skill level: Easy
- Terminology: US crochet terms
- Yarn weight: Worsted weight (#4) cotton
- Hooks: 3.75 mm (F-5) for appliqués, 5.0 mm (H-8) for cords
- Number of pieces: 2 cords, 10 daisies, 13 leaves
- Layout: A-frame; cords 12 in (30.5 cm) apart at the dowels
- Piece size: cord 30 in (76.2 cm) x 0.4 in (1.0 cm); daisy 1.75 in (4.4 cm) across; leaf 1.75 in (4.4 cm) x 0.9 in (2.3 cm)
- Size before border: daisy center 0.75 in (1.9 cm) across after Round 2
- Border depth: no added border; the daisy petal round adds 0.5 in (1.3 cm) on each side of the center
Materials
Choose a smooth worsted cotton, either mercerized or matte. Cotton holds its shape on the wall, does not stretch under the weight of a paper towel roll, and handles kitchen humidity.
- Cream: 45 g, about 70 m (cords and petals)
- Golden yellow: 10 g, about 15 m (daisy centers)
- Sage green: 25 g, about 40 m (leaves)
These amounts include about 20 percent extra for gauge swatches and sewing tails.
Tools and hardware:
- 3.75 mm (F-5) and 5.0 mm (H-8) crochet hooks
- 1 wooden ring, 2 in (5.1 cm) outer diameter
- 2 wooden dowels, 14 in (35.6 cm) long and 5/8 in (1.6 cm) thick
- Tapestry needle
- Locking stitch markers
- Sewing pins
- Ruler or tape measure
- Scissors
- Standard paper towel roll, up to 11 in (27.9 cm) tall, and a hand towel
Abbreviations (US Terms)
- ch – chain
- sl st – slip stitch
- sc – single crochet
- hdc – half double crochet
- dc – double crochet
- st(s) – stitch(es)
- sp – space
- MR – magic ring
- rep – repeat
Special stitch – back bump sl st: Turn the chain over. Each chain has a small horizontal bar on the back. Insert the hook under that bar only, yarn over, and pull through the bar and the loop on the hook.
Petal: (hdc, 2 dc, hdc) all in the same st.
Gauge and Checkpoints
Before you make the full set, make one daisy, one leaf, and a 10 in (25.4 cm) test length of cord.
- Daisy center (3.75 mm hook): 0.75 in (1.9 cm) across after Round 2.
- Finished daisy: 1.75 in (4.4 cm) from petal tip to petal tip.
- Leaf: 1.75 in (4.4 cm) long including the tip, 0.9 in (2.3 cm) wide.
- Cord (5.0 mm hook, yarn held double): 3 back bump sl st = 1 in (2.5 cm); 30 sts = 10 in (25.4 cm).
If too big: go down one hook size (0.25 mm) and check again.
If too small: go up one hook size (0.25 mm) and check again.
The cord gauge matters most. If 90 sts measure more than 30 in (76.2 cm), the roll will hang low and the cords will spread. If they measure less, the paper towel roll may not clear the ring.
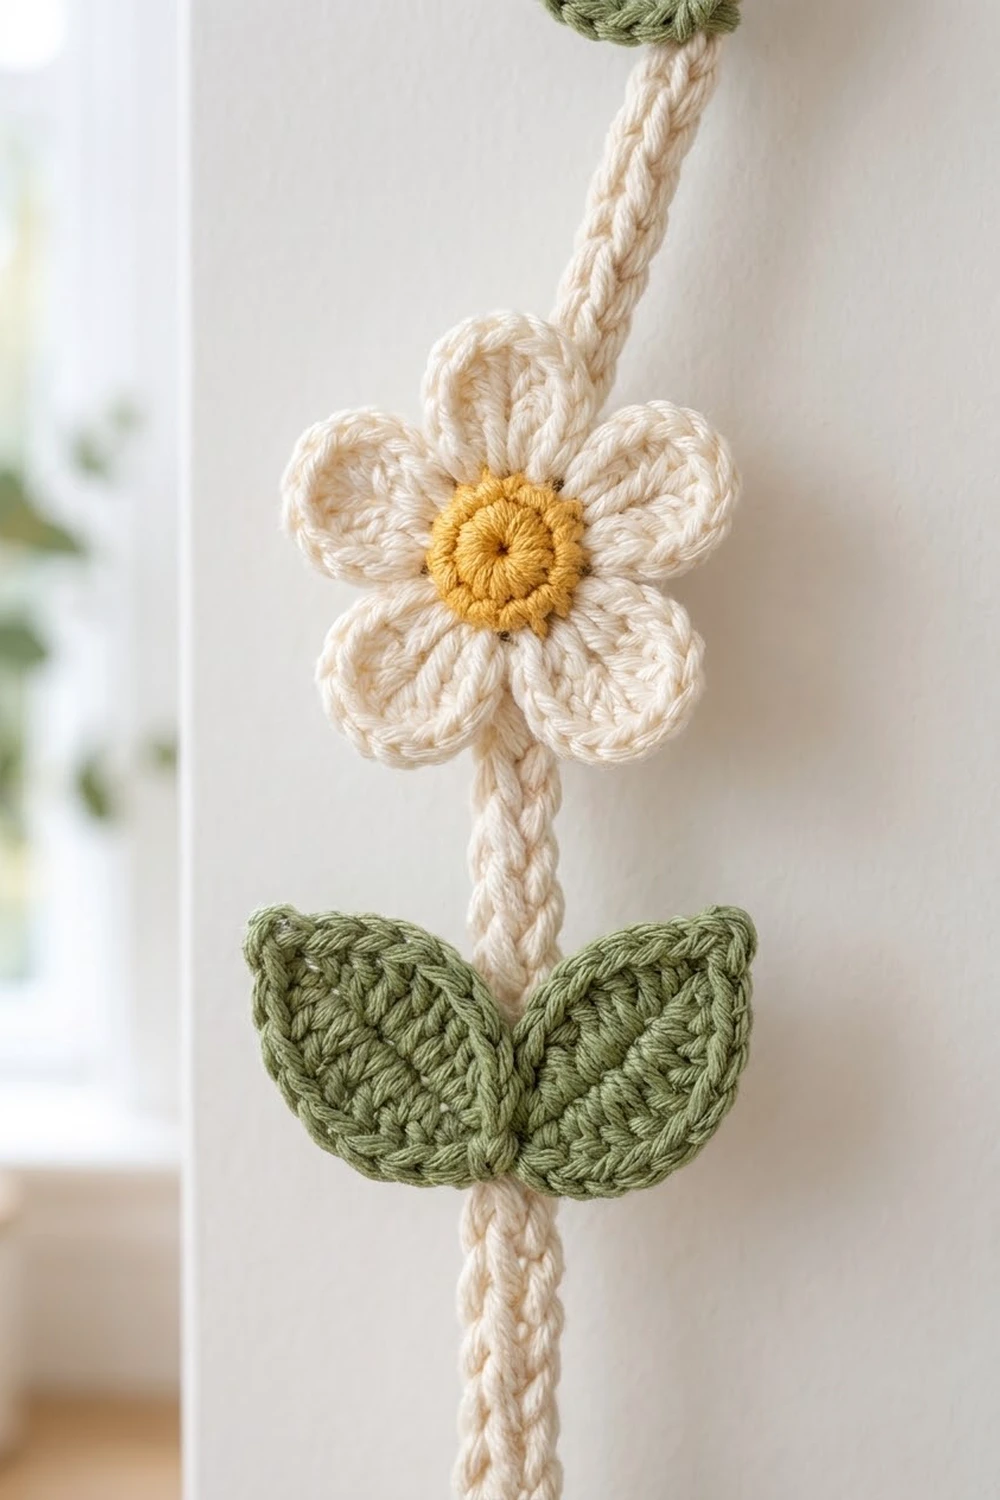
Cord (Make 2)
With 5.0 mm hook and cream held double:
Row 1: Ch 91. Sl st in the back bump of 2nd ch from hook and in the back bump of each ch across. (90 sl st)
Fasten off, leaving a 12 in (30.5 cm) tail at each end. The back bump row rolls the chain into a firm rope with a braided look on the front.
Checkpoint: Each cord measures 30 in (76.2 cm) long and about 0.4 in (1.0 cm) wide. Lay both cords side by side. Their stitch counts must match exactly, and their lengths should be within 1 st of each other.
Mark the cord segments. Count from the starting end and place markers:
- Sts 1–9: ring fold (9 sts, 3 in / 7.6 cm)
- Sts 10–54: slant section (45 sts, 15 in / 38.1 cm)
- Sts 55–60: upper dowel loop (6 sts, 2 in / 5.1 cm)
- Sts 61–81: drop section (21 sts, 7 in / 17.8 cm)
- Sts 82–90: lower dowel fold (9 sts, 3 in / 7.6 cm)
Check: 9 + 45 + 6 + 21 + 9 = 90 sts.
Daisy (Make 10)
With 3.75 mm hook and golden yellow:
Round 1: Make a MR, 6 sc in ring, pull ring closed, sl st to first sc. (6 sc)
Round 2: Ch 1, 2 sc in each st around, sl st to first sc. (12 sc)
Fasten off yellow. Checkpoint: the center measures 0.75 in (1.9 cm) across and lies flat.
Round 3 (petal round): Join cream with sl st in any st of Round 2. *Petal in next st, sl st in next st; rep from * 4 more times, petal in next st, sl st in the joining sl st.
Count: 6 petals x 4 sts = 24 petal sts, plus 6 sl sts = 30 sts. This round is worked over the 12 sts of Round 2, and each petal uses 2 of them: 1 for the petal and 1 for the sl st.
Fasten off, leaving a 10 in (25.4 cm) cream tail for sewing. Weave in the yellow tail.
The sl st between petals pulls each petal into its own rounded shape. This gives six distinct petals around the yellow center.
Leaf (Make 13)
With 3.75 mm hook and sage green:
Ch 9.
Side 1: Sc in 2nd ch from hook, hdc in next ch, dc in next 3 ch, hdc in next ch, sc in next ch. (7 sts)
Tip: (Sc, ch 2, sc) all in last ch.
Side 2: Rotate the leaf and work along the other side of the foundation ch. Sc in next ch, hdc in next ch, dc in next 3 ch, hdc in next ch, sc in next ch. (7 sts)
Sl st in first sc of Side 1 to close the base.
Count: 7 + 2 (tip sc) + 7 = 16 sts, plus 1 ch-2 sp at the tip.
Fasten off, leaving a 10 in (25.4 cm) green tail for sewing.
Checkpoint: 1.75 in (4.4 cm) long and 0.9 in (2.3 cm) wide, pointed at the tip and tapered at the base. The foundation ch runs down the middle like a vein.
Make All Pieces
| Piece | Color(s) | Quantity | Use |
|---|---|---|---|
| Cord | Cream, double | 2 | Frame |
| Daisy | Yellow + cream | 10 | 9 on hanger, 1 on towel |
| Leaf | Sage green | 13 | 12 on hanger (6 pairs), 1 on towel |
Placement layout (per cord, from the ring down):
          [ RING DAISY - covers both ring folds ]
   LEFT CORD                        RIGHT CORD
   st 18      Daisy                 st 18      Daisy
   st 27      Leaf pair             st 27      Leaf pair
   st 36      Daisy                 st 36      Daisy
   st 45      Leaf pair             st 45      Leaf pair
   sts 57-58  Daisy (upper dowel)   sts 57-58  Daisy (upper dowel)
   st 71      Leaf pair             st 71      Leaf pair
   sts 84-85  Daisy (lower dowel)   sts 84-85  Daisy (lower dowel)
Each cord gets 4 daisies and 3 leaf pairs (6 leaves), so the two cords use 8 daisies and 12 leaves. With the ring daisy, that makes 9 daisies on the hanger. The last daisy and leaf go on the towel.
Joining
Step 1 – Ring folds. Pass sts 4–6 of one cord around the bottom of the ring. Lay sts 1–3 flat against the back of sts 7–9 and whipstitch them together with the tail. Repeat with the second cord right next to the first, so both cords hang side by side from the ring.
Step 2 – Upper dowel loops. On each cord, tack st 54 to st 61 at the back with 2–3 stitches. Sts 55–60 now form a closed loop. Slide the paper towel roll onto the upper dowel first, then slide the dowel through both loops.
Step 3 – Lower dowel folds. Wrap sts 82–87 around the lower dowel. Lay sts 88–90 against the back of sts 79–81 and whipstitch. Repeat on the second cord.
Step 4 – Position the cords. Slide each cord to 1 in (2.5 cm) in from the dowel ends. The cords are now 12 in (30.5 cm) apart on both dowels.
Step 5 – Leaf pairs. Place two leaves base to base on the front of the cord, tips pointing outward in a V. Overlap the bases by about 0.25 in (0.6 cm). Sew the bases through the center of one cord st. Then tack each leaf once at its middle so it does not flip.
Step 6 – Daisies. Center each daisy over its marked st. Whipstitch around the yellow center only, through the back of Round 2 and into the cord. Leave the petals free so they stay rounded. Sew the ring daisy over both ring folds at once. Sew each dowel daisy to the front of its dowel loop or fold.
Tension advice: Sew firmly enough that the pieces do not shift, but do not pull the cord into a pucker. If the cord bends at a sewing point, loosen the last stitch.
Size checkpoint: Hang the frame. It should measure about 14 in (35.6 cm) wide and 25 in (63.5 cm) tall, with about 7 in (17.8 cm) of cord between the two dowels.
Border
This design has no separate border round. The petal round is the edge of each daisy, and the cords are finished by their own slip stitch row.
Border gauge: the petal round adds 0.5 in (1.3 cm) beyond the center on every side. A 0.75 in (1.9 cm) center plus 0.5 in (1.3 cm) on each side gives a 1.75 in (4.4 cm) daisy.
Counts per side: the 12 center sts divide into 6 equal sections of 2 sts. Each section holds 1 petal (4 sts) and 1 sl st, so each of the 6 sides has exactly 5 sts, and 6 x 5 = 30.
Cord edges: each cord has 90 sl sts along its length, one for each of the 90 chains worked. No stitches are added at the ends.
Why the math works: 12 divides evenly by 2, so every petal sits on the same base and the daisy stays round. On the cords, every segment is a multiple of 3 sts, so at 3 sts per inch each one is a whole number of inches.
Final Blocking
- Before sewing, pin each daisy and leaf face down on a blocking mat.
- Shape the daisy petals into even rounds and pin the leaf tips into sharp points.
- Hold a steam iron 1 in (2.5 cm) above the pieces for a few seconds. Do not press.
- Let the pieces dry completely before unpinning.
- Dampen the cords lightly, hang each one with a small weight, and let them dry straight.
- Check that each cord still measures 30 in (76.2 cm).
- After assembly, steam any leaves that curled during sewing.
Final Quality-Control Checklist
- Both cords have 90 sts and measure 30 in (76.2 cm).
- Every daisy has 6 petals and measures 1.75 in (4.4 cm).
- Every leaf has 16 sts plus a ch-2 tip and measures 1.75 in (4.4 cm).
- Ring folds, dowel loops, and lower folds are sewn securely.
- Cords sit 12 in (30.5 cm) apart on both dowels.
- The appliqués on the left and right cords mirror each other.
- All tails are woven in and hidden behind the appliqués.
Troubleshooting
Cord twists while hanging: Block it damp with a weight. Make sure the braided side faces front before sewing.
Cord too short: Your sl sts are tight. Go up one hook size or loosen your grip.
Daisy cups or ruffles: A cupped daisy means Round 2 is too tight, and ruffled petals mean the petal round is too loose. Change the hook size for that round.
Petals blur together: Make sure each sl st goes into its own st between petals.
Leaf tip is blunt: Keep the ch-2 at the tip, and block the point firmly.
Roll will not fit: Check that the cords are 12 in (30.5 cm) apart, and slide them outward if needed.
Care
Take off the paper roll and towel before washing. Hand wash in cool water with mild soap, press out the water in a towel, and dry flat.
Final Notes
The measurements build in a short, reliable chain. The daisy center reaches 0.75 in (1.9 cm), the petal round brings it to 1.75 in (4.4 cm), and each leaf matches that length. Each cord has 90 sts at 3 sts per inch, giving 30 in (76.2 cm). That length is split into fixed segments for the ring fold, slant, dowel loop, drop, and lower fold. With the cords set 12 in (30.5 cm) apart on 14 in (35.6 cm) dowels, the frame stands about 25 in (63.5 cm) tall, ready for its daisies and leaves.
Happy crocheting!