

This hanging paper towel holder brings a small forest into your kitchen for the holidays. Two thick cream cords hang from a wooden ring, hold a paper towel roll on an upper dowel, and carry a tea towel on a lower dowel. Six little tiered trees climb the cords, and a seventh sits on the towel.
The palette is calm and cozy: forest green trees, chocolate-brown trunks, and cream cords against natural wood. The style is Scandinavian farmhouse, simple enough to leave up from late November through January.
This pattern uses US crochet terms. The finished hanger measures about 14 in (35.6 cm) wide and 23 in (58.4 cm) tall from the top of the ring to the cord tails. Each tree is 2.5 in (6.4 cm) wide and 3.2 in (8.1 cm) tall.
You will crochet two Romanian cords and seven flat tree appliqués. Each tree is worked top-down in rows, with a step-in row at each tier so the tier points stand out. A one-row edging rounds off those points. Then you fold the cords over the ring, wrap them around the dowels, and sew the trees in place.
Finished Size and Construction
- Finished size: 14 in (35.6 cm) wide × 23 in (58.4 cm) tall
- Skill level: Easy
- Terminology: US
- Yarn weight: DK (3) for trees, worsted (4) cotton for cords
- Hooks: 3.5 mm (E-4) for trees, 5.0 mm (H-8) for cords
- Number of crocheted pieces: 9 (2 cords, 7 trees)
- Layout: cords form a triangle from ring to upper dowel, then drop 7 in (17.8 cm) straight down to lower dowel
- Tree size (finished): 2.5 in (6.4 cm) × 3.2 in (8.1 cm)
- Tree size before edging: 2.2 in (5.6 cm) × 3 in (7.6 cm)
- Edging depth: about 0.15 in (0.4 cm)
- Cord size: 28 in (71.1 cm) long × 0.4 in (1.0 cm) wide
Materials
For the trees, choose a smooth DK acrylic or cotton blend so the tier points stay crisp. For the cords, a worsted-weight cotton gives a firm cord that won’t stretch under a towel.
- Forest green DK: 25 g / 60 m (7 trees and edgings)
- Chocolate brown DK: 6 g / 14 m (7 trunks)
- Cream worsted cotton: 60 g / 94 m (2 cords)
Quantities include a margin of about 20 percent for swatching and sewing.
Tools and hardware:
- 3.5 mm (E-4) and 5.0 mm (H-8) hooks
- Tapestry needle
- Rust-proof pins
- 1 wooden ring, 2 in (5.1 cm) diameter
- 2 wooden dowels, 14 in (35.6 cm) long × 0.5 in (1.3 cm) diameter
- Measuring tape
- Optional: green sewing thread and needle (for the towel tree), tea towel
Abbreviations (US Terms)
- ch – chain
- sc – single crochet
- hdc – half double crochet
- sl st – slip stitch
- st(s) – stitch(es)
- sp – space
- RS – right side
Special stitch: Romanian cord. Ch 2, sc in 2nd ch from hook. Rotate the work clockwise like turning a page so the cord edge faces you. Insert hook under the 2 loops on the left edge, yarn over, pull up a loop, yarn over, pull through both loops. Each sc you add this way counts as 1 cord row.
Gauge and Checkpoints
Tree gauge (3.5 mm hook): 20 hdc × 15 rows = 4 in (10.2 cm), so 5 sts and 3.75 rows per inch. In sc, the trunk works out to about 5 sts and 5 rows per inch.
Cord gauge (5.0 mm hook): 4 Romanian cord rows = 1 in (2.5 cm).
Make one tree before you make the rest. Measure at these checkpoints:
- After Row 3 (7 sts): 1.4 in (3.6 cm) wide
- After Row 6 (9 sts): 1.8 in (4.6 cm) wide
- After Row 9 (11 sts): 2.2 in (5.6 cm) wide, 2.4 in (6.1 cm) tall
- After the trunk: 3 in (7.6 cm) tall
- After edging: 2.5 in (6.4 cm) × 3.2 in (8.1 cm)
If your tree is too big, go down 0.5 mm in hook size. If it’s too small, go up 0.5 mm. A difference of 0.2 in (0.5 cm) either way is fine, because the trees are decorative. Just keep all seven trees the same.
For the cords, check after 20 rows: the cord should be 5 in (12.7 cm) long. Length matters more than width here, so measure as you go.
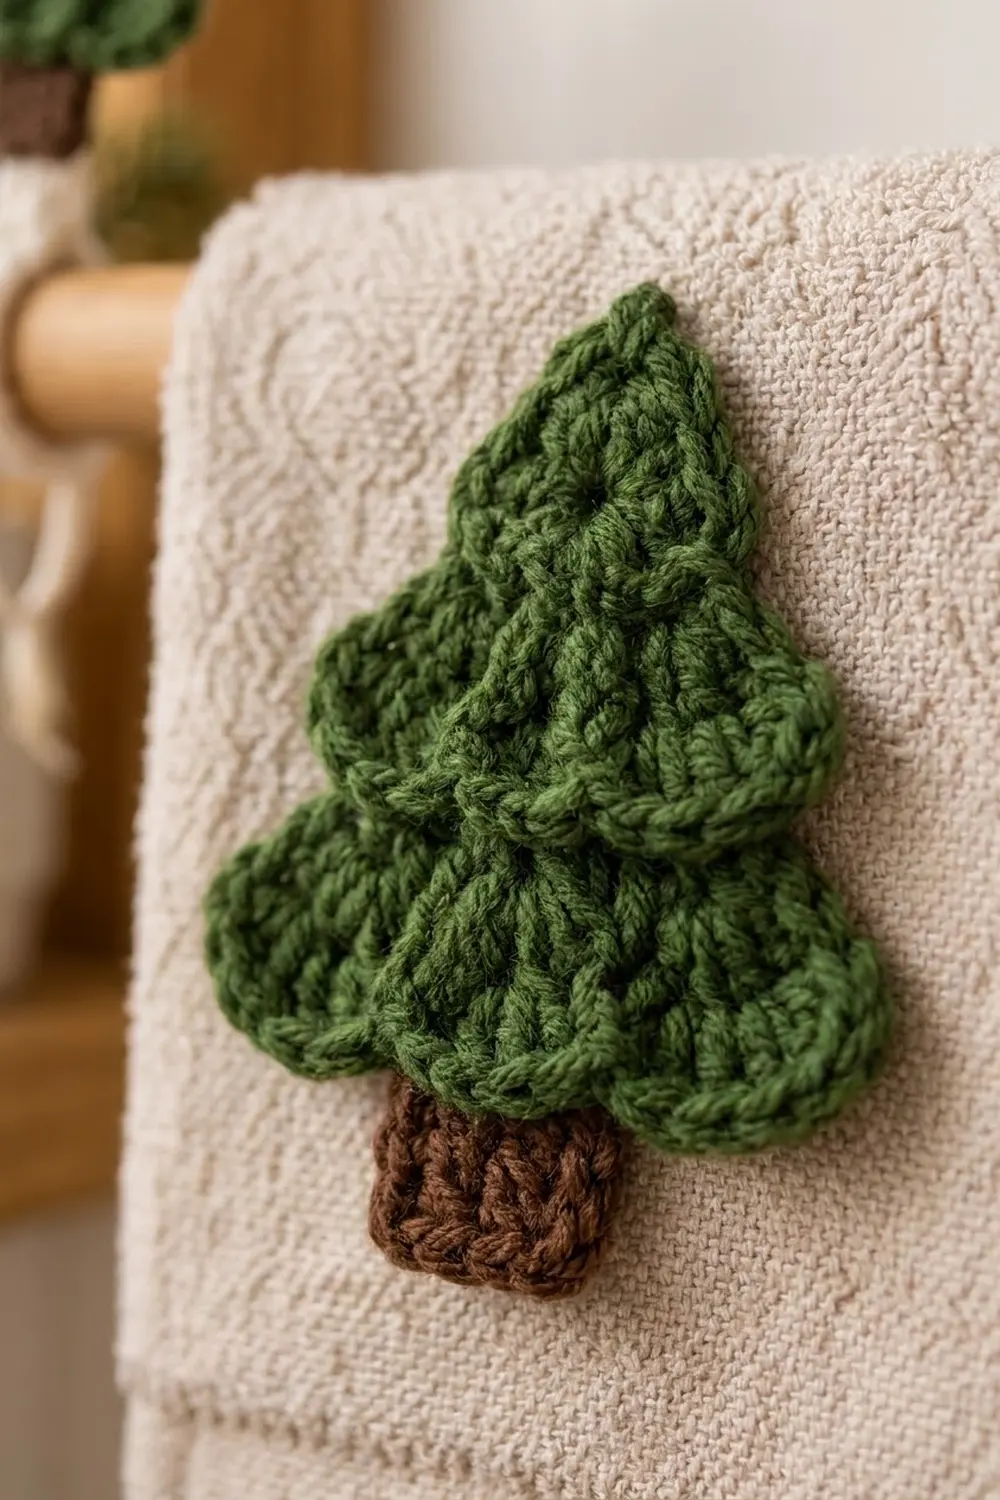
Tree Appliqué (Make 7)
The tree is worked top-down in green. Ch 1 at the start of each row does not count as a stitch.
Tier 1
Row 1: With green and 3.5 mm hook, ch 2. Work 3 hdc in 2nd ch from hook. (3 sts)
Row 2: Ch 1, turn. 2 hdc in first st, hdc in next st, 2 hdc in last st. (5 sts)
Row 3: Ch 1, turn. 2 hdc in first st, hdc in next 3 sts, 2 hdc in last st. (7 sts)
Tier 2
Row 4 (step-in row): Ch 1, turn. Skip first st, hdc in next 5 sts, leave last st unworked. (5 hdc worked 1-per-stitch into the center 5 sts + 0 added; 2 sts left unworked)
These 2 unworked stitches become the side points of Tier 1.
Row 5: Ch 1, turn. 2 hdc in first st, hdc in next 3 sts, 2 hdc in last st. (7 sts)
Row 6: Ch 1, turn. 2 hdc in first st, hdc in next 5 sts, 2 hdc in last st. (9 sts)
Tier 3
Row 7 (step-in row): Ch 1, turn. Skip first st, hdc in next 7 sts, leave last st unworked. (7 hdc worked 1-per-stitch into the center 7 sts + 0 added; 2 sts left unworked)
Row 8: Ch 1, turn. 2 hdc in first st, hdc in next 5 sts, 2 hdc in last st. (9 sts)
Row 9: Ch 1, turn. 2 hdc in first st, hdc in next 7 sts, 2 hdc in last st. (11 sts)
Fasten off green. The tops of Row 9 now form the bottom edge of the tree.
Trunk
Row 10: Count the 11 sts of Row 9 and find the center 3 (sts 5, 6, and 7). Join brown with sc in st 5, sc in sts 6 and 7. (3 sc)
Rows 11–12: Ch 1, turn. Sc in each st across. (3 sc)
Fasten off and leave a 6 in (15.2 cm) tail for sewing. The trunk is about 0.6 in (1.5 cm) square. On each side of the trunk, 4 green sts of Row 9 stay free (sts 1–4 and 8–11).
Edging
The edging is the border of each tree. It’s one continuous row around the green outline, starting at one side of the trunk and ending at the other. It does not cross the trunk.
Edging Gauge
Hdc row-ends are taller than sc stitches. Each tier side is a slanted edge of 3 rows, about 0.9–1.06 in (2.3–2.7 cm) long. At 5 sc per inch, 5 sc covers 1 in (2.5 cm), so each tier side gets 5 sc: 2 sc, 1 sc, 2 sc across its 3 row-ends.
Edging Row
With RS facing and the 3.5 mm hook, join green with sc in st 4 of Row 9 (the green st next to the trunk). Work up the left half:
- Sc in sts 3 and 2. (3 sc on the bottom segment, including the joining sc)
- 3 sc in st 1 (Tier 3 point). (3 sc)
- Along row-ends 9, 8, 7: 2 sc in first row-end, sc in next, 2 sc in next. (5 sc)
- 3 sc in the unworked st of Row 6 (Tier 2 point). (3 sc)
- Along row-ends 6, 5, 4: 2 sc, sc, 2 sc. (5 sc)
- 3 sc in the unworked st of Row 3 (Tier 1 point). (3 sc)
- Along row-ends 3, 2, 1: 2 sc, sc, 2 sc. (5 sc)
Left half total: 3 + 3 + 5 + 3 + 5 + 3 + 5 = 27 sc. The 3 sc in the Tier 3 corner are already part of this count.
Tip: (Sc, ch 1, sc) in the base of the foundation ch. (2 sc + 1 ch-1 sp)
Work down the right half as a mirror image of the left:
- 5 sc along row-ends 1, 2, 3
- 3 sc in Row 3’s unworked st
- 5 sc along row-ends 4, 5, 6
- 3 sc in Row 6’s unworked st
- 5 sc along row-ends 7, 8, 9
- 3 sc in st 11
- sc in sts 10, 9, and 8
Right half total: 27 sc.
Edging total: 27 + 2 + 27 = 56 sc + 1 ch-1 sp. Sl st to the side of the trunk and fasten off.
Why the Math Works
There are 6 tier sides with 5 sc each (30 sc) and 6 tier points with 3 sc each (18 sc). That’s 48 sc. Add 3 sc on each bottom segment (6 sc) and 2 sc at the tip, and you get 56 sc.
The two bottom segments use 3 free sts each (sts 2–4 and 8–10). The corner sts 1 and 11 are counted only as points, never twice. Together with the 3 trunk sts, that accounts for all 11 sts of Row 9 (1 + 3 + 3 + 3 + 1). The 3-sc points flare the tier ends into rounded tips.
Romanian Cord (Make 2)
Row 1: With cream and 5.0 mm hook, ch 2, sc in 2nd ch from hook. (1 cord row)
Rows 2–112: Rotate clockwise, insert hook under the 2 loops on the left edge, sc. (112 cord rows)
The cord should measure 28 in (71.1 cm). Fasten off with a 10 in (25.4 cm) tail. Make a second cord to the same row count. Matching row counts keeps both sides of the hanger level.
Make All Pieces
- Forest green + brown: 7 trees (6 for the cords, 1 for the towel)
- Cream: 2 cords, 112 rows each
Here’s the layout. Distances are measured along each cord from the point where it leaves the ring.
              ( O )        ring
             /     \
          L1        R1     L1 = 5 in (12.7 cm)   R1 = 3 in (7.6 cm)
          /           \
        L2             R2  L2 = 11 in (27.9 cm)  R2 = 9 in (22.9 cm)
        /               \
  ===[==|====roll=======|==]===   upper dowel
        |               |
       L3               R3  3.5 in (8.9 cm) below upper dowel
        |               |
  ===[==|====towel======|==]===   lower dowel
        |    [T7]       |         T7 = tree on towel
      tail             tail
Joining
Assembly has two parts: hanging the cords on the hardware, then sewing the trees to the cords.
Cords to Hardware
- Fold the first 1.5 in (3.8 cm) of one cord over the ring. Whipstitch the cord edge to itself, one stitch per cord row, through the outer loops only.
- Attach the second cord beside it the same way.
- Measure 13.5 in (34.3 cm) down each cord. Wrap the cord once around the upper dowel, 0.75 in (1.9 cm) in from the end, with a short overlap. This uses about 2 in (5.1 cm) of cord.
- Sew the wrap to itself so it forms a loop around the dowel. Don’t sew it to the dowel. That way the dowel slides out when you change rolls.
- Measure 7 in (17.8 cm) down and wrap the lower dowel the same way. Sew the wrap and leave a 2 in (5.1 cm) tail. Knot the tail end and weave in the yarn end.
The cord budget adds up: 1.5 + 13.5 + 2 + 7 + 2 + 2 = 28 in (71.1 cm).
Trees to Cords
Center each tree over its cord, with the cord running behind its vertical center line. Use the green or brown tails to tack the tree at 3 points:
- the tip ch-1 sp
- the center hdc of Row 5
- the center sc of Row 12 (trunk)
At each point, catch 1 loop of the cord edge. Make 2 small stitches per point.
Tension: Sew snugly but don’t pull hard. Over-tight tacks pucker the tree and twist the cord. The tree should lie flat with the cord straight behind it.
Sew the seventh tree onto the towel with sewing thread, centered and 2 in (5.1 cm) above the hem.
Size checkpoint: Hang the piece. The dowels should be level, with the cords 12.5 in (31.8 cm) apart on each dowel. The dowels should sit 7 in (17.8 cm) apart vertically, and the overall height should be about 23 in (58.4 cm).
Final Blocking
- Pin each tree to a foam mat at 2.5 in (6.4 cm) × 3.2 in (8.1 cm).
- Pin all 6 tier points outward so they flare evenly.
- Mist with water (or steam lightly for acrylic, holding the iron above the piece) and let dry fully.
- Hang each cord with a light weight, like a dowel, for an hour so it straightens.
- Unpin the trees, then assemble or reattach.
Final Quality-Control Checklist
- All 7 trees match: 11 sts at Row 9, 3-st trunk, 56-sc edging
- Tier points are visible on both sides of every tier
- Both cords are 112 rows long
- The upper dowel slides out of its loops
- Both dowels hang level
- Trees sit straight and flat on the cords
- All ends are woven in securely
Troubleshooting
- Tree is lopsided: On the step-in rows, make sure you skipped exactly 1 st at each end.
- Tier points are flat: Work the full 3 sc into each point st, then pin out the points when blocking.
- Edging ripples: Use 1 sc per row-end instead of 2 on the slanted edges, or drop down a hook size.
- Edging cups: Check that you worked 5 sc per tier side.
- Hanger tilts: Re-measure both cords from the ring and adjust the wraps.
- Cord stretches: Use cotton, not acrylic, and crochet a little tighter.
Care
Spot clean with a damp cloth and let air dry. If needed, take the dowels out and hand wash the crochet in cool water, then lay it flat to dry.

Final Notes
Here’s the full measurement chain. Gauge of 5 hdc per inch makes 11 sts at Row 9 = 2.2 in (5.6 cm). The 3-row trunk brings each tree to 3 in (7.6 cm) tall. The 56-sc edging finishes the tree at 2.5 in (6.4 cm) × 3.2 in (8.1 cm). At 4 rows per inch, 112-row cords are 28 in (71.1 cm) long, and they make a 14 in (35.6 cm) × 23 in (58.4 cm) hanger. Check each link and the whole piece will line up.
Happy crocheting!