

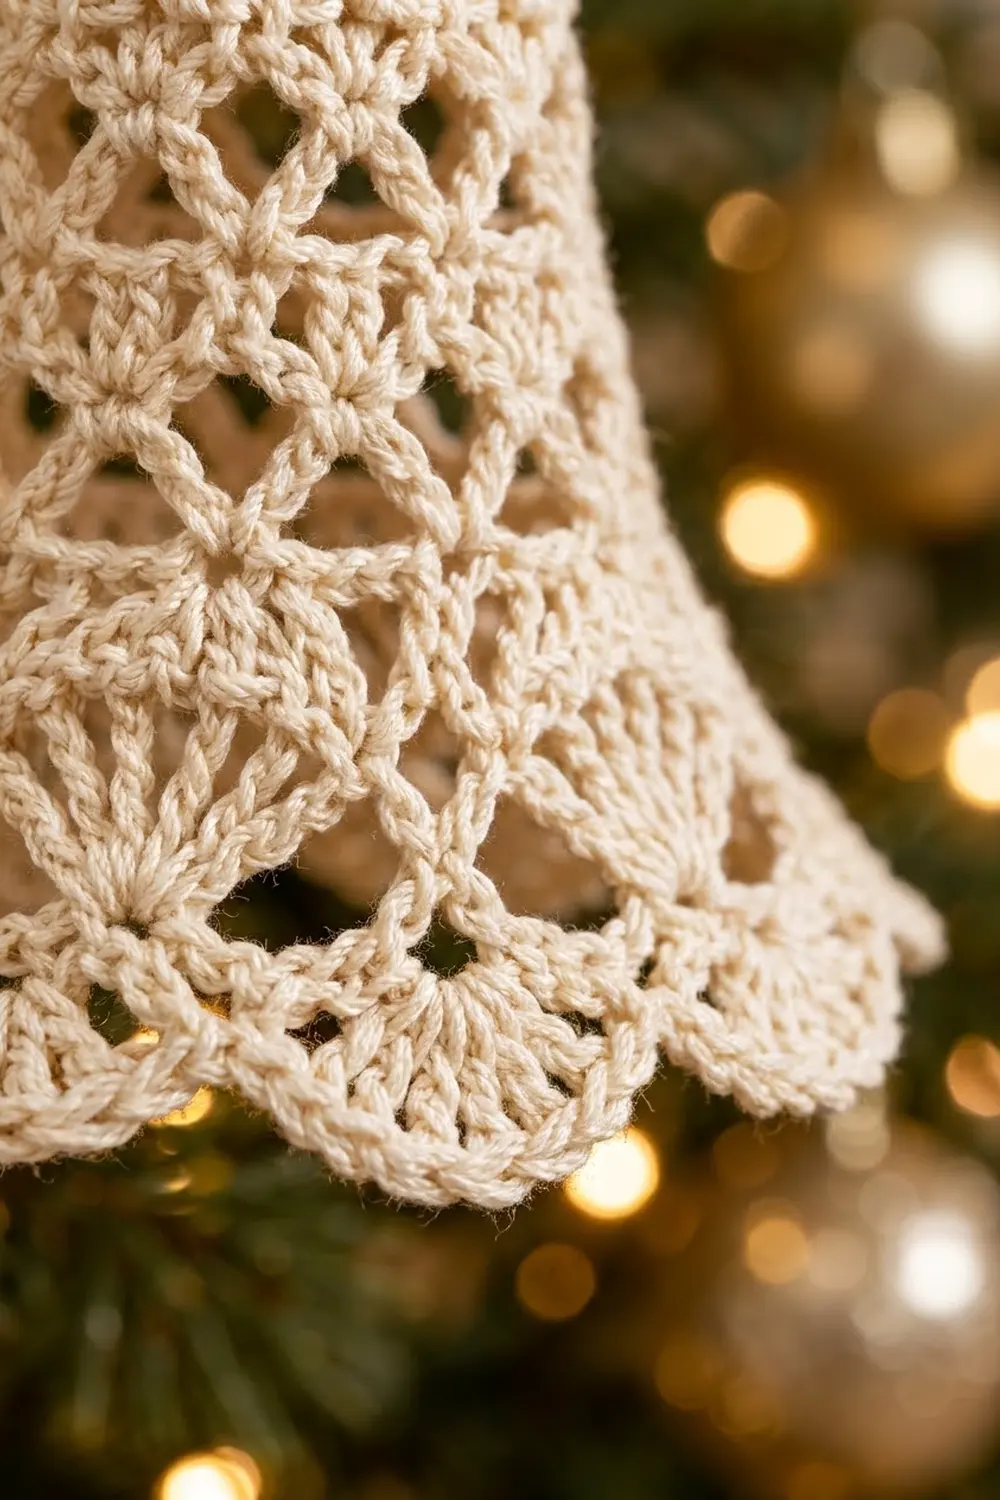
This lacy bell ornament is crocheted as one seamless 3D piece. A solid little crown opens into a diamond lattice, then two bands of fan shells flare out into a soft scalloped hem. It is made in a single cream or ivory thread, which gives it a vintage, heirloom look. It looks great on a green tree with warm lights and gold baubles.
The pattern uses US crochet terms throughout. The finished bell is 3 in (7.6 cm) tall without the hanging loop and 3.5 in (8.9 cm) wide across the hem when laid flat. The crown is 1.25 in (3.2 cm) across.
You work from the top down in joined rounds, so there is no sewing at all. The crown starts as a flat disc. Then a round worked through the back loops turns the work downward. After that, chain-loop net rounds build the lattice, and each band gets longer loops so the bell widens on its own. A fan round, a second offset fan round, and a small chain-loop edging finish the hem. Last, you add a chain hanging loop and stiffen the bell over a form.
Finished Size and Construction
- Finished size: 3 in (7.6 cm) tall; hem 3.5 in (8.9 cm) wide laid flat; crown 1.25 in (3.2 cm) across
- Skill level: Intermediate (chain-loop nets, shells, working in the round)
- Terminology: US crochet terms
- Yarn weight: Size 3 mercerized cotton crochet thread (light fingering)
- Hook: 2.25 mm (US B-1)
- Number of pieces: 1
- Layout: One seamless 3D bell, worked top-down in joined rounds
- Piece size: 3 in (7.6 cm) tall
- Size before border (Rounds 1–10): 2.25 in (5.7 cm) tall
- Border depth (Rounds 11–12): 0.75 in (1.9 cm)
Materials
Yarn: Use a mercerized cotton thread in size 3. Mercerized cotton has a slight sheen and gives crisp stitch definition, and it holds its shape after stiffening better than acrylic. Do not use a fuzzy or very stretchy fiber, because the lattice will lose its shape.
- Cream/ivory: 12 g (about 20 m) for one bell
This amount includes a margin of roughly 30% for your gauge swatch, the hanging loop, and weaving in ends. One bell uses about 8 g of thread.
Tools:
- 2.25 mm (US B-1) crochet hook
- Stitch marker
- Tapered tapestry needle
- Scissors
- Fabric stiffener, or a 1:1 mix of white craft glue and water
- A bell-shaped form, such as a small plastic cup, a foam cone, or a rolled-up piece of cardstock covered with plastic wrap
- Rust-proof pins
- Ruler or tape measure
Abbreviations (US Terms)
- ch – chain
- sl st – slip stitch
- sc – single crochet
- dc – double crochet
- tbl – through the back loop only
- sk – skip
- sp(s) – space(s)
- st(s) – stitch(es)
- rep – repeat
Special stitch – Fan: Work the stated number of dc into one ch-loop. Push the stitches together so they fan out into a half-circle.
Turning chain note: At the start of a dc round, the beginning ch 3 counts as 1 dc. At the start of a sc or net round, the ch 1 does not count as a stitch.
Gauge and Checkpoints
The bell is a single piece, so your test piece is the crown itself. Work Rounds 1 and 2 first and measure before you continue.
Gauge: Rounds 1–2 make a flat disc 1.25 in (3.2 cm) across.
Checkpoints while you work (measure from the top of the crown down the side):
- After Round 2: flat disc, 1.25 in (3.2 cm) across
- After Round 8 (end of lattice): 1.75 in (4.4 cm) tall
- After Round 10 (end of first fan band): 2.25 in (5.7 cm) tall
- After Round 12 (finished hem): 3 in (7.6 cm) tall
If your disc is too big (over 1.5 in / 3.8 cm), go down to a 2 mm hook. If it is too small (under 1 in / 2.5 cm), go up to a 2.5 mm hook. Change the hook, not the stitch counts, because every round below depends on the 12-loop and 6-repeat structure.
A difference of 0.25 in (0.6 cm) in height after stiffening does not matter for an ornament. Keep your tension even so all the loops in a round match.
Pattern
Crown
Foundation: Ch 4, sl st to the first ch to form a ring.
Round 1: Ch 3 (counts as dc), 11 dc in ring, sl st to top of beginning ch-3. (12 dc)
Round 2: Ch 3 (counts as dc), dc in same st, 2 dc in each st around, sl st to top of beginning ch-3. (24 dc)
The disc should lie flat and measure 1.25 in (3.2 cm) across. This is your gauge check.
Round 3 (turning round): Ch 1, sc tbl in each st around, sl st to first sc. (24 sc)
The back-loop round leaves a ridge on the outside and makes the work bend downward. From here on, the stitches form the sides of the bell, and the crown sits on top like a dome.
Lattice Body
Each net round is worked into the chain loops of the round before it. Each new sc sits in the center of a loop below, which creates the diamond pattern. Slip stitches move you to the start of the next loop without adding a stitch.
Round 4: Ch 1, sc in first st, ch 3, sk 1 st, sc in next st, ch 3, sk 1 st rep 11 times, sl st to first sc. (12 ch-3 loops)
Round 5: Sl st into first ch-3 loop, ch 1, sc in same loop, ch 4, sc in next ch-3 loop rep 11 times, ch 4, sl st to first sc. (12 ch-4 loops)
Round 6: Sl st in first 2 ch of first loop, ch 1, sc in same loop, ch 5, sc in next loop rep 11 times, ch 5, sl st to first sc. (12 ch-5 loops)
Round 7: Rep Round 6. (12 ch-5 loops)
Round 8: Sl st in first 3 ch of first loop, ch 1, sc in same loop, ch 6, sc in next loop rep 11 times, ch 6, sl st to first sc. (12 ch-6 loops)
Checkpoint: The bell should be 1.75 in (4.4 cm) tall. The lattice stays at 12 loops in every round, but each loop is longer than the one above it, so the body flares gently with no stitch increases.
First Fan Band
Round 9 (fan round): Sl st in first 3 ch of first ch-6 loop, ch 1, sc in same loop, 9 dc in next loop (Fan), sc in next loop rep 5 times, 9 dc in last loop, sl st to first sc. (6 Fans of 9 dc = 54 dc, plus 6 sc = 60 sts)
Round 10 (net over fans): Ch 1, sc in same st as joining. Ch 5, sk 4 dc, sc in next dc (the 5th, center dc of the Fan), ch 5, sk 4 dc, sc in next sc rep 6 times, working the last “sc in next sc” as a sl st to the first sc. (12 ch-5 loops, 12 sc: 6 in Fan centers, 6 between Fans)
Checkpoint: The bell should be 2.25 in (5.7 cm) tall. This is the size before the border.
Border
The border is made of Rounds 11 and 12. It adds 0.75 in (1.9 cm) of depth and forms the scalloped hem.
Border gauge: One 11-dc Fan in Round 11 should be about 0.6 in (1.5 cm) wide along its outer curve before stiffening. Six Fans fit around the hem, so the hem circumference is about 7 in (17.8 cm), which is 3.5 in (8.9 cm) laid flat.
A tube has no sides, so the counts below are given per repeat. There are 6 repeats in each border round.
Round 11 (offset fans): Sl st in first 3 ch of first ch-5 loop, ch 1, sc in same loop, 11 dc in next loop, sc in next loop, 11 dc in next loop rep 5 times, sl st to first sc.
- Per repeat: 1 sc + 11 dc = 12 sts
- Total: 6 sc + 66 dc = 72 sts
In Round 10, the loops alternate. The odd loops run from a between-Fan sc to a Fan center, and the even loops run back. Round 11 puts a sc in every odd loop and a Fan in every even loop. That shifts each new Fan by half a repeat from the Fans in Round 9 and gives the staggered shell pattern near the hem.
Round 12 (scallop edging): Ch 1, sc in same st as joining. [Ch 3, sk 1 dc, sc in next dc] 5 times, ch 3, sk last dc of Fan, sc in next sc rep 6 times, working the last “sc in next sc” as a sl st to the first sc. Fasten off.
- Per repeat: 6 ch-3 loops; 5 sc in the Fan (on dc 2, 4, 6, 8, and 10) + 1 sc on the between-Fan sc = 6 sc
- Total: 36 ch-3 loops and 36 sc
Why the math works: Each Fan has 11 dc. The bracket uses 2 dc per pass (one skipped, one with a sc) 5 times, which covers dc 1–10. The final “sk last dc” covers dc 11. That makes 11 dc in total, so the repeat always finishes on the between-Fan sc and never drifts. All 6 repeats are the same: 6 × 12 = 72 stitches in, 6 × 6 = 36 loops out. Each chain-3 loop is a little wider than the 2 stitches it spans, so the edging follows the curve of each Fan and makes a clear scallop instead of pulling flat.
Checkpoint: The bell should be 3 in (7.6 cm) tall, and the hem should measure 3.5 in (8.9 cm) laid flat.
Hanging Loop
Join the thread with a sl st to any dc of Round 1, working from the outside of the crown. Ch 20 (about 2 in / 5.1 cm). Sl st into the dc directly across the crown, 6 sts away. Fasten off. The chain makes an arch about 1 in (2.5 cm) high above the crown.
For a sturdier loop, ch 40, fold it in half, and twist it before you attach the free end.
Final Blocking
- Weave in all ends before blocking. Hide them along the solid crown rounds or inside a Fan, never across an open lattice loop.
- Prepare the form. Choose a form that is about 1.25 in (3.2 cm) across at the top and 3.5 in (8.9 cm) across at the bottom, and wrap it in plastic.
- Soak the bell in stiffener for a few minutes. Squeeze out the extra gently, without wringing.
- Slide the bell onto the form. Center the crown on top, and pull the lattice down evenly so all 12 diamonds are open and the same size.
- Shape the hem. Pin the center of each of the 6 Fans so the scallops flare out evenly.
- Open the edging. Use a pin tip to round out each of the 36 chain-3 loops.
- Dry completely, for 12–24 hours, before you take the bell off the form.
- Measure again: 3 in (7.6 cm) tall, with a 3.5 in (8.9 cm) hem.
Final Quality-Control Checklist
- [ ] The crown is solid, round, and has a visible back-loop ridge
- [ ] The lattice has 12 loops in every round from Round 4 to Round 8
- [ ] The diamonds are straight and not twisted to one side
- [ ] There are 6 Fans in Round 9 and 6 offset Fans in Round 11
- [ ] There are 36 chain-3 loops in the edging, 6 per scallop
- [ ] The bell is 3 in (7.6 cm) tall, and the hem is 3.5 in (8.9 cm) wide laid flat
- [ ] The hanging loop is centered, and the bell hangs straight
- [ ] No ends are visible, and the bell is completely dry and firm
Troubleshooting
The crown cups or ruffles. Your Round 2 tension is off. Use a smaller hook for a ruffled disc or a larger one for a cupped disc, and make sure you have exactly 24 dc.
The bell does not turn downward. Make sure Round 3 is worked through the back loop only.
The lattice twists in a spiral. You are probably putting each sc next to a loop instead of in its center. The slip stitches at the start of each round should bring you to the middle of the first loop.
The fans look flat or ruffled. Count the dc: 9 per Fan in Round 9 and 11 per Fan in Round 11. Too many dc will ruffle the hem, and too few will flatten it.
The edging repeat comes out uneven. Count 11 dc per Fan before you start Round 12. The bracket must run exactly 5 times before the final skip.
The bell sags after drying. Use more stiffener, or apply a second coat and dry it on the form again.
Care
Dust the bell gently with a soft brush. If it gets dirty, hand-wash it in cool water, then stiffen and shape it again on the form. Store it flat in a box so the hem does not get crushed.

Final Notes
Here is the measurement chain for this bell. First, the 24-dc crown is 1.25 in (3.2 cm) across. The 12-loop lattice brings the height to 1.75 in (4.4 cm). The first fan band takes it to 2.25 in (5.7 cm). Finally, the 72-stitch fan round and the 36-loop scallop edging finish it at 3 in (7.6 cm) tall with a 3.5 in (8.9 cm) hem. If you check the crown and count each round, your bell will match every time.
Happy crocheting!