

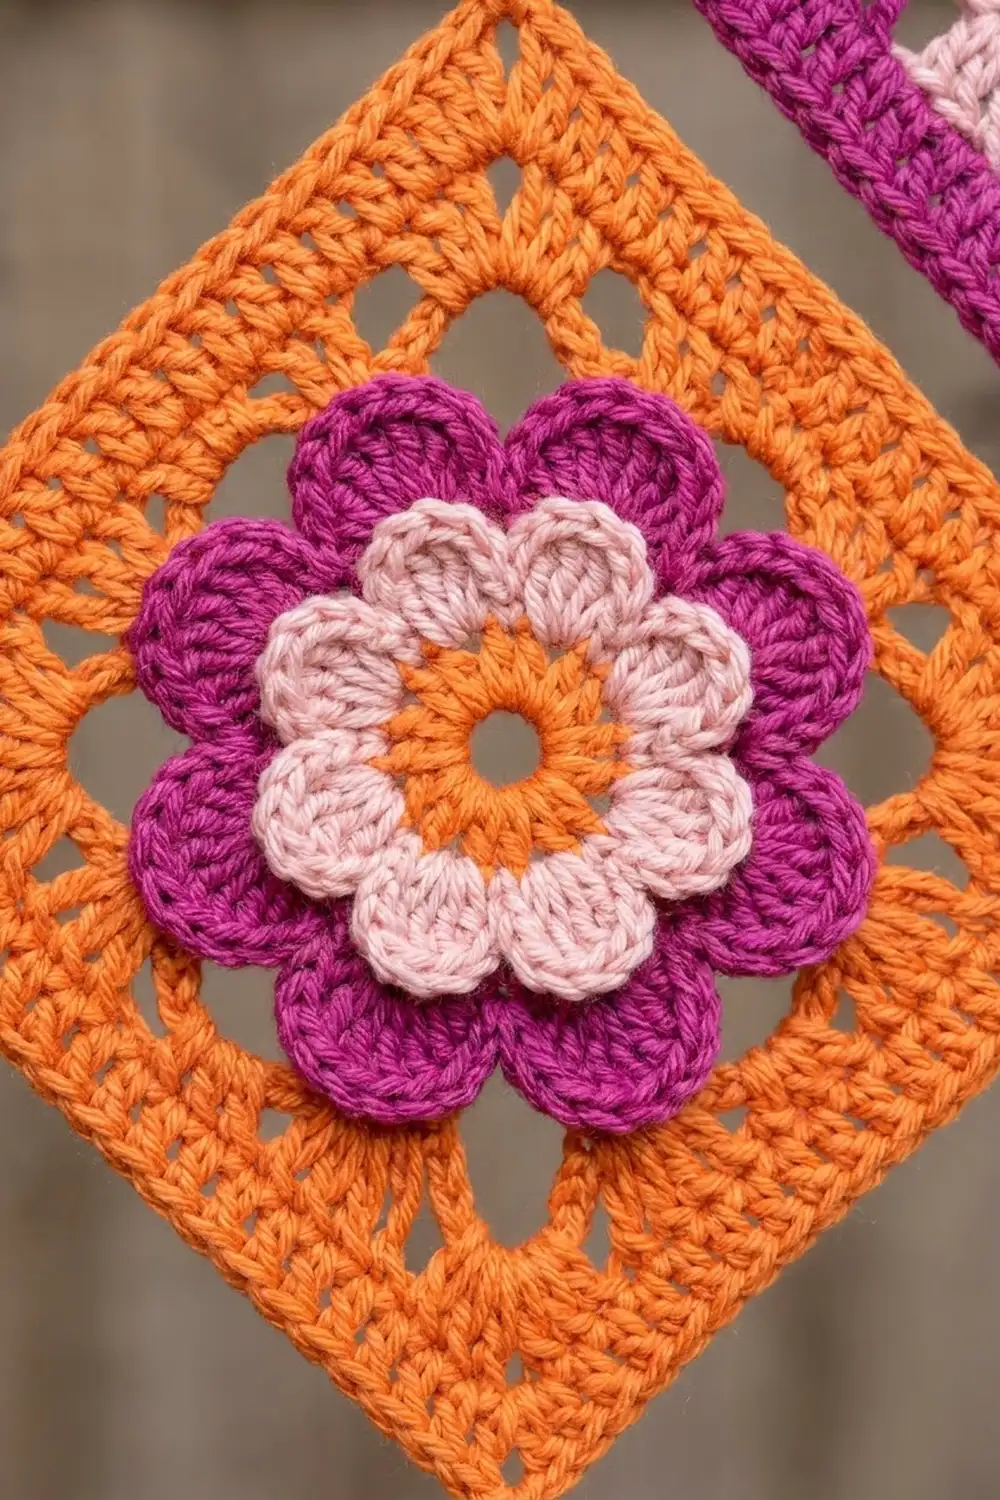
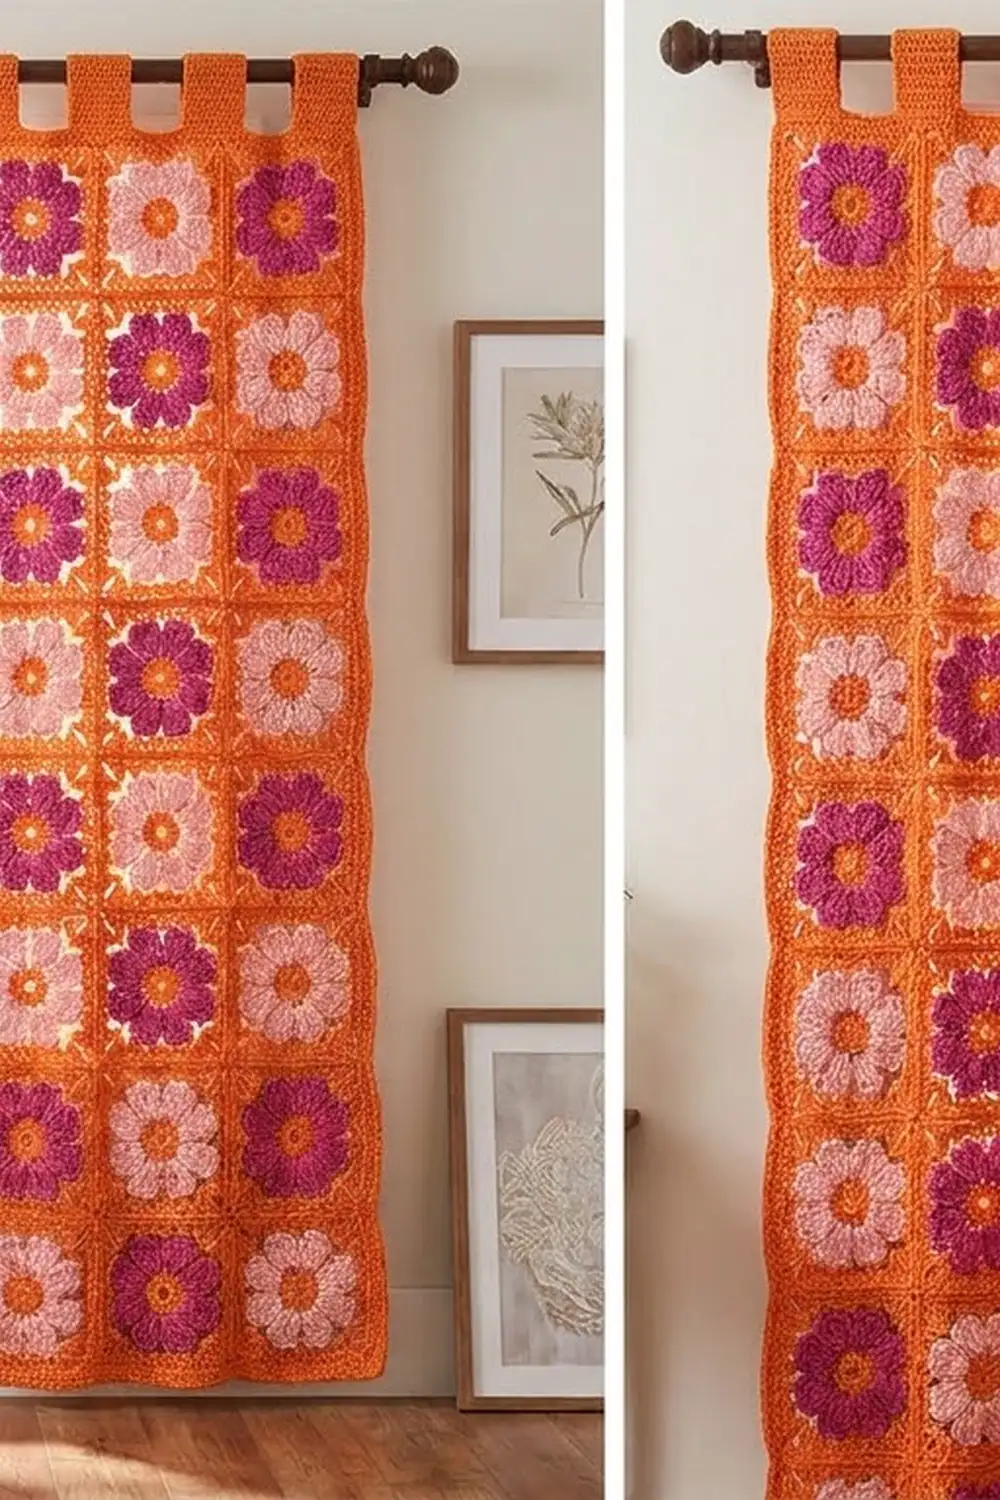
The Marigold Bloom Curtain Panel is a tall, airy window panel made from square flower motifs. Each square has a small orange center, two layers of eight rounded petals, and an open orange frame that lets the light through.
The colors are warm and bright: tangerine orange, deep magenta, and soft blush pink. Half of the squares have blush inner petals backed by magenta, and the other half swap those two colors. Placed in a checkerboard, they give the panel a cheerful, vintage-garden look.
This pattern uses US crochet terms. One finished panel measures 26 in (66.0 cm) wide by 86 in (218.4 cm) long, not counting the tabs. The photo shows a pair of panels, so make two for a standard window.
The construction is simple. You crochet 56 motifs in the round, sew them flat into a grid 4 squares wide and 14 squares tall, and add a 3-round border. Then you work five tabs straight off the top border and fold them over the rod.
Finished Size and Construction
- Finished panel size: 26 x 86 in (66.0 x 218.4 cm), tabs not included
- Skill level: Intermediate
- Terminology: US crochet terms
- Yarn weight: Worsted (#4), cotton or cotton blend
- Hook: 5.0 mm (H-8)
- Number of pieces: 56 square motifs plus 5 tabs per panel
- Layout: 4 motifs across x 14 motifs down
- Motif size: 6 x 6 in (15.2 x 15.2 cm) after blocking
- Size before border: 24 x 84 in (61.0 x 213.4 cm)
- Border depth: 1 in (2.5 cm) on each side
- Tabs: 3 in (7.6 cm) wide, 7 in (17.8 cm) long before folding
Materials
Choose a smooth worsted-weight cotton or cotton blend. Cotton hangs well, holds the petal shapes, and resists stretching in direct sun. The amounts below assume about 190 m (208 yd) per 100 g.
For one panel:
- Color A, Tangerine orange: 620 g, about 1,178 m (centers, frames, border, and tabs)
- Color B, Blush pink: 280 g, about 532 m
- Color C, Magenta: 280 g, about 532 m
Double every amount for a pair of panels.
Tools:
- 5.0 mm (H-8) crochet hook
- Tapestry needle
- Scissors
- Stitch markers
- Rust-proof pins and a blocking surface
- Spray bottle
- Measuring tape
All quantities include a margin of about 15 percent for gauge swatches, tails, and small differences in tension.
Abbreviations (US Terms)
- ch – chain
- sl st – slip stitch
- sc – single crochet
- hdc – half double crochet
- dc – double crochet
- tr – treble crochet
- sp(s) – space(s)
- st(s) – stitch(es)
- RS / WS – right side / wrong side
Special stitch – Back post sc (BPsc): Insert the hook from back to front to back around the post of the stitch named in the instructions. Yarn over, pull up a loop, yarn over, and pull through both loops. This places the new stitch behind the petals.
Gauge and Checkpoints
Make one complete motif before anything else. Block it, let it dry, and measure it. Everything that follows depends on this single square.
Motif gauge: 1 motif = 6 x 6 in (15.2 x 15.2 cm) after blocking.
Round checkpoints (lightly flattened, before blocking):
- After Round 1: 1.25 in (3.2 cm) across
- After Round 3: 3 in (7.6 cm) across, tip to tip
- After Round 5: 4.25 in (10.8 cm) across, tip to tip
- After Round 6: 5.25 in (13.3 cm) across, side to side
- After Round 7: 6 in (15.2 cm) across, side to side
If your motif is too big (over 6.25 in / 15.9 cm), go down to a 4.5 mm hook. If it is too small (under 5.75 in / 14.6 cm), go up to a 5.5 mm hook. Being off by 0.25 in (0.6 cm) per motif adds up to 3.5 in (8.9 cm) over 14 motifs, so take this step seriously.
Motif
Make 28 of Motif 1 and 28 of Motif 2. The only difference between them is which color goes on Rounds 2–3 and which goes on Rounds 4–5.
- Motif 1: Rounds 2–3 in Color B (blush), Rounds 4–5 in Color C (magenta)
- Motif 2: Rounds 2–3 in Color C (magenta), Rounds 4–5 in Color B (blush)
Rounds 1, 6, and 7 are always Color A (orange). Work every round with the RS facing you.
Round 1 (Color A): Ch 4, sl st to the first ch to form a ring. Ch 3 (counts as dc), work 15 dc into the ring. Sl st to the top of the beginning ch-3. (16 dc) Fasten off.
Round 2 (inner petal color): Join with a sc in any dc. Ch 3, skip 1 dc. Sc in the next dc, ch 3, skip 1 dc. Repeat from * 6 more times. Sl st to the first sc. (8 sc, 8 ch-3 sps)
Round 3: Sl st into the first ch-3 sp. In each ch-3 sp, work (sc, hdc, 3 dc, hdc, sc). Sl st to the first sc. (8 petals, 56 sts) Fasten off.
These are the eight small, rounded inner petals.
Round 4 (outer petal color): Fold the Round 3 petals toward you. Join with a BPsc around the post of any sc from Round 2. Ch 5 behind the petal. BPsc around the next Round 2 sc, ch 5. Repeat from * 6 more times. Sl st to the first BPsc. (8 BPsc, 8 ch-5 sps)
The ch-5 loops sit directly behind the inner petals.
Round 5: Sl st into the first ch-5 sp. In each ch-5 sp, work (sc, hdc, 5 dc, hdc, sc). Sl st to the first sc. (8 petals, 72 sts) Fasten off.
The larger outer petals peek out behind and past the inner petals, which creates the layered flower.
Round 6 (Color A): Join with a sl st in the center dc (3rd of 5) of any petal. This is a corner petal. Ch 7 (counts as tr + ch 3), tr in the same st. Ch 5, sc in the center dc of the next petal, ch 5. (Tr, ch 3, tr) in the center dc of the next petal, ch 5, sc in the center dc of the next petal, ch 5. Repeat from * 2 more times. Sl st to the 4th ch of the beginning ch-7. (8 tr, 4 sc, 8 ch-5 sps, 4 corner ch-3 sps)
Each side now has 13 sts between the corner spaces: tr, 5 ch, sc, 5 ch, tr. This round turns the flower into a square with open chain windows.
Round 7: Sl st into the next corner ch-3 sp. Ch 3 (counts as dc), then work (dc, ch 2, 2 dc) in the same sp. Dc in the next tr, 5 dc in the ch-5 sp, dc in the sc, 5 dc in the next ch-5 sp, dc in the next tr, (2 dc, ch 2, 2 dc) in the corner sp. Repeat from * 3 more times, leaving off the last corner group. Sl st to the top of the beginning ch-3. Fasten off. On about half your motifs, leave a 24 in (61.0 cm) tail for sewing.
Count: 17 dc per side (2 + 13 + 2), counted between the corner ch-2 spaces. The corner ch-2 spaces don’t count as stitches. (68 dc and 4 corner ch-2 sps total)
Weave in all ends except the sewing tails. Block each motif to 6 x 6 in (15.2 x 15.2 cm) before joining. Squares that are blocked first line up much more evenly.
Make All Pieces
For one panel:
- Motif 1 (blush inside, magenta outside): 28
- Motif 2 (magenta inside, blush outside): 28
- Total: 56 motifs
Arrange the motifs in a checkerboard. In this grid, 1 = Motif 1 and 2 = Motif 2.
Row  1:  1 2 1 2
Row  2:  2 1 2 1
Row  3:  1 2 1 2
Row  4:  2 1 2 1
Row  5:  1 2 1 2
Row  6:  2 1 2 1
Row  7:  1 2 1 2
Row  8:  2 1 2 1
Row  9:  1 2 1 2
Row 10:  2 1 2 1
Row 11:  1 2 1 2
Row 12:  2 1 2 1
Row 13:  1 2 1 2
Row 14:  2 1 2 1
Row 1 is the top of the curtain. Lay the whole grid out on the floor before joining and take a photo of it for reference.
Joining
Method: Whip stitch through the outer loops with Color A and a tapestry needle. This seam lies flat, adds no width, and blends into the orange frames.
Stitch-to-stitch logic: Place two motifs side by side with the RS facing up. Start in the matching corner ch-2 spaces and whip through both of them once. Then whip through the outer loop of each of the 17 dc on one motif and the matching dc on the other, one to one. Finish in the next pair of corner ch-2 spaces. Every seam joins 17 dc to 17 dc, so the sides always line up.
Order: First join the motifs into 14 rows of 4. Then sew the rows to each other with long seams that run the full width of the panel. Where four corners meet, pass the needle through all four corner spaces once to close the gap.
Tension: Pull each stitch snug enough to close the seam, but not so tight that it puckers. Lay the work flat every few seams. If a seam ripples, loosen up. If you can see gaps, tighten.
Size checkpoint: The joined panel should measure 24 in (61.0 cm) wide and 84 in (213.4 cm) long. Measure your first finished row of 4 before you join the rest; it should be 24 in (61.0 cm).
Border
Border gauge: About 3 sc per inch (2.5 cm). This matches the motif edges, which have 17 dc per 6 in (15.2 cm).
Work all border rounds in Color A with the RS facing you.
Round 1 (sc): Join with a sc in any dc just after an outer corner. Work 1 sc in each dc along the edge. At each seam, work 1 sc through the joined pair of corner ch-2 spaces. At each of the 4 outer corners, work 3 sc in the corner ch-2 space. Sl st to the first sc.
- Short sides: 4 motifs x 17 dc = 68 sc, plus 3 seam sc = 71 sc
- Long sides: 14 motifs x 17 dc = 238 sc, plus 13 seam sc = 251 sc
- Counted between corner center sts: 73 per short side and 253 per long side, because the 2 outer sc of each corner group belong to the sides
- Total: 2 x 73 + 2 x 253 + 4 corner centers = 656 sts
Round 2 (dc): Sl st across to the next corner center sc. Ch 3 (counts as dc), 2 dc in the same st. Work 1 dc in each st along each side and 3 dc in each corner center st. Sl st to the top of the beginning ch-3.
- 75 per short side, 255 per long side, plus 4 corner centers
- Total: 664 sts (656 + 8)
Round 3 (sc): Ch 1. Work 1 sc in each st and 3 sc in each corner center dc. Sl st to the first sc.
- 77 per short side, 257 per long side, plus 4 corner centers
- Total: 672 sts (664 + 8)
Why the math works: Round 1 puts one sc in each motif dc, plus one sc in each seam where two corner spaces meet. That gives the 24 in (61.0 cm) edge 71 sc, at about 3 sc per inch. Each later round adds exactly 2 sts per side at the corners and nothing anywhere else, so the edges stay flat. Together the three rounds add 1 in (2.5 cm) all around, which brings the panel to 26 x 86 in (66.0 x 218.4 cm).
Tabs
Work along the top short edge in the 77 sts of Round 3, starting with the first st after the corner center. The tabs sit on sts 1–9, 18–26, 35–43, 52–60, and 69–77, with 8 sts between each pair of tabs (5 x 9 + 4 x 8 = 77).
Row 1: With the RS facing, join Color A in the first st of the tab. Ch 3 (counts as dc), dc in the next 8 sts. Turn. (9 dc)
Rows 2–14: Ch 3 (counts as dc), dc in each st across. Turn. (9 dc)
Each tab measures 3 in (7.6 cm) wide and 7 in (17.8 cm) long. Fasten off, leaving a 12 in (30.5 cm) tail. Fold the tab to the WS and sew the last row to the back of Border Round 1. The loop fits rods up to 1.5 in (3.8 cm) in diameter.
Final Blocking
- Weave in all remaining ends before you block.
- Lay the panel on a clean floor, or on blocking mats with a sheet over them.
- Spray the panel evenly until it’s damp but not soaking.
- Pin the four outer corners first, to 26 x 86 in (66.0 x 218.4 cm).
- Pin along each edge every 4–6 in (10.2–15.2 cm), keeping the edges straight.
- Gently open each flower with your fingers so the petals lie flat and round.
- Square up each orange frame so the seams run in straight lines.
- Let the panel dry completely before you unpin it, usually about 24 hours.
Final Quality-Control Checklist
- The panel measures 26 x 86 in (66.0 x 218.4 cm).
- All 56 motifs are in the correct checkerboard order.
- Every motif side has 17 dc between the corner spaces.
- Every point where four corners meet is closed.
- Border Round 3 has 77 sts per short side and 257 per long side.
- The five tabs are evenly spaced and sewn on securely.
- No loose ends show on the RS.
- The panel hangs straight, with no wavy edges.
Troubleshooting
Motifs are different sizes. Your tension changed between sessions. Block all motifs to 6 in (15.2 cm), and remake any that are more than 0.25 in (0.6 cm) off.
Outer petals don’t show behind the inner petals. Your Round 4 ch-5 loops are too tight. Work them more loosely, or try ch 6.
Square frame curls or cups. The Round 6 chains are too short for your tension. Go up one hook size for Rounds 6 and 7 only.
Border ruffles. Make sure you didn’t add extra sts at the seams. Each seam gets exactly 1 sc in Round 1.
Border pulls in. Work the border with a hook one size larger.
Panel droops over time. Cotton relaxes a little when it hangs. Re-block it, and spread the tabs evenly along the rod.
Care
Hand wash, or machine wash on a gentle cold cycle in a mesh laundry bag. Lay flat to dry and re-block lightly. Don’t hang the panel to dry while it’s wet, because its weight can stretch it.
Final Notes
The size of this curtain comes from a simple chain of measurements. One motif is 6 in (15.2 cm), with 17 dc per side. Four motifs across make 24 in (61.0 cm), and 14 motifs down make 84 in (213.4 cm). The border adds 1 in (2.5 cm) on every side, for a finished panel of 26 x 86 in (66.0 x 218.4 cm) with five tabs on top. Check your first motif carefully, and the rest of the panel will fall into place.
Happy crocheting!