

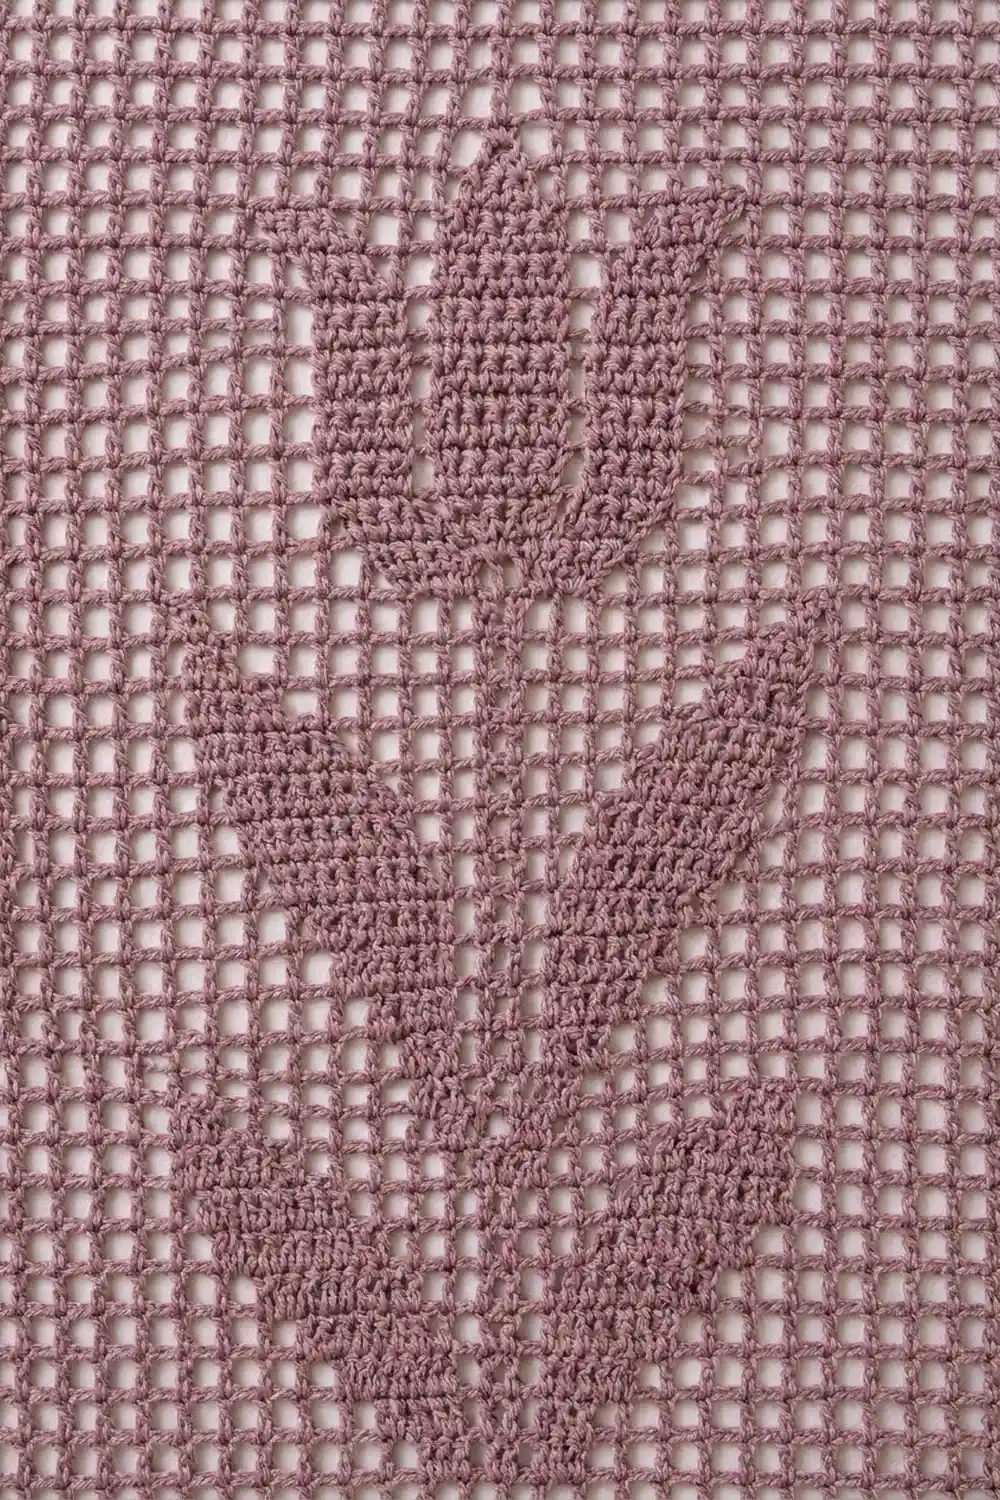
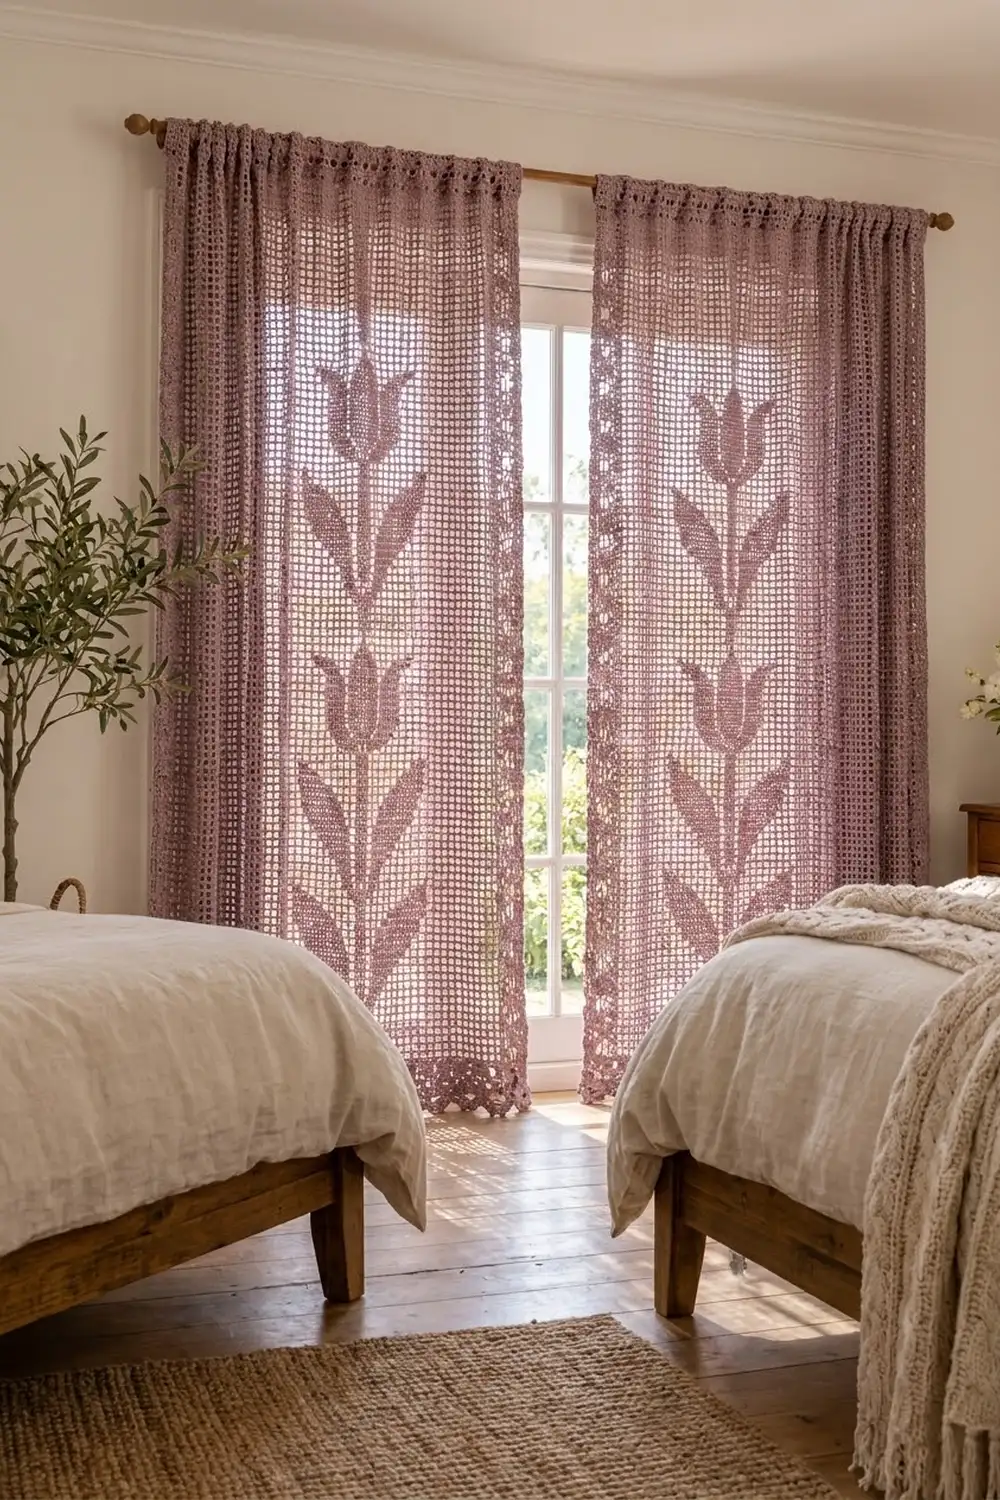
The Mauve Meadow Tulip Curtain Panel is a soft, romantic filet crochet panel worked in one dusty mauve shade. Four tulips run up the center, one above the other. Each tulip sits on a straight stem with two pairs of angled, pointed leaves. Open grid mesh surrounds the motifs and lets daylight through.
The panel uses a single color. When light shines through, the solid blocks stand out against the open mesh. A narrow eyelet strip finishes each side, and a row of small scallops finishes the hem. The style is cottage-traditional: it looks like vintage lace but uses sturdy cotton that hangs well.
This pattern uses US crochet terms. One finished panel measures 22.4 in (56.9 cm) wide and 72.0 in (182.9 cm) long when hanging, with a rod pocket at the top. Most windows use two identical panels, as shown.
Construction is simple. Chain a foundation and work the whole panel from the bottom up in filet rows, following the written row guide. Add a three-row border to the sides and bottom. Then block the panel and fold the top rows down to form the rod pocket.
Finished Size and Construction
- Finished size (one panel): 22.4 in (56.9 cm) wide x 72.0 in (182.9 cm) long, hanging
- Skill level: Intermediate
- Terminology: US
- Yarn weight: DK / light (#3) cotton
- Hook: 3.5 mm (E-4)
- Number of pieces: 1 per panel (make a second identical panel for a pair)
- Layout: single panel, 51 filet squares wide x 181 rows tall
- Panel size before border: 20.4 in (51.8 cm) x 72.4 in (183.9 cm)
- Border depth: 1.0 in (2.5 cm) at each side, 1.2 in (3.0 cm) at the hem
- Rod pocket: top 4 rows folded down, 1.6 in (4.1 cm) deep; fits a rod up to 0.75 in (1.9 cm) in diameter
Materials
Choose a smooth, mercerized or combed cotton in DK weight. Smooth yarn shows the blocks crisply and won’t stretch much on the rod. Avoid fuzzy blends, which blur the mesh.
- Dusty mauve DK cotton: 850 g, about 1,870 m (approx. 110 m per 50 g) for one panel; 1,700 g, about 3,740 m, for a pair
- 3.5 mm (E-4) crochet hook
- Tapestry needle
- Stitch markers (at least 4)
- Measuring tape
- Blocking mats or a carpeted floor with a towel, plus rust-proof pins
- Spray bottle
These yarn amounts already include a margin of about 10% to cover the gauge swatch and small differences in tension.
Abbreviations (US Terms)
- ch – chain
- sl st – slip stitch
- sc – single crochet
- dc – double crochet
- sk – skip
- sp(s) – space(s)
- st(s) – stitch(es)
- RS / WS – right side / wrong side
Special filet terms
- O (open square): ch 2, sk next 2 sts, dc in next dc.
- B (block): dc in each of next 2 sts (dc or ch), dc in next dc.
- Open square at start of row: ch 5 (counts as dc + ch 2), sk first 2 sts, dc in next dc.
- Block at start of row: ch 3 (counts as dc), dc in each of next 3 sts.
- Work the last dc of each row into the 3rd ch of the turning ch-5, or into the top of the turning ch-3.
Each square is 3 sts wide, plus 1 closing dc for the row. Every row has 51 squares, which is 154 sts.
Gauge and Checkpoints
Gauge: 10 squares and 10 rows = 4 in (10.2 cm) in filet mesh. Each square is 0.4 in (1.0 cm) wide and each row is 0.4 in (1.0 cm) tall.
Test swatch: Ch 39. Dc in 4th ch from hook and in each ch across (37 sts, 12 blocks). Work 11 rows of open squares (12 O per row). The swatch should measure 4.8 in (12.2 cm) square. Cotton relaxes, so wash the swatch and dry it flat before you measure.
Checkpoints:
- After Row 5: width 20.4 in (51.8 cm).
- After Row 47 (first tulip repeat finished): height 18.8 in (47.8 cm).
- After Row 173: height 69.2 in (175.8 cm).
- After Row 181: height 72.4 in (183.9 cm).
If your swatch is too big, use a 3.25 mm hook. If it is too small, use a 3.75 mm hook. Change hooks if you are off by more than 0.2 in (0.5 cm) over 4 in (10.2 cm). Across 181 rows, a small error grows to several inches.
Panel
Ch 156.
Row 1 (RS): Dc in 4th ch from hook and in each ch across. The skipped ch count as the first dc. Turn. (154 dc = 51 B)
Rows 2–5: Ch 5, sk 2, dc in next dc, ch 2, sk 2, dc in next dc; repeat from * across, working the last dc in the top of the turning ch. Turn. (51 O: 52 dc + 51 ch-2 sps = 154 sts)
Tulip Repeat (36 motif rows + 6 spacer rows = 42 rows)
Each line lists the squares in order across the row. Every row is symmetrical, so it reads the same on RS and WS rows. Every row totals 51 squares (154 sts).
- Motif Rows 1–2 (stem): O 25, B 1, O 25.
- Motif Rows 3–10 (first leaf pair):
- Row 3: O 23, B 5, O 23.
- Row 4: O 21, B 9, O 21.
- Row 5: O 19, B 5, O 1, B 1, O 1, B 5, O 19.
- Row 6: O 17, B 6, O 2, B 1, O 2, B 6, O 17.
- Row 7: O 15, B 6, O 4, B 1, O 4, B 6, O 15.
- Row 8: O 14, B 5, O 6, B 1, O 6, B 5, O 14.
- Row 9: O 13, B 4, O 8, B 1, O 8, B 4, O 13.
- Row 10: O 12, B 2, O 11, B 1, O 11, B 2, O 12.
- Motif Rows 11–13 (stem): O 25, B 1, O 25.
- Motif Rows 14–21 (second leaf pair): Repeat Motif Rows 3–10.
- Motif Rows 22–24 (stem): O 25, B 1, O 25.
- Motif Rows 25–36 (tulip head):
- Row 25: O 24, B 3, O 24.
- Row 26: O 23, B 5, O 23.
- Row 27: O 22, B 7, O 22.
- Row 28: O 21, B 9, O 21.
- Rows 29–32: O 20, B 11, O 20.
- Row 33: O 20, B 3, O 1, B 3, O 1, B 3, O 20.
- Row 34: O 20, B 2, O 2, B 3, O 2, B 2, O 20.
- Row 35: O 20, B 1, O 3, B 3, O 3, B 1, O 20.
- Row 36: O 25, B 1, O 25.
- Spacer Rows 37–42: O 51.
The leaves start as a solid wedge joined to the stem (Motif Rows 3–4). From there they split away and step outward and upward. Each leaf ends in a 2-block point 12–13 squares from the stem. The tulip head widens to 11 blocks and ends in three points: two side petals and a taller center petal.
Panel Rows 6–173: Work the Tulip Repeat 4 times.
- Motif rows: Panel Rows 6–41, 48–83, 90–125 and 132–167.
- Spacer rows: Panel Rows 42–47, 84–89, 126–131 and 168–173.
The motif is 31 squares wide, 12.4 in (31.5 cm), and 36 rows tall, 14.4 in (36.6 cm). One full repeat measures 16.8 in (42.7 cm).
Rows 174–181 (rod pocket band): Ch 3, dc in each st across. Turn. (154 dc = 51 B each row) The band measures 3.2 in (8.1 cm). Do not fasten off; go straight on to the border.
Place a marker at each bottom corner.
Border
The border is worked in turned rows along the first side, the bottom and the second side. Leave the top edge plain for the rod pocket.
Border gauge: 5 sc = 1 in (2.5 cm).
Border Row 1:
- Ch 1 and turn the panel to work down the first side. Work 2 sc in each row end (362 sc).
- Ch 2 for the corner.
- Along the foundation ch: sc in first ch, sk next ch, sc in each of next 2 ch; repeat from * 51 times (103 sc).
- Ch 2 for the corner.
- Work 2 sc in each row end up the second side (362 sc). Turn.
(Side 362 sc | corner ch-2 | bottom 103 sc | corner ch-2 | side 362 sc = 827 sc + 2 corner sps)
Border Row 2 (eyelets):
- First side: ch 3 (counts as dc), ch 1, sk 1, dc in next sc; repeat from * 180 times, then dc in last sc of the side. (182 dc + 180 ch-1 sps = 362 sts)
- Corner: (dc, ch 2, dc) in the corner sp.
- Bottom: dc in first sc, ch 1, sk 1, dc in next sc; repeat from * 51 times. (52 dc + 51 ch-1 sps = 103 sts)
- Corner: (dc, ch 2, dc) in the corner sp.
- Second side: dc in first sc, ch 1, sk 1, dc in next sc; repeat from * 180 times, then dc in last sc. (362 sts) Turn.
(Each side 362 sts; bottom 103 sts; each corner group of 2 dc + ch-2 sp is counted separately)
Border Row 3 (scallops):
- First side: ch 1, sc in each dc and each ch-1 sp (362 sc).
- Corner: sk corner dc, 7 dc in corner ch-2 sp, sk next corner dc.
- Bottom: sk first dc, sc in first ch-1 sp, 5 dc in next ch-1 sp, sc in next ch-1 sp; repeat from * 25 times, then sk last dc. (25 scallops: 26 sc + 125 dc = 151 sts)
- Corner: sk corner dc, 7 dc in corner ch-2 sp, sk next corner dc.
- Second side: sc in each dc and each ch-1 sp (362 sc). Fasten off.
Why the math works: Each filet row is 0.4 in (1.0 cm) tall, so 2 sc per row end gives exactly 5 sc per inch: 181 x 2 = 362 sc per side. Along the bottom, 2 sc per square plus 1 closing sc gives 51 x 2 + 1 = 103 sc, also at 5 sc per inch. Because 103 is odd, the eyelet row starts and ends with a dc and leaves 51 ch-1 sps. Each scallop uses 2 sps, and 51 = 1 + (25 x 2), so the hem starts and ends with an sc and has exactly 25 scallops of about 0.8 in (2.0 cm). Each corner has its own space in every row, so no corner stitch is counted twice.
Final Blocking
- Weave in all ends through solid blocks or border stitches, never across open mesh.
- Soak the panel in cool water with a little gentle wash for 15 minutes. Squeeze gently; do not wring.
- Roll the panel in towels to remove extra water.
- Lay it flat and pin it to 22.4 in (56.9 cm) x 73.6 in (186.9 cm). That is the 72.4 in (183.9 cm) body plus the 1.2 in (3.0 cm) hem border, before folding.
- Pin the sides straight and pin each scallop out to a point. Lay a long ruler along the stem column to check that every tulip is centered.
- Let the panel dry completely, for at least 24 hours.
- Fold Rows 178–181 to the WS along the line between Rows 177 and 178. Whipstitch the top edge of Row 181 to the top of Row 173 to form a 1.6 in (4.1 cm) rod pocket. Leave both ends of the pocket open.
Final Quality-Control Checklist
- Every row has 154 sts / 51 squares.
- All four tulips line up on the center stem column (square 26).
- The leaf points match from left to right.
- Panel before border: 20.4 in (51.8 cm) x 72.4 in (183.9 cm).
- Border Row 1 has 362 / 103 / 362 sc.
- The hem has 25 scallops plus 2 corner fans.
- The hanging panel measures 22.4 in (56.9 cm) x 72.0 in (182.9 cm).
- The rod slides easily through the pocket.
Troubleshooting
- Mesh slants or edges wave: You are probably losing or adding a stitch at the row ends. Start each row with ch 5 or ch 3, and finish each row in the turning ch.
- Tulip off-center: Recount the first O run. On any row, the two outer O counts must match.
- Squares taller than wide: Shorten your dc slightly by snugging the loop on the hook before each yarn over.
- Side border ruffles: Work Border Rows 1–3 with a hook one size smaller.
- Hem cups: The scallops are too tight. Work Border Row 3 with a hook one size larger.
- Panel lengthens after hanging: Cotton can drop over time. Block to exact length before sewing the pocket. On a second panel, you can also remove 1 spacer row per repeat.
Care
Hand wash in cool water, or machine wash on a gentle cycle inside a mesh bag. Reshape the panel and dry it flat, then hang it while it is still slightly damp so it settles straight.
Final Notes
Every measurement in this pattern builds from the square size. A 0.4 in (1.0 cm) square gives a 20.4 in (51.8 cm) x 72.4 in (183.9 cm) panel. The border adds 1.0 in (2.5 cm) per side and 1.2 in (3.0 cm) at the hem. The pocket fold takes away 1.6 in (4.1 cm), so the panel hangs at 22.4 in (56.9 cm) x 72.0 in (182.9 cm). If your gauge matches at each checkpoint, your finished size will match too. Make a second panel to frame the window.
Happy crocheting!