

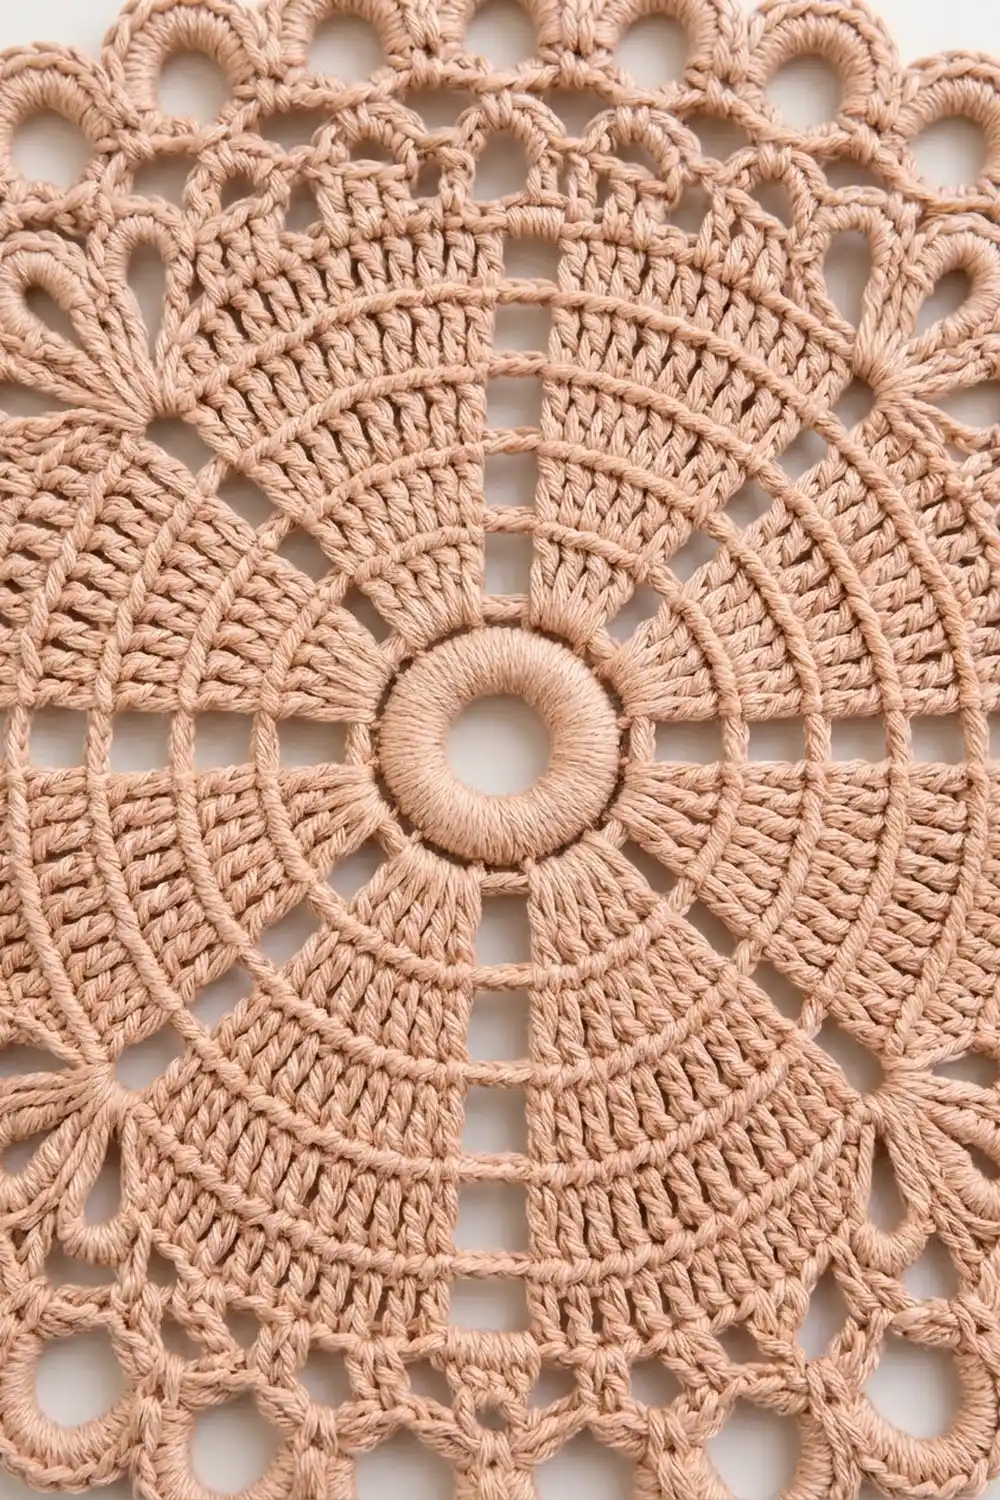
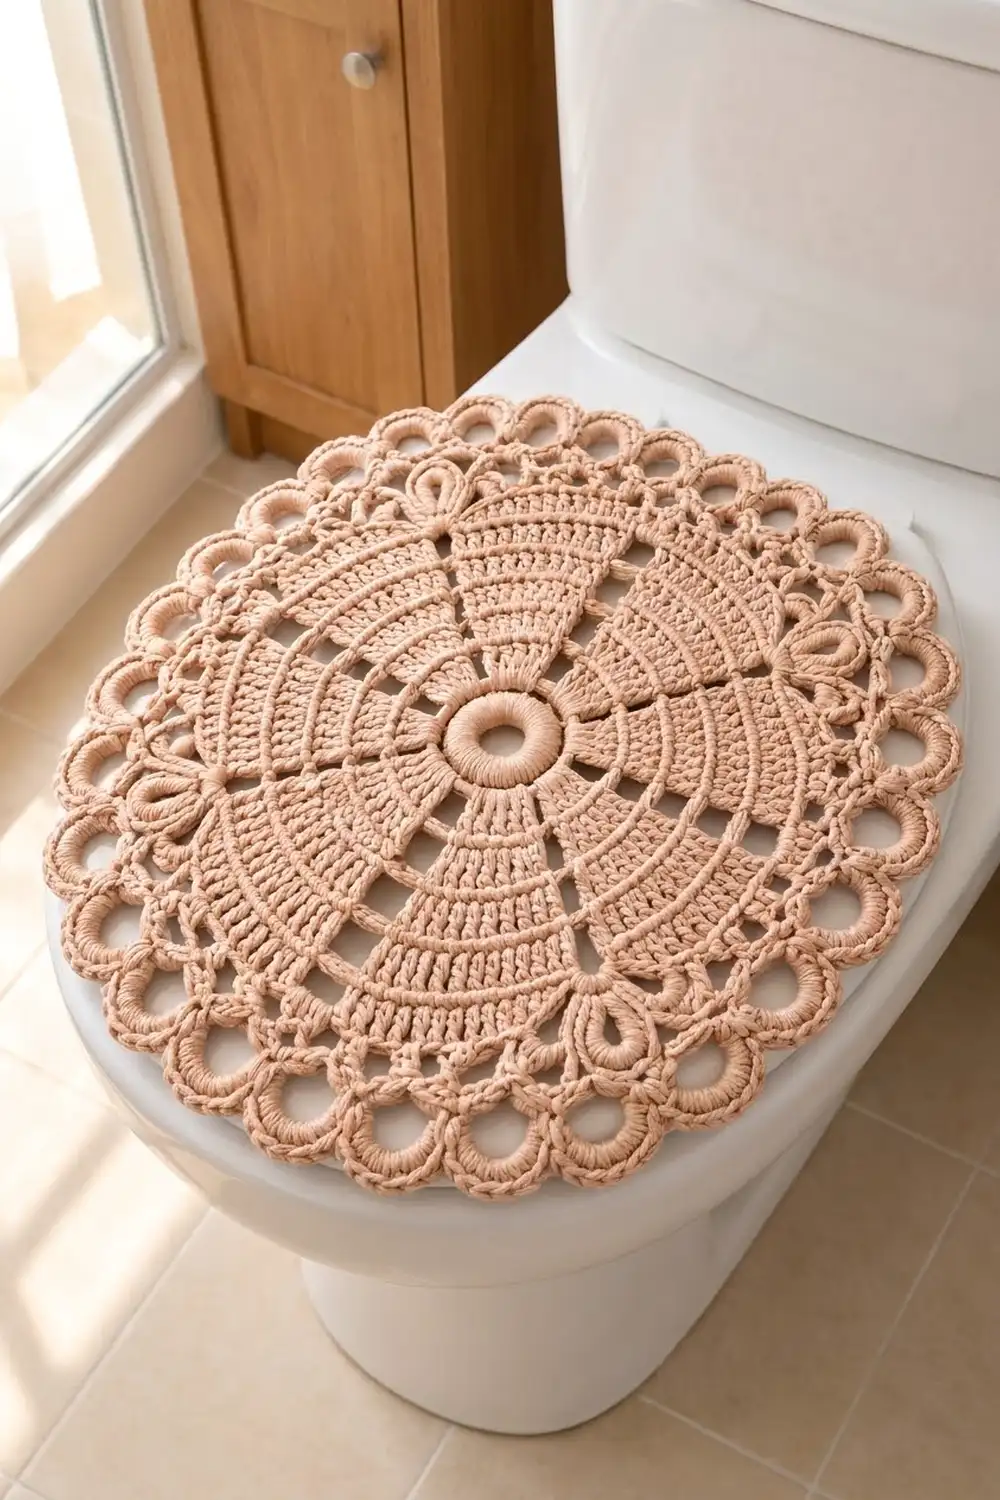
The Rose Compass Lace Lid Topper is one round lace motif in a soft blush-beige cotton. A padded ring sits at the center. Eight ladder-like spokes run out from it like the points of a compass. Between them, dense ridged wedges open into a lacy edge of teardrop petals and round ring scallops.
It uses one color, so the texture does all the work. The back-loop ridges in each wedge form fine concentric lines and the spokes give the piece a clean structure. The double edging adds a vintage doily feel that suits a warm, natural bathroom.
This pattern uses US crochet terms. After blocking, the topper measures 14.75 in (37.5 cm) across. That fits well on a standard lid of about 14 x 17 in (35.6 x 43.2 cm).
Construction is simple. You work the center ring, then nine rounds of double crochet wedges divided by chain spokes, then a four-round lace border. It is one piece, worked in joined rounds, with no turning and no sewing.
Finished Size and Construction
- Finished size: 14.75 in (37.5 cm) diameter
- Skill level: Intermediate
- Terminology: US crochet terms
- Yarn weight: #4 worsted, 100% cotton
- Hook: 5 mm (H-8)
- Number of pieces: 1
- Layout: one round motif with 8 wedges and 8 spokes
- Piece size: 14.75 in (37.5 cm) across
- Size before border (after Rnd 11): 10.75 in (27.3 cm) across
- Border depth: 2 in (5.1 cm) on every side
Materials
Choose a smooth worsted cotton or cotton blend. Cotton holds the lace shape, blocks crisply and washes well, which matters in a bathroom. Avoid fuzzy or very splitty yarn, because the back-loop ridges and petal tips need clear stitch definition.
- Blush beige (dusty pink-tan): about 140 g / 240 m (262 yd)
This amount includes a margin of about 15 percent to cover your gauge check and small differences in tension.
Tools:
– 5 mm (H-8) crochet hook
– Tapestry needle
– Scissors
– 4 stitch markers
– Measuring tape
– Blocking mat and rust-proof pins
– Spray bottle
– Optional: a circle of non-slip shelf liner to go under the topper
Abbreviations (US Terms)
- ch – chain
- sl st – slip stitch
- sc – single crochet
- dc – double crochet
- BLO – back loop only
- st(s) – stitch(es)
- sp – space
- sk – skip
- rnd – round
- inc – 2 dc in the same stitch
Special stitch – Teardrop Petal: work (4 sc, ch 3, 4 sc) into the same ch-6 loop. The sc fill the loop and the ch-3 makes a pointed tip. The open center of the loop still shows, which gives the teardrop shape.
Spoke note: never work into the ch-1 and ch-2 spaces between wedges during the wedge rounds. You chain over them each round, and as they stack up they form the ladder spokes.
Gauge and Checkpoints
Gauge: 16 dc and 8 rnds = 4 in (10.2 cm), worked flat in BLO dc. Each dc round adds about 0.5 in (1.3 cm) to the radius, which is 1 in (2.5 cm) to the diameter.
Test first: work Rnds 1–5 as your gauge piece and measure it flat. If it matches, keep going with the same piece.
Checkpoints (measure flat, edge to edge through the center):
– After Rnd 2: 1.75 in (4.4 cm)
– After Rnd 5: 4.75 in (12.1 cm)
– After Rnd 8: 7.75 in (19.7 cm)
– After Rnd 11: 10.75 in (27.3 cm)
– After Rnd 13: 12.75 in (32.4 cm)
– After Rnd 15: 14.75 in (37.5 cm), blocked
Being off by up to 0.25 in (0.6 cm) either way is fine.
Too big: go down to a 4.5 mm hook. Too small: go up to a 5.5 mm hook. If the edges curl up into a cup, your tension is tight, so go up a hook size. If the edges ruffle, go down a size. Measure again at the next checkpoint.
Center Ring
Rnd 1: Ch 10 and sl st in the first ch to form a ring. Ch 1, then work 24 sc into the ring, covering the chain completely. Join with a sl st to the first sc. (24 sc)
Rnd 2: Ch 1, sc in the BLO of each st around. Join. (24 sc)
The center is now a raised, padded ring with a round opening. It should measure 1.75 in (4.4 cm) across.
Wedge and Spoke Rounds
Work every dc in the BLO from here on. Rnd 3 goes into the BLO of the Rnd 2 sc. The ch-3 at the start of each round counts as the first dc. Join each round with a sl st to the top of the starting ch-3. To help you count, put a marker in the first dc of wedges 1, 3, 5 and 7.
Rnd 3: Ch 3, dc in next 2 sts, ch 1, *dc in next 3 sts, ch 1; rep from * 6 more times. Join. (24 dc: 8 wedges of 3 dc, 8 ch-1 sps)
Rnd 4: Ch 3, dc in same st, dc in next st, inc in next st, ch 1, sk ch-1 sp, *inc in next st, dc in next st, inc in next st, ch 1, sk ch-1 sp; rep from * 6 more times. Join. (40 dc: 8 wedges of 5 dc)
Rnd 5: Ch 3, dc in same st, dc in next 4 sts, ch 1, sk sp, *inc in next st, dc in next 4 sts, ch 1, sk sp; rep from * 6 more times. Join. (48 dc: 8 wedges of 6 dc)
Checkpoint: 4.75 in (12.1 cm).
Rnd 6: From here on the spokes are ch-2. Ch 3, dc in same st, dc in next 4 sts, inc in last st of wedge, ch 2, sk sp, *inc in next st, dc in next 4 sts, inc in next st, ch 2, sk sp; rep from * 6 more times. Join. (64 dc: 8 wedges of 8 dc, 8 ch-2 sps)
Rnd 7: Ch 3, dc in same st, dc in next 7 sts, ch 2, sk sp, *inc in next st, dc in next 7 sts, ch 2, sk sp; rep from * 6 more times. Join. (72 dc: 8 wedges of 9 dc)
Rnd 8: Ch 3, dc in same st, dc in next 7 sts, inc in last st, ch 2, sk sp, *inc in next st, dc in next 7 sts, inc in next st, ch 2, sk sp; rep from * 6 more times. Join. (88 dc: 8 wedges of 11 dc)
Checkpoint: 7.75 in (19.7 cm).
Rnd 9: Ch 3, dc in same st, dc in next 10 sts, ch 2, sk sp, *inc in next st, dc in next 10 sts, ch 2, sk sp; rep from * 6 more times. Join. (96 dc: 8 wedges of 12 dc)
Rnd 10: Ch 3, dc in same st, dc in next 10 sts, inc in last st, ch 2, sk sp, *inc in next st, dc in next 10 sts, inc in next st, ch 2, sk sp; rep from * 6 more times. Join. (112 dc: 8 wedges of 14 dc)
Rnd 11: Ch 3, dc in same st, dc in next 13 sts, ch 2, sk sp, *inc in next st, dc in next 13 sts, ch 2, sk sp; rep from * 6 more times. Join. (120 dc: 8 wedges of 15 dc, 8 ch-2 sps)
Checkpoint: 10.75 in (27.3 cm). This is your size before the border.
Why the increases alternate: at this gauge, a flat dc circle needs about 12 new stitches per round. A round that adds 2 stitches per wedge adds 16, and a round that adds 1 per wedge adds 8. Alternating them gives an average of 12, and the wider ch-2 spokes from Rnd 6 add a little extra room. Don’t skip the BLO. The unworked front loops are what make the concentric ridge lines.
Border
Border gauge: one ch-6 loop covers about 0.9 in (2.3 cm) of the edge. One finished ring scallop covers about 1.1 in (2.8 cm). The border is counted in sections: one section is one 15-dc wedge plus the ch-2 spoke after it, and there are 8 sections.
Number the dc in each wedge 1 to 15. The starting ch-3 of Rnd 11 is dc 1 of wedge 1.
Rnd 12 (loop round): Sl st in the BLO of the next 2 dc, which puts you in dc 3. Ch 1, sc in same st, ch 6, sk 2 dc, sc in dc 6, ch 6, sk 3 dc, sc in dc 10, ch 6, sk 2 dc, sc in dc 13, ch 6, sk 2 dc, sc in ch-2 spoke sp, ch 6, *sk dc 1 and 2 of next wedge, sc in dc 3, ch 6, sk 2 dc, sc in dc 6, ch 6, sk 3 dc, sc in dc 10, ch 6, sk 2 dc, sc in dc 13, ch 6, sk 2 dc, sc in spoke sp, ch 6; rep from * 6 more times. Join to first sc. (Per section: 5 sc, 5 ch-6 loops. Total: 40 sc, 40 loops)
The anchors at dc 3, 6, 10 and 13 mirror each other around the middle of the wedge (dc 8), and there is one more anchor in each spoke. This keeps the petals centered on each wedge and puts a petal directly over every spoke.
Rnd 13 (teardrop petals): Sl st into the first ch-6 loop. Ch 1, then work 1 Teardrop Petal in each ch-6 loop around. Join to first sc. (Per section: 5 petals = 40 sc and 5 ch-3 tips. Total: 320 sc, 40 tips)
Checkpoint: 12.75 in (32.4 cm).
Rnd 14 (ring foundation): Sl st in next 3 sc and into the first ch-3 tip. Ch 1, sc in same tip, *ch 7, sc in next ch-3 tip; rep from * 38 more times, ch 7. Join to first sc. (Per section: 5 sc, 5 ch-7 loops. Total: 40 sc, 40 loops)
Rnd 15 (ring scallops): Sl st into the first ch-7 loop. Ch 1, then work 11 sc in each ch-7 loop around. Join to first sc and fasten off. (Per section: 55 sc. Total: 440 sc)
Each covered ch-7 loop arches outward into a round ring scallop, with one ring sitting between each pair of petals.
Why the math works: Rnd 11 ends with 15 dc plus 1 spoke in each section, and Rnd 12 places 5 anchors per section, so 8 x 5 = 40 loops. Every round after that works one unit into each loop or tip, so the count stays at 40 all the way out: 40 loops, 40 petals, 40 tips, 40 rings.
At about 0.9 in (2.3 cm) per loop, 40 loops cover the roughly 37.7 in (95.8 cm) edge at Rnd 12 without pulling. The slightly longer ch-7 loops in Rnd 14 suit the larger outer edge. Each pair of border rounds adds 1 in (2.5 cm) per side, so 10.75 + 2 + 2 = 14.75 in (37.5 cm).
Final Blocking
- Weave in all ends along the back of the dc wedges, not through the lace.
- Soak the topper in cool water for 10 minutes, then roll it in a towel to press out the water. Do not wring it.
- Lay it flat on a blocking mat, right side up.
- Pin the center ring first. Then pin the tip of one spoke 7.375 in (18.7 cm) from the center. Do the same for the opposite spoke, then the other 6.
- Pin each teardrop petal tip so the petals point straight out.
- Pin the top center of each ring scallop so it opens into a round shape.
- Check that the diameter is 14.75 in (37.5 cm) in at least 4 directions.
- Mist lightly and let it dry completely, usually about 24 hours.
Final Quality-Control Checklist
- The center ring is raised and round, with 24 sc
- There are 8 straight ladder spokes, evenly spaced
- Each wedge has 15 dc after Rnd 11 (120 total)
- Concentric ridge lines show in every wedge
- There are 40 teardrop petals, each with a pointed ch-3 tip
- There are 40 ring scallops, each with 11 sc
- The diameter is 14.75 in (37.5 cm), give or take 0.25 in (0.6 cm)
- The piece lies flat with no cupping or ruffling
- All ends are secured and hidden
Troubleshooting
Spokes are crooked or drifting. You probably worked into a spoke space or skipped one. Count the dc in each wedge and unravel back to the round where the count first goes wrong.
The center bulges up. Rnd 3 is too tight. Work it again with a larger hook or looser tension.
The edges cup. Your tension is tight or you missed an increase. Recount, and go up a hook size if needed.
The edges ruffle. Your tension is loose. Go down a hook size from Rnd 6 onward.
The petals are off-center. Check the Rnd 12 anchors: dc 3, 6, 10, 13 and the spoke.
The ring scallops look flat. Make sure every loop has all 11 sc, and pin the top of each ring when blocking.
The topper slides on the lid. Put a circle of non-slip shelf liner underneath.
Care
Hand wash, or machine wash on a gentle cool cycle inside a mesh bag. Reshape it while damp and dry it flat.
Final Notes
Here is the measurement chain. The center ring starts at 1.75 in (4.4 cm), and each dc round adds 1 in (2.5 cm) to the diameter until it reaches 10.75 in (27.3 cm) after Rnd 11. The petal rounds bring it to 12.75 in (32.4 cm), and the ring scallops finish it at 14.75 in (37.5 cm). Keep 15 dc in each wedge and 40 units in every border round, measure at each checkpoint, and the topper will lie flat and even.
Happy crocheting!