

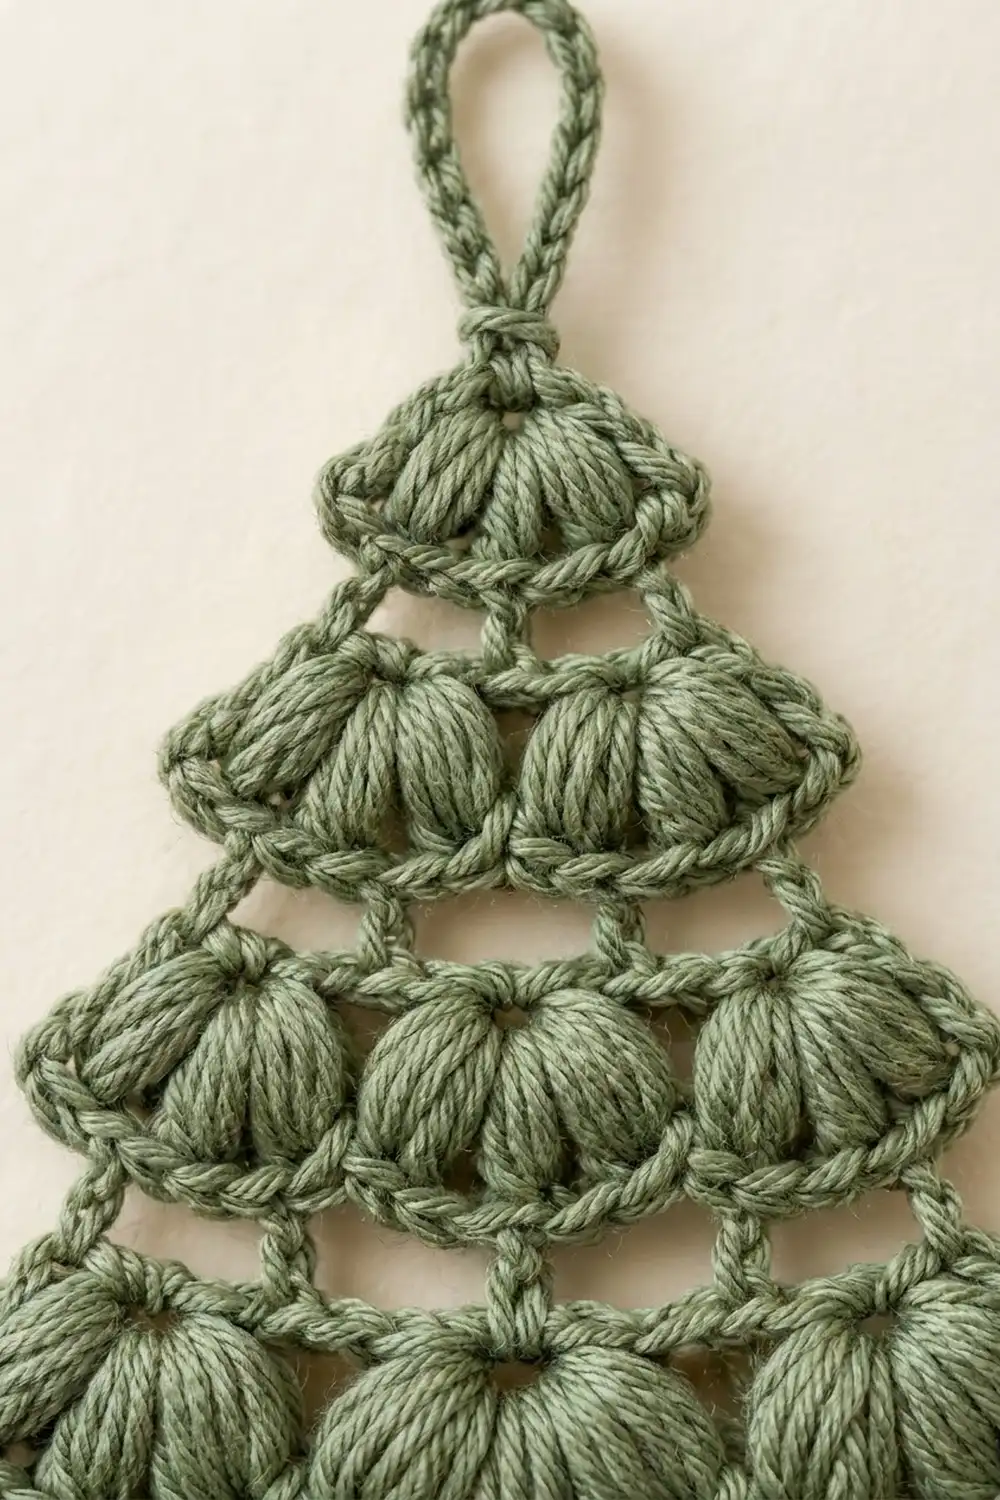
This little tree ornament is made of stacked puff-stitch fans in soft sage green. It has four tiers, with one, two, three and three fans from top to bottom. Each fan opens downward from a small point, so every tier ends in a rounded scallop that looks like a branch.
The look is calm and Scandinavian: a single muted color, plenty of texture and small open gaps between the tiers that let the light through. It works on a tree, on a gift tag or hanging from a window latch.
This pattern uses US crochet terms. The finished ornament measures 3.5 in (8.9 cm) wide and 3.75 in (9.5 cm) tall, plus a 1.5 in (3.8 cm) hanging loop. The total hanging length is 5.25 in (13.3 cm).
You make the whole ornament in one piece from the top down. First you chain the hanging loop. Then you work alternating fan rows and mesh rows, which widen the tree one tier at a time. A bottom row and a side outline finish it, and you fasten off only once.
Finished Size and Construction
- Finished size: 3.5 in (8.9 cm) wide × 3.75 in (9.5 cm) tall, plus a 1.5 in (3.8 cm) loop
- Skill level: Easy+ (you need to be comfortable with puff stitches)
- Terminology: US crochet terms
- Yarn weight: DK (light #3) cotton or cotton blend
- Hook: 3.5 mm (US E-4)
- Number of pieces: 1
- Layout: a single flat tree with 4 tiers of 1, 2, 3 and 3 fans
- Piece size before border: 3.25 in (8.3 cm) wide × 3.5 in (8.9 cm) tall after Row 7
- Border depth: 0.25 in (0.6 cm) at the bottom (Row 8) and 0.125 in (0.3 cm) on each side (edging)
Materials
Yarn: Use a smooth, mercerized or matte DK cotton. Cotton shows each puff clearly and keeps its shape on the tree. Acrylic also works, but the puffs will look softer and less defined. Avoid fuzzy yarns, because they hide the open gaps between tiers.
- Sage green: about 8 g, roughly 18 m (20 yd), per ornament
This quantity includes a margin for a gauge swatch and weaving in ends. A 50 g ball makes about six ornaments.
Tools:
– 3.5 mm (US E-4) crochet hook
– Tapestry needle
– Scissors
– Stitch marker (optional, to mark the center puff)
– Rust-proof pins and a foam blocking mat
– Spray bottle or steam iron
– Light spray starch (optional)
Abbreviations (US Terms)
- ch – chain
- sl st – slip stitch
- sc – single crochet
- dc – double crochet
- sk – skip
- sp(s) – space(s)
- st(s) – stitch(es)
- puff – puff stitch (see below)
Puff stitch (puff): [Yarn over, insert hook in the stated st or sp, yarn over, pull up a loop to about 0.25 in (0.6 cm)] 4 times (9 loops on hook). Yarn over and draw through all 9 loops. The puff does not have its own closing chain; the ch-1 spaces are written into each row.
Shell: (Puff, ch 1, puff, ch 1, puff) in the same st or sp. That makes 3 puffs and 2 ch-1 sps.
Large shell: (Puff, ch 1) 3 times, then puff, all in the same sp. That makes 4 puffs and 3 ch-1 sps.
Gauge and Checkpoints
Make one test ornament before you make a batch. It takes about 30 minutes and tells you everything about your tension.
Basic gauge:
– 16 ch = 3 in (7.6 cm)
– 1 shell = 0.75 in (1.9 cm) wide
– 1 large shell = 0.875 in (2.2 cm) wide
Checkpoints (measure flat without stretching):
– After Row 1: 1.25 in (3.2 cm) wide
– After Row 3: 2 in (5.1 cm) wide
– After Row 4: 1.75 in (4.4 cm) tall from the tip
– After Row 5: 2.75 in (7.0 cm) wide
– After Row 7: 3.25 in (8.3 cm) wide × 3.5 in (8.9 cm) tall
– Finished: 3.5 in (8.9 cm) × 3.75 in (9.5 cm)
If your tree is too big: Go down to a 3.25 mm (US D-3) hook, or pull up the puff loops a little shorter.
If your tree is too small: Go up to a 3.75 mm (US F-5) hook, or pull up the puff loops a little longer.
The puff loop height has more effect on size than anything else, so keep it the same in every puff.
Pattern
Hanging Loop and Tip
Leave a 6 in (15.2 cm) tail. Ch 16, then sl st in the first ch to form the loop.
Ch 1, then sc in the same ch at the base of the loop. This sc is the tip sc. The whole ornament grows from it.
Tier 1
Row 1: Ch 3 (counts as dc), ch 1, [puff, ch 1] 3 times in the tip sc, then dc in the tip sc.
Count: 2 dc, 3 puffs, 4 ch-1 sps, all worked into the tip sc to make one fan.
Row 2 (mesh): Turn. Ch 1, sc in the first dc. Ch 4, sk the next ch-1 sp, puff and ch-1 sp, then sc in the center (2nd) puff. Ch 4, sk the remaining sts, then sc in the 3rd ch of the turning ch-3.
Count: 3 sc, 2 ch-4 sps.
The mesh chains lie along the rounded bottom of the fan and outline the first tier.
Tier 2
Row 3: Turn. Ch 3 (counts as dc), ch 1. [Shell in the next ch-4 sp, ch 1] 2 times, then dc in the last sc.
Count: 2 dc, 2 shells (6 puffs), 7 ch-1 sps (3 between or beside the shells, 4 inside them).
Checkpoint: 2 in (5.1 cm) wide.
Row 4 (mesh): Turn. Ch 1, sc in the first dc. [Ch 4, sc in the center puff of the next shell] 2 times. Ch 4, then sc in the 3rd ch of the turning ch-3.
Count: 4 sc, 3 ch-4 sps.
Checkpoint: 1.75 in (4.4 cm) tall from the tip.
Tier 3
Row 5: Turn. Ch 3 (counts as dc), ch 1. [Shell in the next ch-4 sp, ch 1] 3 times, then dc in the last sc.
Count: 2 dc, 3 shells (9 puffs), 10 ch-1 sps (4 between or beside the shells, 6 inside them).
Checkpoint: 2.75 in (7.0 cm) wide.
Row 6 (mesh): Turn. Ch 1, sc in the first dc. Ch 5, sk the first shell, then sc in the ch-1 sp between shells 1 and 2. Ch 5, sc in the ch-1 sp between shells 2 and 3. Ch 5, then sc in the 3rd ch of the turning ch-3.
Count: 4 sc, 3 ch-5 sps.
This mesh row anchors between the shells rather than in their centers. That way the bottom tier keeps 3 fans instead of growing to 4, and each bottom fan sits right under a Tier 3 fan, as in the finished tree.
Tier 4 (Bottom)
Row 7: Turn. Ch 3 (counts as dc), ch 1. [Large shell in the next ch-5 sp, ch 1] 3 times, then dc in the last sc.
Count: 2 dc, 3 large shells (12 puffs), 13 ch-1 sps (4 between or beside the shells, 9 inside them).
Checkpoint: 3.25 in (8.3 cm) wide × 3.5 in (8.9 cm) tall. This is the size before the border.
Do not fasten off. Continue straight into the border.
Border
The border has two parts:
– Row 8 is a scalloped bottom row.
– The edging is one continuous outline up both slanted sides.
Border gauge: 6 sc over each bottom scallop, and about 4 sc per 1 in (2.5 cm) along the sides.
Row 8 (bottom edge): Turn. Ch 1, sc in the first dc, then sl st in the next ch-1 sp. Work 2 sc in each of the 3 ch-1 sps inside the large shell, then sl st in the next ch-1 sp. Repeat from * to * 2 more times. Sc in the 3rd ch of the turning ch-3.
Count: 24 sts (20 sc + 4 sl st). That is 6 sc per scallop, 1 sc at each corner, and 4 sl sts in the dips.
Edging (sides): Do not turn. Ch 1 and rotate the piece to work up the side edge.
Work across the row ends from the bottom up:
– 1 sc in the Row 8 row-end
– 3 sc in the Row 7 row-end
– 1 sc in the Row 6 row-end
– 3 sc in the Row 5 row-end
– 1 sc in the Row 4 row-end
– 3 sc in the Row 3 row-end
– 1 sc in the Row 2 row-end
– 3 sc in the Row 1 row-end
That is 16 sc. Sl st in the tip sc at the base of the loop.
Work down the second side the same way in reverse order, 3, 1, 3, 1, 3, 1, 3, 1, for another 16 sc. Sl st in the first sc of Row 8. Fasten off.
Edging count: 16 sc on each side, plus 1 sl st at the tip and 1 joining sl st.
Why the math works: Each puff or dc row is about 3 sc tall at this gauge, and each sc mesh row is about 1 sc tall. So 3 sc per tall row-end and 1 sc per short row-end keeps the sides flat. They won’t ripple or pull in.
Each side has 4 tall rows and 4 short rows, so (4 × 3) + (4 × 1) = 16 sc.
The corner sc of Row 8 are already counted in Row 8’s 24 sts. The side counts do not include them, so no corner is counted twice.
Along the bottom, 2 sc per ch-1 sp follows the curve of each large shell. The sl st in each gap pulls the edge in to make the scalloped dips.
Final Blocking
- Weave in both tails along the back of the mesh rows. Leave the loop tail until after blocking so you can use it to tidy the loop base.
- Pin the ornament face up on a foam mat. Pin the tip, both bottom corners and the center of each bottom scallop.
- Check that it measures 3.5 in (8.9 cm) across the bottom and 3.75 in (9.5 cm) from the tip to the bottom edge.
- Gently nudge each fan open so the puffs fan out evenly from their points.
- Spray lightly with water, or hover a steam iron about 1 in (2.5 cm) above the piece. Do not press the puffs flat.
- For a crisper ornament, mist lightly with spray starch.
- Let it dry completely, usually 2–3 hours. Then unpin it, weave in the last tail and trim.
Final Quality-Control Checklist
- Tiers hold 1, 2, 3 and 3 fans from top to bottom
- All 24 puffs are the same height and fully closed
- Mesh rows show 2, 3 and 3 even chain loops
- Row 8 has 4 clear scallop dips
- Each side has 16 sc and lies flat without rippling
- The ornament measures 3.5 in (8.9 cm) × 3.75 in (9.5 cm)
- The loop hangs 1.5 in (3.8 cm) and the tree hangs straight
- No visible tails on the front
Troubleshooting
Puffs look thin or scraggly: Pull each loop up to the full 0.25 in (0.6 cm) before the final yarn over, and pull the closing loop through firmly.
Tree curls or cups forward: Your mesh chains are too tight. Chain more loosely, or go up a hook size for the mesh rows only.
Sides ripple: Your edging is too loose or you’ve added extra sc. Count exactly 16 per side, and work 3 sc into each tall row-end, not 4.
Bottom tier has 4 fans: You anchored Row 6 in the center puffs. Pull it out and re-anchor it in the ch-1 sps between the shells.
Tree hangs crooked: The tip sc may have twisted. Block with the loop pinned straight above the tip, and tighten the loop tail at the back.
Tip feels crowded: Working 5 sts into one sc is tight. Insert the hook under both loops plus the back bar of the sc for more room.
Care
Hand wash in cool water with mild soap, press out the water in a towel and reshape it flat to dry. Store flat or hang it by the loop, away from heavy decorations that could crush the puffs.

Final Notes
The sizes build up in a simple chain:
– A 16-ch loop that hangs 1.5 in (3.8 cm)
– One fan at 1.25 in (3.2 cm) wide, then 2 in (5.1 cm), 2.75 in (7.0 cm) and 3.25 in (8.3 cm) as the tiers grow
– Row 8 and the edging add 0.25 in (0.6 cm) of height and 0.125 in (0.3 cm) per side, for a finished 3.5 in (8.9 cm) × 3.75 in (9.5 cm) tree
If each checkpoint matches, the finished size will too. Once your test ornament is right, the rest go quickly, and a handful in sage green makes a lovely, quiet tree.
Happy crocheting!