

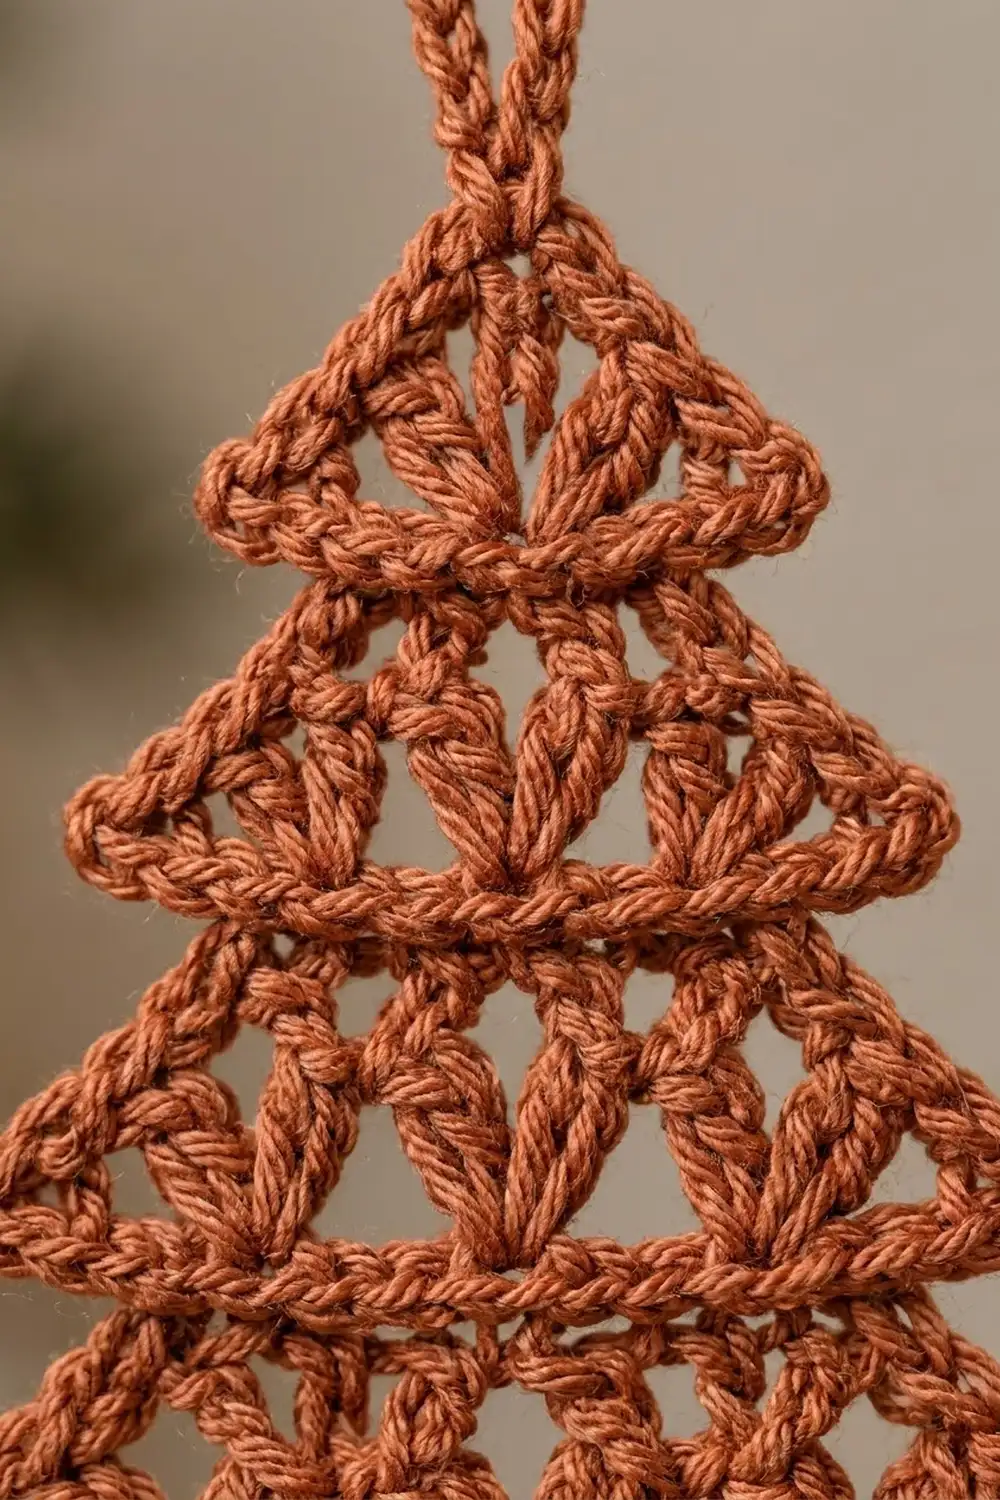
This little lace tree is a flat ornament made as one piece in a warm cinnamon-terracotta color. It has three stacked tiers. Each tier sticks out wider than the one above it, so the outline looks like a classic Christmas tree right away. Chunky V-shaped clusters fill every tier, and small triangle-shaped openings between them let the light through.
The style is simple and a little rustic. Using one solid color keeps the focus on the texture, and a crisp single crochet outline frames the whole tree. A chain loop at the tip lets you hang it from a branch, a gift tag or a window hook.
The pattern uses US crochet terms. The finished tree is about 3.8 in (9.7 cm) wide and 4.6 in (11.7 cm) tall. The hanging loop adds about 1 in (2.5 cm), so the total hanging length is about 5.6 in (14.2 cm).
You work the tree from the bottom up in rows, all in one piece. Each tier has five rows: a single crochet base, a V-cluster row, a shaping row, a second V-cluster row and a narrow top band. Each new tier starts with two extra stitches on each side. To finish, one border round outlines the whole tree and makes the hanging loop in the same round.
Finished Size and Construction
- Finished size: 3.8 in (9.7 cm) wide x 4.6 in (11.7 cm) tall, plus a 1 in (2.5 cm) loop
- Skill level: Easy-Intermediate
- Terminology: US crochet terms
- Yarn weight: DK (3), cotton or cotton blend
- Hook: 3.5 mm (US E-4)
- Number of pieces: 1
- Layout: one flat piece with three stacked tiers, worked in rows
- Piece size before border: 3.4 in (8.6 cm) wide x 4.2 in (10.7 cm) tall
- Border depth: one round of sc, about 0.2 in (0.5 cm) on every edge
Materials
Choose a smooth DK cotton or mercerized cotton blend. Cotton holds the points and V shapes well, and it won’t get fuzzy on the tree. Avoid fuzzy or very stretchy yarns: they blur the lace openings and make the tiers droop.
- Cinnamon / terracotta (main color): 10 g, about 20 m (22 yd)
These amounts include a safety margin of about 40%. One tree uses roughly 6 g, so one 50 g ball makes several ornaments.
Tools:
- 3.5 mm (US E-4) crochet hook
- Tapestry needle
- Scissors
- 2 stitch markers
- Blocking mat and rust-proof pins
- Spray starch or fabric stiffener (optional)
Abbreviations (US Terms)
- ch: chain
- sl st: slip stitch
- sc: single crochet
- dc: double crochet
- sp: space
- st(s): stitch(es)
- yo: yarn over
- sc3tog: single crochet 3 together
- sc5tog: single crochet 5 together
- esc: extension single crochet (see below)
- dc-cl: 2-double-crochet cluster (see below)
- V-cl: V-cluster (see below)
Special stitches
- dc-cl (2-dc cluster): [yo, insert hook in indicated st, yo, pull up a loop, yo, draw through 2 loops] twice, yo, draw through all 3 loops on hook.
- V-cl (V-cluster): (dc-cl, ch 1, dc-cl) all in the same st. Counts as 3 sts: cluster, ch-1 sp, cluster.
- esc (extension single crochet): insert hook under the 2 strands at the base of the last st made, yo, pull up a loop, yo, draw through 1 loop (this makes the base chain), yo, draw through 2 loops. Adds 1 st to the end of a row.
- sc3tog: [insert hook in next st, yo, pull up a loop] 3 times, yo, draw through all 4 loops.
- sc5tog: [insert hook in next st, yo, pull up a loop] 5 times, yo, draw through all 6 loops.
Counting notes: The ch-3 at the start of a V-cluster row counts as 1 dc. The ch 1 at the start of an sc row does not count as a st. Put a marker in the top of each ch-3 so you don’t miss it on the next row.
Gauge and Checkpoints
Gauge: 10 sc and 10 sc rows = 2 in (5.1 cm) with a 3.5 mm hook. In the tree, one V-cluster row plus one sc row is about 0.6 in (1.5 cm) tall.
The ornament is small, so the tree itself is your swatch. Make the first tier (Rows 1–5), then measure before you go on.
Checkpoints:
- Row 1: 17 sc = 3.4 in (8.6 cm) wide.
- After Row 5 (Tier 1): 1.4 in (3.6 cm) tall; Row 5 is 1.8 in (4.6 cm) wide.
- After Row 6: Row 6 is 2.6 in (6.6 cm) wide.
- After Row 10 (Tier 2): 2.8 in (7.1 cm) tall.
- After Row 15 (Tier 3): 4.2 in (10.7 cm) tall.
- After the border: 3.8 in (9.7 cm) wide x 4.6 in (11.7 cm) tall, not counting the loop.
If your tier is too big, start again with a 3.0 mm (US C-2 or D-3) hook. If it’s too small, try a 4.0 mm (US G-6) hook. Being off by 0.2 in (0.5 cm) is fine for an ornament. A bigger difference changes the tier proportions, so it’s worth fixing.
Pattern
Tier 1 (bottom tier)
Foundation: Ch 18.
Row 1 (base band): Sc in 2nd ch from hook and in each ch across, turn. (17 sc)
Row 2 (V-cluster row): Ch 3 (counts as dc), skip next st, V-cl in next st, skip next st, sc in next st; repeat from * 2 more times, skip next st, V-cl in next st, skip next st, dc in last st, turn. (4 V-cl, 3 sc, 2 dc = 17 sts)
The two chunky legs of each V-cl lean outward. The sc between them sits low, which leaves a small point-down triangle opening between each pair of V’s.
Row 3 (shaping row): Ch 1, sc3tog over first 3 sts (dc, cluster, ch-1 sp), sc in each of next 11 sts, sc3tog over last 3 sts, turn. (1 + 11 + 1 = 13 sts)
Row 4 (V-cluster row): Ch 3, skip next st, V-cl in next st, skip next st, sc in next st; repeat from * once more, skip next st, V-cl in next st, skip next st, dc in last st, turn. (3 V-cl, 2 sc, 2 dc = 13 sts)
Row 5 (top band): Ch 1, sc3tog, sc in each of next 7 sts, sc3tog, turn. (1 + 7 + 1 = 9 sts)
Checkpoint: Tier 1 is about 1.4 in (3.6 cm) tall. It is 3.4 in (8.6 cm) wide at the bottom and 1.8 in (4.6 cm) wide at Row 5.
Tier 2 (middle tier)
Row 6 (step-out base band): Ch 3, sc in 2nd ch from hook and in next ch (2 sc), sc in each of the 9 sts of Row 5, esc 2 times, turn. (2 + 9 + 2 = 13 sts)
The 2 extra sts on each side stick out past Row 5 and form the pointed corners of the middle tier.
Row 7 (V-cluster row): Work as Row 4. (3 V-cl, 2 sc, 2 dc = 13 sts)
Row 8 (shaping row): Ch 1, sc3tog, sc in each of next 7 sts, sc3tog, turn. (1 + 7 + 1 = 9 sts)
Row 9 (V-cluster row): Ch 3, skip next st, V-cl in next st, skip next st, sc in next st, skip next st, V-cl in next st, skip next st, dc in last st, turn. (2 V-cl, 1 sc, 2 dc = 9 sts)
Row 10 (top band): Ch 1, sc3tog, sc in each of next 3 sts, sc3tog, turn. (1 + 3 + 1 = 5 sts)
Checkpoint: the tree is now 2.8 in (7.1 cm) tall. Row 6 is 2.6 in (6.6 cm) wide.
Tier 3 (top tier)
Row 11 (step-out base band): Ch 3, sc in 2nd ch from hook and in next ch (2 sc), sc in each of the 5 sts of Row 10, esc 2 times, turn. (2 + 5 + 2 = 9 sts)
Row 12 (V-cluster row): Work as Row 9. (2 V-cl, 1 sc, 2 dc = 9 sts)
Row 13 (shaping row): Ch 1, sc3tog, sc in each of next 3 sts, sc3tog, turn. (1 + 3 + 1 = 5 sts)
Row 14 (V-cluster row): Ch 3, skip next st, V-cl in next st, skip next st, dc in last st, turn. (1 V-cl, 2 dc = 5 sts)
Row 15 (tip): Ch 1, sc5tog over all 5 sts. (1 st) Do not fasten off.
Checkpoint: the tree is 4.2 in (10.7 cm) tall, and Row 11 is 1.8 in (4.6 cm) wide.
Width chain at a glance: Tier 1 goes 17 → 17 → 13 → 13 → 9. Tier 2 goes 13 → 13 → 9 → 9 → 5. Tier 3 goes 9 → 9 → 5 → 5 → 1. Each new tier starts 4 sts wider than the band below it.
Border and Hanging Loop
Border gauge: same as the body, 5 sc per 1 in (2.5 cm). Work 1 sc into each sc-row end and 2 sc around each dc-row end (the ch-3 or the last dc). A dc row is about 0.4 in (1 cm) tall, so 2 sc fit it exactly. An sc row is about 0.2 in (0.5 cm) tall, so 1 sc fits it.
Round 1: Ch 1, sc in top of the sc5tog (the tip). Now work down the first side:
- 2 sc in Row 14 end, 1 sc in Row 13 end, 2 sc in Row 12 end.
- 2 sc in Row 11 end (tier 3 point).
- 1 sc in the underside of each of the 2 extension sts of Row 11 (2 sc).
- 1 sc in Row 10 end, 2 sc in Row 9 end, 1 sc in Row 8 end, 2 sc in Row 7 end.
- 2 sc in Row 6 end (tier 2 point).
- 1 sc in the underside of each of the 2 extension sts of Row 6 (2 sc).
- 1 sc in Row 5 end, 2 sc in Row 4 end, 1 sc in Row 3 end, 2 sc in Row 2 end.
First side total: 25 sc (7 + 2 + 8 + 2 + 6).
Bottom edge: Working in the free loops of the foundation chain, 3 sc in the first ch (this corner group wraps the Row 1 end), sc in each of next 15 ch, 3 sc in last ch. (3 + 15 + 3 = 21 sc)
Second side: Work up the other side as a mirror of the first: 2 sc in Row 2 end, 1 in Row 3, 2 in Row 4, 1 in Row 5, 2 in the underside of the Row 6 extension, 2 in Row 6 end, 2 in Row 7, 1 in Row 8, 2 in Row 9, 1 in Row 10, 2 in the underside of the Row 11 extension, 2 in Row 11 end, 2 in Row 12, 1 in Row 13, 2 in Row 14. (25 sc)
Hanging loop: Ch 14, sl st in the first sc of the round. Fasten off and weave in ends.
Round total: 1 (tip) + 25 + 21 + 25 = 72 sc, plus the ch-14 loop.
Why the math works: The bottom edge gets 1 sc per foundation chain, which matches the 17-st base. Each corner group adds only 2 extra sts, and those 3-sc corners turn the sharp bottom corners without cupping. The 2-sc groups at the Row 6 and Row 11 ends sharpen each tier point. At the inner corners, where a top band meets the step-out above it, you add nothing, so the steps stay crisp. Each side has 25 sc and the round is symmetrical, so the tree hangs straight.
Final Blocking
- Soak the ornament in cool water for a few minutes, then press the water out gently in a towel. Don’t wring it.
- Lay it flat on a blocking mat, right side up.
- Pin the tip, the 2 bottom corners and the 4 tier points. Check that the bottom edge is 3.8 in (9.7 cm) wide and the tree is 4.6 in (11.7 cm) tall.
- Use a pin or blunt needle to open each V-cluster and each triangle opening evenly.
- Straighten the bottom edge and each top band so they run horizontally.
- Lay the hanging loop straight up from the tip.
- If you want a stiffer ornament, spray it lightly with starch.
- Let it dry completely before you unpin it.
Final Quality-Control Checklist
- Tier bases have the right stitch counts: 17, 13 and 9 sts.
- Each tier has 2 V-cluster rows with these V counts: 4 and 3, then 3 and 2, then 2 and 1.
- Every V-cl has a visible ch-1 gap and 2 full clusters.
- The tier points stick out evenly on both sides.
- The border has 25 sc on each side and 21 sc along the bottom.
- The finished size is about 3.8 in (9.7 cm) x 4.6 in (11.7 cm).
- The loop is centered over the tip and the tree hangs straight.
- All ends are woven in and hidden behind solid sts.
Troubleshooting
The tiers curl or cup. Your sc rows are too tight compared with the V rows. Loosen up on the sc rows, or block firmly with starch.
The tier points don’t stick out. Check that you added 2 sts on each side in Rows 6 and 11, and that you worked 2 sc into those row ends in the border.
The V’s look flat or closed. Make sure there is a ch 1 between the two clusters. Pin each V open when you block.
The edges look wavy. You probably worked more than 2 sc into the dc-row ends. Stick to the 2-and-1 rhythm.
The tree leans. Count each side of the border. Both sides should have 25 sc.
The stitch count is off after a V row. Check that you skipped 1 st on each side of every V-cl and counted the ch-3 as a dc.
The tip is lumpy. Pull each loop of the sc5tog up to the same height before you finish the stitch.
Care
Hand wash in cool water with mild soap, press dry in a towel and reshape flat. Store it flat between sheets of tissue paper so the points stay crisp.

Final Notes
The measurement chain is simple. A 17-st base gives a bottom tier 3.4 in (8.6 cm) wide. Within each tier, every shaping row takes away 4 sts, and the next tier’s base adds 4 sts back. Three tiers of 1.4 in (3.6 cm) each make 4.2 in (10.7 cm) of height. The 72-sc border adds 0.2 in (0.5 cm) on every edge. That gives a finished tree of 3.8 in (9.7 cm) x 4.6 in (11.7 cm) with a 1 in (2.5 cm) loop.
Make one for your tree, tie one onto a gift, or make a whole set in the same cozy shade.
Happy crocheting!