

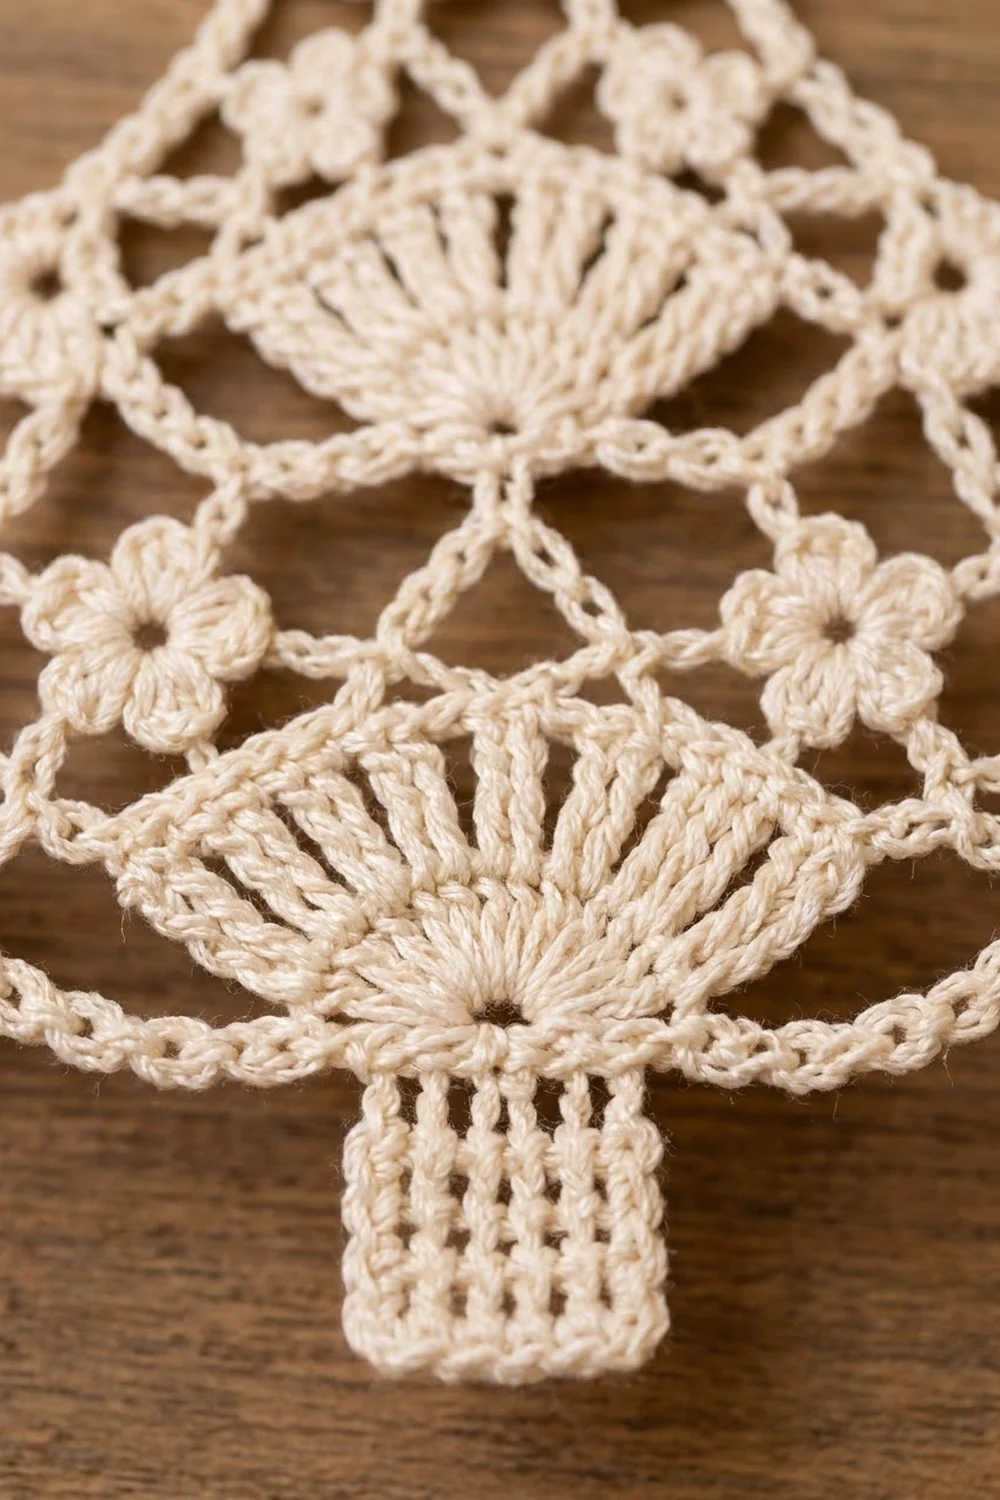
This lace Christmas tree ornament is made in fine cream cotton thread. It has three stacked tiers, each with a fan at its base and open lattice above. Tiny five-petal flowers fill the lattice, and picot-edged rings stick out at every tier corner, so the outline looks stepped and scalloped. A solid little trunk sits underneath.
It’s a single color, so the stitch texture does all the work. Hang it on the tree, tie it to a gift, or tuck it into a card.
The pattern uses US crochet terms. The finished ornament measures 3.25 in (8.3 cm) wide × 4.25 in (10.8 cm) tall, plus a 1.25 in (3.2 cm) hanging loop.
You work it in one piece from the bottom up. First you make the trunk in rows. Each tier then starts with a base row (corner rings plus a fan), followed by an arc row and lattice rows that decrease toward the next tier. A ring flower closes the top. One edging round adds the picot rings and firms the outline.
Finished Size and Construction
- Finished size: 3.25 in (8.3 cm) wide × 4.25 in (10.8 cm) tall; 5.5 in (14.0 cm) including the loop
- Skill level: Intermediate (thread lace, working into chain spaces)
- Terminology: US
- Yarn weight: Size 10 cotton crochet thread
- Hook: 1.75 mm steel hook
- Number of pieces: 1
- Layout: Single motif; trunk + 3 tiers + top flower
- Piece size before border: 3 in (7.6 cm) wide × 4.125 in (10.5 cm) tall
- Border depth: 0.125 in (0.3 cm) on the sides and bottom. The top flower is not edged.
Materials
Choose a mercerized size 10 cotton thread. It holds starch well and the lace stays crisp. Avoid fuzzy blends, because they blur the fans.
- Cream/ivory size 10 thread: 5 g (about 26 m / 28 yd) per ornament
Tools:
- 1.75 mm steel crochet hook
- Tapestry needle (fine)
- Scissors
- 1 locking stitch marker
- Fabric stiffener or starch
- Foam blocking board, rust-proof pins, plastic wrap
The quantity includes about a 25% margin for the gauge swatch and weaving in ends.
Abbreviations (US Terms)
- ch – chain
- sl st – slip stitch
- sc – single crochet
- dc – double crochet
- tr – treble crochet
- sp(s) – space(s)
- st(s) – stitch(es)
Special stitches
- Ring: ch 9, sl st in 6th ch from hook. This makes a 6-ch ring on a 3-ch leg. (In Tier 3 the Ring sits at the end of a longer chain instead; see Row 1.)
- Flower (Fl): ch 4, sl st in 4th ch from hook to form a tiny ring, then (ch 3, sl st in ring) 5 times. That gives 5 petals. Carry on with the next chain from the ring.
- Fan: a group of tr worked into one stitch or space, with ch 2 between them. The count is given in each row.
- Picot border group: in a ring, (sc, ch 3) 4 times, sc = 5 sc + 4 ch-3 picots.
Gauge and Checkpoints
The trunk is your gauge swatch.
- Gauge: 12 dc = 1 in (2.5 cm); 4 dc rows = 0.6 in (1.5 cm); about 14 ch = 1 in (2.5 cm)
- Trunk: 9 sts × 4 rows = 0.75 in (1.9 cm) wide × 0.6 in (1.5 cm) tall
If the trunk is wider than 0.8 in (2.0 cm), go down to a 1.5 mm hook. If it’s narrower than 0.7 in (1.8 cm), go up to 2.0 mm. Changing your tension in the middle of the piece distorts the fans, so settle gauge here first.
Stage checkpoints (blocked lightly with your fingers):
| Stage | Measurement |
|---|---|
| After Row 2 | 3 in (7.6 cm) between the outer edges of the rings |
| After Row 4 | 1.6 in (4.1 cm) from trunk bottom |
| After Row 6 | Tier 2 rings 2.25 in (5.7 cm) apart |
| After Row 9 | 2.75 in (7.0 cm) tall |
| After Row 11 | Tier 1 rings 1.5 in (3.8 cm) apart |
| After Row 15 | 3.5 in (8.9 cm) tall |
| After top flower | 4.125 in (10.5 cm) tall |
Trunk
Ch 11.
Row T1: Dc in 4th ch from hook and in each ch across. (9 sts; the skipped ch count as 1 dc)
Rows T2–T4: Ch 3 (counts as dc), turn, dc in each st across, ending in top of the turning ch. (9 sts)
Don’t fasten off. Number the sts of Row T4 1–9 in the order you worked them. You’re now at st 9, a top corner.
Tier 3 (Bottom Tier)
Row 1 (arms and fan): Ch 17, sl st in 6th ch from hook (first Ring; 11 arm ch remain). Sl st in each of the 11 arm ch back to the trunk. Sl st in st 9, then in sts 8, 7, 6 and 5. In st 5 work: ch 4 (counts as tr), (ch 2, tr in st 5) 8 times. Sl st in sts 4, 3, 2 and 1. Ch 17, sl st in 6th ch from hook (second Ring).
Count: 2 Rings, two 11-ch arms, fan of 9 tr with 8 ch-2 sps.
Row 2 (arc row): Turn. Ch 1, sc in Ring, ch 9, sc in top of the nearest tr, 3 dc in each of the 8 ch-2 sps, sc in top of the last fan st, ch 9, sc in other Ring.
Count: 24 dc (8 groups of 3), 4 sc, 2 ch-9 sps.
Row 3: Turn. Ch 1, sc in first sc, ch 5, sc in ch-9 sp, ch 5, sc in 5th dc, ch 5, sc in the gap between the 12th and 13th dc, ch 5, sc in 20th dc, ch 5, sc in next ch-9 sp, ch 5, sc in last sc.
Count: 6 ch-5 loops. The 5th and 20th dc are each the center of the second group from either end, so the lattice is symmetrical.
Row 4: Turn. Sl st in first 3 ch, ch 1, sc in same loop. Ch 5, sc in next loop, Fl. (Ch 5, sc in next loop) 3 times, Fl. Ch 5, sc in last loop.
Count: 5 ch-5 loops, 2 Flowers.
Tier 2 (Middle Tier)
Row 5 (base row): Turn. Ring, ch 3, sc in first loop, ch 5, sc in next loop, ch 3. Fan in center loop: (tr, ch 2) 6 times, tr. Ch 3, sc in next loop, ch 5, sc in last loop, Ring, ch 3, sl st in first sc of Row 4.
Count: 2 Rings, 4 sc, fan of 7 tr with 6 ch-2 sps, 2 ch-5 sps.
Row 6 (arc row): Turn. Sl st in 3 ch to the Ring, ch 1, sc in Ring, ch 5, sc in next ch-5 sp, ch 3, sc in top of first tr, 3 dc in each of the 6 ch-2 sps, sc in top of last tr, ch 3, sc in next ch-5 sp, ch 5, sc in Ring.
Count: 18 dc, 6 sc, 2 ch-5, 2 ch-3.
Row 7: Turn. Ch 1, sc in first sc, ch 5, sc in next ch-5 sp, Fl, ch 5, sc in 5th dc, ch 5, sc in 14th dc, ch 5, sc in next ch-5 sp, Fl, ch 5, sc in last sc.
Count: 5 ch-5 loops, 2 Flowers.
Row 8: Turn. Sl st in first 3 ch, ch 1, sc in same loop, (ch 5, sc in next loop) 4 times.
Count: 4 loops.
Row 9: Repeat Row 8, working (ch 5, sc in next loop) 3 times.
Count: 3 loops.
Tier 1 (Top Tier)
Row 10 (base row): Turn. Ring, ch 3, sc in first loop, ch 3. Fan in center loop: (tr, ch 2) 4 times, tr. Ch 3, sc in last loop, Ring, ch 3, sl st in first sc of Row 9.
Count: 2 Rings, 2 sc, fan of 5 tr with 4 ch-2 sps.
Row 11 (arc row): Turn. Sl st in 3 ch to the Ring, ch 1, sc in Ring, ch 4, sc in top of first tr, 3 dc in each of the 4 ch-2 sps, sc in top of last tr, ch 4, sc in Ring.
Count: 12 dc, 4 sc, 2 ch-4.
Row 12: Turn. Ch 1, sc in first sc, ch 5, sc in 5th dc, ch 5, sc in 8th dc, ch 5, sc in last sc.
Count: 3 loops.
Row 13: Turn. Sl st in first 3 ch, ch 1, sc in same loop, (ch 5, sc in next loop) twice.
Count: 2 loops.
Row 14: Turn. Sl st in first 3 ch, ch 1, sc in same loop, ch 5, sc in next loop.
Count: 1 loop.
Row 15: Turn. Sl st in first 3 ch, ch 1, sc in loop. This sc is the top point.
Top Flower
Ch 7, sl st in 6th ch from hook. This makes a 6-ch ring on a 1-ch stem.
Rnd 1: Ch 1, 12 sc in ring, sl st in first sc. (12 sc)
Rnd 2: (Ch 3, skip next sc, sl st in next sc) 6 times. (6 petals) Fasten off.
The flower is about 0.5 in (1.3 cm) across.
Hanging loop: Join thread with sl st in the petal opposite the stem. Ch 30, sl st in same petal, work 40 sc into the loop, sl st in petal. Fasten off. The loop hangs about 1.25 in (3.2 cm) long.
Border
Border gauge: about 14 sc per 1 in (2.5 cm) along chain edges. That’s 1 sc per ch on straight runs, so the edges stay flat.
Round 1: Join with sl st in the free loop of the first foundation ch of the trunk.
Bottom: Ch 1, 2 sc in same ch, sc in next 7 ch, 2 sc in last ch. (11 sc, both corners included)
Side A (going up):
- 8 sc along the trunk row ends (2 per row)
- 11 sc along the underside of the Tier 3 arm
- Picot border group in the Ring (5 sc, 4 picots)
- 3 sc in the outer half of the Row 3 edge loop
- 3 sc along the Tier 2 Ring leg
- Picot border group in the Ring
- 3 sc in the outer half of the Row 7 edge loop
- 3 sc in the outer half of the Row 8 edge loop
- 3 sc along the Tier 1 Ring leg
- Picot border group in the Ring
- 3 sc in the outer half of the Row 12 edge loop
- 3 sc in the outer half of the Row 13 edge loop
- 3 sc in the first half of the Row 14 loop
Top: Sl st in the base of the top-flower stem.
Side B (going down): Work Side A in reverse order: 3 sc in the second half of the Row 14 loop, … 11 sc along the arm, 8 sc down the trunk. Sl st in first sc. Fasten off.
Counts: each side has 58 sc + 12 picots. The full round is 58 + 58 + 11 = 127 sc, 24 picots and 1 sl st.
Why the math works:
- On the arms and ring legs, 1 sc per ch matches the chain length exactly, so nothing ripples.
- A half ch-5 loop holds 2.5 ch, and 3 sc gives just enough ease to turn the slanted corner without cupping.
- Each ring’s outer arc is roughly 4 of its 6 ch. Five sc fill it, and the 4 picots flare outward to make the little ring flowers.
- The border adds 0.125 in (0.3 cm) per side, which takes the piece from 3 in (7.6 cm) to 3.25 in (8.3 cm) wide.
- Height grows by 0.125 in (0.3 cm) at the bottom only, from 4.125 in (10.5 cm) to 4.25 in (10.8 cm).
Final Blocking
- Weave in all ends along solid areas (the trunk and the arcs).
- Soak the ornament in stiffener and squeeze out the excess. Don’t wring it.
- Cover the foam board with plastic wrap.
- Pin the trunk square, 0.75 in (1.9 cm) wide.
- Pin the 6 corner rings so the widths are 3.25 in (8.3 cm), 2.25 in (5.7 cm) and 1.5 in (3.8 cm) from bottom to top. Measure each pair from the center line so they’re symmetrical.
- Pin each fan spoke out into an even half-circle.
- Open each Flower and the picots with a pin tip.
- Check that the height is 4.25 in (10.8 cm).
- Let it dry completely (6–12 hours), then unpin.
Final Quality-Control Checklist
- Trunk has 9 sts and 4 rows and is square
- Fans have 9, 7 and 5 spokes from bottom to top
- Arcs have 24, 18 and 12 dc
- 4 Flowers in total, 2 in Tier 3 and 2 in Tier 2
- 6 corner rings, each with 4 picots
- Border has 58 sc per side and 11 sc across the bottom
- Both sides are symmetrical within 0.125 in (0.3 cm)
- Hanging loop is centered over the top flower
Troubleshooting
- Fan cups or ruffles: Pull the tr loops to the same height. If it still ruffles, use ch 1 instead of ch 2 between spokes, but keep the 3 dc per space in the arc.
- Lattice leans to one side: You put an anchor sc in the wrong dc. Recount from both ends (5th and 20th in Row 3).
- Rings flop inward: Starch them heavily and pin each one outward.
- Outline pulls tight: Loosen your tension on the border, or add 1 sc to each half-loop on both sides.
- Piece is too small: Your chains are tight. Go up a hook size for the chains only.
Care
Hand wash in cool water with mild soap, then re-starch and re-block flat. Store flat or hanging, away from heat and humidity.

Final Notes
The measurement chain runs like this:
- Trunk: 0.75 in (1.9 cm) wide
- Row 2: 3 in (7.6 cm) wide
- Row 4: 1.6 in (4.1 cm) tall
- Row 9: 2.75 in (7.0 cm) tall
- Row 15: 3.5 in (8.9 cm) tall
- Top flower: 4.125 in (10.5 cm) tall
- After the border: 3.25 × 4.25 in (8.3 × 10.8 cm)
Check each stage as you go and the finished tree will come out even. Make one, then a dozen for the whole tree.
Happy crocheting!