

The Daisy Pantry Bag Holder is a tall, soft tube of joined granny squares that keeps plastic grocery bags under control. You stuff bags in through the wide top and pull them out one at a time through a small opening at the bottom. It hangs from a strap on any hook, door knob, or pantry peg.
Each square has a warm mustard-gold center, a ring of twelve puffy white petals, and a cream background. The result is cheerful and a little vintage, and it looks at home in a farmhouse kitchen. The same pattern also works in dusty pink with burgundy centers, or in any three colors you like.
This pattern uses US crochet terms. The finished holder measures 8 in (20.3 cm) wide when flattened and 18 in (45.7 cm) tall, not counting the hanging strap.
Construction is simple. You make 16 daisy squares, join them flat into a 4 × 4 panel, and close the panel into a tube. Then you work a solid top band, a decreasing bottom band, and a separate strap that you sew to the back of the top band.
Finished Size and Construction
- Finished size: 8 in (20.3 cm) wide when flattened × 18 in (45.7 cm) tall, plus the strap
- Tube circumference: 16 in (40.6 cm)
- Skill level: Easy-Intermediate
- Terminology: US crochet terms
- Yarn weight: Aran / worsted (#4), cotton or cotton blend
- Hook: 5.0 mm (H-8)
- Number of pieces: 16 squares + 1 strap
- Layout: 4 squares around × 4 squares tall
- Square size: 4 in × 4 in (10.2 cm × 10.2 cm)
- Size before bands: 16 in (40.6 cm) circumference × 16 in (40.6 cm) tall
- Band depth: top band 1 in (2.5 cm); bottom band 1 in (2.5 cm)
Materials
Yarn: Use a smooth aran- or worsted-weight cotton or cotton blend with about 85 m per 50 g. Cotton holds its shape and stands up to bags being pulled out of it. Avoid very fuzzy yarns, because they blur the petals.
- Color A – Mustard Gold (centers): 25 g / 43 m
- Color B – White (petals): 60 g / 102 m
- Color C – Cream (background, joins, bands, strap): 170 g / 289 m
These quantities include a margin of about 15–20% for gauge swatches and weaving in ends.
Tools:
– 5.0 mm (H-8) crochet hook
– Tapestry needle
– 4 locking stitch markers
– Scissors
– Measuring tape
– Blocking mat and rust-proof pins
– Spray bottle
Abbreviations (US Terms)
- ch – chain
- sl st – slip stitch
- sc – single crochet
- hdc – half double crochet
- dc – double crochet
- sc2tog – single crochet 2 together
- sp(s) – space(s)
- st(s) – stitch(es)
- rep – repeat
- RS / WS – right side / wrong side
Special stitch – Puff stitch (puff): *Yarn over, insert the hook into the stitch, and pull up a loop to about 3/4 in (1.9 cm). Repeat from * 3 more times (9 loops on the hook). Yarn over and pull through all 9 loops, then ch 1 to close.
Beginning puff: Ch 2. *Yarn over, insert the hook into the same stitch, and pull up a long loop. Repeat from * 2 more times (7 loops on the hook). Yarn over and pull through all 7 loops, then ch 1 to close.
Gauge and Checkpoints
Make one complete square before you start the full set, and measure it after each round:
- After Round 1: 1.5 in (3.8 cm) across
- After Round 2: 2.75 in (7.0 cm) across, from petal tip to petal tip
- After Round 3: 3.25 in (8.3 cm) square
- After Round 4: 4 in (10.2 cm) square, with 16 dc per side
Band gauge: 16 sc and 5 rounds = 4 in (10.2 cm) wide × 1 in (2.5 cm) tall.
If your square is too big (over 4.25 in / 10.8 cm), go down half a hook size. If it is too small (under 3.75 in / 9.5 cm), go up half a hook size. A 1/4 in (0.6 cm) error per square adds up to 1 in (2.5 cm) around the tube, so it is worth getting this right.
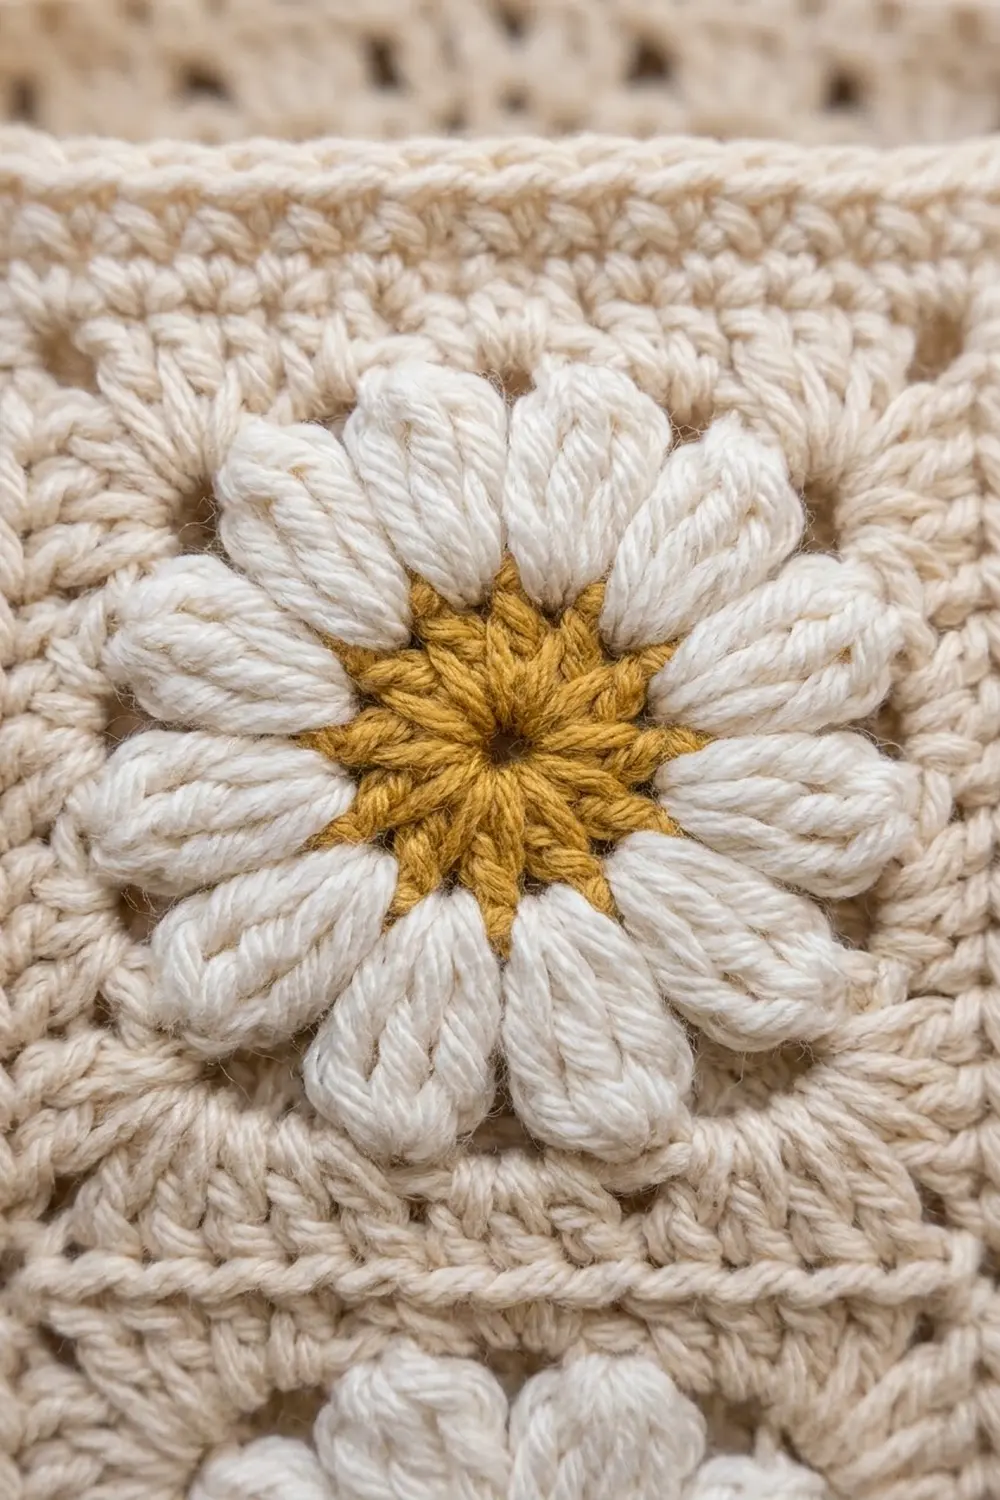
Daisy Square (make 16)
Round 1 (Color A): Make a magic ring. Ch 3 (counts as dc), then work 11 dc into the ring. Pull the ring closed and join with sl st to the top of the ch-3. (12 dc) Fasten off.
Round 2 (Color B): Join Color B in any dc. Work a beginning puff, then ch 2. Puff in the next dc, ch 2. Rep from * 10 more times. Join with sl st to the top of the beginning puff. (12 puffs, 12 ch-2 sps)* Fasten off.
Each puff is one petal, worked one per dc from Round 1. This gives the twelve rounded white petals.
Round 3 (Color C) – squaring round: Join Color C in any ch-2 sp.
– Ch 3 (counts as dc), then work (2 dc, ch 2, 3 dc) in the same sp. This is the corner.
– Work 3 hdc in each of the next 2 ch-2 sps.
– *Work (3 dc, ch 2, 3 dc) in the next ch-2 sp for a corner, then 3 hdc in each of the next 2 ch-2 sps. Rep from * 2 more times.
– Join with sl st to the top of the ch-3.
Count: (12 sps × 3 sts) + (4 corner sps × 3 extra sts) = 36 + 12 = 48 sts (24 dc + 24 hdc), plus 4 ch-2 corner sps. That makes 12 sts per side between the corner spaces.
The hdc over the side petals and the taller dc at the corners turn the circle into a square.
Round 4 (Color C): Sl st in the next 2 dc and into the corner ch-2 sp.
– Ch 3 (counts as dc), then work (1 dc, ch 2, 2 dc) in the same sp.
– Dc in each of the next 12 sts.
– *Work (2 dc, ch 2, 2 dc) in the corner sp, then dc in each of the next 12 sts. Rep from * 2 more times.
– Join with sl st to the top of the ch-3. Fasten off.
Count: 48 sts worked 1-per-stitch + (4 corners × 4 dc) = 48 + 16 = 64 dc, plus 4 ch-2 corner sps.
Per side: 2 + 12 + 2 = 16 dc, counted from corner space to corner space. The 2 dc worked into each corner on that side are included in the 16. The ch-2 corner spaces are counted separately and are not part of the 16.
Weave in all ends on the WS before joining. Check every square against the 4 in (10.2 cm) checkpoint.
Make All Pieces
Make 16 identical squares. You will use:
– Color A: 16 centers
– Color B: 16 petal rounds
– Color C: 16 × Rounds 3–4
Layout grid (4 columns around × 4 rows tall):
Top edge (top band goes here)
[ 1 ][ 2 ][ 3 ][ 4 ]
[ 5 ][ 6 ][ 7 ][ 8 ]
[ 9 ][10 ][11 ][12 ]
[13 ][14 ][15 ][16 ]
Bottom edge (bottom band goes here)
Column 4 will be joined back to Column 1 to close the tube. That closing seam becomes the center back.
Joining
Method: Flat slip-stitch join through the outer loops, using Color C.
- Lay two squares side by side with both RS facing up.
- Join Color C in the matching corner ch-2 sps of both squares and sl st through both.
- Sl st through the outer loops of each matching dc pair, 16 times.
- Sl st through the next pair of corner sps.
That is 1 + 16 + 1 = 18 sl sts per square edge. Because each side has exactly 16 dc, the stitches match one to one, with no skipping or doubling.
Order:
1. Vertical seams: Join the columns. Work Column 1 to Column 2 down all 4 rows in one pass, then Column 2 to 3, then 3 to 4.
2. Horizontal seams: Join Row 1 to Row 2 across all 4 columns in one pass, then Row 2 to 3, then 3 to 4. Where seams cross, sl st through the joined corners to keep the intersection flat.
3. Close the tube: Fold the panel RS out so the left edge of Column 1 meets the right edge of Column 4. Join them the same way, down all 4 rows.
Tension: Keep your slip stitches loose, about as long as one dc is wide. Tight joins pucker and shrink the tube. If your seams pull, go up one hook size for joining only.
Size checkpoint: Before you close the tube, the flat panel should measure 16 in × 16 in (40.6 cm × 40.6 cm). After closing, the tube flattens to 8 in (20.3 cm) wide.
Border: Top Band, Bottom Band, and Strap
Border gauge: 16 sc = 4 in (10.2 cm), and 5 rounds = 1 in (2.5 cm). This matches the square exactly: 16 dc per side across 4 in.
Top Band (Color C)
Round 1: With RS facing, join Color C in the first dc after a corner on the top edge of Square 1. Sc in each of the 16 dc across each top square, all the way around. Do not work into the joined corner spaces at the seams; step straight over them. Join with sl st to the first sc.
(4 squares × 16 sts = 64 sc)
Rounds 2–5: Ch 1, sc in each st around, and join. (64 sc each round)
Fasten off. The top band is 1 in (2.5 cm) deep.
Why the math works: The tube is 4 squares around, with 16 dc on each square’s top edge, so the band starts at 4 × 16 = 64 sc. No stitches are added at the seams. At 16 sc per 4 in, 64 sc is exactly 16 in (40.6 cm), the same as the tube’s circumference, so the band neither flares nor pulls in.
Bottom Band (Color C)
Round 1: Turn the tube upside down. Join Color C on the bottom edge and sc in each of the 16 dc of each bottom square, skipping the joined corner spaces. Join.
(4 × 16 = 64 sc)
Round 2: Ch 1, sc in the next 2 sts, sc2tog. Rep from * around (16 repeats). Join. (48 sc)*
Round 3: Ch 1, sc in the next st, sc2tog. Rep from * around (16 repeats). Join. (32 sc)*
Rounds 4–5: Ch 1, sc in each st around, and join. (32 sc each round)
Fasten off. The band is 1 in (2.5 cm) deep. The opening measures 8 in (20.3 cm) around and lies about 4 in (10.2 cm) across when flattened. It is snug enough to hold bags in but loose enough to pull one out.
Why the math works: 64 sc is 16 groups of 4 stitches. Round 2 turns each group of 4 into 3, giving 16 × 3 = 48. Round 3 turns each group of 3 into 2, giving 16 × 2 = 32. Thirty-two stitches at 4 sts per inch is 8 in (20.3 cm), which is half the tube’s circumference. That gives the inward curl you can see at the bottom.
Hanging Strap (Color C)
Foundation: Ch 49.
Row 1: Sc in the 2nd ch from the hook and in each ch across. (48 sc)
Row 2: Ch 1, turn, and sc in each st across. (48 sc)
Fasten off and leave a 12 in (30.5 cm) tail.
The strap is 12 in (30.5 cm) long and about 1/2 in (1.3 cm) wide.
Attaching the strap:
1. Find the closing seam at the center back.
2. Count 8 sts on each side of it along the top band. Place a marker at each point. The markers are 16 sts, or 4 in (10.2 cm), apart.
3. Overlap each strap end 3/4 in (1.9 cm) down the inside of the band, centered on a marker.
4. Whipstitch each end securely, stitching through both layers twice.
This leaves 10.5 in (26.7 cm) of free strap, which forms a hanging loop that rises about 4.5 in (11.4 cm) above the top band.
Final Blocking
- Weave in all remaining ends on the WS, running each through at least 2 in (5.1 cm) of stitches.
- Fill the tube loosely with a rolled towel so it holds a smooth cylinder shape.
- Lightly mist the tube with water until it is damp but not soaked.
- Gently shape it to 8 in (20.3 cm) wide when flattened and 18 in (45.7 cm) tall.
- Press each petal ring outward with your fingertips to round it, and straighten the seams.
- Pinch the bottom band so it curls evenly inward.
- Lay the strap flat and pin it straight.
- Let everything dry completely before removing the towel.
Final Quality-Control Checklist
- All 16 squares measure 4 in (10.2 cm), with 16 dc per side
- Every square has 12 petals and 64 dc in Round 4
- The seams lie flat with no puckers, and the corner intersections are neat
- The flat panel measured 16 in × 16 in (40.6 cm × 40.6 cm) before closing
- The top band has 64 sc on every round
- The bottom band goes 64 → 48 → 32 → 32 → 32
- The strap is centered on the back seam and firmly sewn
- The finished tube is 8 in (20.3 cm) × 18 in (45.7 cm)
- All ends are woven in and invisible from the RS
Troubleshooting
- The petals look flat or thin. Pull each puff loop up to the full 3/4 in (1.9 cm) before closing.
- The square cups or ruffles. Check that you have exactly 12 sts per side in Round 3. If it still ruffles, go down a hook size for Rounds 3–4.
- The corners are rounded. Make sure every corner has a full ch 2, and pin the corners sharply when blocking.
- The seams pucker. Your slip stitches are too tight. Undo the seam and rejoin with a larger hook.
- The top band flares or pulls in. Recount it; it should be 64 sc. If the count is right, change hook size for the band only.
- The bottom opening is too loose. Add one more round of (sc 2, sc2tog) to bring it to 24 sc.
- The bottom opening is too tight. Skip Round 3 and work Rounds 4–5 over 48 sc instead.
- The strap stretches. Add a third row of sc, or work a row of sl st along both long edges.
Care
Hand wash in cool water with a mild soap, press out the water in a towel, and reshape the holder to dry flat or over a rolled towel. Do not tumble dry, because the puffs can felt and the bands can shrink.

Final Notes
Every measurement in this pattern builds on the one before it. Each square is 4 in (10.2 cm) with 16 dc per side. Four squares around give 64 stitches and 16 in (40.6 cm) of circumference. Four squares tall give 16 in (40.6 cm) of body. The top and bottom bands each add 1 in (2.5 cm), for a total height of 18 in (45.7 cm). The bottom band halves the circumference to 32 sts, which makes the dispensing opening. If your first square measures true, everything after it will fit.
Happy crocheting!