

Seraphina is a small lace angel worked in cream cotton thread. She has a round, spoked halo-style head, two fanned wings, and a bell-shaped skirt made of fan tiers that ends in a scalloped hem. Once stiffened, she hangs flat and crisp on a tree branch, a gift box, or a window latch.
The design uses one color, a soft cream or ecru, so the lace texture is what you notice. The style is traditional heirloom thread crochet, but the stitches are simple: chains, single crochet, double crochet, V-stitches, and shells.
This pattern uses US crochet terms. The finished angel is 4.5 in (11.4 cm) tall and 4 in (10.2 cm) wide at the hem, not counting the hanging loop.
You start by working the head in the round. Then you work the neck and skirt in turned rows from the bottom of the head, and finish the skirt with a scalloped hem. Last, you join the thread at each shoulder to work the wings, and add a chain hanging loop. Everything is worked onto one piece, so there is no sewing.
Finished Size and Construction
- Finished size: 4.5 in (11.4 cm) tall × 4 in (10.2 cm) wide
- Hanging loop: 1.25 in (3.2 cm) tall
- Skill level: Intermediate (thread crochet)
- Terminology: US
- Yarn weight: Size 10 cotton crochet thread (Lace, weight 0)
- Hook: 1.5 mm (US steel 7)
- Number of pieces: 1
- Layout: One single ornament: the head is worked in the round, the skirt in rows, and the wings in rows worked into the shoulders
- Head size: 1.25 in (3.2 cm) across
- Size before border: 3.5 in (8.9 cm) wide × 3.75 in (9.5 cm) tall after Row 7
- Border (scalloped hem) depth: 0.75 in (1.9 cm)
Materials
Use a mercerized cotton thread in size 10. Mercerized thread has a slight sheen, keeps a crisp stitch outline, and holds starch well. Avoid acrylic and very fuzzy threads, because they won’t block flat.
- Cream / ecru size 10 cotton thread: 8 g, about 25 m (27 yd)
- 1.5 mm (US steel 7) crochet hook
- Fine tapestry needle
- Locking stitch marker
- Fabric stiffener, or a starch solution
- Rust-proof pins and a foam blocking board covered in plastic wrap
These quantities include a margin of about 25% for your gauge swatch and weaving in ends.
Abbreviations (US Terms)
- ch = chain
- sl st = slip stitch
- sc = single crochet
- dc = double crochet
- sp = space
- st(s) = stitch(es)
- tch = turning chain
- RS = right side
Special stitches
- V-st: (dc, ch 2, dc) in the same stitch or space.
- Shell: 5 dc in the same space. The 3rd dc is the center dc.
- Hem shell: 7 dc in the same space.
Gauge and Checkpoints
Gauge matters less here than in a garment, but it decides whether the wings and skirt line up neatly. Make the head first (Rnds 1–3) and treat it as your gauge swatch.
- Rnd 1: 0.5 in (1.3 cm) across
- Rnd 3: 1.25 in (3.2 cm) across
- Row 2 (yoke): 1 in (2.5 cm) wide
- Row 4: 2.25 in (5.7 cm) wide
- Row 7: 3.5 in (8.9 cm) wide
- Row 9: 4 in (10.2 cm) wide, 4.5 in (11.4 cm) total height
If your head measures more than 1.4 in (3.6 cm), go down to a 1.25 mm hook. If it measures under 1.1 in (2.8 cm), go up to a 1.75 mm hook. Check gauge after blocking the head lightly with your fingers. Thread lace always looks smaller and more crumpled before it is blocked.
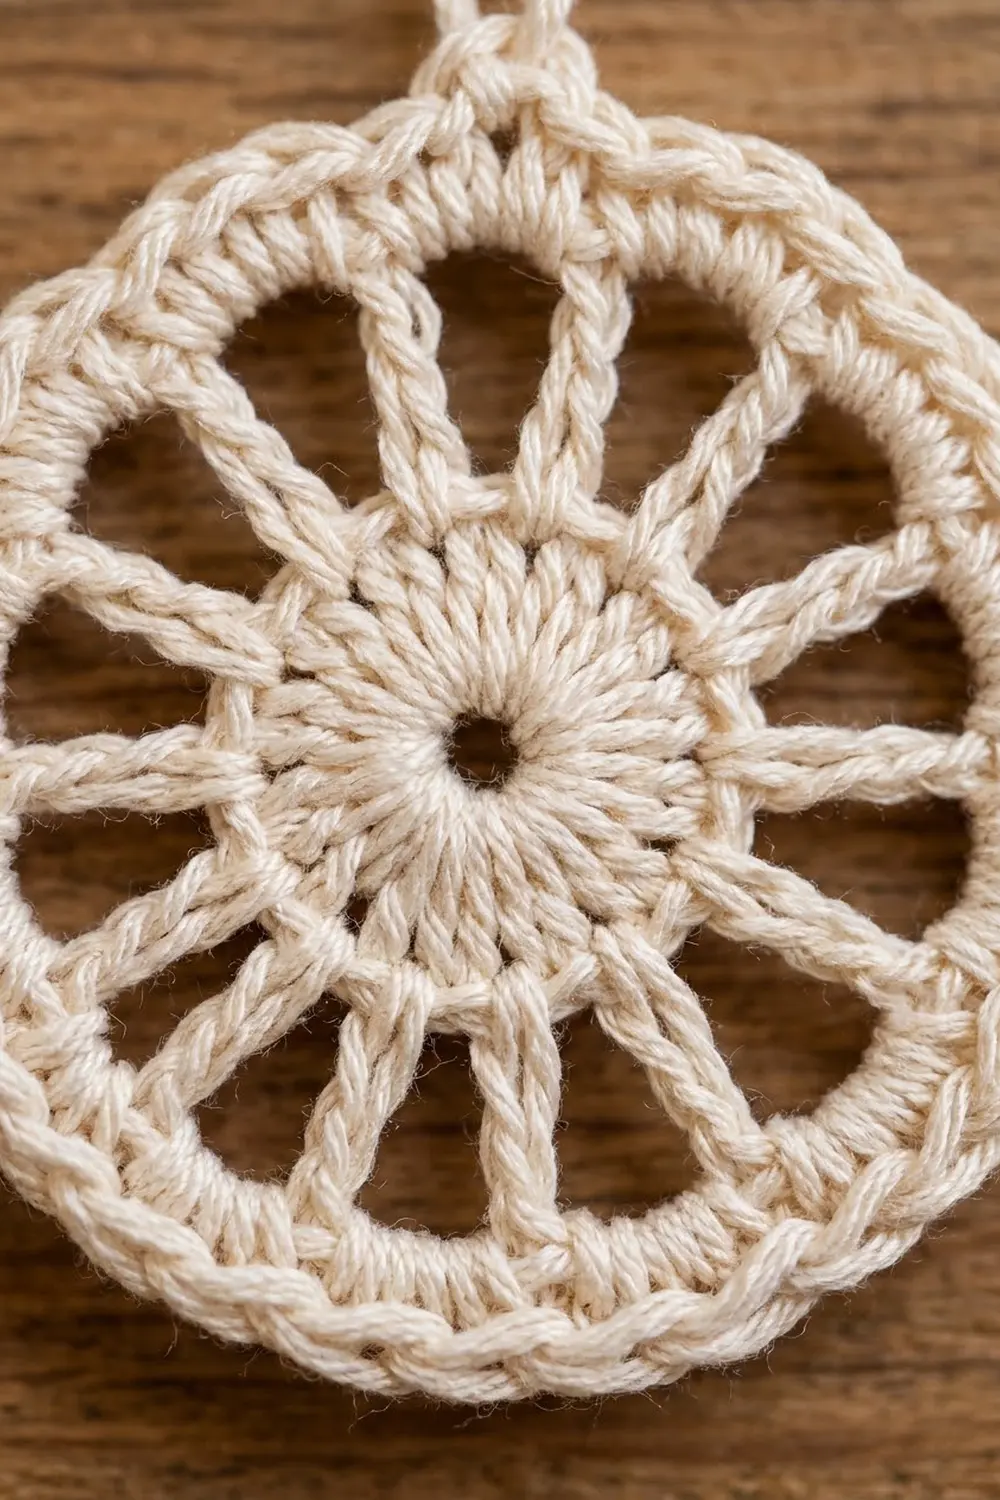
Head
Rnd 1: Ch 6 and sl st to the first ch to form a ring. Ch 3 (counts as dc), then work 15 dc in the ring. Join with a sl st to the top of the ch-3. (16 dc)
Rnd 2: Ch 5 (counts as dc + ch 2). Dc in the next dc, ch 2; repeat from * 14 more times. Join with a sl st to the 3rd ch of the ch-5. (16 dc, 16 ch-2 sps)* These are the spokes.
Rnd 3: Sl st into the first ch-2 sp and ch 1. Work 3 sc in each ch-2 sp around. Join with a sl st to the first sc. (48 sc) Fasten off.
Checkpoint: the head should measure 1.25 in (3.2 cm) across.
Lay the head RS up. Choose 8 consecutive sc at the bottom and mark the first one as sc 1. Those 8 sc form the neck base.
Neck and Yoke
From here the skirt is worked in turned rows.
Row 1 (neck): With RS facing, join the thread in sc 1. Ch 3 (counts as dc), then dc in each of the next 7 sc. Turn. (8 dc) The neck should measure 0.75 in (1.9 cm) wide.
Row 2 (yoke): Ch 4 (counts as dc + ch 1). Dc in the next dc, ch 1; repeat from * 5 more times. Dc in the top of the tch. Turn. (8 dc, 7 ch-1 sps)* This row makes the vertical “bodice” lines you see under the head. It should measure 1 in (2.5 cm) wide.
Skirt Body
Row 3: Ch 3 (counts as dc). V-st in the first ch-1 sp. Ch 1, skip the next ch-1 sp, V-st in the next ch-1 sp; repeat from * 2 more times. Dc in the 3rd ch of the tch. Turn. (4 V-sts, 3 ch-1 sps, 2 edge dc)*
Row 4 (fan tier 1): Ch 3 (counts as dc). Shell in the ch-2 sp of the next V-st, ch 2; repeat from * 2 more times. Shell in the last V-st, then dc in the top of the tch. Turn. (4 shells, 3 ch-2 sps, 2 edge dc = 22 dc)*
Checkpoint: the skirt should measure 2.25 in (5.7 cm) wide.
Row 5 (mesh): Ch 3 (counts as dc), then dc in the first st (2 edge dc). Ch 2. V-st in the center dc of the next shell, ch 2, V-st in the next ch-2 sp, ch 2; repeat from * 2 more times. V-st in the center dc of the last shell, ch 2, then 2 dc in the top of the tch. Turn. (7 V-sts, 8 ch-2 sps, 4 edge dc)*
Row 6 (fan tier 2): Ch 3 (counts as dc), dc in the next dc, ch 2. Shell in the next V-st, ch 2, V-st in the next V-st, ch 2; repeat from * 2 more times. Shell in the last V-st, ch 2, dc in the next dc, then dc in the top of the tch. Turn. (4 shells, 3 V-sts, 8 ch-2 sps, 4 edge dc = 30 dc)*
On this row, shells alternate with open V-stitches. That keeps the middle of the skirt lacy and stops it from going solid.
Row 7 (mesh): Ch 5 (counts as dc + ch 2), then dc in the same st. This makes an edge V-st. Ch 2. V-st in the center dc of the next shell, ch 2, V-st in the ch-2 sp of the next V-st, ch 2; repeat from * 2 more times. V-st in the center dc of the last shell, ch 2. Skip the remaining edge dc and work a V-st in the top of the tch. Turn. (9 V-sts, 8 ch-2 sps)*
The count is 1 edge V-st + 7 inner V-sts + 1 edge V-st = 9.
Checkpoint: the skirt should be 3.5 in (8.9 cm) wide, and the angel should be 3.75 in (9.5 cm) tall from the top of the head. Don’t fasten off. Continue with the border.
Wings (Make 2)
Work the wings after the border (see the next section), but they are written here because they belong to the body.
Row 1: With RS facing, join the thread in the row-end of Row 2 at one side of the yoke. Ch 3 (counts as dc), then work 6 dc in the same row-end. Turn. (7 dc)
Row 2: Ch 5 (counts as dc + ch 2). Dc in the next dc, ch 2; repeat from * 4 more times. Dc in the top of the tch. Turn. (7 dc, 6 ch-2 sps)*
Row 3: Ch 6 (counts as dc + ch 3). Dc in the next dc, ch 3; repeat from * 4 more times. Dc in the 3rd ch of the tch. Turn. (7 dc, 6 ch-3 sps)* These longer chains make the radiating rays.
Row 4: Ch 1, sc in the first dc. 5 dc in the next ch-3 sp, sc in the next dc; repeat from * 5 more times. Work the last sc in the 3rd ch of the tch. (6 scallops, 30 dc, 7 sc)* Fasten off.
Repeat on the other side of the yoke. Each wing should measure 1.25 in (3.2 cm) from the shoulder to the outer scallop. The wingspan should be about 3.5 in (8.9 cm).
Border: Scalloped Hem and Picot Edge
Border gauge: one 7-dc hem shell plus its sc measures about 0.45 in (1.1 cm) across. Nine shells make the 4 in (10.2 cm) hem.
Row 8 (hem shells): Sl st into the first ch-2 sp (the center of the edge V-st). Ch 3 (counts as dc), then work 6 dc in the same sp. Sc in the next ch-2 sp, hem shell in the next V-st; repeat from * 7 more times. Turn. (9 hem shells = 63 dc, 8 sc)*
Row 9 (picot loops): Ch 1. Sc in the first dc of the shell, [ch 3, skip 1 dc, sc in the next dc] 3 times, skip the sc; repeat from * across all 9 shells. Work the final sc in the top of the beginning ch-3 from Row 8. (36 sc, 27 ch-3 loops)* Fasten off.
The hem has only one edge, the bottom, so there are no corners to count. Why the math works: Row 7 has exactly 9 V-sts with 8 ch-2 sps between them. Row 8 puts one hem shell in each V-st and one sc in each gap: 9 shells and 8 sc. In Row 9, each 7-dc shell takes sc in dc 1, 3, 5, and 7, which is 4 sc and 3 loops per shell. That gives 9 × 4 = 36 sc and 9 × 3 = 27 loops. The border adds 0.75 in (1.9 cm) of depth and 0.5 in (1.3 cm) of width. That brings the angel to 4.5 in × 4 in (11.4 cm × 10.2 cm).
Hanging loop: Count around Rnd 3 of the head and join the thread in sc 28, directly opposite the neck. Ch 25, then sl st in the same sc. Fasten off. The loop stands 1.25 in (3.2 cm) tall.
Final Blocking
- Weave in all the ends along the solid sc rounds and rows, and trim them close.
- Soak the angel in fabric stiffener or starch solution until it is fully saturated.
- Squeeze out the excess gently. Don’t wring it. Blot it in a towel.
- Lay it RS up on the covered foam board.
- Pin the head into a true circle 1.25 in (3.2 cm) across, with one pin in every other spoke space.
- Pin the skirt into a symmetric triangle: 4 in (10.2 cm) across the hem and 4.5 in (11.4 cm) from the top of the head to the hem.
- Pin each hem scallop and each ch-3 loop open.
- Fan the wings outward and upward, and pin each scallop. Check that the two wings match in angle.
- Let it dry completely, usually 12–24 hours. Then unpin it.
Final Quality-Control Checklist
- The head has 16 even spokes and lies flat.
- The neck is centered under the head.
- The skirt has 4 fans in each of the two fan tiers, and 9 hem shells.
- Every hem shell has 3 ch-3 loops.
- Each wing has 7 rays and 6 scallops.
- The wings sit at the same height and the same angle.
- The hanging loop sits directly above the neck.
- The final size is 4.5 in × 4 in (11.4 cm × 10.2 cm).
- All ends are hidden and the stiffener has dried clear.
Troubleshooting
- The head cups: Your Rnd 2 chains are too tight. Use ch 3 instead of ch 2 between spokes, and keep 3 sc per space.
- The head ruffles: Rnd 3 is too loose. Work 2 sc in every other space, or drop to a smaller hook.
- The skirt is lopsided: Recount the edge stitches on Rows 5–7. Each edge needs its full 2 dc or edge V-st.
- The hem is short by one shell: Row 7 is probably missing an edge V-st. You need 9 V-sts.
- The wings flop: Use more stiffener and pin each scallop while it dries.
- The loop leans: Rejoin it at the sc exactly opposite the center of the neck.
Care
Hand wash in cool water with mild soap, then re-stiffen and re-block. Store the angel flat between sheets of tissue paper so it keeps its shape.
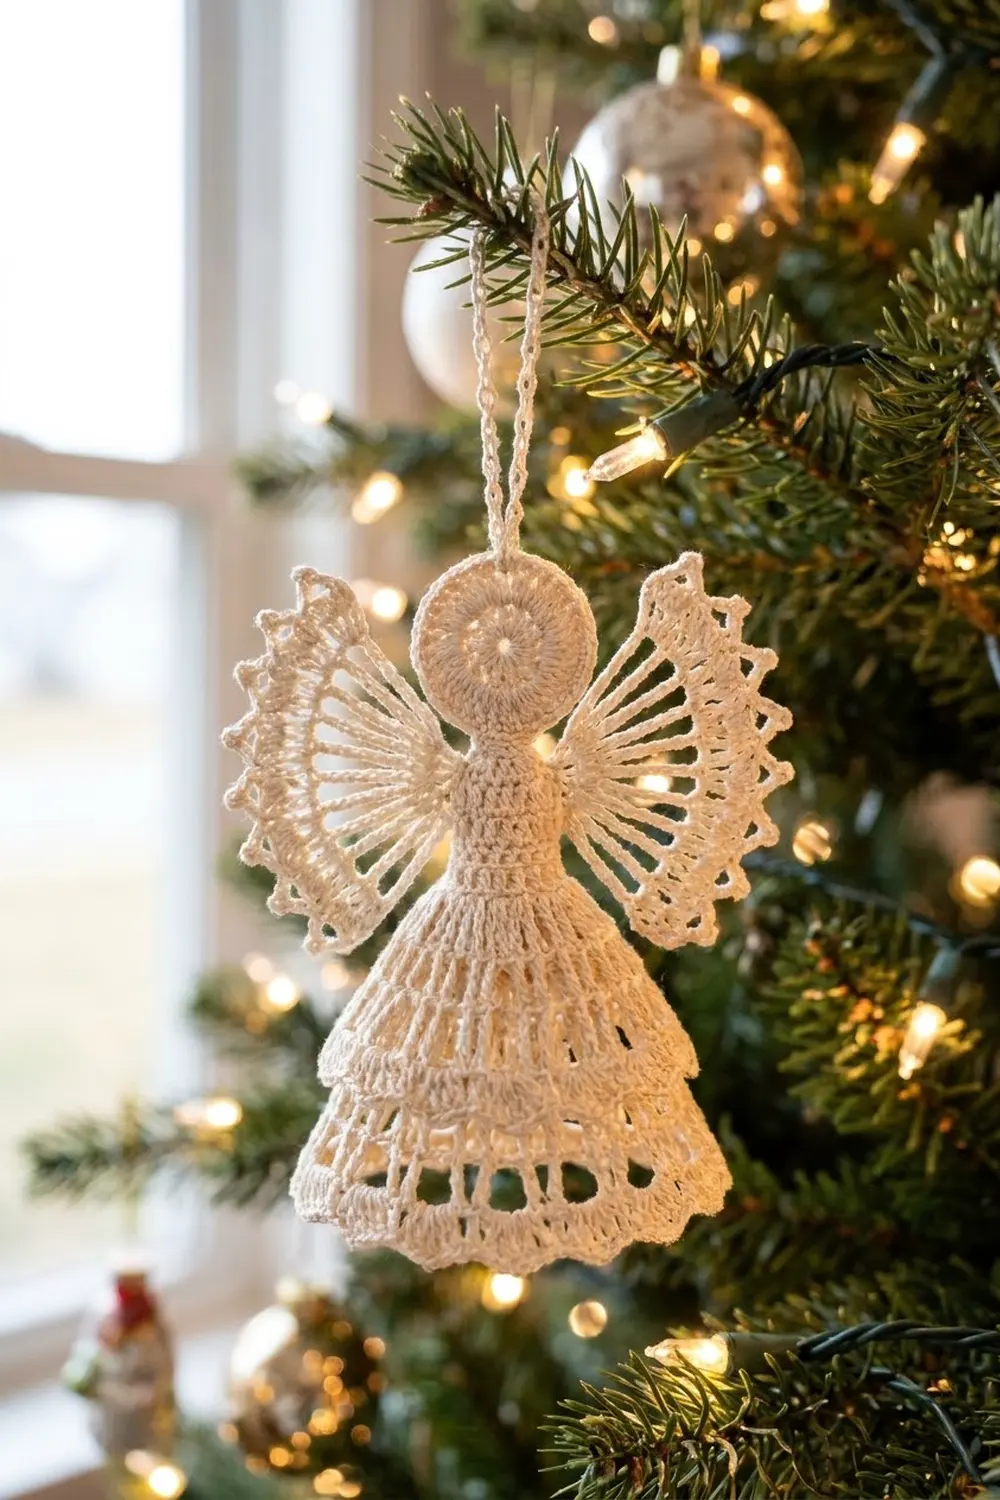
Final Notes
The measurements build on each other in this order:
- The head reaches 1.25 in (3.2 cm) across.
- The neck and yoke open to 1 in (2.5 cm).
- The first fan tier reaches 2.25 in (5.7 cm).
- The mesh widens the skirt to 3.5 in (8.9 cm).
- The scalloped hem finishes it at 4 in (10.2 cm) wide and 4.5 in (11.4 cm) tall.
If you check each of these sizes as you go, the finished angel will match. Make one, then stitch a small group for a tree or for gifts.
Happy crocheting!