

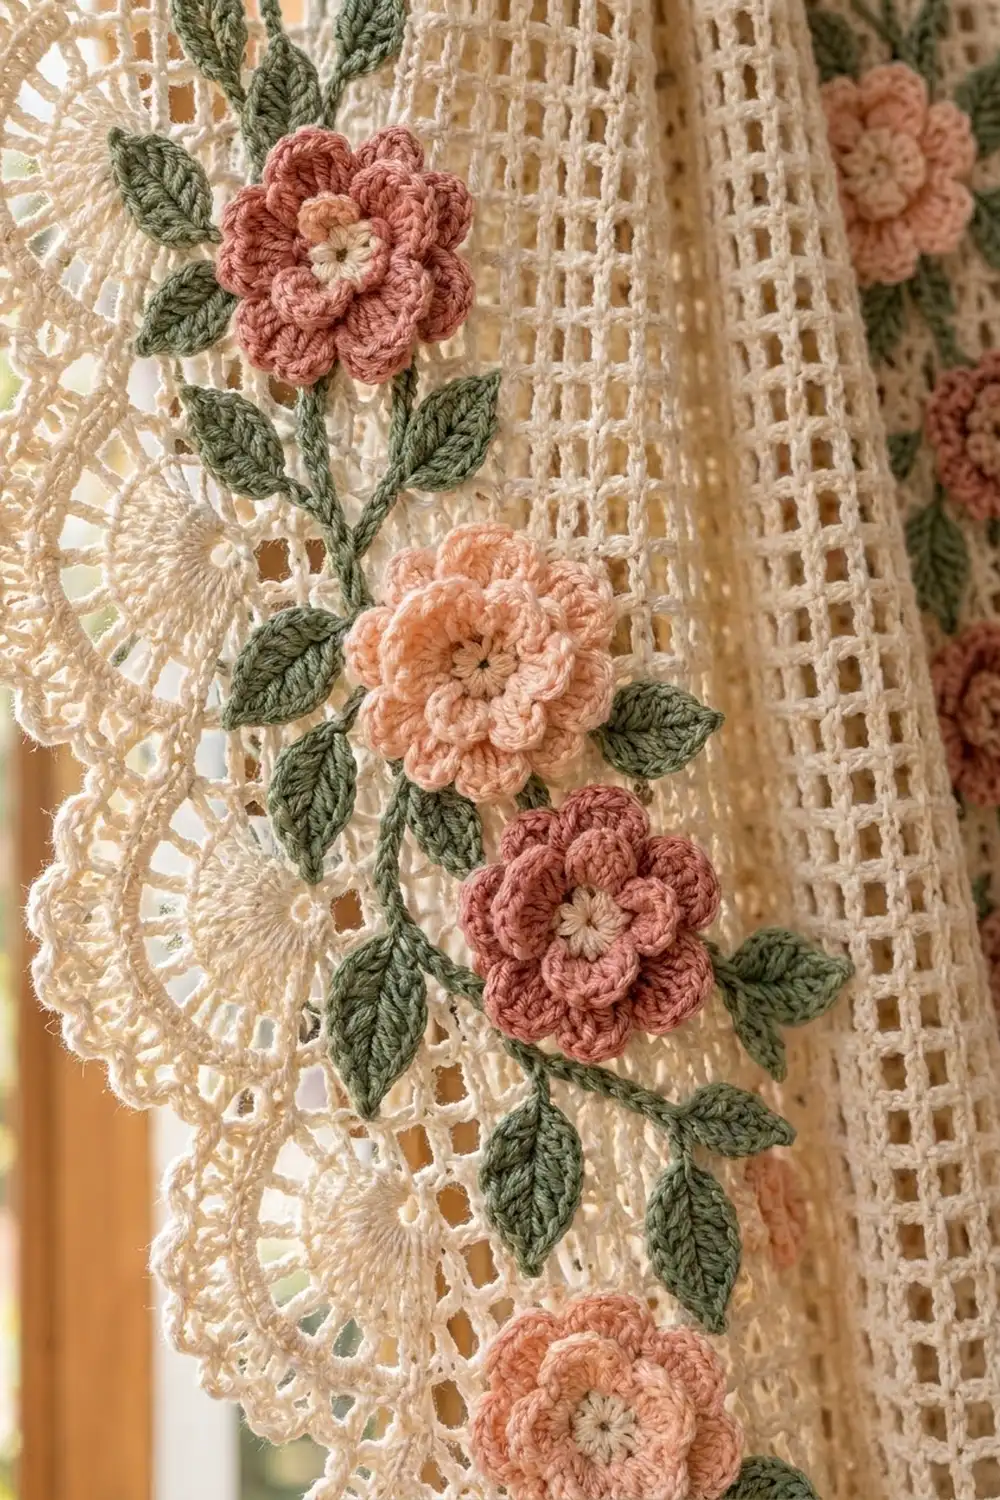
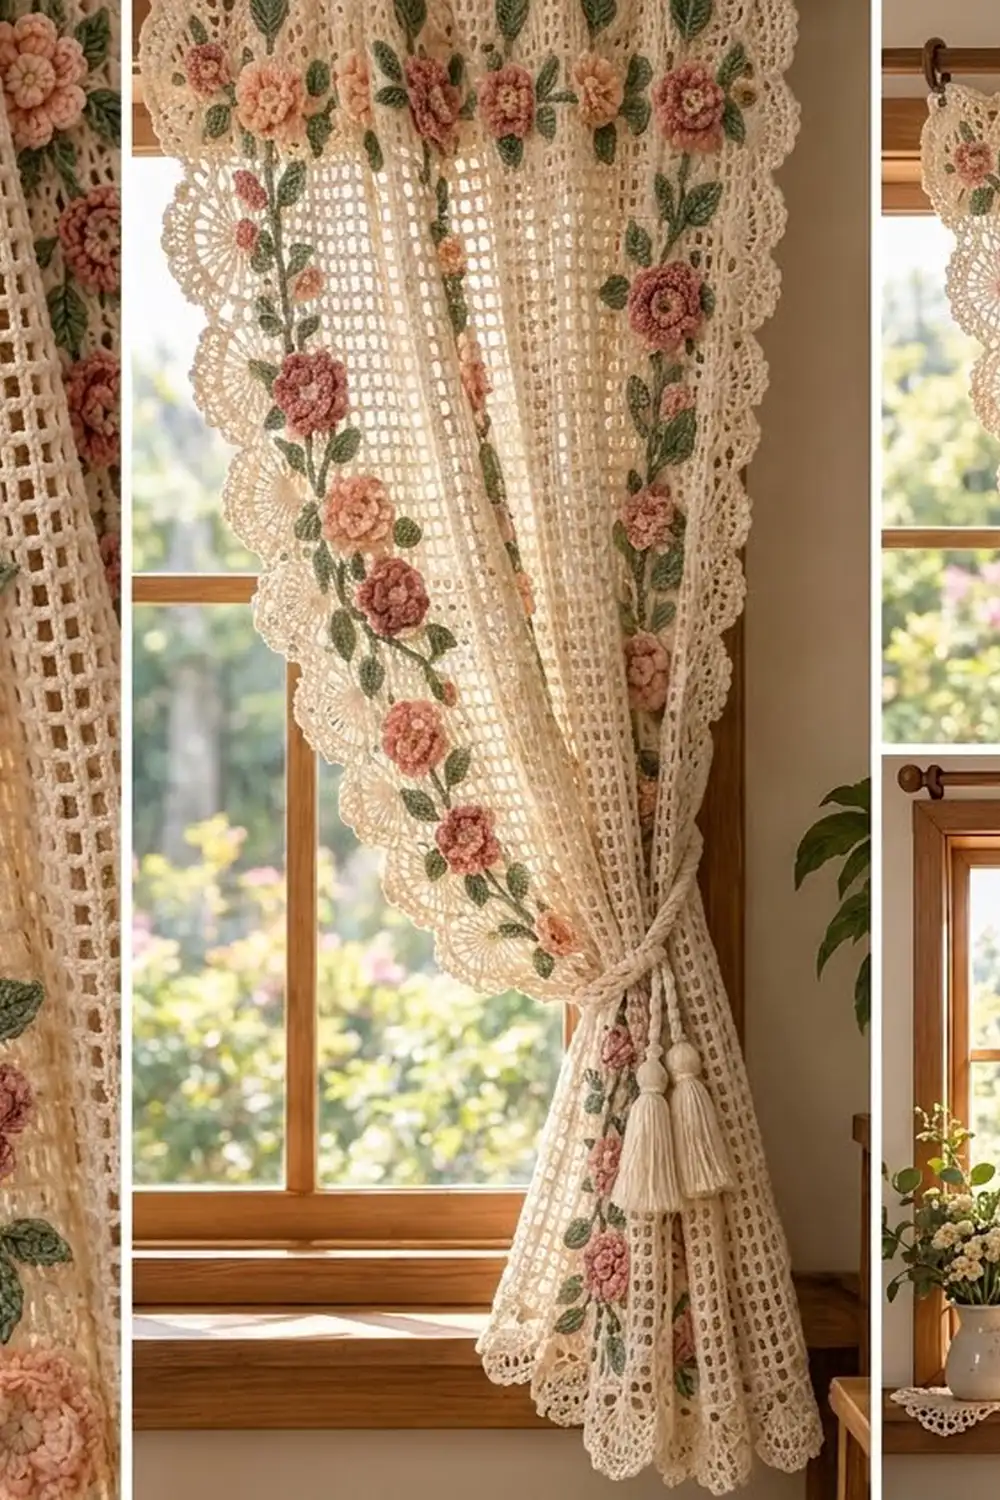
This cream filet mesh curtain panel has a scalloped fan border and a climbing vine of crocheted roses. The open grid lets soft light through, and the fans give every edge a vintage, cottage-style finish.
The palette is cream for the panel, border and tieback, dusty rose and soft peach for the roses, and sage green for the vines and leaves. Each rose has two layers of petals around a small cream center, so it stands out clearly from the flat mesh.
The pattern uses US crochet terms. The finished panel measures 34 in × 54 in (86.4 cm × 137.2 cm) including the border.
The panel is one rectangle of filet mesh worked in rows. A four-round fan border is then worked all the way around. The roses, leaves and vine cords are made separately and sewn on, and a tasseled tieback completes the set.
Finished Size and Construction
- Finished size: 34 in × 54 in (86.4 cm × 137.2 cm)
- Skill level: Intermediate
- Terminology: US crochet terms
- Yarn weight: DK (#3 light) cotton
- Hook: 4.0 mm (G-6) for the panel, border and tieback; 3.5 mm (E-4) for the appliqués
- Number of pieces: 1 mesh panel, plus 24 roses, 52 leaves, 3 vine cords, 1 tieback and 2 tassels
- Layout: a single panel; the vine runs across the top and down both long sides
- Panel size before border: 30 in × 50 in (76.2 cm × 127.0 cm), which is 60 mesh wide × 100 rows tall
- Border depth: 2 in (5.1 cm) on every side
Materials
Use a smooth mercerized or combed DK cotton, about 115 m per 50 g. Cotton holds the square mesh crisply, blocks well and stands up to sunlight better than acrylic.
- Cream: 400 g (920 m), for the panel, border, rose centers, tieback and tassels
- Dusty rose: 50 g (115 m), for 12 roses
- Soft peach: 50 g (115 m), for 12 roses
- Sage green: 80 g (184 m), for 52 leaves and 3 vine cords
All quantities include a margin of about 15% for swatching and tension differences.
Tools:
– 4.0 mm (G-6) and 3.5 mm (E-4) crochet hooks
– Tapestry needle
– Locking stitch markers (at least 20)
– Rust-proof pins and blocking mats or a clean carpet with a towel on top
– Measuring tape
– Stiff card 4.5 in (11.4 cm) tall, for the tassels
– 17 curtain clip rings
Abbreviations (US Terms)
- ch – chain
- sl st – slip stitch
- sc – single crochet
- hdc – half double crochet
- dc – double crochet
- tr – treble crochet
- sk – skip
- sp – space
- rep – repeat
- RS – right side
Special stitches
- Mesh: ch 2, sk 2, dc in next stitch. Each mesh is one open square.
- Picot: ch 3, sl st in 3rd ch from hook.
- Fan: 9 tr worked in the same stitch.
Gauge and Checkpoints
Gauge: 8 mesh × 8 rows = 4 in × 4 in (10.2 cm × 10.2 cm) with the 4.0 mm hook. One mesh square is 0.5 in × 0.5 in (1.3 cm × 1.3 cm).
Before you start, make a test swatch of 10 mesh × 10 rows: ch 35 and follow Rows 1–2 of the panel. Block it, pin it square and let it dry. It should measure 5 in × 5 in (12.7 cm × 12.7 cm).
Make one test rose with the 3.5 mm hook as well. It should measure 2.25 in (5.7 cm) across.
Checkpoints:
– After Row 10: 30 in (76.2 cm) wide and 5 in (12.7 cm) tall
– After Row 50: 25 in (63.5 cm) tall
– After Row 100: 30 in × 50 in (76.2 cm × 127.0 cm)
– After Border Round 1: 30.5 in × 50.5 in (77.5 cm × 128.3 cm)
– After Border Round 2: 32 in × 52 in (81.3 cm × 132.1 cm)
– After Border Round 3: 33 in × 53 in (83.8 cm × 134.6 cm)
– After Border Round 4: 34 in × 54 in (86.4 cm × 137.2 cm)
If your swatch is too big, go down half a hook size. If it is too small, go up half a size. If only the row height is off, adjust how far you pull up the loop on each dc rather than changing hooks. That keeps the width right while you fix the height.
Panel
Use cream yarn and the 4.0 mm hook.
Foundation: Ch 185. The formula is 3 chains per mesh × 60 mesh + 5.
Row 1 (RS): Dc in 8th ch from hook. This counts as the first mesh.
Ch 2, sk 2 ch, dc in next ch; rep from * across.
You have 60 mesh: 61 dc (the skipped ch-5 counts as the first dc) and 60 ch-2 spaces, for 181 stitches across.
Row 2: Ch 5 (counts as dc + ch 2), turn. Sk the first ch-2 sp, dc in next dc.
Ch 2, dc in next dc; rep from * across, working the last dc in the 3rd ch of the turning chain. You still have 60 mesh and 181 stitches.
Rows 3–100: Rep Row 2.
Place a marker every 10 rows so counting stays easy. At the end of Row 100 do not fasten off. Ch 1 and go straight into the border.
Checkpoint: 60 mesh × 100 rows = 30 in × 50 in (76.2 cm × 127.0 cm).
Border
The border is worked in rounds with the 4.0 mm hook.
Border gauge: 6 sc = 1 in (2.5 cm). That is exactly 3 sc for every 0.5-in mesh, so the edge stays flat.
Each fan repeat uses 12 stitches, which equals 2 in (5.1 cm).
Round 1 (conversion round)
In this round, the side counts are the stitches between the corner ch-2 spaces. No corner stitches are included in them.
Top edge: Working across Row 100, sc in each stitch (each dc and each ch) = 181 sc.
First corner: Ch 2.
First long side: Working into the row ends, work 3 sc into each row end, but work 4 sc into the last row end of the side. Count: (100 row ends × 3) + 1 extra = 301 sc.
Second corner: Ch 2.
Bottom edge: Working into the remaining loops of the foundation chain, sc in each ch = 181 sc.
Third corner: Ch 2.
Second long side: Work as for the first long side = 301 sc.
Fourth corner: Ch 2, sl st to the first sc.
Round 1 total: 964 sc and 4 corner ch-2 spaces.
Round 2 (fan round)
Each side: Sl st into the first sc of the side, then work the repeat:
Sk 5 sc, fan in next sc, sk 5 sc, sc in next sc
Work the repeat 15 times along the top and bottom edges and 25 times along each long side. Each side ends with an sc in its last stitch.
Each corner: Fan (9 tr) in the corner ch-2 sp. Then sc in the first stitch of the next side and continue with the repeat.
Counts:
– Top and bottom: 15 fans + 16 sc = 151 stitches each
– Long sides: 25 fans + 26 sc = 251 stitches each
– Corners: 4 fans of 9 tr = 36 stitches
Round 2 total: 84 fans and 84 sc = 840 stitches. Join with a sl st to the first sc.
Round 3 (open fan round)
Work the same sequence over every fan, including the corner fans:
Sc in sc, (dc in next tr, ch 1) 8 times, dc in 9th tr
Each fan becomes 9 dc and 8 ch-1 spaces (17 stitches), and the sc between fans adds 1 more.
Counts:
– Top and bottom: 16 sc + (15 × 17) = 271 stitches each
– Long sides: 26 sc + (25 × 17) = 451 stitches each
– Corners: 4 × 17 = 68 stitches
Round 3 total: 1,512 stitches. Join with a sl st to the first sc.
Round 4 (picot round)
Work this sequence over every fan:
Sl st in sc, sk 1 dc, (sc in next ch-1 sp, picot) 7 times, sc in last ch-1 sp, sk 1 dc
Each fan gets 8 sc and 7 picots.
Counts:
– Top and bottom: 120 sc, 105 picots and 16 sl st each
– Long sides: 200 sc, 175 picots and 26 sl st each
– Corners: 8 sc and 7 picots each
Round 4 total: 84 sl st, 672 sc and 588 picots. Fasten off and weave in the ends.
Why the math works
The panel is 181 stitches wide. Each fan uses 12 stitches, so 181 = 1 + (12 × 15): one starting sc plus 15 full repeats.
Each long side has 300 natural stitches from the row ends. One extra sc makes it 301 = 1 + (12 × 25).
Because every side is “1 + a multiple of 12,” each side begins and ends with an sc. The four corner fans sit neatly between those sc stitches. The 15 top fans span 15 × 2 in = 30 in (76.2 cm), exactly the width of the panel.
Appliqués
Use the 3.5 mm hook. Leave a 12-in (30.5-cm) tail on every piece for sewing.
Rose (make 12 dusty rose, 12 peach)
Round 1: With cream, ch 4 and sl st to form a ring. Ch 1, 10 sc in ring, sl st to the first sc. 10 sc. Fasten off the cream.
Round 2: Join the rose color in any sc. Ch 1, sc in the same sc.
Ch 3, sk next sc, sc in next sc; rep 3 more times. Ch 3, sk the last sc, sl st to the first sc. 5 sc, 5 ch-3 loops.
Round 3 (inner petals): In each ch-3 loop, work (sc, hdc, 3 dc, hdc, sc). 5 petals, 35 stitches.
Round 4: Fold the petals forward and work behind them. Sl st around the back post of the first Round 2 sc.
Ch 5, sc around the back post of the next Round 2 sc; rep around, ending with a sl st in the first sl st. 5 ch-5 loops.
Round 5 (outer petals): In each ch-5 loop, work (sc, hdc, 5 dc, hdc, sc). 5 petals, 45 stitches. Fasten off.
The outer petals sit behind and between the inner ones, which gives the layered, cupped rose. Checkpoint: 2.25 in (5.7 cm) across.
Leaf (make 52)
With sage, ch 8.
Sc in 2nd ch from hook, hdc in next ch, dc in next 3 ch, hdc in next ch, sc in last ch. 7 stitches.
Ch 2 for the tip. Working along the opposite side of the foundation, sc, hdc, 3 dc, hdc, sc. 7 stitches.
Sl st to the first sc and fasten off.
If you like, surface sl st a center vein in sage. Checkpoint: 1.5 in (3.8 cm) long.
Vine cords (make 3)
With sage, chain the length below, then sl st in the back bump of each chain to make a firm cord:
- Top vine: ch 138, about 27.5 in (69.9 cm)
- Side vines (make 2): ch 240 each, about 48 in (121.9 cm)
Lay the cords on the panel to check the length before you fasten off.
Tieback and Tassels
Cords: With cream and the 4.0 mm hook, make 3 cords of ch 120, about 24 in (61.0 cm), the same way as the vine cords.
Braid the 3 cords loosely and stitch the ends together firmly. The finished braid is about 22 in (55.9 cm).
Tassels (make 2): Wrap cream 40 times around the 4.5-in (11.4-cm) card.
Tie the loops together at the top and cut through the bottom loops. Wrap the bundle 0.5 in (1.3 cm) below the tie and trim the ends level.
Sew one tassel to each end of the braid.
Placement
Count mesh from the inside edge of the border.
- Top vine: centered on mesh row 3 from the top, running from column 3 to column 58
- Side vines: centered on column 3 and on column 58, running from row 3 down to 0.75 in (1.9 cm) above the bottom border
- Corner roses: at the two corners of the upside-down U (column 3/row 3 and column 58/row 3)
- Top roses: 4 more, at columns 14, 25, 36 and 47. That puts all 6 top roses 11 mesh = 5.5 in (14.0 cm) apart.
- Side roses: 9 more per side, at rows 13, 23, 33, 43, 53, 63, 73, 83 and 93 from the top, spaced every 10 rows = 5 in (12.7 cm)
- Colors: Alternate dusty rose and peach along the vine.
- Leaves: Tuck 2 leaves under each rose, angled outward. Add 2 extra leaves at the bottom end of each side vine.
Pin everything in place first. Then whipstitch the cords to the mesh bars with matching yarn, sew each rose around its Round 2 base, and tack each leaf at its base and tip.
Stitch only into solid dc bars. Do not stretch across open spaces.
Final Blocking
- Soak the finished curtain in cool water with a little wool wash for 15 minutes.
- Press the water out gently in towels. Do not wring.
- Lay the panel flat and pin the mesh edges to 30 in × 50 in (76.2 cm × 127.0 cm). Use the mesh lines as your guide for straightness.
- Pin out every fan: one pin at each sc between fans and one at the center picot of each scallop. The outer edge should measure 34 in × 54 in (86.4 cm × 137.2 cm).
- Fluff the rose petals by hand. Do not pin through them.
- Let the curtain dry completely before unpinning, usually 24–48 hours.
Final Quality-Control Checklist
- 60 mesh across and 100 rows tall, with every square open and even
- Round 1 counts: 181 / 301 / 181 / 301
- 15 fans on the top and bottom, 25 on each long side and 4 at the corners
- All 84 fans have 8 sc and 7 picots
- 24 roses in alternating colors, evenly spaced along the vine
- All 52 leaves sewn securely at the base and tip
- Finished size of 34 in × 54 in (86.4 cm × 137.2 cm)
- No loose ends visible from either side
- 17 clip rings attached along the top: one at each of the 16 sc between top fans plus the center of one corner fan, or spaced evenly to suit your rod
Troubleshooting
- The mesh leans to one side: You are probably skipping the first dc or the last turning chain. Count 61 dc every row.
- The squares look like tall rectangles: Your dc is too tall. Pull up shorter loops, or go down a hook size.
- The border ruffles: Your Round 1 is over the count. Recount 3 sc per row end along the long sides.
- The border cups: Your tension is too tight. Work Rounds 2–4 with a 4.5 mm hook.
- The corners pull in: Make sure the corner fan is worked into the ch-2 corner space, not into the next stitch.
- The roses look flat: Make sure Round 4 is worked around the back posts, behind the inner petals.
- The vine puckers the mesh: You are stitching too tightly. Use loose tacking stitches about 0.5 in (1.3 cm) apart.
Care
Hand wash in cool water and dry flat, reshaping the fans and petals while the curtain is damp. Avoid long exposure to strong direct sun so the rose and sage colors stay fresh.
Final Notes
The whole curtain follows one measurement chain. The 0.5-in mesh gives a 30 in × 50 in (76.2 cm × 127.0 cm) panel. Round 1 converts that edge to exactly 6 sc per inch. The 12-stitch fans then fit each side perfectly, and the 2-in (5.1-cm) border brings the panel to 34 in × 54 in (86.4 cm × 137.2 cm). Check your gauge early, count at each checkpoint, and the roses will have a straight trellis to climb.
Happy crocheting!