

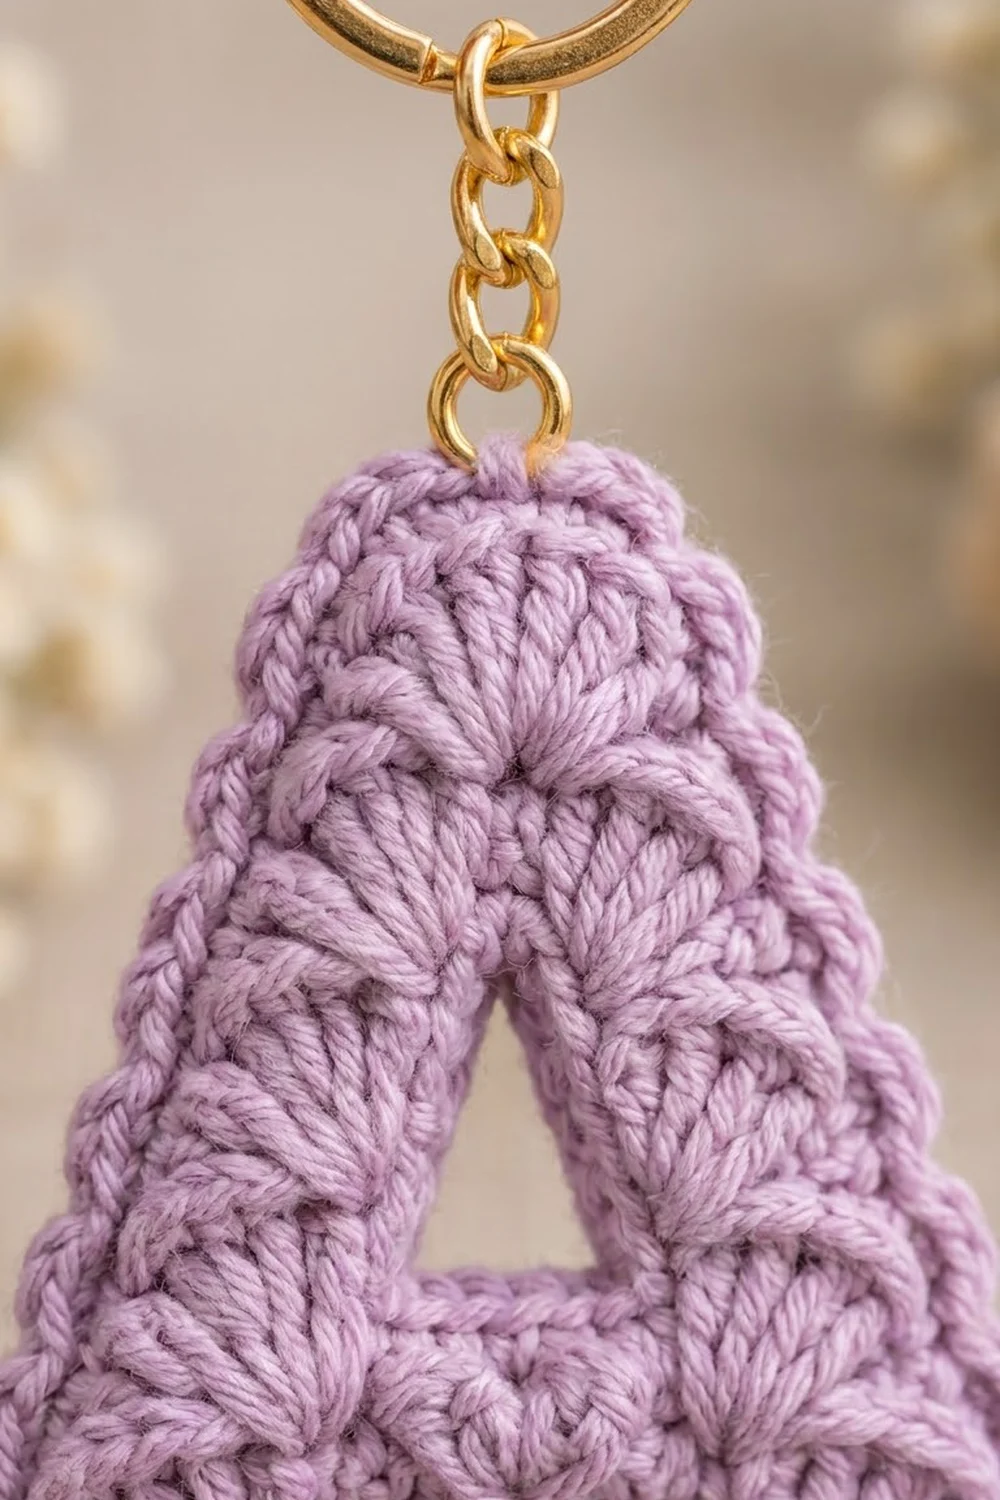
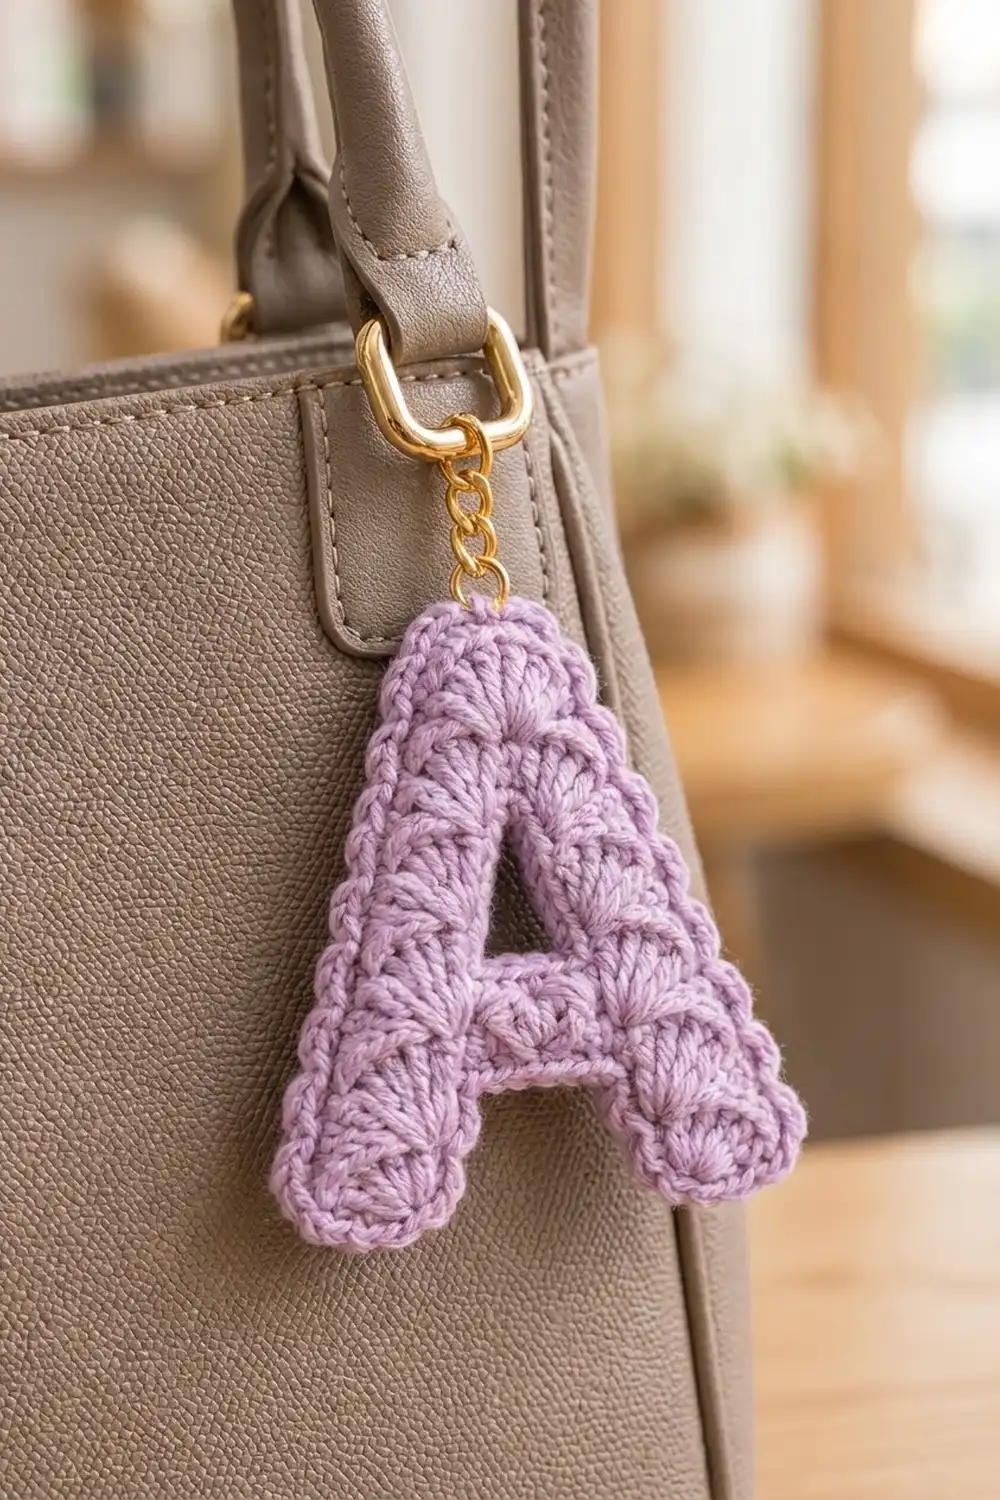
This little letter “A” is a soft, textured bag charm. Raised shell fans sit in tiers across a firm single-crochet base. A corded rope edge outlines the letter, and gold-tone hardware finishes it.
The sample is made in one lilac shade, but the design suits any color. Pastels look sweet, while deep jewel tones make the shells stand out more. Because the base is dense, the charm keeps its shape on a bag, a pencil case, or a set of keys.
The pattern uses US crochet terms. The finished letter measures 3.5 in (8.9 cm) wide by 4 in (10.2 cm) tall, not counting the hardware.
Here is how it is built. You work two legs separately, then join them into a crossbar. Next you split the work around a small triangular opening, rejoin it, and decrease to the top. Some rows go into back loops only, which leaves front-loop ridges on the right side. You then work the shells into those ridges, crochet a two-round rope border, and add a chain and key ring.
Finished Size and Construction
- Finished size: 3.5 in (8.9 cm) wide × 4 in (10.2 cm) tall
- Skill level: Easy-intermediate
- Terminology: US crochet terms
- Yarn weight: DK (light, #3)
- Hook: 3.5 mm (E-4)
- Number of pieces: 1 (the legs start separately but are joined in Row 7)
- Layout: One upright letter “A” with 5 shell tiers (9 shells in total)
- Piece size before border: 3 in (7.6 cm) wide × 3.5 in (8.9 cm) tall
- Border depth: 0.25 in (0.6 cm) on every edge
Materials
Yarn: Use a smooth DK cotton or cotton blend. Cotton gives crisp shell ribs and a firm edge that won’t stretch on a keychain. Avoid fuzzy yarns because they hide the shell texture.
- Lilac: 15 g, about 38 m (41.6 yd)
The quantity includes a margin for your gauge swatch, the shell tails, and the border.
Tools and hardware:
- 3.5 mm (E-4) crochet hook
- Tapestry needle
- Stitch markers (2–3)
- Gold-tone split key ring, 25 mm
- Gold-tone curb chain, 1.5 in (3.8 cm)
- 2 jump rings, 8 mm
- 2 pairs of flat-nose pliers
- Blocking mat, rust-proof pins, and a spray bottle
Abbreviations (US Terms)
- ch: chain
- sc: single crochet
- dc: double crochet
- sl st: slip stitch
- sc2tog: single crochet 2 together
- BLO: back loop only
- FL: front loop
- rsc: reverse single crochet (crab stitch)
- st(s): stitch(es)
- RS / WS: right side / wrong side
Special stitches:
- Shell: 5 dc in the same stitch.
- Shift row: On one row, sc2tog at the outer edge and work 2 sc in the stitch at the inner edge. The count stays at 5, but the section moves 1 stitch inward. This creates the slant of the “A”.
- rsc: Work sc from left to right (for right-handers). Insert the hook into the next stitch to the right, yarn over, pull up a loop, yarn over, and draw through both loops.
Gauge and Checkpoints
Gauge: 20 sc × 22 rows = 4 in (10.2 cm) in sc rows. That works out to 5 sts and 5.5 rows per inch (2.5 cm).
The letter is a single piece, so make a 4 in (10.2 cm) sc swatch first and measure it. Then check the piece at these stages:
- After Row 6 (each leg): 1 in (2.5 cm) wide × 1.1 in (2.8 cm) tall
- After Row 9: 2.6 in (6.6 cm) wide across the crossbar; 1.6 in (4.1 cm) total height
- After Row 13: 2.2 in (5.6 cm) wide; 2.4 in (6.1 cm) total height
- After Row 19: 3 in (7.6 cm) at the base; 3.5 in (8.9 cm) tall; 1 in (2.5 cm) across the top
- After the border: 3.5 in (8.9 cm) × 4 in (10.2 cm)
If your piece is too big, go down to a 3.25 mm hook. If it is too small, go up to a 3.75 mm hook. Don’t change the stitch counts, because the shells and the border are calculated from them.
The Letter Base
These directions are for right-handers: RS rows are worked right to left as you look at the RS. Odd rows are RS rows.
Left Leg
Ch 6.
Row 1 (RS): Sc in 2nd ch from hook and in each ch across. (5 sc)
Row 2 (WS): Ch 1, turn, sc in each st across. (5 sc)
Row 3 (RS): Ch 1, turn, sc BLO in each st across. (5 sc) The front loops of Row 2 are now free on the RS. This is Shell Ridge 1.
Row 4 (WS, shift row): Ch 1, turn, sc2tog (outer edge), sc in next 2 sts, 2 sc in last st (inner edge). (5 sc)
Row 5 (RS): Ch 1, turn, sc in each st across. (5 sc)
Row 6 (WS): Ch 1, turn, sc in each st across. (5 sc) Fasten off.
Right Leg
Ch 6. Work Rows 1–3 the same as the Left Leg.
Row 4 (WS, shift row): Ch 1, turn, 2 sc in first st (inner edge), sc in next 2 sts, sc2tog (outer edge). (5 sc)
Rows 5–6: Work the same as the Left Leg. Do not fasten off.
Lay both legs RS up with their inner edges facing each other. Their bases should be 1 in (2.5 cm) apart. Thanks to the shift row, the gap narrows to 0.6 in (1.5 cm) at the top.
Crossbar
Row 7 (RS, joining row): Ch 1, turn, sc BLO in each of the 5 Right Leg sts, ch 3, then sc BLO in each of the 5 Left Leg sts. (13 sts: 10 sc + 3 ch) Shell Ridge 2 is now the free FLs of Row 6.
Row 8 (WS): Ch 1, turn, sc in each of the 5 sc, sc in each of the 3 ch, sc in each of the 5 sc. (13 sc)
Row 9 (RS): Ch 1, turn, sc in each st across. (13 sc)
Upper Sides (Triangular Opening)
Side A
Row 10 (WS): Ch 1, turn, sc in first 5 sts. Leave the remaining 8 sts unworked. (5 sc)
Row 11 (RS, BLO, shift row): Ch 1, turn, 2 sc BLO in first st (inner edge), sc BLO in next 2 sts, sc2tog BLO (outer edge). (5 sc) Shell Ridge 3 is the free FLs of Row 10.
Row 12 (WS): Ch 1, turn, sc in each st across. (5 sc) Fasten off.
Side B
With the WS facing, skip the next 3 sts of Row 9. These skipped sts form the bottom of the opening. Join yarn in the next st.
Row 10 (WS): Ch 1, sc in the same st and in the next 4 sts. (5 sc)
Row 11 (RS, BLO, shift row): Ch 1, turn, sc2tog BLO (outer edge), sc BLO in next 2 sts, 2 sc BLO in last st (inner edge). (5 sc)
Row 12 (WS): Ch 1, turn, sc in each st across. (5 sc) Do not fasten off.
The opening is now a small triangle: 3 sts (0.6 in / 1.5 cm) wide at the base, narrowing to 1 st at the top.
Top Section
Row 13 (RS, joining row): Ch 1, turn, sc in each of the 5 Side B sts, ch 1, sc in each of the 5 Side A sts. (11 sts: 10 sc + 1 ch)
Row 14 (WS): Ch 1, turn, sc2tog, sc in next 7 sts (including the ch), sc2tog. (9 sc)
Row 15 (RS): Ch 1, turn, sc BLO in each st across. (9 sc) Shell Ridge 4 is the free FLs of Row 14.
Row 16 (WS): Ch 1, turn, sc2tog, sc in next 3 sts, sc2tog. (7 sc)
Row 17 (RS): Ch 1, turn, sc in each st across. (7 sc)
Row 18 (WS): Ch 1, turn, sc2tog, sc in next 3 sts, sc2tog. (5 sc)
Row 19 (RS): Ch 1, turn, sc BLO in each st across. (5 sc) Shell Ridge 5 is the free FLs of Row 18. Fasten off and weave in all base tails.
Check the base now: it should be 3 in (7.6 cm) wide × 3.5 in (8.9 cm) tall.
Shell Tiers
Hold the letter RS up with the top pointing away from you. Each shell uses 5 free FLs and is worked like this:
Basic shell (over 5 FLs): Join yarn with sc in the 1st FL, skip next FL, Shell in next FL, skip next FL, sc in last FL. Fasten off and leave a 6 in (15.2 cm) tail. (1 shell: 5 dc + 2 sc)
Work the shells in this order:
- Tier 1 (Row 2 FLs): 1 basic shell on each leg. (2 shells)
- Tier 2 (Row 6 FLs): 1 basic shell on each leg. These shells rise over the crossbar. (2 shells)
- Tier 3 (Row 10 FLs): 1 basic shell on Side A and 1 on Side B. (2 shells)
- Tier 4 (Row 14 FLs, 9 FLs): Join with sc in 1st FL, [skip next FL, Shell in next FL, skip next FL, sc in next FL] twice. (2 shells sharing the center sc: 10 dc + 3 sc)
- Tier 5 (Row 18 FLs): 1 basic shell. This is the top fan. (1 shell)
That makes 9 shells in total. Each shell stands about 0.5 in (1.3 cm) tall and overlaps the base of the tier above, which gives the layered scallop look. Pull the tails to the WS and weave them into the base sc only, so the shells stay free.
Border
Border gauge: Work 1 sc per stitch, 1 sc per sc row-end, and 3 sc at each outside corner. The sc border has the same 5 sts per inch (2.5 cm) as the base.
Opening edging (optional, matches the sample): With the RS facing, join yarn at the bottom of the triangular opening. Work sc in each of the 3 skipped Row 9 sts, then 3 sc up one side (1 per row-end of Rows 10–12) and 3 sc down the other side. Sl st to the first sc. (9 sc) Fasten off.
Rnd 1 (RS): Join yarn at the outer bottom corner of the Left Leg. Work around the letter as follows:
- Left Leg bottom: 3 sc in the first foundation ch, sc in the next 3 ch, 3 sc in the last ch. (9 sc)
- Left Leg inner edge: 1 sc in each row-end of Rows 2–6. (5 sc)
- Under the crossbar: 1 sc in each of the 3 ch from Row 7. (3 sc)
- Right Leg inner edge: 1 sc in each row-end of Rows 6–2. (5 sc)
- Right Leg bottom: 3 sc in the first ch, sc in the next 3 ch, 3 sc in the last ch. (9 sc)
- Right outer edge: 1 sc in each row-end of Rows 2–18. (17 sc)
- Top (Row 19): 3 sc in the first st, sc in the next 3 sts, 3 sc in the last st. (9 sc)
- Left outer edge: 1 sc in each row-end of Rows 18–2. (17 sc)
Sl st to the first sc. Total: 74 sc (9 + 5 + 3 + 5 + 9 + 17 + 9 + 17).
Don’t add stitches at the two inside corners where the legs meet the crossbar. Those corners are concave, and extra stitches would make them ruffle.
Rnd 2 (RS): Ch 1, rsc in each st around. (74 rsc) Sl st to join and fasten off.
Why the math works: Each row-end and each stitch gets exactly 1 sc, so Rnd 1 matches the base at the same gauge. The six 3-sc corner groups (18 sts in total) add the 2 extra sts each outer corner needs to turn without cupping. Row 1 and Row 19 row-ends are covered by the corner groups and not counted again. The rsc round works 1 per st, so it keeps the count at 74. Its corded edge pulls in slightly, which makes the edge firm and flat. The two rounds together add 0.25 in (0.6 cm) on every side, so the 3 in × 3.5 in (7.6 cm × 8.9 cm) base becomes 3.5 in × 4 in (8.9 cm × 10.2 cm).
Hardware: Open one jump ring with the pliers. Pass it through the center stitch of the top 3-sc corner group, catching both border rounds and the top of Row 19. Hang one end of the chain on it and close the ring. Use the second jump ring to attach the other end of the chain to the split key ring.
Final Blocking
- Take the hardware off, or keep it out of the water.
- Mist both sides of the letter until it is damp, not soaked.
- Lay it RS up on the blocking mat.
- Pin the base corners to 3.5 in (8.9 cm) wide and the top to 4 in (10.2 cm) high.
- Push each shell gently upward with your fingertip so it fans open evenly.
- Pin the triangular opening into a clean point if needed.
- Let it dry completely before reattaching the hardware.
Final Quality-Control Checklist
- The letter measures 3.5 in (8.9 cm) × 4 in (10.2 cm).
- Both legs slant inward by the same amount.
- The triangular opening is centered above the crossbar.
- All 9 shells are present, with 5 dc each, and fan upward.
- Border Rnd 1 has 74 sc, and Rnd 2 has 74 rsc.
- No tails show on the RS.
- The jump rings are fully closed, and the charm hangs straight.
Troubleshooting
- The legs slant the same direction: Row 4 was worked the same on both legs. Redo one leg with its mirrored shift row.
- The shells lie flat or point down: You worked them with the piece upside down. Rework them with the top pointing away from you.
- The border ruffles: Check that you didn’t add sc at the inside corners, and recount to 74.
- The border cups: Your rsc is too tight. Go up 0.25 mm for Rnd 2 only.
- The opening has closed up: Make sure you skipped exactly 3 sts in Row 9.
- The charm hangs crooked: Move the jump ring to the true center stitch of the top.
Care
Spot clean with mild soap and cool water, reshape, and dry flat. Keep the gold hardware dry to protect its finish.
Final Notes
The measurements build on each other. The 5 sc legs are 1 in (2.5 cm) wide. The 13-st crossbar is 2.6 in (6.6 cm). The finished base is 3 in × 3.5 in (7.6 cm × 8.9 cm). The 74-st rope border adds 0.25 in (0.6 cm) on each side, for a final size of 3.5 in × 4 in (8.9 cm × 10.2 cm). If you match the gauge at the start, every count after it falls into place.
Happy crocheting!