

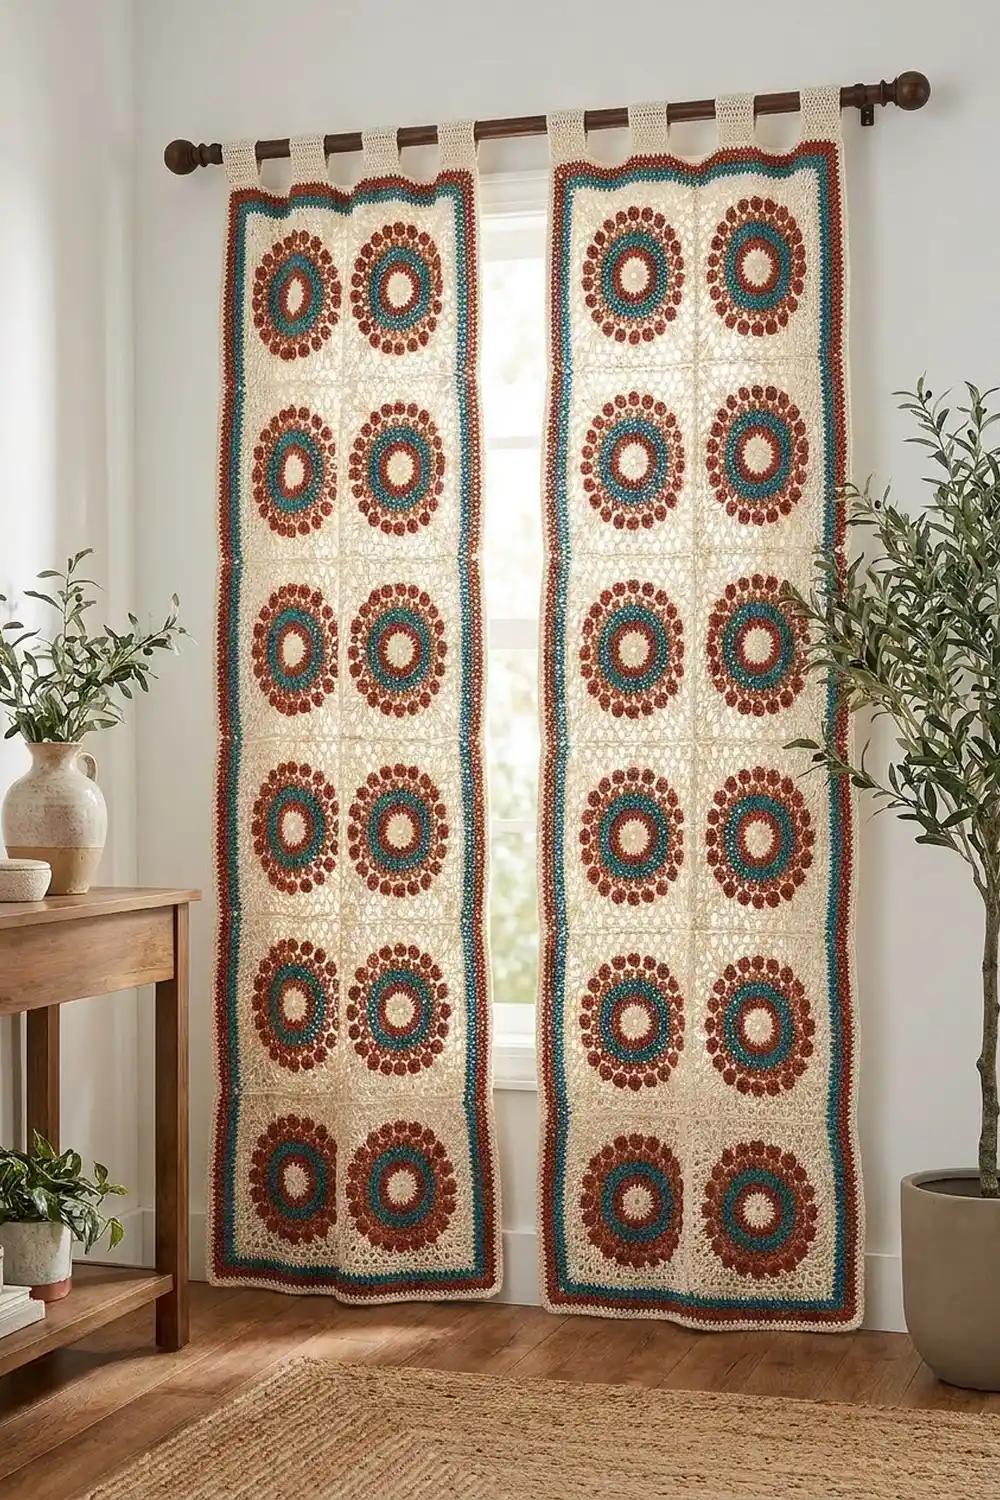
This curtain panel is a tall column of mandala motifs in a warm boho palette. Each square has a rust and teal mandala in the middle, surrounded by an airy cream mesh frame, so daylight shows through while the colors still read clearly from across the room.
The palette uses three colors: cream, rust and dusty teal. Cream does most of the work, in the motif centers, the squaring rounds, the joins and the hanging tabs. Rust and teal form the mandala rings and the two colored stripes that run down both long edges of the border.
The pattern uses US crochet terms. One finished panel measures 10.5 in (26.7 cm) wide by 74.5 in (189.2 cm) long, plus tab loops that rise about 1.5 in (3.8 cm) above the top edge.
Construction is simple and modular. You make nine identical 8 in (20.3 cm) square motifs, join them in one vertical column with slip stitches, work a three-round border around the whole strip, and then crochet three tabs directly onto the top edge. To dress a window the way it’s shown in the photo, make four panels and hang them as two pairs.
Finished Size and Construction
- Finished panel size: 10.5 in x 74.5 in (26.7 cm x 189.2 cm), not including tabs
- Skill level: Intermediate
- Terminology: US crochet terms
- Yarn weight: Worsted (Category 4) cotton or cotton blend
- Hook: US H-8 (5.0 mm)
- Number of pieces: 9 square motifs, plus 3 tabs worked directly onto the panel
- Layout: 1 motif wide x 9 motifs long
- Motif size: 8 in (20.3 cm) square, 27 dc per side
- Size before border: 8 in x 72 in (20.3 cm x 182.9 cm)
- Border depth: 1.25 in (3.2 cm) on every side
Materials
Choose a smooth, mercerized or matte worsted cotton. Cotton holds the lace open, resists sagging better than acrylic, and handles sunlight well. Pick yarns of the same brand and weight so the motifs come out the same size.
Quantities are for one panel:
- Cream (MC): 250 g / about 425 m (465 yd)
- Rust (CC1): 150 g / about 255 m (279 yd)
- Dusty teal (CC2): 150 g / about 255 m (279 yd)
These quantities include a margin of roughly 20% for your gauge swatch, weaving in ends and small tension differences. For four panels, multiply each amount by four.
Tools:
- US H-8 (5.0 mm) crochet hook
- Tapestry needle
- Stitch markers (at least 4)
- Scissors
- Measuring tape
- Blocking mats and rust-proof pins
- Spray bottle
Abbreviations (US Terms)
- ch – chain
- sl st – slip stitch
- sc – single crochet
- hdc – half double crochet
- dc – double crochet
- tr – treble crochet
- sk – skip
- sp(s) – space(s)
- st(s) – stitch(es)
- BLO – back loop only
- RS / WS – right side / wrong side
- rep – repeat
Special stitches:
- Beginning cluster (beg cl): Ch 2, *yarn over, insert hook in the indicated st, pull up a loop, yarn over, draw through 2 loops; rep from * once more, yarn over, draw through all 3 loops on hook.
- Cluster (cl): *Yarn over, insert hook in the indicated st, pull up a loop, yarn over, draw through 2 loops; rep from * 2 more times, yarn over, draw through all 4 loops on hook.
Gauge and Checkpoints
Make one complete motif before anything else and block it. This is your gauge swatch. Every later measurement depends on it.
Target gauge: One blocked motif = 8 in (20.3 cm) square, with 27 dc along each side of Round 9.
Checkpoints while working the motif (measured flat, unblocked):
- After Round 1: about 1.5 in (3.8 cm) across
- After Round 3: about 3.5 in (8.9 cm) across
- After Round 5: about 5.5 in (14.0 cm) across
- After Round 6: about 6.5 in (16.5 cm) across
- After Round 7: about 6.75 in (17.1 cm) per side
- After Round 9: about 8 in (20.3 cm) per side
If your motif is too big: go down one hook size, to US G-6 (4.0 mm), and make a new motif.
If your motif is too small: go up one hook size, to US I-9 (5.5 mm).
If the circle rounds ruffle, your tension is looser than the increases expect. If they cup, it’s tighter. Fix that before you move on to the squaring rounds.
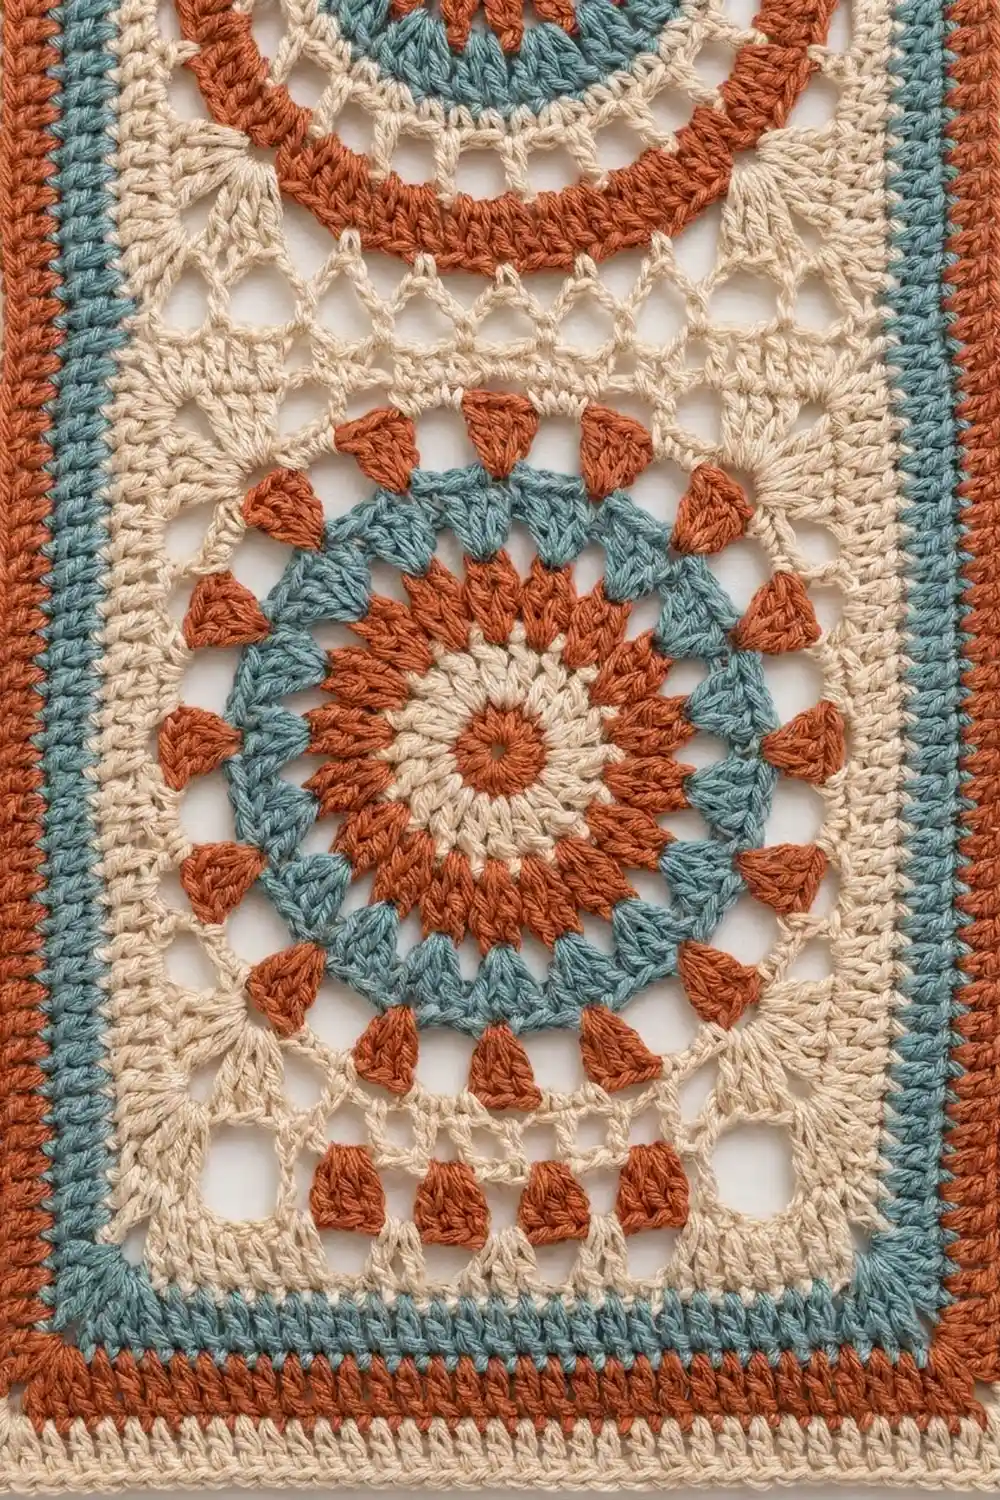
Motif (Make 9)
The motif is worked in joined rounds with the RS facing throughout. Don’t turn. Fasten off at every color change and join the new color as written.
Round 1 (cream): Make a magic ring. Ch 3 (counts as dc), 11 dc in the ring, sl st to the top of the beginning ch-3. Pull the ring closed. (12 dc)
Fasten off cream.
Round 2 (rust): Join rust in any st. Ch 3 (counts as dc), dc in the same st, 2 dc in each remaining st around, sl st to the top of ch-3. (24 dc)
Round 3 (rust): Ch 3 (counts as dc), dc in the same st, dc in next st, 2 dc in next st, dc in next st; rep from * around, sl st to the top of ch-3. (36 dc)*
Fasten off rust.
Round 4 (teal): Join teal in any st. Ch 3 (counts as dc), dc in the same st, dc in next 2 sts, 2 dc in next st, dc in next 2 sts; rep from * around, sl st to the top of ch-3. (48 dc)*
Round 5 (teal): Ch 3 (counts as dc), dc in the same st, dc in next 3 sts, 2 dc in next st, dc in next 3 sts; rep from * around, sl st to the top of ch-3. (60 dc)*
Fasten off teal.
Round 6 (rust, cluster dots): Join rust in any st. Beg cl in the same st, ch 4, sk next 4 sts, cl in next st, ch 4, sk next 4 sts; rep from * 10 more times, sl st to the top of the beg cl. (12 cl and 12 ch-4 sps; 12 x 5 = 60, so every Round 5 st is used)*
Fasten off rust. This round makes the ring of rust dots with open windows between them.
Round 7 (cream, squaring round): Join cream in any cl. Ch 4 (counts as tr), (2 tr, ch 2, 3 tr) in the same cl to make the first corner. *4 dc in next ch-4 sp, dc in next cl, 4 hdc in next ch-4 sp, dc in next cl, 4 dc in next ch-4 sp, (3 tr, ch 2, 3 tr) in next cl for the corner; rep from * 2 more times. Then 4 dc in next ch-4 sp, dc in next cl, 4 hdc in next ch-4 sp, dc in next cl, 4 dc in next ch-4 sp, and sl st to the top of ch-4.
Count for Round 7: each side, from corner sp to corner sp, has 3 tr + 4 dc + 1 dc + 4 hdc + 1 dc + 4 dc + 3 tr = 20 sts, so the round has 80 sts and 4 corner ch-2 sps. The tall corners and short middles turn the circle into a square.
Round 8 (cream, filet mesh): Sl st in next 2 tr and into the corner ch-2 sp. Ch 5 (counts as dc and ch 2), dc in the same sp. *(Ch 1, sk next st, dc in next st) 10 times, ch 1, (dc, ch 2, dc) in the next corner ch-2 sp; rep from * 2 more times. Then (ch 1, sk next st, dc in next st) 10 times, ch 1, and sl st to the 3rd ch of the beginning ch-5.
Count for Round 8: each side between corner ch-2 sps has 1 corner dc + 10 dc + 11 ch-1 sps + 1 corner dc = 23 units (12 dc and 11 ch-1 sps). The round has 48 dc, 44 ch-1 sps and 4 corner ch-2 sps. This is the open cream frame you see around each mandala.
Round 9 (cream, solid edge): Sl st into the corner ch-2 sp. Ch 3 (counts as dc), (dc, ch 2, 2 dc) in the same sp. *Dc in each dc and each ch-1 sp across, 23 dc in all, then (2 dc, ch 2, 2 dc) in the next corner ch-2 sp; rep from * 2 more times. Dc in each dc and ch-1 sp across (23 dc), sl st to the top of ch-3.
Count for Round 9: each side has 2 + 23 + 2 = 27 dc. In this pattern the corner ch-2 sps are defined as separate from the 27 dc. They are not counted as stitches. The round has 108 dc and 4 corner ch-2 sps.
Fasten off and weave in all ends. Block the motif to 8 in (20.3 cm) square before checking gauge.
Make All Pieces
Make 9 motifs in total for one panel. Use the same color order in every motif.
Color use per motif:
- Cream: Rounds 1, 7, 8, 9
- Rust: Rounds 2, 3, 6
- Teal: Rounds 4, 5
Layout grid (1 x 9, top to bottom):
[M1]  <- top (tabs go here)
[M2]
[M3]
[M4]
[M5]
[M6]
[M7]
[M8]
[M9]  <- bottom
Block all nine motifs to the same 8 in (20.3 cm) square before you join them. It makes matching the stitches much easier.
Joining
Method: slip stitch join through the back loops, using cream.
Hold M1 and M2 with their WS together and the RS facing you, lining up the bottom edge of M1 with the top edge of M2. Join cream in the matched corner ch-2 sps of both motifs.
Stitch-to-stitch logic: sl st through both corner ch-2 sps. Then sl st through the BLO of each matching pair of dc, 27 pairs, and finish with a sl st through the next matched pair of corner ch-2 sps. That makes 29 sl sts per seam, matched 1 to 1. You never add or skip stitches.
Fasten off, then join M3 to the bottom of M2 the same way. Continue until all 9 motifs are joined, which gives 8 seams.
Tension advice: keep the slip stitches as loose as the dc they join. If the seam is tight, the column will pucker and the panel will hang short. If needed, go up one hook size for the joins only.
Size checkpoint: the joined column should measure 8 in x 72 in (20.3 cm x 182.9 cm) when laid flat without stretching.
Border
Border gauge: about 3.5 sc per inch (2.5 cm) along the edges. The sc round is about 0.25 in (0.6 cm) tall, and each dc round is about 0.5 in (1.3 cm) tall, so the border is 1.25 in (3.2 cm) deep.
Round 1 (cream, sc): With the RS facing, join cream in the top-right outer corner ch-2 sp. Ch 1, (sc, ch 2, sc) in the same sp.
- Long side: sc in each of the 27 dc of each motif. At each seam, work 1 sc through the joined pair of corner ch-2 sps. Count: 9 x 27 = 243 sc, plus 8 seam sc, is 251. Adding the 2 corner sc gives 253 sc between corner ch-2 sps.
- Short side: (sc, ch 2, sc) in the outer corner sp, then sc in each of the 27 dc. Count: 1 + 27 + 1 = 29 sc.
Work around all four sides, putting (sc, ch 2, sc) in each outer corner. Sl st to the first sc.
Round 1 total: 2 x 253 + 2 x 29 = 564 sc and 4 corner ch-2 sps.
Fasten off cream.
Round 2 (teal, dc): Join teal in any corner ch-2 sp. Ch 3 (counts as dc), (dc, ch 2, 2 dc) in the same sp. Dc in each sc around, with (2 dc, ch 2, 2 dc) in each corner sp. Sl st to the top of ch-3.
- Long side: 2 + 253 + 2 = 257 dc
- Short side: 2 + 29 + 2 = 33 dc
- Total: 2 x 257 + 2 x 33 = 580 dc
Fasten off teal.
Round 3 (rust, dc): Join rust in any corner ch-2 sp. Work as for Round 2.
- Long side: 2 + 257 + 2 = 261 dc
- Short side: 2 + 33 + 2 = 37 dc
- Total: 2 x 261 + 2 x 37 = 596 dc
Fasten off rust and weave in the ends.
Why the math works: each long side starts from exactly 9 motifs x 27 dc. The only extras are the 8 seam sc, shown above, which fill the small gaps where two corner spaces meet, plus the corner stitches. After that, every round adds exactly 2 stitches to each side, which is enough to keep the corners flat without frilling the edges. With 8 in (20.3 cm) of motif and 1.25 in (3.2 cm) of border on each side, the panel is 10.5 in (26.7 cm) wide. With 72 in (182.9 cm) of motifs plus 1.25 in (3.2 cm) of border at each end, it is 74.5 in (189.2 cm) long.
Hanging Tabs (cream)
The top short edge has 37 rust dc in Round 3. The tabs follow a 7-8-7-8-7 layout: tab, gap, tab, gap, tab. That is 7 + 8 + 7 + 8 + 7 = 37 sts.
Tab 1: With the RS facing, join cream in the first dc of the top edge (the one right after the corner sp).
- Row 1: Ch 3 (counts as dc), dc in next 6 sts. (7 dc)
- Rows 2–8: Ch 3, turn, dc in each st across. (7 dc)
Fasten off, leaving a 12 in (30.5 cm) tail.
Tab 2: Sk the 8 dc after Tab 1, join cream in the next dc, and work the same as Tab 1.
Tab 3: Sk the next 8 dc and work the same in the last 7 dc.
Each tab is about 2 in (5.1 cm) wide and 4 in (10.2 cm) long. Fold each tab to the WS and whipstitch Row 8 to the back of Border Round 1. This makes a loop that fits a rod up to 1.25 in (3.2 cm) in diameter.
Final Blocking
- Weave in all remaining ends along seams or inside solid rounds, never through the mesh.
- Lay the panel flat on mats, with the RS up. Because the panel is long, block it in sections if you need to.
- Spray it until it is evenly damp, but not dripping.
- Pin the outer corners to make a rectangle 10.5 in x 74.5 in (26.7 cm x 189.2 cm).
- Pin along each long edge every 3–4 in (7.6–10.2 cm), keeping the edges straight.
- Gently open the mesh of Round 8 and the ch-4 windows of Round 6 with your fingers.
- Leave it until completely dry. Move the pins along to the next section if you are blocking in stages.
Final Quality-Control Checklist
- All 9 motifs measure 8 in (20.3 cm) square with 27 dc per side.
- Every motif follows the same color order.
- Every seam has 29 sl sts, with no gaps or puckers.
- Border Round 1 has 253 sc on each long side and 29 on each short side.
- Border Round 3 has 261 dc on each long side and 37 on each short side.
- The tabs follow 7-8-7-8-7 and are all sewn down at the same depth.
- The panel lies flat at 10.5 in x 74.5 in (26.7 cm x 189.2 cm).
- All ends are woven in securely.
Troubleshooting
Round 7 corners curl up: your tr are too tight. Loosen your yarn-overs, or work the corners with a hook one size larger.
The motif cups after Round 5: go up a hook size for Rounds 1–5, or check that you have 60 dc.
Round 6 clusters don’t line up evenly: recount Round 5. Each repeat must sk exactly 4 sts.
The panel hangs shorter than 74.5 in (189.2 cm): the joins are too tight. Redo them more loosely, then re-block.
The long edges wave: the border has too many sts. Check the count of 253 sc and rework Round 1.
The tabs pull the top edge into scallops: sew the tabs down at Round 1, not lower, and check the 8-st gaps.
Care
Hand wash in cool water with a mild detergent, press out the water in a towel, and dry flat, re-pinning to size. Don’t hang it to dry wet, because the panel’s own weight will stretch it.
Final Notes
The measurement chain keeps everything predictable. A motif with 27 dc per side measures 8 in (20.3 cm). Nine motifs in a column give 72 in (182.9 cm). The 1.25 in (3.2 cm) border brings the panel to 10.5 in x 74.5 in (26.7 cm x 189.2 cm). If your first motif hits gauge, every later count will fall into place.
Happy crocheting!