

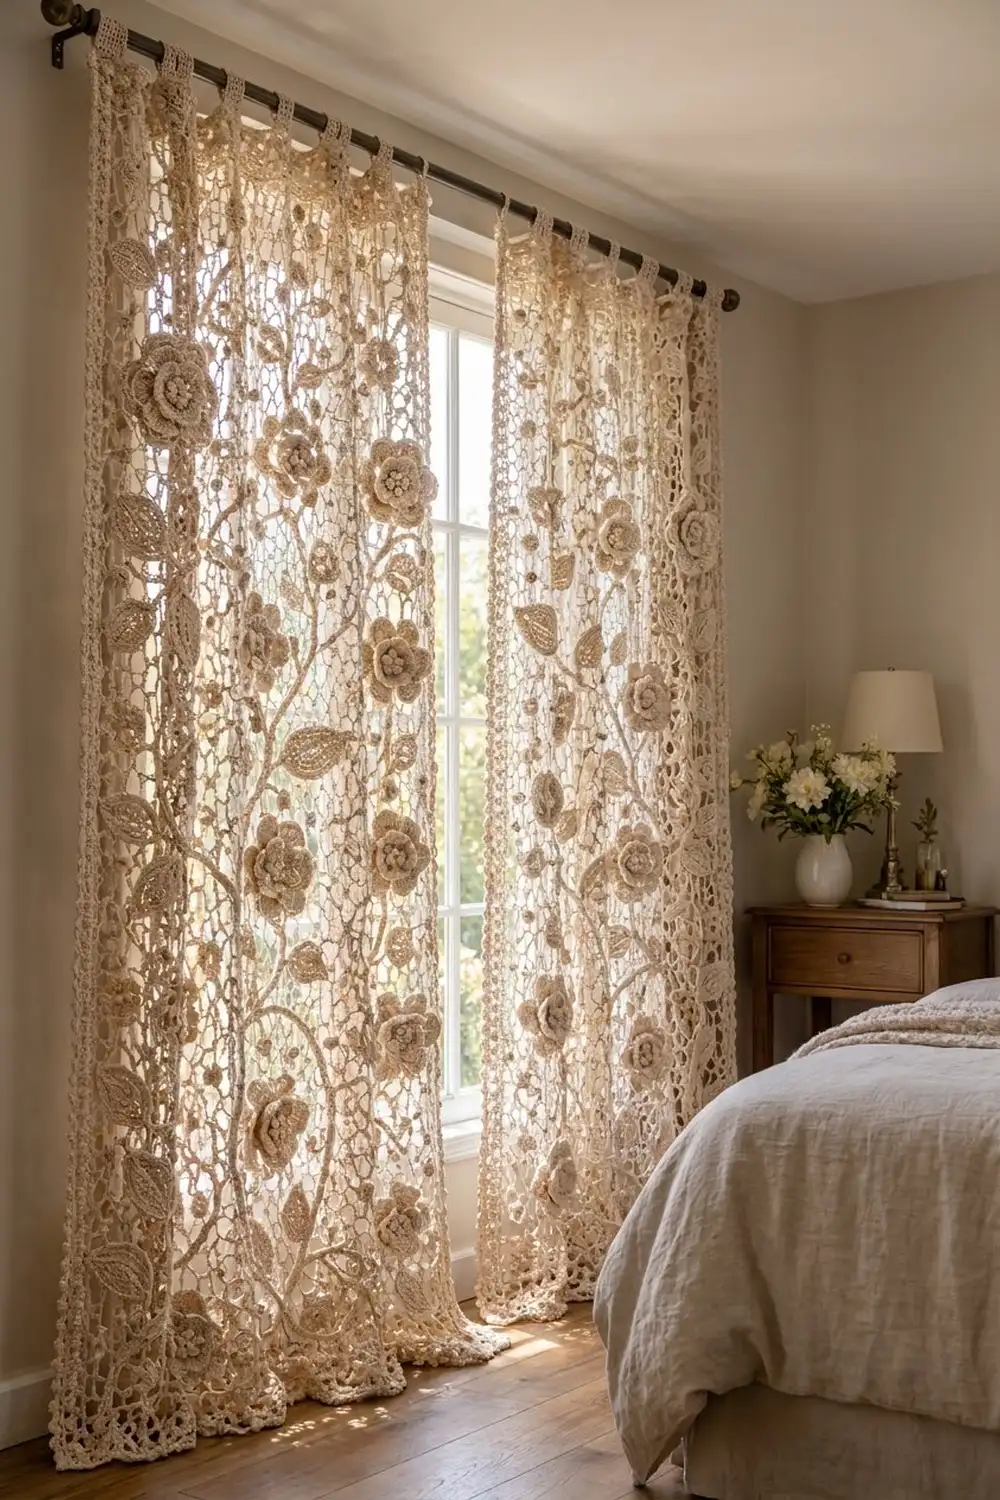
The Ivory Rosevine curtains bring old Irish crochet lace to a modern window. Each panel has rows of raised three-tier roses, ridged leaves and an open chain mesh dotted with small ball nodes. When light comes through, the roses and leaves stand out against the airy background.
The panels use one natural ivory cotton, which keeps the look soft and timeless. The pattern uses US crochet terms throughout. One finished panel measures 44 in x 86 in (111.8 cm x 218.4 cm). The photo shows two panels, so make two for a matching pair.
Each panel is built from square lace blocks. Every block starts with a layered rose, which is then squared off with rounds of mesh and finished with a solid single crochet edge. You sew two leaves onto each block, join the blocks in a grid, and finish the whole panel with a three-round border.
This is a long project, but every block is identical, so the rhythm becomes relaxing. The measurement checkpoints below keep your panel on size.
Finished Size and Construction
- Finished size (one panel): 44 in x 86 in (111.8 cm x 218.4 cm)
- Skill level: Experienced
- Terminology: US crochet terms
- Yarn weight: Fingering (#1 super fine) mercerized cotton
- Hook: 2.5 mm
- Number of pieces: 98 rose blocks and 196 leaves per panel (196 blocks and 392 leaves for the pair)
- Layout: 7 blocks wide x 14 blocks long
- Block size: 6 in x 6 in (15.2 cm x 15.2 cm)
- Size before border: 42 in x 84 in (106.7 cm x 213.4 cm)
- Border depth: 1 in (2.5 cm) on every side
Materials
Yarn: Use a smooth, mercerized fingering-weight cotton (about 170 m per 50 g). Mercerized cotton holds the raised petals well and keeps the ball nodes crisp. Avoid fuzzy or very stretchy yarns, because they blur the lace.
- Ivory (one panel): 1,450 g / 4,930 m (29 balls of 50 g)
- Ivory (pair of panels): 2,900 g / 9,860 m (58 balls of 50 g)
Each block uses about 10 g of yarn and each leaf about 1.5 g. These quantities include a margin of roughly 8% for swatching, ripping back and the border. Buy all your yarn from the same dye lot.
Tools:
– 2.5 mm crochet hook
– Tapestry needle
– Stitch markers
– Rust-proof pins and blocking mats, or a clean sheet over carpet
– Spray bottle
– Measuring tape
– Clip curtain rings for hanging
Abbreviations (US Terms)
- ch – chain
- sl st – slip stitch
- sc – single crochet
- hdc – half double crochet
- dc – double crochet
- BLO – back loop only
- sp – space
- st(s) – stitch(es)
- MR – magic ring
Special stitches:
- Bobble: [Yarn over, insert hook in the stitch, yarn over, pull up a loop, yarn over, pull through 2 loops] 4 times in the same stitch, then yarn over and pull through all 5 loops.
- BN (ball node): Ch 3, then [yarn over, insert hook in the 3rd ch from hook, yarn over, pull up a loop, yarn over, pull through 2 loops] 3 times. Yarn over, pull through all 4 loops, then ch 1 to lock it.
- ML (mesh loop): Ch 3, BN, ch 3.
Gauge and Checkpoints
Gauge: 24 sc = 4 in (10.2 cm). The border uses this same 6 sc per inch.
Make one complete test block before anything else. Check it at each of these stages:
- After Round 8 (rose): 3 in (7.6 cm) across
- After Round 9: 4 in (10.2 cm) across
- After Round 10: 4.75 in (12.1 cm) across
- After Round 11: 5.5 in (14.0 cm) across
- After Round 12: 6 in x 6 in (15.2 cm x 15.2 cm) when lightly blocked
- Leaf: about 2.75 in (7.0 cm) long and 1.5 in (3.8 cm) wide, not counting the stem
If your block is too big, go down to a 2.25 mm hook. If it is too small, go up to a 2.75 mm hook. Even a 0.25 in (0.6 cm) error per block adds up to 1.75 in (4.4 cm) across the width and 3.5 in (8.9 cm) down the length, so get the test block right first.
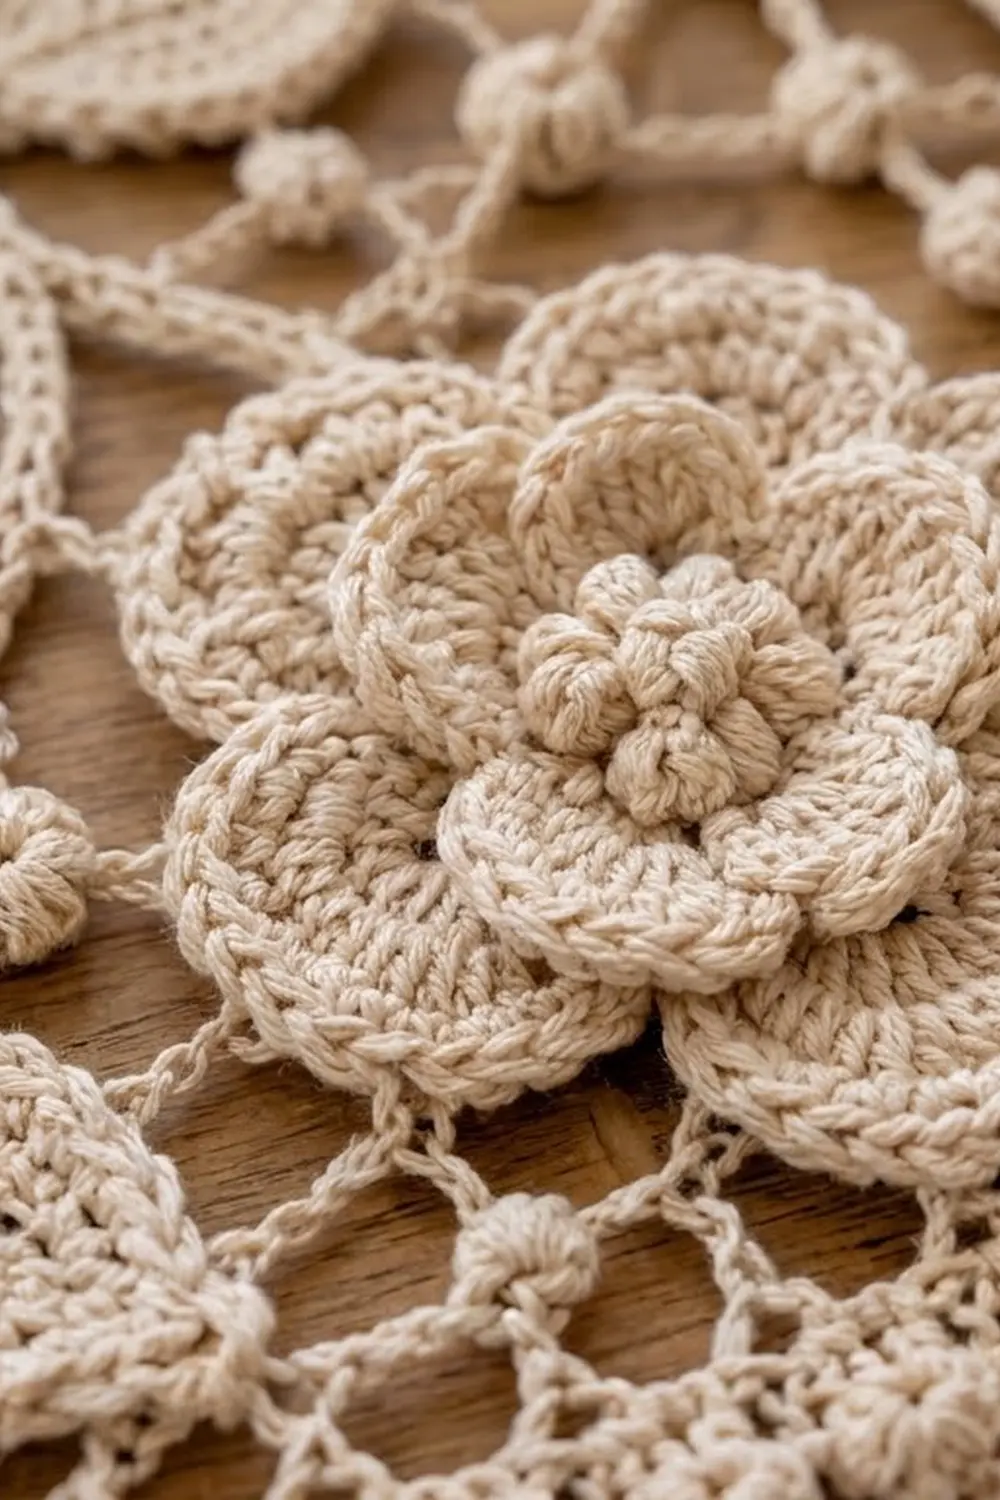
Rose Block
The Rose
Round 1: Make a MR. Ch 1, then work 12 sc in the ring. Join with a sl st to the first sc. (12 sc)
Round 2 (bobble center): Turn so the wrong side faces you. Ch 1, then [sc in the next st, Bobble in the next st] 6 times. Join. (6 sc, 6 bobbles) Bobbles pop away from you, so working this round from the wrong side pushes them onto the right side. Turn back so the right side faces you.
Round 3: Ch 1, then [sc in the next sc, ch 3, skip the bobble] 6 times. Join. (6 ch-3 sps)
Round 4 (petal tier 1): In each ch-3 sp work (sc, hdc, 3 dc, hdc, sc). Join. (6 petals, 42 sts)
Round 5: Working behind the petals, [sc around the post of the next Round 3 sc, ch 5] 6 times. Join. (6 ch-5 sps)
Round 6 (petal tier 2): In each ch-5 sp work (sc, hdc, 5 dc, hdc, sc). Join. (6 petals, 54 sts)
Round 7: Working behind the petals, [sc around the post of the next Round 5 sc, ch 7] 6 times. Join. (6 ch-7 sps)
Round 8 (petal tier 3): In each ch-7 sp work (sc, hdc, 7 dc, hdc, sc). Join. (6 petals, 66 sts)
This gives three stacked tiers of petals, each larger than the one before, around a raised bobble center.
Squaring the Mesh
Round 9: Sl st along to the center dc of any petal (the 6th st of that petal). Ch 1 and sc in the same st. Then work: ML, sc in the gap between this petal and the next, ML. *Sc in the center dc of the next petal, ML, sc in the gap between petals, ML. Repeat from * 4 more times. Join to the first sc. (12 ML)
The 1st, 4th, 7th and 10th loops are the corner loops, so each side has 1 corner loop and 2 side loops. Place a marker in each corner loop.
Round 10: Sl st to the center of the first corner loop. Ch 1, then (sc, ML, sc) in the corner loop. *[ML, sc in the next loop] 2 times, ML, then (sc, ML, sc) in the next corner loop. Repeat from * 2 more times. Then [ML, sc in the next loop] 2 times, ML, and join. (16 ML: 4 corner loops + 3 side loops per side)
From this round on, the first loop of every round is a corner loop.
Round 11: Sl st to the center of the first corner loop. Ch 1, then (sc, ML, sc) in the corner loop. *[ML, sc in the next loop] 3 times, ML, then (sc, ML, sc) in the next corner loop. Repeat from * 2 more times. Then [ML, sc in the next loop] 3 times, ML, and join. (20 ML: 4 corner loops + 4 side loops per side)
Round 12 (edge, conversion round): Sl st to the center of the first corner loop. Ch 1, then (2 sc, ch 2, 2 sc) in the corner loop, placing the ch-2 at the ball. *In each of the next 4 side loops, work 4 sc before the ball and 4 sc after it (8 sc per loop), then (2 sc, ch 2, 2 sc) in the corner loop. Repeat from * 2 more times. Work 8 sc in each of the last 4 side loops and join.
Stitch count: Each side has (4 loops x 8 sc) + (2 + 2 corner sc) = 36 sc between the corner ch-2 sps. The whole round has 144 sc and 4 ch-2 sps. Fasten off.
Leaves (make 2 per block)
Foundation: Ch 13.
Row 1: Sc in the 2nd ch from hook and in the next 10 ch (11 sc). Work 3 sc in the last ch for the tip. Working along the other side of the chain, sc in the next 10 ch and leave the last ch unworked. (24 sc)
Rows 2–5: Ch 1 and turn. Working in BLO, sc in the next 11 sts, 3 sc in the center st of the tip, then sc in the next 10 sts, leaving the remaining sts unworked. (24 sc in each row)
Working in back loops makes the ridged veins. Leaving stitches unworked at the end of each row shapes the oval and the point.
Stem: Ch 7, then sl st in the 2nd ch from hook and in the next 5 ch. Fasten off and leave a 12 in (30.5 cm) tail for sewing.
Attach: Sew the two leaves flat onto the mesh with their stems tucked under the outer petals. Point them along one diagonal, toward opposite corners. On a Type A block, point them to the top-left and bottom-right corners. On a Type B block, point them to the top-right and bottom-left corners.
Make All Pieces
Per panel, make:
- Ivory rose blocks: 98 (49 Type A, 49 Type B)
- Ivory leaves: 196
For a pair, double these numbers. Lightly block each finished block to 6 in (15.2 cm) square before joining.
Layout grid (7 wide x 14 long):
Row 1:  A B A B A B A
Row 2:  B A B A B A B
Row 3:  A B A B A B A
Row 4:  B A B A B A B
Row 5:  A B A B A B A
Row 6:  B A B A B A B
Row 7:  A B A B A B A
Row 8:  B A B A B A B
Row 9:  A B A B A B A
Row 10: B A B A B A B
Row 11: A B A B A B A
Row 12: B A B A B A B
Row 13: A B A B A B A
Row 14: B A B A B A B
The checkerboard pattern lines the leaves up into a zigzag vine that runs down the panel.
Joining
Method: Slip-stitch join through the back loops.
- Hold two blocks with right sides together and their edges matched.
- Sl st through both corner ch-2 sps.
- Work 1 sl st through the back loop of each pair of matching sc, for 36 sl sts per edge.
- Finish with a sl st through both of the next corner ch-2 sps.
Each edge has exactly 36 stitches facing 36 stitches, so the blocks line up without easing.
Join each horizontal row of 7 blocks first, then join the rows to each other the same way. Where four corners meet, sl st through all of the corner spaces together.
Tension: Keep your slip stitches as loose as your sc, and pull up a slightly taller loop if needed. Tight joins pucker the lace and shrink the panel.
Checkpoint: A row of 7 joined blocks should measure 42 in (106.7 cm). The joined panel should measure 42 in x 84 in (106.7 cm x 213.4 cm).
Border
Border gauge: 6 sc per inch, the same as the block edges.
Round 1: Join the yarn in any outer corner ch-2 sp. Ch 1 and work (sc, ch 2, sc) in each outer corner sp. Work 1 sc in each block-edge sc. Do not work any stitches into the seam junctions.
- Short sides: (7 x 36) + 2 corner sc = 254 sc
- Long sides: (14 x 36) + 2 corner sc = 506 sc
Round 2: Sl st into the corner sp. Ch 1 and work (sc, ch 3, sc) in each corner sp. Along each side, [ch 3, skip 1 st, sc in the next st] across.
- Short sides: 254 ÷ 2 = 127 repeats, plus 1 loop into the corner = 128 ch-3 loops
- Long sides: 506 ÷ 2 = 253 repeats, plus 1 = 254 ch-3 loops
- Add 4 corner loops for a total of 768 loops.
Round 3 (ball edge): In every loop, including the corner loops, work (sc, BN, sc).
- Short sides: 256 sc and 128 BN
- Long sides: 508 sc and 254 BN
Fasten off and weave in the ends.
Why the math works: At 6 sc per inch, 252 sc covers 42 in (106.7 cm) and 504 sc covers 84 in (213.4 cm). Each side’s count is (blocks x 36) plus exactly 2 corner sc, and nothing is added at the seams. Both side counts are even, so the skip-1 mesh in Round 2 ends exactly at each corner. The three rounds add 1 in (2.5 cm) per side, which brings the panel to 44 in x 86 in (111.8 cm x 218.4 cm).
Final Blocking
- Soak the panel in cool water for 15 minutes, then gently press out the water without wringing.
- Roll it in towels to remove more moisture.
- Lay it flat on mats or a sheet and pin the corners to 44 in x 86 in (111.8 cm x 218.4 cm).
- Pin along each edge every 2 in (5.1 cm), keeping the edges straight.
- Open up each mesh loop and pinch the petals upward so the roses stay raised.
- Let it dry completely, which takes 24–48 hours.
Final Quality-Control Checklist
- Every block is 6 in (15.2 cm) square, with 36 sc per side.
- All roses have 3 tiers of petals and a raised bobble center.
- The leaves alternate between Type A and Type B in a checkerboard.
- Joins lie flat, with no puckering at the four-way corners.
- The border counts are 254/506 sc in Round 1 and 128/254 loops in Round 2.
- The finished panel measures 44 in x 86 in (111.8 cm x 218.4 cm).
- All ends are woven in securely.
Troubleshooting
- Bobbles sink to the back: Work Round 2 with the wrong side facing you, then push the bobbles through to the front.
- Rose cups or ruffles: Your back-post sc are too tight or your chains are too long. Check the counts of ch 3, ch 5 and ch 7.
- Block won’t square: Recheck the corner markers. Each side needs exactly 4 side loops by Round 11.
- Leaf is lopsided: Make sure every row has 24 sc and that the 3 sc always go in the center tip stitch.
- Border ripples: Your border is looser than 6 sc per inch, so go down a hook size for the border only.
- Border pulls in: Your border is too tight, so go up a hook size.
Care
Hand-wash in cool water with mild soap and dry flat, re-pinning lightly to keep the shape. Avoid hot dryers. Hang the curtains out of strong, constant sunlight to slow yellowing.
Final Notes
The whole size depends on one measurement chain:
- a 3 in (7.6 cm) rose
- squared to a 6 in (15.2 cm) block with 36 sc per side
- joined 7 x 14 into 42 in x 84 in (106.7 cm x 213.4 cm)
- bordered by 1 in (2.5 cm) per side to finish at 44 in x 86 in (111.8 cm x 218.4 cm)
Check your test block carefully, and every panel will follow. Happy crocheting!