

This snug headband cover and two pointed ears turn plain black headphones into a cozy little fox. The cover wraps all the way around the headband and closes with a seam on the underside, so the top stays smooth and the ears stand up cleanly.
The colors are classic fox: warm rust orange for the cover and the ear frames, cream for the inner ears, and dark chocolate brown for the tips. The fabric is dense single crochet. It looks neat, wears well, and grips the band without slipping.
This pattern uses US crochet terms. The finished cover measures about 4 in (10.2 cm) wide by 11.5 in (29.2 cm) long before it is wrapped. Each ear measures 3.25 in (8.3 cm) wide by 2.8 in (7.1 cm) tall.
Construction is simple. You crochet one flat rectangle in rows, add a one-round border, wrap it around the headband, and whipstitch the long edges together underneath. The two ears are worked flat in rows with small blocks of color, then sewn to the top of the cover.
Finished Size and Construction
- Finished size: cover 4 in x 11.5 in (10.2 cm x 29.2 cm) flat; ears 3.25 in x 2.8 in (8.3 cm x 7.1 cm)
- Skill level: Easy (advanced beginner; simple color blocking)
- Terminology: US
- Yarn weight: worsted (#4)
- Hook: 4.5 mm (US 7)
- Number of pieces: 3 (1 band cover, 2 ears)
- Layout: ears sewn along the top center line of the cover, 2.6 in (6.6 cm) apart
- Piece size: cover body 3.5 in x 11 in (8.9 cm x 27.9 cm)
- Size before border: 3.5 in x 11 in (8.9 cm x 27.9 cm)
- Border depth: 1 round, about 0.2–0.25 in (0.5–0.6 cm)
The cover fits a headband with a circumference of about 3.25–3.75 in (8.3–9.5 cm) and an outer arc of about 11–12 in (27.9–30.5 cm). Measure your headband before you start.
Materials
Choose a smooth worsted acrylic or cotton blend. Smooth yarn shows the single crochet texture clearly and resists pilling where the band touches your hair.
- Rust orange: 30 g (about 55 m), for the cover, border, ear frames and seaming
- Cream: 5 g (about 9 m), for the inner ears
- Dark brown: 3 g (about 5 m), for the ear tips
These quantities include a comfortable margin for a gauge swatch and sewing tails.
Tools:
– 4.5 mm (US 7) crochet hook
– Tapestry needle
– Scissors
– Stitch markers
– Locking pins
– Measuring tape
– Steam iron or garment steamer, and a towel
Abbreviations (US Terms)
- ch: chain
- sc: single crochet
- sc2tog: single crochet 2 together (decrease)
- sc3tog: single crochet 3 together (decrease)
- st(s): stitch(es)
- rep: repeat
- R / C / B: rust / cream / dark brown
Color change (special technique): Work the last stitch in the old color until 2 loops remain on the hook. Yarn over with the new color and pull through. On the ears, use a separate small ball of rust for each side frame, and never carry yarn across the back. At each change, twist the old and new yarns once on the wrong side to prevent holes.
sc2tog over row ends: Insert the hook in the next row end and pull up a loop. Insert the hook in the following row end and pull up a loop. Yarn over and pull through all 3 loops.
Gauge and Checkpoints
Gauge: 16 sc and 20 rows = 4 in (10.2 cm) in single crochet rows. That is 4 sts and 5 rows per 1 in (2.5 cm).
Make one ear first. It is small and quickly shows whether your tension is right.
- Ear Row 1: 13 sts should measure 3.25 in (8.3 cm).
- Finished ear: 14 rows should measure 2.8 in (7.1 cm) tall.
- Cover Row 1: 14 sts should measure 3.5 in (8.9 cm).
- Cover Row 10: the piece should measure 2 in (5.1 cm) long.
- Cover Row 25: 5 in (12.7 cm) long.
- Cover Row 55: 11 in (27.9 cm) long.
If your pieces are too big, use a hook 0.5 mm smaller. If they are too small, use a hook 0.5 mm larger. Keep the fabric firm, because a loose cover will twist on the band.
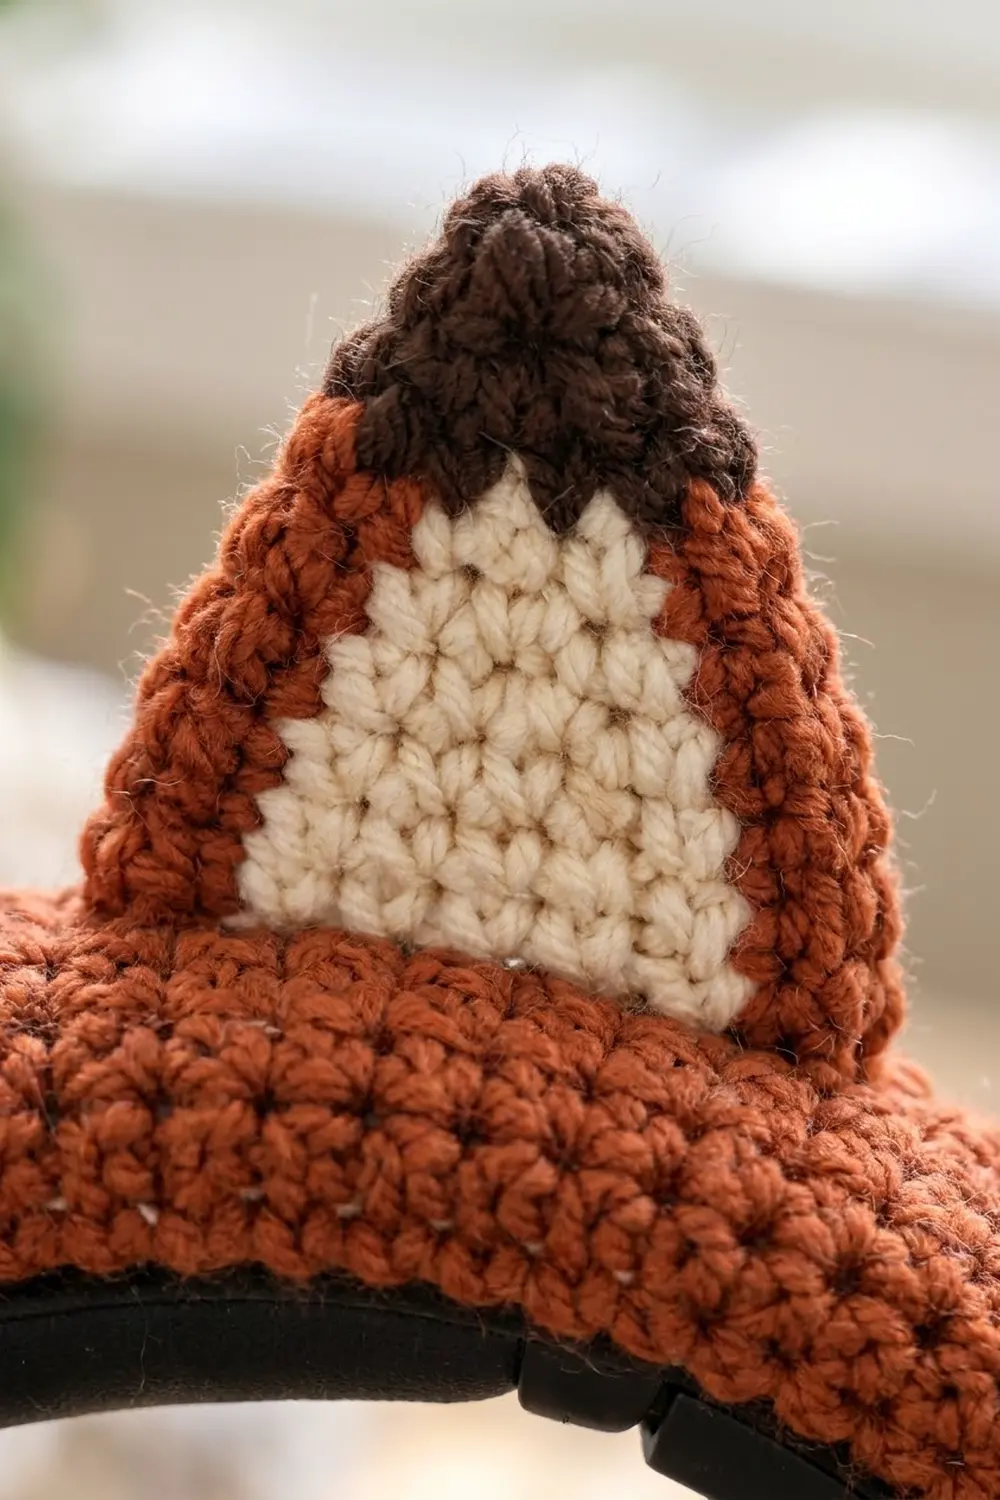
Ear (Make 2)
For each ear, wind 2 small balls of rust (about 1.5 m each) and 1 small ball of cream. The ear is worked from the bottom up in rows. The right side faces you on odd rows.
Foundation: With R, ch 14.
Row 1 (R): Sc in 2nd ch from hook and in each ch across, turn. (13 sts)
Row 2: Ch 1. With R, sc in first 2 sts; with C, sc in next 9 sts; with second ball of R, sc in last 2 sts, turn. (13 sts: 2R, 9C, 2R)
Row 3: Ch 1. 2R, 9C, 2R, turn. (13 sts)
Row 4 (decrease): Ch 1. With R, sc2tog, sc in next st; with C, sc in next 7 sts; with R, sc in next st, sc2tog, turn. (11 sts: 2R, 7C, 2R)
Rows 5–6: Ch 1. 2R, 7C, 2R, turn. (11 sts)
Row 7 (decrease): Ch 1. With R, sc2tog, sc in next st; with C, sc in next 5 sts; with R, sc in next st, sc2tog, turn. (9 sts: 2R, 5C, 2R)
Row 8: Ch 1. 2R, 5C, 2R, turn. (9 sts)
Row 9 (decrease): Ch 1. With R, sc2tog, sc in next st; with C, sc in next 3 sts; with R, sc in next st, sc2tog, turn. (7 sts: 2R, 3C, 2R)
Row 10: Ch 1. 2R, 3C, 2R, changing to B in the last st. Fasten off C and both R balls, leaving 6 in (15.2 cm) tails. Turn. (7 sts)
Row 11 (B, decrease): Ch 1, sc2tog, sc in next 3 sts, sc2tog, turn. (5 sts)
Row 12 (B): Ch 1, sc in each st across, turn. (5 sts)
Row 13 (B, decrease): Ch 1, sc2tog, sc in next st, sc2tog, turn. (3 sts)
Row 14 (B): Ch 1, sc3tog. (1 st) Fasten off and weave in.
The result is a cream triangle framed by 2 rust stitches on each side, with a full rust bottom row and a 4-row brown tip 0.8 in (2.0 cm) deep. Leave the beginning rust tail long, about 12 in (30.5 cm), for sewing the ear to the cover.
Checkpoint: 3.25 in (8.3 cm) wide at the base and 2.8 in (7.1 cm) tall.
Band Cover
The cover is a rectangle worked in rows across its narrow width. Once the cover is wrapped, each row goes once around the headband.
Foundation: With R, ch 15.
Row 1: Sc in 2nd ch from hook and in each ch across, turn. (14 sts)
Rows 2–55: Ch 1, sc in each st across, turn. (14 sts)
Do not fasten off. Go straight on to the border.
Checkpoint: 3.5 in (8.9 cm) wide and 11 in (27.9 cm) long.
Adjusting length: Every 5 rows add or remove 1 in (2.5 cm). Keep the total row count a multiple of 5 so the border math below still works. The cover body should be about 0.5 in (1.3 cm) shorter than the outer arc of your headband, because the border and the stretch of the fabric make up the difference.
Make All Pieces
- Band cover: 1 piece in rust (about 46 m)
- Ears: 2 pieces, each using rust (about 3 m), cream (about 2 m) and dark brown (about 1 m)
Layout along the top center line of the cover (55 rows):
Rows:  1-5    6-21     22-34     35-50    51-55
      [ end ][ EAR 1 ][  gap   ][ EAR 2 ][ end ]
       1 in   3.2 in   2.6 in    3.2 in   1 in
That leaves 1 in (2.5 cm) of plain band at each end, 3.2 in (8.1 cm) for each ear base, and 2.6 in (6.6 cm) between the ears. The ears are symmetrical around Row 28, the center row.
Border
The border is one round of sc around the cover. It firms up the edges for seaming and squares off the short ends.
Border gauge: 4 sc per 1 in (2.5 cm) along every edge, matching the stitch gauge. Along the long sides, 5 row ends equal 1 in (2.5 cm), so you work 4 stitches into every 5 row ends.
Border Round: Ch 1, do not turn.
- Short side 1 (top of Row 55): 3 sc in first st (corner), sc in next 12 sts, 3 sc in last st (corner). (18 sts)
- Long side 1: Working in row ends, *sc in next 3 row ends, sc2tog over next 2 row ends; rep from * 10 more times. (44 sts)
- Short side 2 (foundation chain): 3 sc in first ch (corner), sc in next 12 ch, 3 sc in last ch (corner). (18 sts)
- Long side 2: Rep long side 1. (44 sts)
Join with a sl st to the first sc. Fasten off, leaving a 30 in (76.2 cm) rust tail for seaming. Total: 124 sts.
Counting per side: The center stitch of each 3-sc group is the corner stitch. Counting from corner stitch to corner stitch, both included, each short side has 16 sts (1 + 1 + 12 + 1 + 1) and each long side has 48 sts (1 + 1 + 44 + 1 + 1). Each of the 4 corners is shared by two sides, so 2 x 16 + 2 x 48 – 4 = 124.
Why the math works: The 55 rows make 11 groups of 5 row ends, and each group becomes 4 sts. So 11 x 4 = 44 sts cover 11 in (27.9 cm) at exactly 4 sts per 1 in (2.5 cm). The short sides keep all 14 sts and add 2 extra sts at each corner, so the corners lie flat without cupping.
Checkpoint: 4 in x 11.5 in (10.2 cm x 29.2 cm).
Joining
Wrap and seam the cover
- Lay the cover wrong side up. Center the headband on it lengthwise, with the inner (head) side of the band facing up.
- Fold both long sides up around the band so the long edges meet along the center of the inner curve.
- Pin the two corners at one end together, then the two corners at the other end, then pin the middle.
- With the rust tail, whipstitch through the outer loops of the border, matching stitch to stitch. Each long side has 48 sts from corner to corner, so the stitches pair up exactly 1 to 1.
- Leave the short ends open. They sit near the hinges and keep the band adjustable.
Tension advice: Pull each stitch just snug enough to close the gap. If you pull too tight, the seam puckers and the cover twists toward the inside of the band.
Sew on the ears
- Find the top center line, opposite the seam. It runs between the 7th and 8th sts of each row.
- Along that line, mark Rows 6 and 21, and Rows 35 and 50.
- Pin Ear 1 with its base between the Row 6 and Row 21 markers, right side facing forward. Pin Ear 2 between Rows 35 and 50.
- Using the long ear tail, whipstitch the 13 base sts of Row 1 to the cover, spreading them evenly over the 16 rows. Sew through the cover fabric only, never around the headband.
- Sew a second pass along the back of each ear base for strength so the ears stand upright.
Size checkpoint: Each ear base should span 3.2 in (8.1 cm), with 2.6 in (6.6 cm) between the ears and 1 in (2.5 cm) of plain band at each end.
Final Blocking
- Block the ears before sewing them on. Pin each ear flat to 3.25 in x 2.8 in (8.3 cm x 7.1 cm), right side up, with the tip pinned to a sharp point.
- Hold the steam just above each ear for a few seconds without touching the yarn. Let it dry completely.
- After assembly, put the headphones on a stand.
- Steam lightly just above the cover to relax the seam and settle the stitches around the curve.
- Straighten each ear with your fingers and pinch the tip into a clean point. Let everything cool and dry before wearing.
Final Quality-Control Checklist
- The cover body has 55 rows of 14 sts each.
- The border has 124 sts: 18 on each short side and 44 on each long side.
- The seam sits centered on the underside of the band.
- Each ear has 13 sts at the base and 1 st at the tip.
- The cream area is centered, with 2 rust sts on each side.
- The brown tip is 4 rows deep on both ears.
- The ears are symmetrical around Row 28 and stand upright.
- All tails are woven in securely.
Troubleshooting
Holes at color changes: Twist the yarns on the wrong side at each change, and pull the new color snug on its first stitch.
Ears curl or lean: Block them again and add a second line of sewing along the back of the base.
Cover twists on the band: Either the fabric is too loose or the seam is too tight. Use a smaller hook, or resew the seam with gentler tension.
Cover too short to reach the hinges: Add 5 rows (1 in / 2.5 cm) and redo the border with 4 sts per 5 row ends.
Border ripples on the long sides: Check that you worked a sc2tog in every group of 5 row ends.
Cover too tight to wrap: Add 2 chains to the foundation for 0.5 in (1.3 cm) more width.
Care
Remove the cover from the headphones before washing. Hand wash in cool water with mild soap, press out the water in a towel, and dry flat.
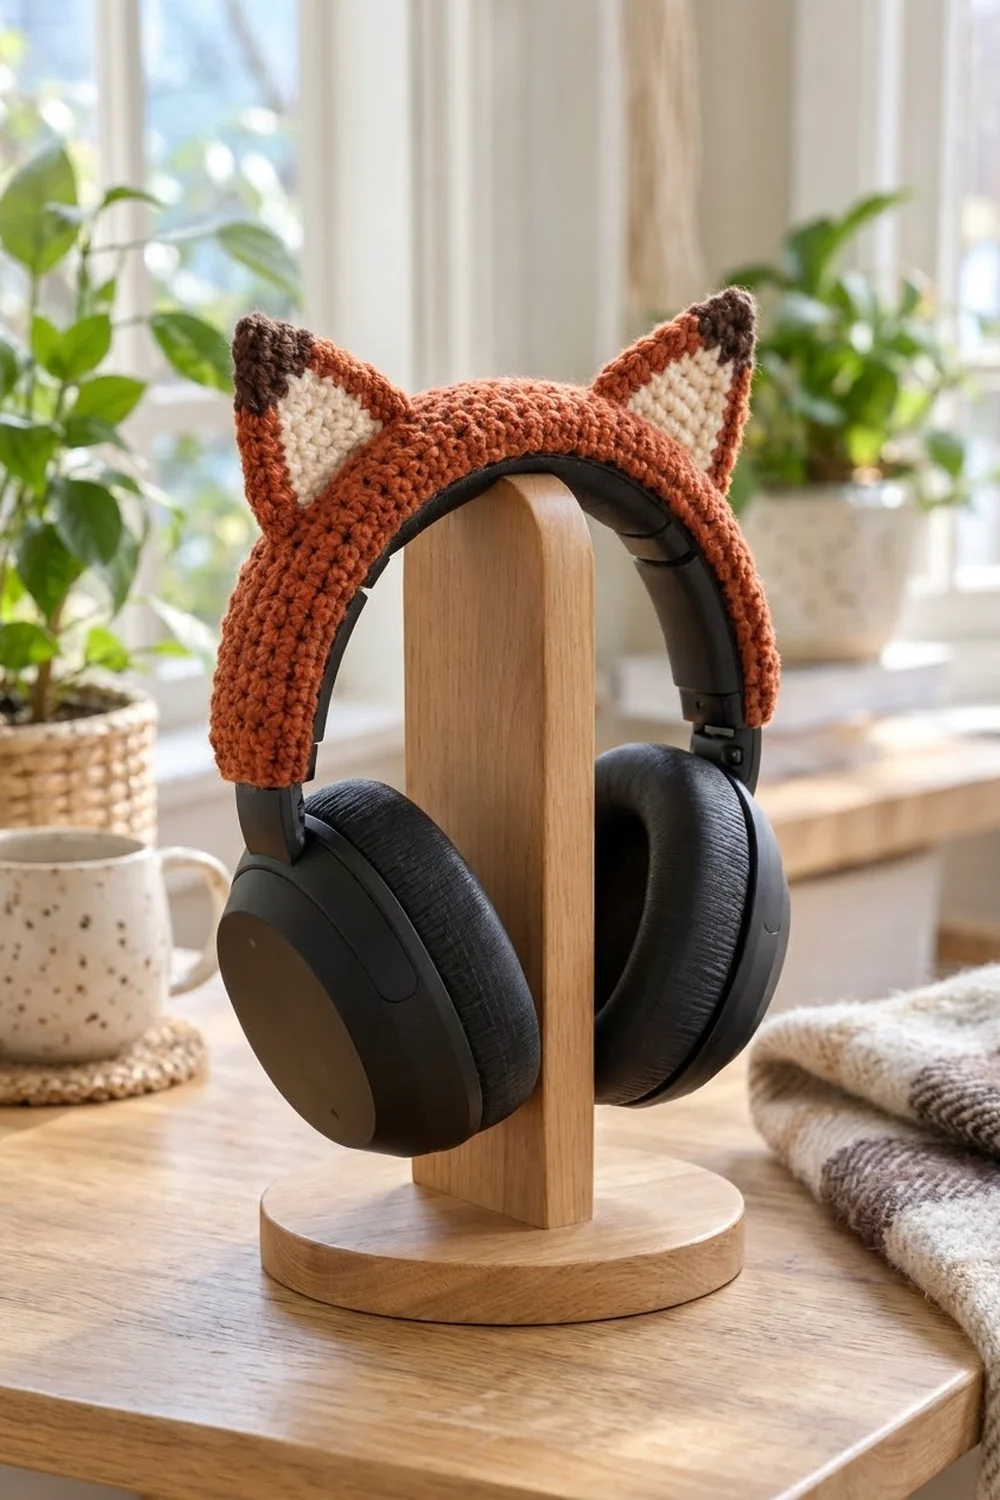
Final Notes
The measurement chain is short and reliable. A gauge of 16 sc and 20 rows to 4 in (10.2 cm) gives an ear 3.25 in x 2.8 in (8.3 cm x 7.1 cm) and a cover body 3.5 in x 11 in (8.9 cm x 27.9 cm). One border round brings the cover to 4 in x 11.5 in (10.2 cm x 29.2 cm), and the 48-stitch long sides seam together stitch for stitch around your headband. Check your gauge on the first ear, measure at each checkpoint, and your fox will fit neatly.
Happy crocheting!