

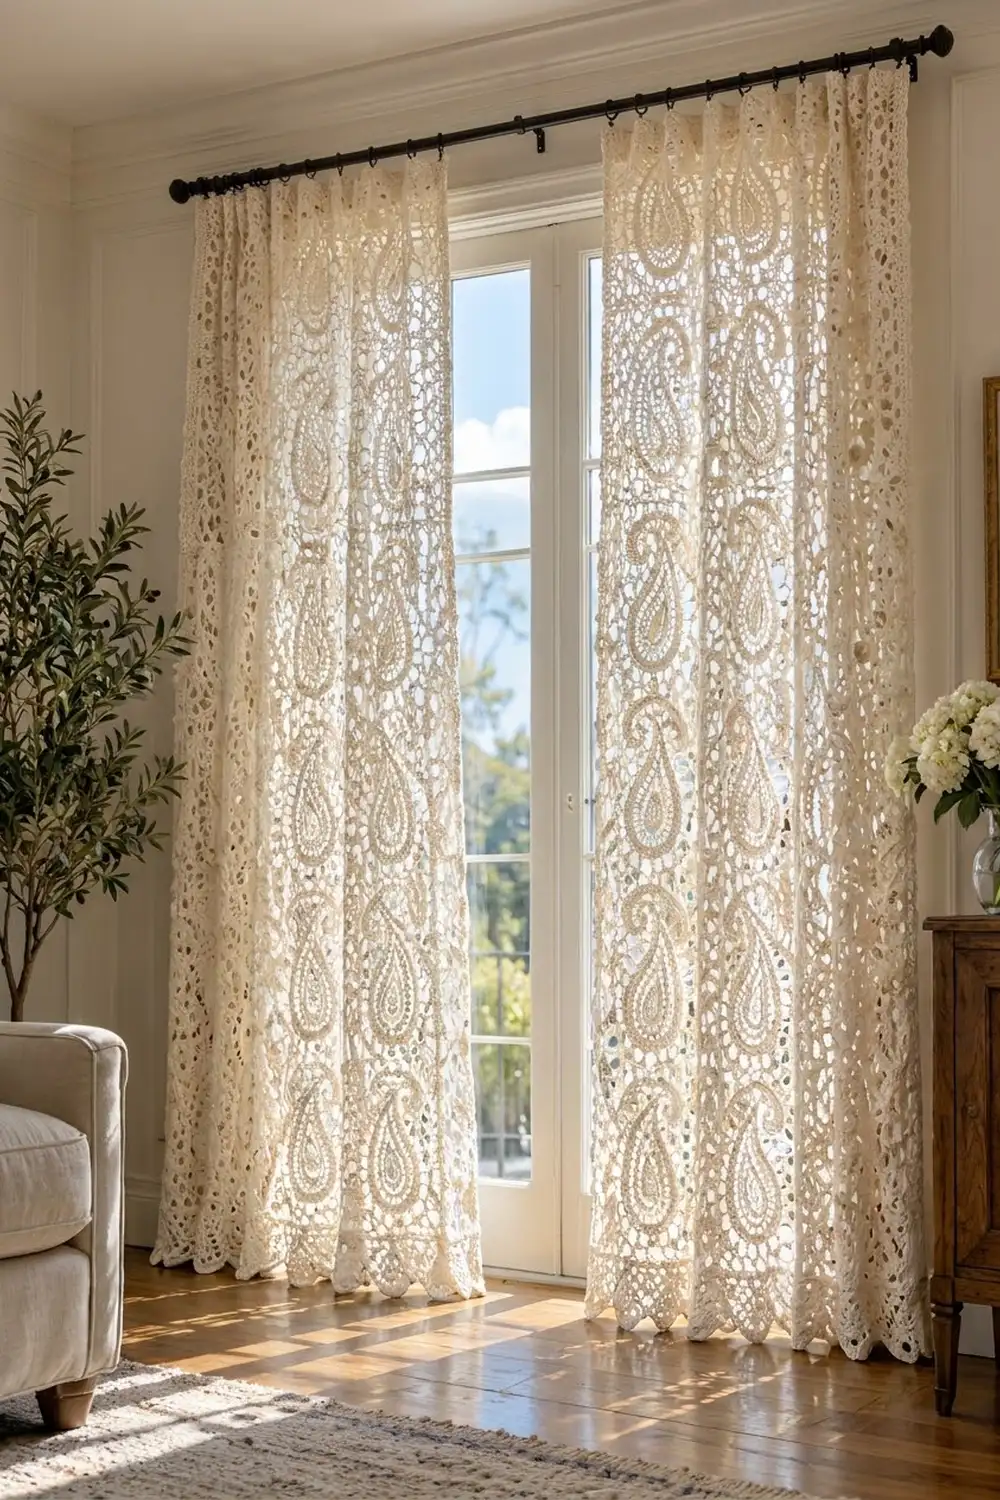
These ivory lace curtains are made from large paisley motifs, each one framed in airy mesh, so daylight comes through and leaves soft paisley shadows on the floor. The look is vintage and romantic, but the method is simple and repetitive: you make one block many times, join the blocks, and add a border.
The whole pair is worked in one color, a warm ivory cotton thread. All instructions use US crochet terms.
Each finished panel measures 35.5 in (90.2 cm) wide by 81.25 in (206.4 cm) long. The pattern makes two panels.
Each rectangular block starts with a paisley worked in rounds around a foundation chain. Three framing rounds then turn the curved shape into a 5 x 8 in (12.7 x 20.3 cm) rectangle. You join 70 blocks per panel in a 7 x 10 grid, then add a border: a narrow picot edge on the sides, a plain edge at the top and shell scallops along the bottom.
Finished Size and Construction
- Finished panel size: 35.5 x 81.25 in (90.2 x 206.4 cm)
- Skill level: Intermediate
- Terminology: US crochet terms
- Yarn weight: Size 3 cotton crochet thread (fingering, category 1)
- Hook: 2.75 mm (US C-2)
- Number of pieces: 70 blocks per panel, 140 for the pair
- Layout: 7 blocks across by 10 blocks down, per panel
- Block size: 5 x 8 in (12.7 x 20.3 cm)
- Panel size before border: 35 x 80 in (88.9 x 203.2 cm)
- Border depth: about 0.25 in (0.6 cm) on the top and sides, and 1 in (2.5 cm) at the scalloped bottom
Materials
Use a mercerized cotton thread. It holds crisp stitch definition, blocks well and hangs straight in the sun. Avoid acrylic, which can stretch over time under its own weight on a long curtain.
- Ivory (the only color): 900 g, about 3,060 m, for the pair (450 g, about 1,530 m, per panel)
Tools:
– 2.75 mm (US C-2) crochet hook
– Tapestry needle
– Rust-proof pins and a large blocking surface
– Spray bottle
– Stitch markers
– Measuring tape
– Curtain clip rings or a rod (for hanging)
The quantities include a margin of about 10% for gauge swatches, weaving in ends and small tension differences.
Abbreviations (US Terms)
- ch = chain
- sl st = slip stitch
- sc = single crochet
- hdc = half double crochet
- dc = double crochet
- sk = skip
- sp(s) = space(s)
- st(s) = stitch(es)
- RS = right side
Special stitches
- Petal: (sc, hdc, dc, hdc, sc) in the same loop.
- Picot: ch 3, then sl st into the top of the sc just made.
- Standing dc: start with a slipknot on the hook, yarn over, insert the hook, and complete a dc as usual.
Gauge and Checkpoints
Gauge: 28 sc and 32 rows = 4 in (10.2 cm) in sc, blocked.
Before you start the full project, make one complete block and block it. Check these measurements as you go:
- After Rnd 1: about 3.75 x 1 in (9.5 x 2.5 cm)
- After Rnd 2: about 4.25 x 1.5 in (10.8 x 3.8 cm)
- After Rnd 4: about 5 x 2.5 in (12.7 x 6.4 cm), not counting the tail
- After Rnd 7, blocked: 5 x 8 in (12.7 x 20.3 cm). The short edge has 35 sts and the long edge has 56 sts, both counts including the corner sts.
If the block is too big, go down to a 2.5 mm hook. If it is too small, go up to a 3.0 mm hook. A difference of 0.25 in (0.6 cm) per block adds up to 1.75 in (4.4 cm) across the panel width and 2.5 in (6.4 cm) down its length, so fix the size before making more blocks.
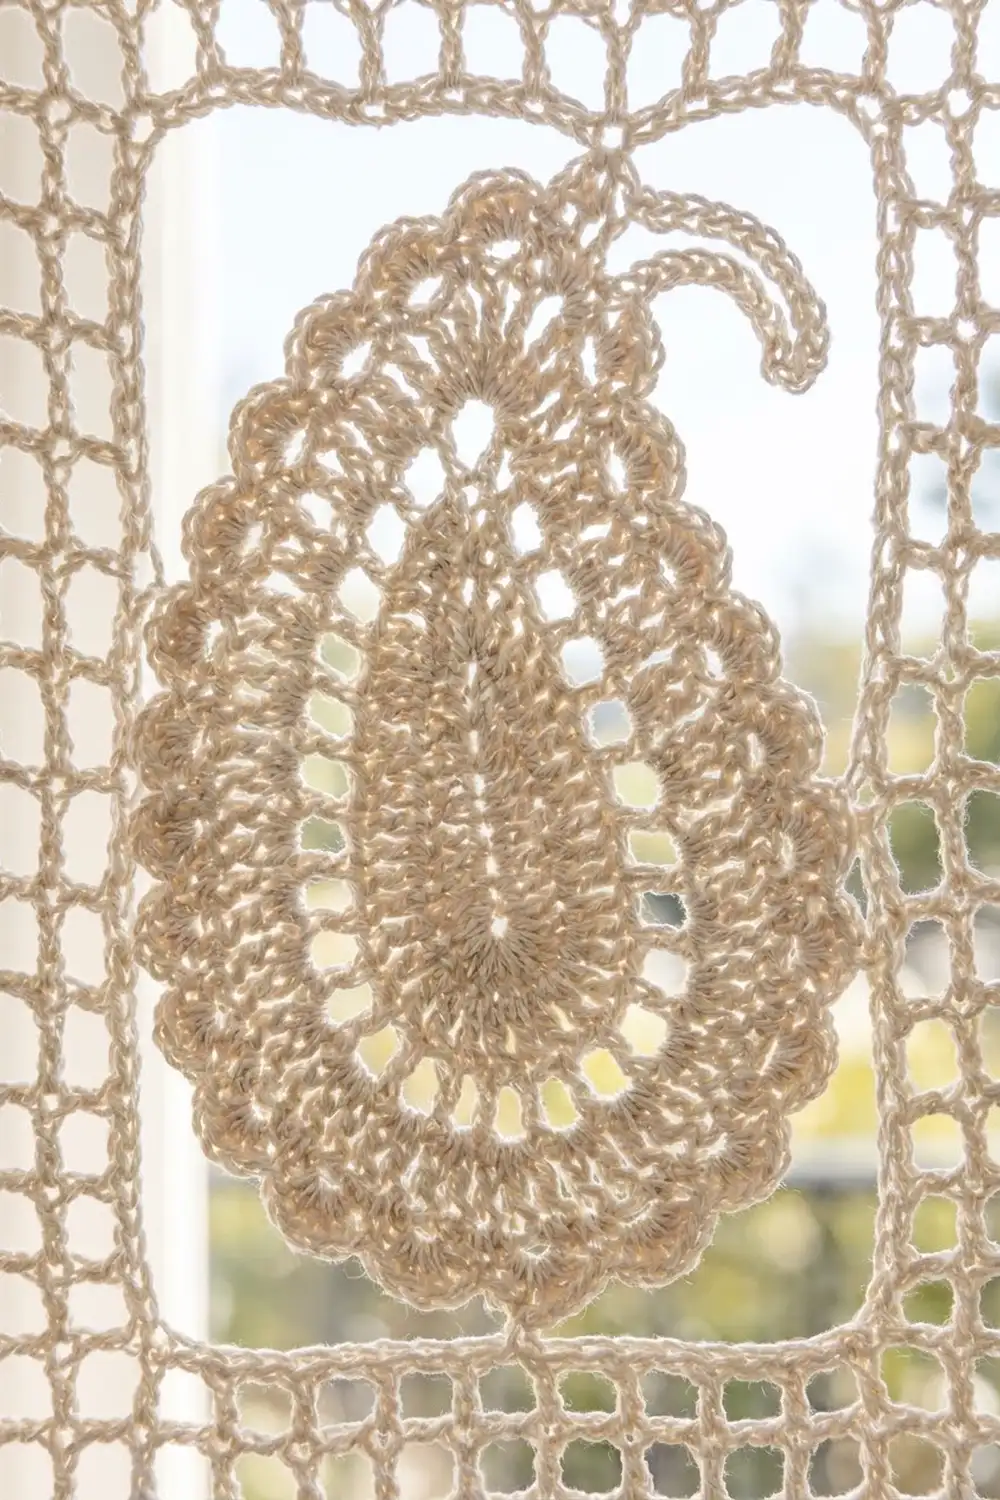
Paisley Block (make 140)
Throughout this section, sides A and B are the two long sides of the paisley.
Foundation: Ch 26.
Rnd 1 (solid core):
1. Sc in the 2nd ch from the hook, hdc in the next 2 ch, dc in the next 21 ch, 9 dc in the last ch.
2. Working along the opposite side of the foundation, dc in the next 21 ch, hdc in the next 2 ch, sc in the last ch.
3. Ch 3 and sl st to the first sc to form the tip sp.
(57 sts: 24 on side A, 9 on the bulb, 24 on side B, plus 1 tip ch-3 sp)
Rnd 2 (eyelets):
1. Sl st into the tip sp. Ch 1 and work (sc, ch 3, sc) in the same sp.
2. Side A: (dc in the next st, ch 1, sk the next st) 12 times.
3. Bulb: (dc, ch 1) in each of the next 9 sts.
4. Side B: (dc in the next st, ch 1, sk the next st) 12 times.
5. Sl st to the first sc.
(33 dc, 33 ch-1 sps, plus the tip ch-3 sp)
The straight sides keep the same length, and the bulb doubles to curve smoothly.
Rnd 3 (loops):
1. Sl st into the tip ch-3 sp. Ch 1 and work (sc, ch 5, sc) in the same sp, then ch 1.
2. Sc in the next ch-1 sp, ch 3. Repeat from * 33 times in total.
3. Sl st to the first sc.
(33 ch-3 loops, plus 1 ch-5 tip loop)
Rnd 4 (scalloped outline and tail):
1. Sl st into the ch-5 tip loop. Ch 1 and work 3 sc in the loop (T1 to T3).
2. Work 1 more sc in the loop (T4). Make the tail from T4: ch 14, then 2 sc in the 2nd ch from the hook and in each of the next 5 ch (12 sc), sc in each of the next 7 ch (7 sc), and sl st in T4. (19 tail sc)
3. Work 3 more sc in the tip loop (T5 to T7). Sk the ch-1.
4. Side A: 3 sc in each of the next 12 loops (36 sc, A1 to A36).
5. Bulb: 1 petal in each of the next 9 loops (45 sts, petals P1 to P9).
6. Side B: 3 sc in each of the next 12 loops (36 sc, B1 to B36).
7. Sl st to the first sc.
(124 sts, plus the 19-sc tail)
Because the tail has 2 sc in each of its first sts, it curls toward side A.
Rnd 5 (frame loops):
1. Join with a sc in A1.
2. Side A: (ch 9, sk 4, sc in the next st) 7 times, ending in A36.
3. Corner C2: ch 15, sc in the center dc of P2.
4. Bottom: (ch 11, sc in the center dc of the next even-numbered petal) 3 times, so the sc go in P4, P6 and P8.
5. Corner C3: ch 15, sc in B1.
6. Side B: (ch 9, sk 4, sc in the next st) 7 times, ending in B36.
7. Corner C4: ch 15, sc in T1.
8. Top: ch 9, sc in the first sc of the tail (its outer end). Ch 9, sc in T7.
9. Corner C1: ch 15, sl st to the first sc.
(23 loops: 7 + 7 side loops, 3 bottom loops, 2 top loops, 4 corner loops)
Rnd 6 (filet mesh): Each corner loop gets this repeat: (dc, ch 2, dc, ch 3, dc, ch 2, dc, ch 2).
- Join with a standing dc in the first side A loop, then ch 2, dc in the same loop, ch 2.
- Work (dc, ch 2, dc, ch 2) in each of the next 6 side A loops.
- Work the corner repeat in C2.
- Bottom:
- first loop: (dc, ch 2) twice
- second loop: (dc, ch 2) 3 times
- third loop: (dc, ch 2) twice
- Work the corner repeat in C3.
- Work (dc, ch 2, dc, ch 2) in each of the 7 side B loops.
- Work the corner repeat in C4.
- Top:
- first loop: (dc, ch 2) 4 times
- second loop: (dc, ch 2) 3 times
- Work the corner repeat in C1 and sl st to the first dc.
(58 dc: 18 on each long side and 11 on each short side, with 17 or 10 ch-2 sps between them, plus 4 ch-3 corners)
Check one long side: 2 dc from C1 + 14 dc from the side loops + 2 dc from C2 = 18. Check one short side: 2 + 7 + 2 = 11.
Rnd 7 (sc frame):
1. Ch 1. Sc in each dc, 2 sc in each ch-2 sp and 3 sc in each ch-3 corner.
2. Sl st to the first sc and fasten off.
(178 sc)
- Long side: 18 + 34 + 2 flanking corner sc + 2 corner centers = 56 sts
- Short side: 11 + 20 + 2 + 2 = 35 sts
- Round total: 2 x 56 + 2 x 35 − 4 shared corners = 178
Block each piece to 5 x 8 in (12.7 x 20.3 cm) before joining. Blocking pulls the corner loops out square.
Make All Pieces
Each panel needs 70 blocks, and the pair needs 140 ivory blocks.
To mirror the paisley curl, use half of the blocks with the RS facing (A) and half turned face-down (B). The lace looks almost the same on both sides.
Layout for one panel (the tip points up on every block):
Row 1:  A B A B A B A
Row 2:  B A B A B A B
Row 3:  A B A B A B A
Row 4:  B A B A B A B
Row 5:  A B A B A B A
Row 6:  B A B A B A B
Row 7:  A B A B A B A
Row 8:  B A B A B A B
Row 9:  A B A B A B A
Row 10: B A B A B A B
Joining
Method: Flat slip-stitch join through the back loops only.
- Columns: Hold two blocks with their short edges together and sl st through the back loops of matching sts, stitch to stitch: 35 sts to 35 sts, corner to corner. Join 10 blocks into a column, which should measure 5 x 80 in (12.7 x 203.2 cm).
- Panel: Join the 7 columns along their long edges. Each seam is 10 x 56 = 560 sts to 560 sts, with the block corners lined up at every horizontal seam.
Tension: Keep the slip stitches as loose as your fabric stitches. Tight joins pucker the seams and shorten the panel. If a seam looks tight, go up 0.25 mm in hook size for joining.
Size checkpoint: 35 x 80 in (88.9 x 203.2 cm).
Border
Border gauge: the same as the block gauge, 7 sc per 1 in (2.5 cm).
Starting counts:
– Top and bottom: 7 blocks x 35 sts = 245 sts
– Sides: 10 blocks x 56 sts = 560 sts
These counts include the 2 panel corners on each side. No extra stitches are added at the seams.
Rnd 1:
1. With the RS facing, join in any st.
2. Ch 1. Sc in each st and 3 sc in each panel corner st.
3. Sl st to the first sc.
Per side, including both new corner centers:
– Top and bottom: 245 + 2 = 247 sts
– Sides: 560 + 2 = 562 sts
Rnd 2:
1. Join at the top-left corner center. Ch 1 and work 3 sc in the corner st.
2. Top: sc in each of the next 245 sts, then 3 sc in the top-right corner.
3. Right side: (sc in the next 4 sts, picot) 140 times, covering 560 sts.
4. Bottom: sc in the bottom-right corner st, then (sk 2, 7 dc in the next st, sk 2, sc in the next st) 41 times. The last sc lands in the bottom-left corner.
5. Left side: (sc in the next 4 sts, picot) 140 times.
6. Sl st to the first sc and fasten off.
Why the math works:
– Bottom: 1 + (6 x 41) = 247, so the scallops start and end exactly on a corner.
– Sides: the 560 sts between the corners divide by 4 exactly (4 x 140).
– Top: stays plain and firm, so it holds clip rings without stretching.
Finished size: width 35 + 0.25 + 0.25 = 35.5 in (90.2 cm). Length 80 + 0.25 + 1 = 81.25 in (206.4 cm).
Final Blocking
- Weave in all ends along the sc frames, never through the open mesh.
- Lay the panel flat on clean towels or blocking mats. Work in sections if your space is smaller than the panel.
- Spray the panel evenly until it is damp, not soaked.
- Pin the top edge straight to 35.5 in (90.2 cm).
- Pin the sides to 81.25 in (206.4 cm), checking every 8 in (20.3 cm) at each block seam.
- Pin each bottom scallop into a rounded point.
- Open the paisley eyelets and corner loops with your fingers.
- Let the panel dry completely before you unpin it. Then block the second panel the same way.
Final Quality-Control Checklist
- Every block measures 5 x 8 in (12.7 x 20.3 cm).
- Every block’s Rnd 7 has 178 sts (35 per short side, 56 per long side).
- The A and B blocks alternate as shown in the grid.
- All seams are flat, with the corners aligned.
- Before the border, the panel measures 35 x 80 in (88.9 x 203.2 cm).
- The bottom has 41 even scallops, and each side has 140 picots.
- After blocking, the panel measures 35.5 x 81.25 in (90.2 x 206.4 cm).
- Both panels are the same length.
Troubleshooting
- The paisley cups or ruffles: Count Rnd 2 again. Each side must have exactly 12 eyelets and the bulb 9.
- The tail doesn’t curl: Make sure you worked 2 sc in each of the first 6 chains.
- The corners won’t square: Your corner loops are too short. Crochet them loosely, or add 1 ch to each corner loop.
- The block is narrow: Your Rnd 6 dc are too tight. Go up a hook size for that round only.
- The seams pucker: Join with a larger hook.
- The scallops don’t end on the corner: Count the bottom again. You need 247 sts after Rnd 1.
- The panels hang at different lengths: Measure and block both panels together, side by side.
Care
Hand wash in cool water with a mild detergent, and roll the panel in towels to remove water. Dry it flat and re-block it lightly. Never hang a wet panel, because it will stretch.
Final Notes
The measurement chain is simple:
– Each block is 35 x 56 sts, which measures 5 x 8 in (12.7 x 20.3 cm).
– A 7 x 10 grid makes a panel 35 x 80 in (88.9 x 203.2 cm).
– The border adds 0.5 in (1.3 cm) to the width and 1.25 in (3.2 cm) to the length, for a finished panel of 35.5 x 81.25 in (90.2 x 206.4 cm).
Check each link in that chain, and the paisleys will line up evenly from top to bottom.
Happy crocheting!