

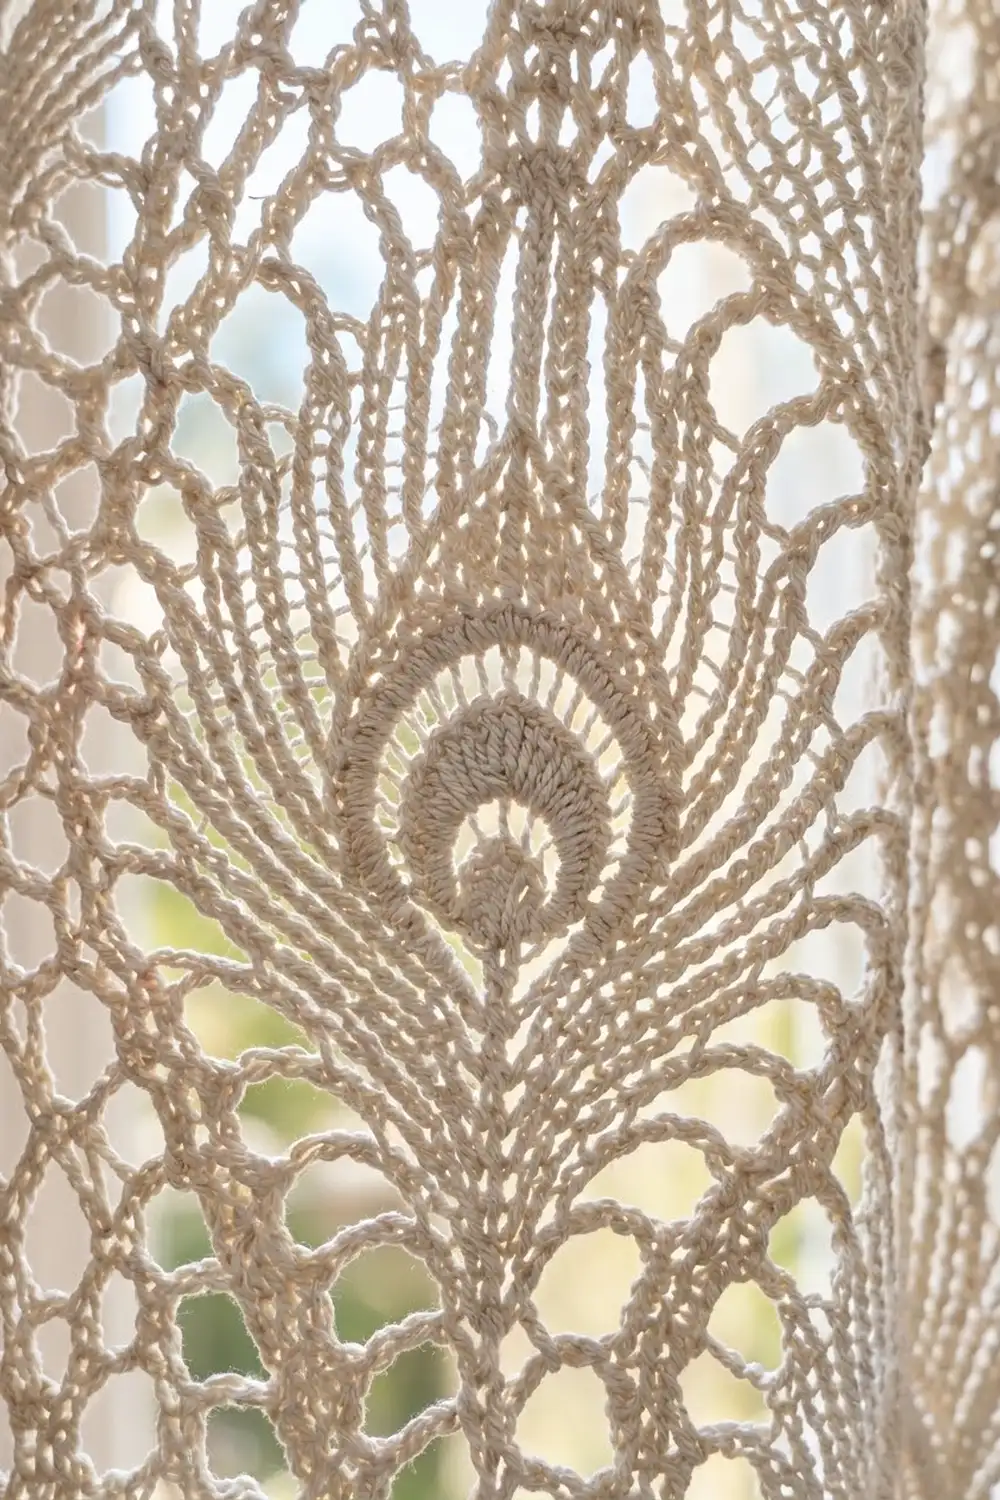
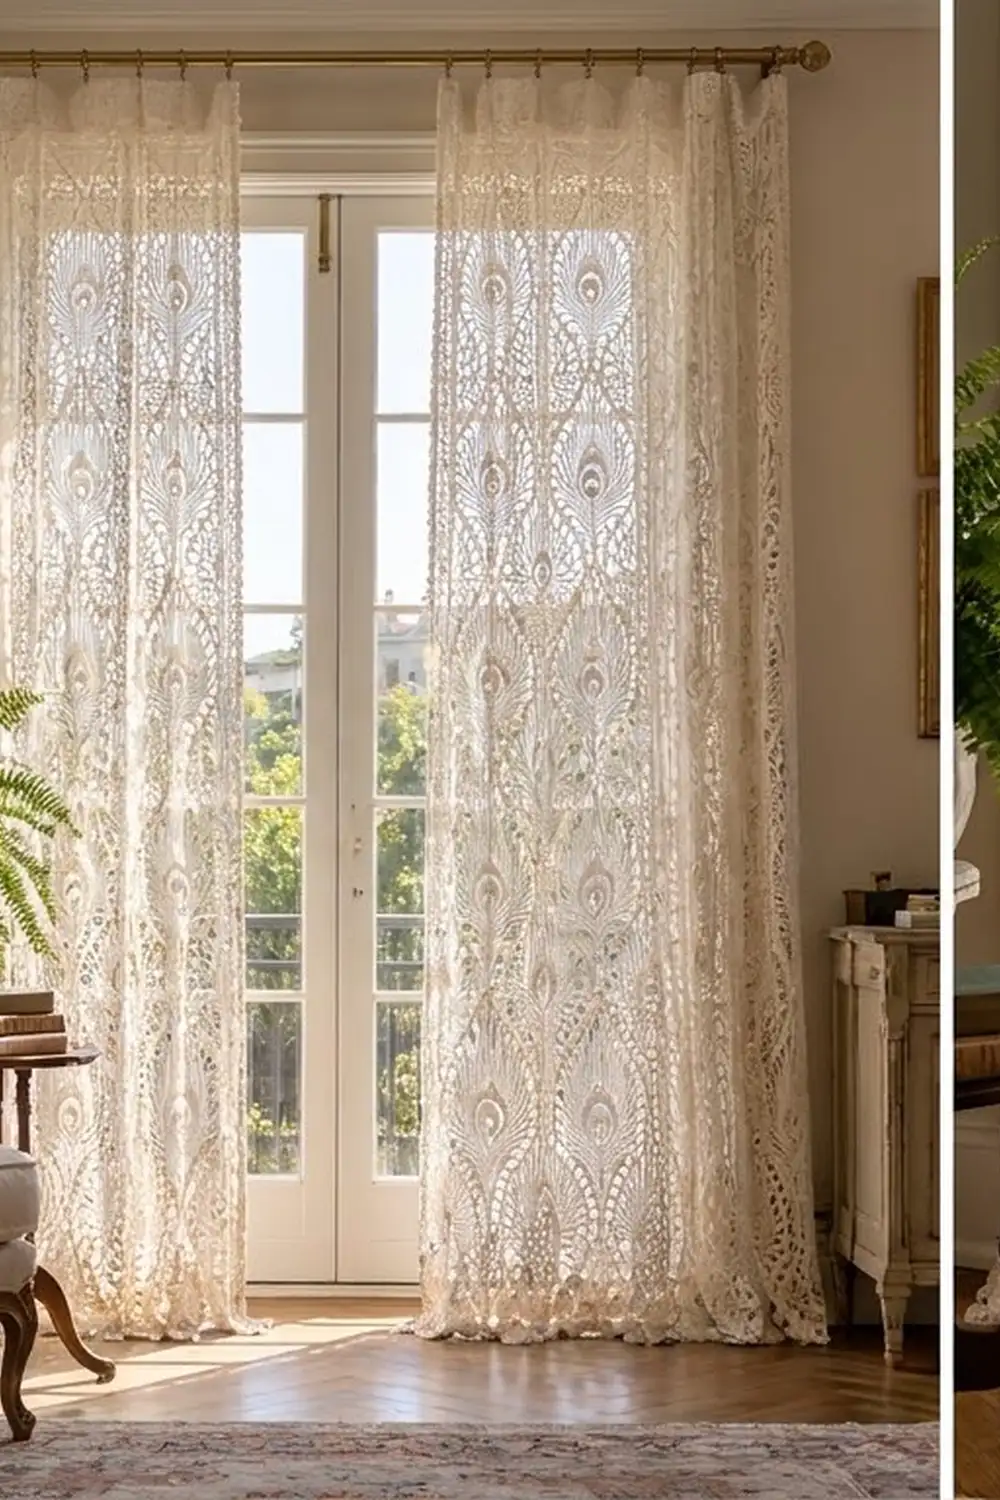
This floor-length lace curtain is made as one continuous piece of ivory cotton lace. Columns of peacock feathers run from the hem to the top. Each feather has a round eye with a raised center, fine rays that spread outward, and a ridged outline. An open chain-loop net fills the space between the feathers.
The look is soft and vintage-inspired. It works best in one light neutral, such as ivory, cream, or white, so the texture and the light coming through the lace do all the work. The lower edge ends in deep scalloped fans with picots. The sides and top stay straight so the panel hangs cleanly.
This pattern uses US crochet terms. One finished panel measures 35.5 in (90.2 cm) wide and 82.25 in (208.9 cm) long after blocking. Make two panels for a pair, as shown.
You work the panel flat in rows from the bottom up. A base row of double crochet sets the width. The feather columns and net are worked in a 24-row repeat, stacked 8 times. A conversion row turns the lace back into solid stitches, followed by a short solid top band. A simple border finishes all four edges, and scallops are added along the hem.
Finished Size and Construction
- Finished size: 35.5 in (90.2 cm) wide x 82.25 in (208.9 cm) long, per panel
- Skill level: Intermediate to experienced
- Terminology: US crochet terms
- Yarn weight: Sport weight (#2) mercerized cotton
- Hook: 3.5 mm (E-4)
- Number of pieces: 1 panel (make 2 for a pair)
- Layout: 4 feather columns across, 8 feather tiers up
- Size before border: 35 in (88.9 cm) x 80 in (203.2 cm)
- One feather tier: 9.6 in (24.4 cm) tall
- Border depth: 0.25 in (0.6 cm) on the sides and top; 2 in (5.1 cm) at the hem
Materials
Choose a smooth, mercerized sport weight cotton. It shows stitch detail clearly, holds its shape when hung, and survives washing. Avoid fuzzy or very stretchy fibers, because a long curtain stretches under its own weight.
- Ivory: 1,200 g (about 3,360 m / 3,675 yd) per panel, based on 50 g balls of about 140 m (153 yd). For a pair, buy 2,400 g (about 6,720 m / 7,349 yd).
Tools:
- 3.5 mm (E-4) crochet hook
- Tapestry needle
- Stitch markers
- Rust-proof pins, blocking mats, and a measuring tape
- Curtain clip rings for hanging
The quantities include a margin of roughly 10%. Buy every ball from the same dye lot.
Abbreviations (US Terms)
- ch: chain
- sl st: slip stitch
- sc: single crochet
- dc: double crochet
- tr: treble crochet
- dc2tog: double crochet 2 together
- sk: skip
- sp(s): space(s)
- st(s): stitch(es)
- tch: turning chain
- rep: repeat
Special stitches:
- Shell: (2 dc, ch 2, 2 dc) in the stitch or space given.
- 3-dc cluster (cl): [yarn over, insert hook in space, yarn over, pull up a loop, yarn over, pull through 2 loops] 3 times, yarn over, pull through all 4 loops.
Gauge and Checkpoints
Gauge: 20 dc and 10 rows = 4 in (10.2 cm) in plain dc rows. Every row in this pattern, lace or solid, is about 0.4 in (1.0 cm) tall.
Make a test piece first. Before starting the full panel, make a one-feather sample. Ch 69 and work Row 1 (67 sts). For Row 2, work the edge, 1 net section, 1 feather, 1 net section, and the edge. Then work Rows 3–26 in the same order. After blocking, the sample should measure 13.4 in (34.0 cm) wide and 10.4 in (26.4 cm) tall.
Checkpoints:
- After Row 1: 35 in (88.9 cm) wide
- After Row 26 (Tier 1): 10.4 in (26.4 cm) tall
- After Row 98 (Tier 4): 39.2 in (99.6 cm) tall
- After Row 194 (Tier 8): 77.6 in (197.1 cm) tall
- After Row 200: 80 in (203.2 cm) tall
If your sample is too big, go down a hook size, to 3.25 mm (D-3). If it’s too small, go up to 3.75 mm (F-5). If the lace ruffles while the dc base lies flat, your chains are too loose. Make every net loop 1 chain shorter in every row.
Panel Pattern
Row 1 (base): Ch 177. Dc in the 4th ch from the hook and in each ch across. Turn. (175 sts; the skipped 3 ch count as 1 dc.)
Row 2 (setup): Ch 3 (counts as dc, here and throughout), dc in next 5 sts. *Ch 5, sk 3, sc in next st, [ch 5, sk 3, sc in next st] 3 times, ch 5, sk 3, shell in next st, sk 2, dc in next 11 sts, sk 2, shell in next st; rep from * 3 more times. Ch 5, sk 3, [sc in next st, ch 5, sk 3] 4 times, dc in last 6 sts. Turn.
Count: 12 edge dc, 25 ch-5 loops (5 per net section), 20 sc, 8 shells, 44 feather dc (11 per feather).
How Every Lace Row Is Built
Every lace row uses the same layout. The edge bands, net sections, and shells stay in place. Only the stitches inside each feather and the chain lengths change.
Row layout: Ch 3, dc in next 5 dc. *Net, shell in ch-2 sp of next shell, Interior, shell in ch-2 sp of next shell; rep from * 3 more times. Net, dc in next 5 dc, dc in top of tch. Turn.
Net, odd rows: Ch 2, sc in next ch-loop, [ch L, sc in next ch-loop] 4 times, ch 2. (4 loops)
Net, even rows: Ch L, sc in next ch-loop, [ch L, sc in next ch-loop] 3 times, ch L. (5 loops)
On even rows, skip the ch-2 connectors from the row below. The net alternates between 4 and 5 loops, so it never grows or shrinks. L is the loop length given for each row below. The net loops get shorter as the ray spaces get longer, which keeps the panel the same width.
Feather Repeat (Rows 3–26)
Row 3: L = 5. Interior: dc in each of 11 dc. (11 dc)
Row 4: L = 5. Interior: dc in next 3 dc, ch 5, sk 5 dc, dc in next 3 dc. This opens the eye. (6 dc, 1 ch-5 sp)
Row 5: L = 5. Interior: dc in next 3 dc, ch 2, cl in ch-5 sp, ch 2, dc in next 3 dc. The cluster forms the raised center of the eye. (6 dc, 1 cl)
Row 6: L = 5. Interior: dc in next 3 dc, ch 5, sk (ch-2, cl, ch-2), dc in next 3 dc. The chain arches over the cluster to form the eye ring.
Row 7: L = 5. Interior: dc in next 3 dc, 5 dc in ch-5 sp, dc in next 3 dc. (11 dc)
Rows 8–11: L = 5. Interior: dc in first dc, [ch 1, dc in next dc] 10 times, skipping the ch sps of the row below. (11 dc, 10 ch-1 sps)
Rows 12–15: L = 4. Interior: dc in first dc, [ch 2, dc in next dc] 10 times. (11 dc, 10 ch-2 sps)
Rows 16–19: L = 3. Interior: dc in first dc, [ch 3, dc in next dc] 10 times. (11 dc, 10 ch-3 sps) This is the widest part of the feather.
Rows 20–22: L = 4. Work the interior as for Rows 12–15.
Rows 23–25: L = 5. Work the interior as for Rows 8–11.
Row 26: L = 5. Interior: dc in each dc, skipping the ch sps. (11 dc) This closes the feather tip.
Row 26 has the same count as Row 2: 12 edge dc, 25 ch-5 loops, 20 sc, 8 shells, and 44 feather dc. The next tier starts directly on top of it.
Rows 27–194: Rep Rows 3–26 seven more times. (8 tiers total)
Top Band
Row 195 (conversion): Ch 3, dc in next 5 dc. *[3 dc in next ch-5 loop, dc in next sc] 4 times, 3 dc in next ch-5 loop; dc2tog over first 2 dc of shell, dc in ch-2 sp, dc2tog over last 2 dc of shell; dc in next 11 dc; dc2tog over first 2 dc of next shell, dc in ch-2 sp, dc2tog over last 2 dc of shell; rep from * 3 more times. [3 dc in next ch-5 loop, dc in next sc] 4 times, 3 dc in next ch-5 loop, dc in next 5 dc, dc in top of tch. Turn.
Count: 76 sts worked 1 per existing stitch (12 edge, 44 feather, 20 sc) + 99 sts added from loops and shells (75 in loops, 24 from shells) = 175 sts.
Rows 196–200: Ch 3, dc in each st across. Turn. (175 sts)
Fasten off. The panel now measures 35 in (88.9 cm) x 80 in (203.2 cm).
Border
Border gauge: 5 sc = 1 in (2.5 cm). On the long sides, work 2 sc in each dc row-end. At 2.5 rows per inch, that gives 5 sc per inch, which matches the stitch gauge.
Round 1: Join yarn in the last st of Row 200. Ch 1, 3 sc in the same st (corner), sc in next 173 sts, 3 sc in last st (corner). Down the side, work 2 sc in each row-end of Rows 199 through 2 (396 sc). Working into the underside of the foundation chain, 3 sc in the first ch (corner), sc in next 173 ch, 3 sc in last ch (corner). Up the other side, work 396 sc as before. Join with a sl st to the first sc. Fasten off.
Count: top 173 + bottom 173 + sides 396 + 396 + 4 corners x 3 = 1,150 sc.
Row 2 (hem fans): Turn the panel so the bottom edge is on top. Join yarn in the center sc of the right corner. Ch 1, sc in the same st. *Sk 3, 7 dc in next sc, sk 3, sc in next sc; rep from * 21 more times, ending in the center sc of the left corner. Turn. (22 fans: 154 dc + 23 sc = 177 sts)
Row 3: Ch 1, sc in first sc. *Ch 1, [tr in next dc, ch 1] 7 times, sc in next sc; rep from * across. Turn. (154 tr, 23 sc, 176 ch-1 sps)
Row 4 (picots): Ch 1, sc in first sc. *Sk first ch-1 sp, [(sc, ch 3, sc) in next ch-1 sp] 6 times, sk last ch-1 sp, sc in next sc; rep from * across. Fasten off. (132 picots)
Why the math works: The hem runs from corner center to corner center: 1 + 1 + 173 + 1 + 1 = 177 sts. Each fan uses 8 sts (1 sc + 3 skipped + 1 fan st + 3 skipped), so 22 x 8 + 1 = 177. Every fan sits evenly, with no stitches left over. Each fan is 1.6 in (4.1 cm) wide.
Final Blocking
- Weave in all ends through solid dc or sc, never across the open net.
- Soak the panel in cool water with a little wool wash for 15 minutes.
- Press out the water by rolling the panel in towels. Do not wring it.
- Lay it flat on blocking mats. If you are short on space, block it in sections.
- Pin the long edges straight to 82.25 in (208.9 cm). Pin the width to 35.5 in (90.2 cm).
- Pin each hem fan into a rounded scallop, then pin out each picot.
- Open each feather eye and smooth the rays so they spread evenly.
- Let the panel dry completely before you unpin it.
Final Quality-Control Checklist
- Width is 35.5 in (90.2 cm) at the top, middle, and hem.
- Length is 82.25 in (208.9 cm) on both long sides.
- Every tier shows 4 complete feathers, each with a clear eye and a raised center.
- Each net section alternates between 4 and 5 loops.
- Row 195 and every top band row have 175 sts.
- The hem has 22 even fans with 6 picots each.
- All ends are hidden in solid stitches.
Troubleshooting
The panel narrows at the feathers: The ray chains are too tight. Use a hook one size larger for Rows 12–22 only.
The net loops sag: The chains are too loose. Use L minus 1 in every row.
The eye looks flat: Work the cluster more tightly and keep the ch-5 arch in the next row snug.
The fan count is off: Recount Round 1 along the bottom. You need exactly 173 sc between the corners.
The long sides wave: There are too many sc in the row-ends. Rework them with exactly 2 sc per row.
The panel stretches when hung: This is normal for cotton. Let it hang for a day, then re-block it slightly shorter.
Care
Hand wash in cool water and dry flat. Re-pin the scallops if they lose their shape.
Final Notes
Here is how the measurements fit together. 175 sts at 5 sts per inch make 35 in (88.9 cm). 200 rows at 2.5 rows per inch make 80 in (203.2 cm). The border adds 0.25 in (0.6 cm) to the top and to each side, and 2 in (5.1 cm) at the hem. That gives a finished size of 35.5 in (90.2 cm) x 82.25 in (208.9 cm). Hang the panel with clip rings spaced about 4 in (10.2 cm) apart along the top border.
Happy crocheting!