

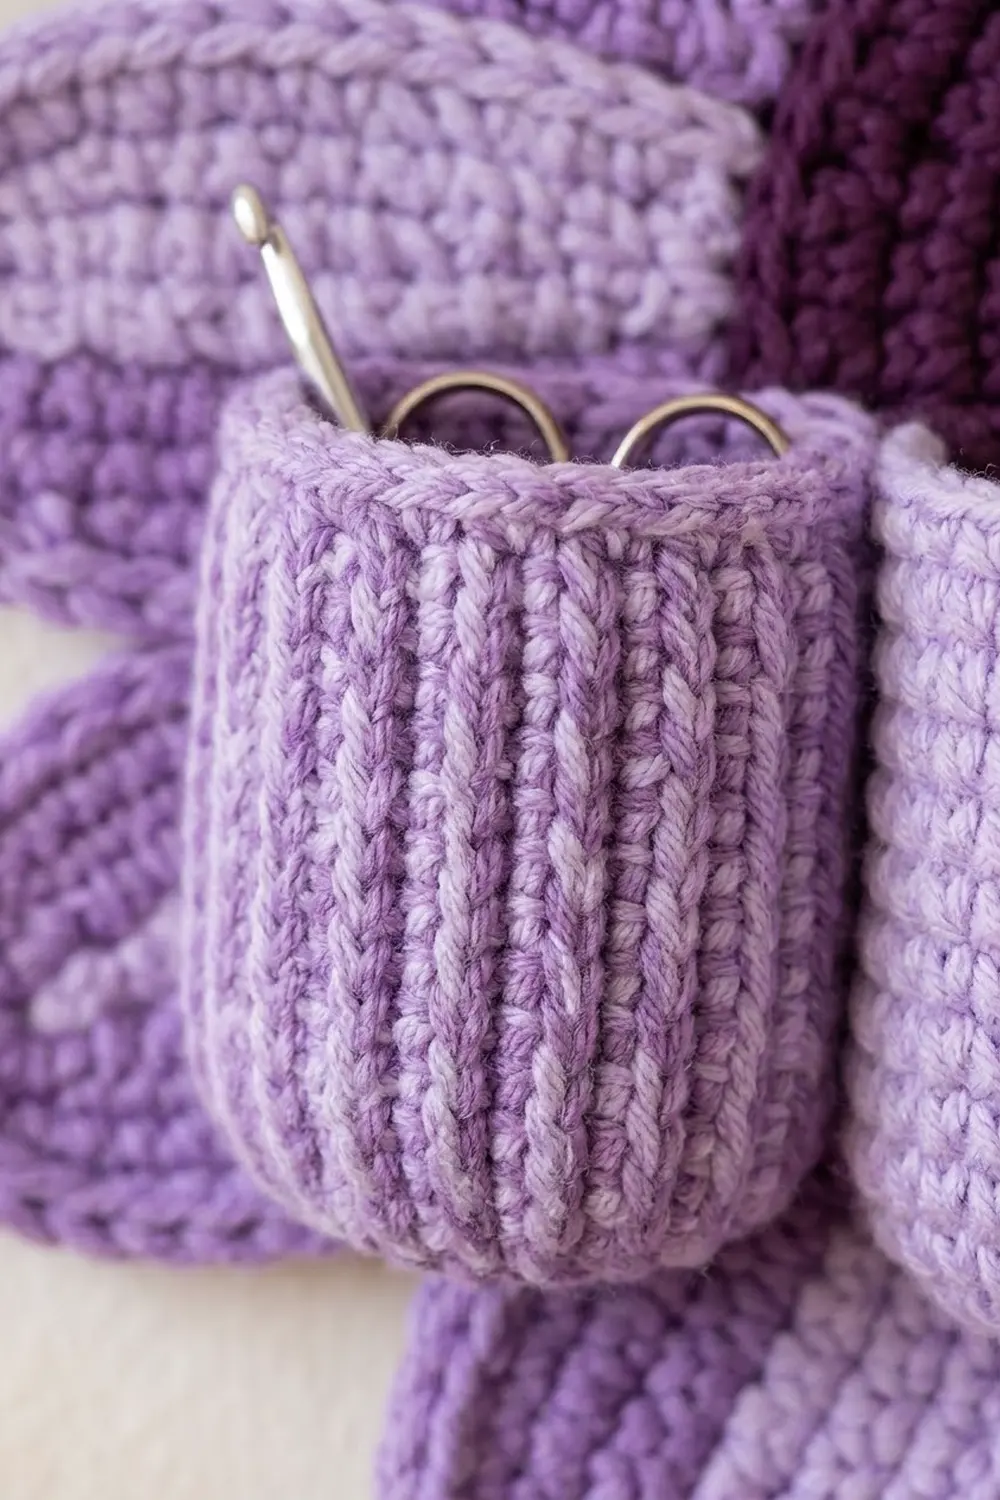
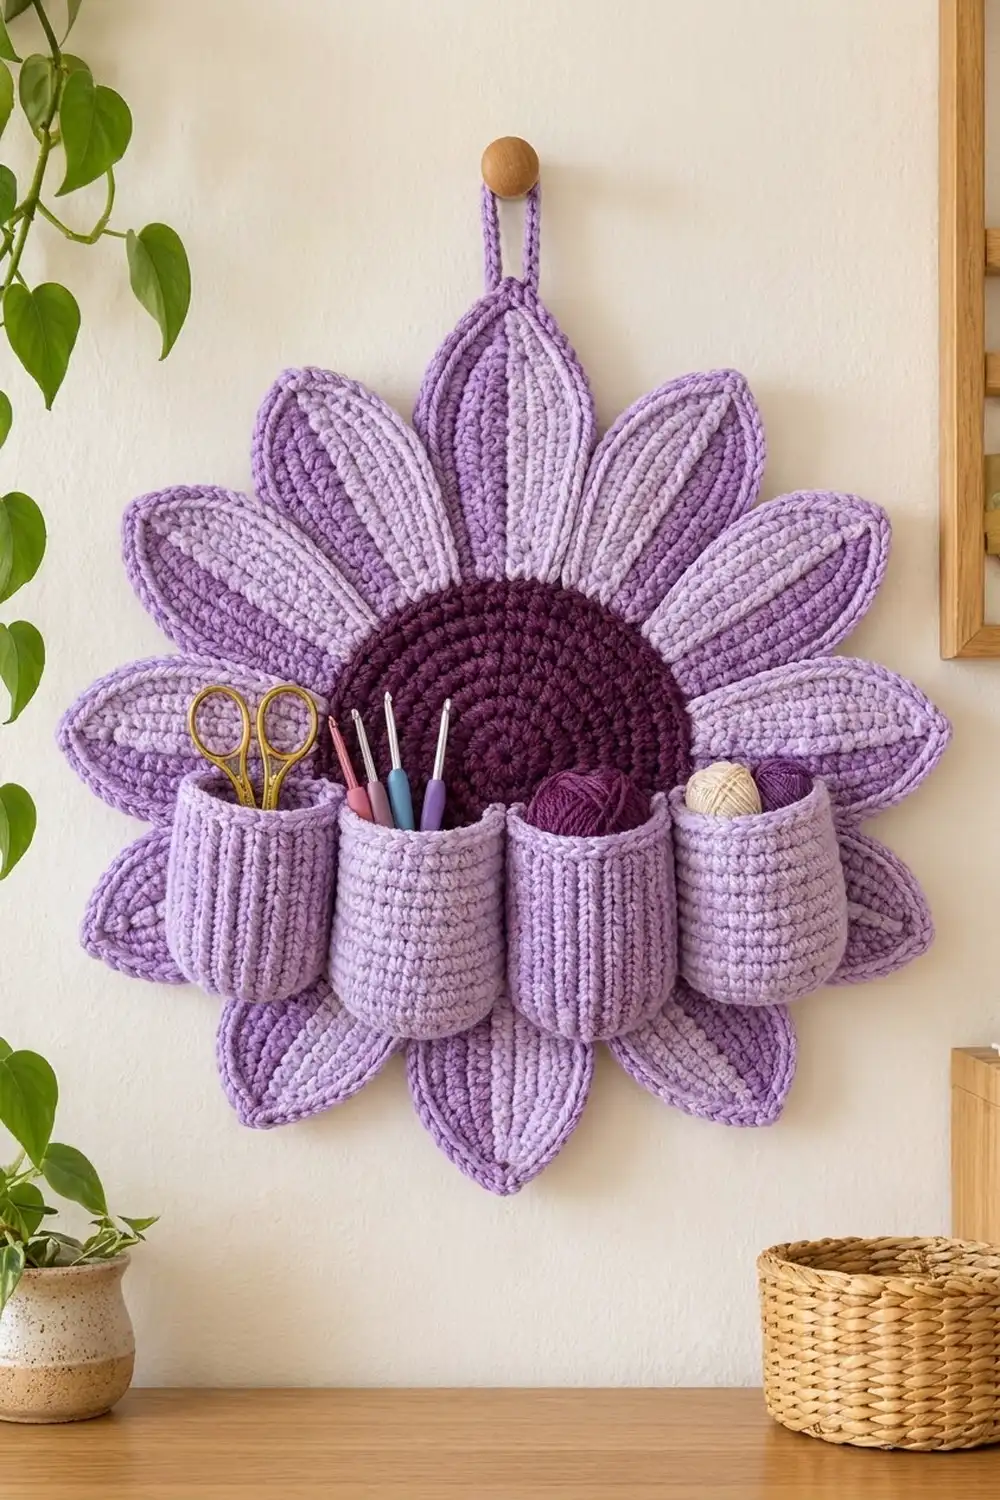
The Lavender Bloom Wall Organizer is a large crochet flower that holds your small tools. A deep plum center disc sits on a ring of 14 two-tone petals, and four snug pockets run across the lower half. They hold hooks, scissors, a tape measure, or a couple of mini yarn balls.
The palette is three shades of purple. Each petal is pale lavender on one half and medium lilac on the other, with a medium lilac outline. The pockets alternate between those two shades, and the plum center ties it all together. The fabric is dense and tidy, so the flower keeps its shape on the wall.
This pattern uses US crochet terms. The finished organizer measures 13¾ in (34.9 cm) across the petals, not counting the hanging loop. Each pocket is 3½ in (8.9 cm) deep.
Here is how it comes together. You make one center disc in joined rounds, 14 petals in rows along a foundation chain, and four pockets as small cups worked in rounds. Each petal gets an outline round. Then the petals are sewn behind the disc, the pockets are sewn on the front, and a loop is added to the top petal.
Finished Size and Construction
- Finished size: 13¾ in (34.9 cm) across the petals; the loop adds 3 in (7.6 cm) at the top
- Skill level: Easy–Intermediate
- Terminology: US crochet terms
- Yarn weight: Worsted (#4)
- Hook: 4.0 mm (US G-6)
- Number of pieces: 19 (1 disc, 14 petals, 4 pockets), plus a loop worked onto a petal
- Layout: 14 petals in one ring behind the disc; 4 pockets in a row across the lower half
- Piece sizes: disc 6¼ in (15.9 cm) across; petal 4½ in × 2 in (11.4 cm × 5.1 cm); pocket 3½ in (8.9 cm) tall, 3 in (7.6 cm) wide when flattened
- Petal size before border: 4 in × 1½ in (10.2 cm × 3.8 cm)
- Border depth: ¼ in (0.6 cm), one round of single crochet around each petal
Materials
Use a smooth worsted yarn with good stitch definition. Cotton or a cotton blend makes the crispest, stiffest pockets. Soft acrylic also works if you crochet firmly.
- Color A – Pale Lavender: 80 g, about 144 m (petal halves, 2 pockets)
- Color B – Medium Lilac: 90 g, about 162 m (petal halves, petal edging, 2 pockets, loop)
- Color C – Deep Plum: 35 g, about 63 m (center disc)
Tools:
- 4.0 mm (US G-6) crochet hook
- Tapestry needle
- Stitch markers (at least 16)
- Rustproof pins
- Scissors
- Ruler or tape measure
- Blocking mat and spray bottle
- Optional: a 6 in (15.2 cm) circle of stiff felt to reinforce the back
These quantities include a margin of about 15% for gauge swatching and weaving in ends.
Abbreviations (US Terms)
- ch – chain
- sl st – slip stitch
- sc – single crochet
- hdc – half double crochet
- dc – double crochet
- rev sc – reverse single crochet (crab stitch)
- MR – magic ring
- BLO – back loop only
- st(s) – stitch(es)
- rnd(s) – round(s)
- inc – 2 sc in the same st
Special stitch – Reverse single crochet (rev sc): Work from left to right (right-handed). Insert the hook into the next stitch to the right, yarn over, and pull up a loop. Yarn over and pull through both loops on the hook. This makes a corded, rolled edge.
Gauge and Checkpoints
Gauge: 16 sc × 18 rows = 4 in (10.2 cm) in single crochet.
Make one petal first. Before you edge it, it should measure 4 in (10.2 cm) long and 1½ in (3.8 cm) wide across both halves. After the edging round, it should measure 4½ in × 2 in (11.4 cm × 5.1 cm).
Disc checkpoints:
- After Rnd 5: 2¼ in (5.7 cm) across
- After Rnd 10: 4½ in (11.4 cm) across
- After Rnd 14: 6¼ in (15.9 cm) across
Pocket checkpoint: After Rnd 4, the base should be 1¾ in (4.4 cm) across.
If your pieces are too big, go down one hook size. If they are too small, go up one hook size. If the disc ruffles, your tension is too loose for the increases, so try a smaller hook. If it cups, your tension is too tight, so try a larger hook.
Center Disc (make 1)
With Color C. Join every round with a sl st to the first sc and ch 1. The ch 1 does not count as a stitch. Spread the increases evenly as written so the disc stays round, not hexagonal.
- Rnd 1: Work 6 sc in a MR. (6 sts)
- Rnd 2: Inc in each st around. (12 sts)
- Rnd 3: *Sc in next st, inc in next st; repeat from * 6 times. (18 sts)
- Rnd 4: Sc in next st, inc, *sc in next 2 sts, inc; repeat from * 4 more times, sc in last st. (24 sts)
- Rnd 5: *Sc in next 3 sts, inc; repeat from * 6 times. (30 sts)
- Rnd 6: Sc in next 2 sts, inc, *sc in next 4 sts, inc; repeat from * 4 more times, sc in last 2 sts. (36 sts)
- Rnd 7: *Sc in next 5 sts, inc; repeat from * 6 times. (42 sts)
- Rnd 8: Sc in next 3 sts, inc, *sc in next 6 sts, inc; repeat from * 4 more times, sc in last 3 sts. (48 sts)
- Rnd 9: *Sc in next 7 sts, inc; repeat from * 6 times. (54 sts)
- Rnd 10: Sc in next 4 sts, inc, *sc in next 8 sts, inc; repeat from * 4 more times, sc in last 4 sts. (60 sts)
- Rnd 11: *Sc in next 9 sts, inc; repeat from * 6 times. (66 sts)
- Rnd 12: Sc in next 5 sts, inc, *sc in next 10 sts, inc; repeat from * 4 more times, sc in last 5 sts. (72 sts)
- Rnd 13: *Sc in next 11 sts, inc; repeat from * 6 times. (78 sts)
- Rnd 14: Sc in next 6 sts, inc, *sc in next 12 sts, inc; repeat from * 4 more times, sc in last 6 sts. (84 sts)
Fasten off and leave a 40 in (101.6 cm) tail for sewing on the petals. Each round adds 6 sts, so Rnd 14 has 6 × 14 = 84 sts. That works out to exactly 6 sts for each of the 14 petals.
Petal (make 14)
Each petal is worked in rows on both sides of one foundation chain, so the ridges run along its length. Side A is pale lavender and Side B is medium lilac. The base is the slip-knot end of the chain, and the tip is the hook end.
Side A (Color A):
- Foundation: Ch 17.
- Row 1: Sc in the 2nd ch from the hook (tip end) and in each ch across to the base. Ch 1 and turn. (16 sc)
- Row 2 (shaping, base to tip): Sc in next 2 sts, hdc in next 3 sts, dc in next 6 sts, hdc in next 3 sts, sc in next st, sl st in last st. Fasten off. (16 sts: 2 + 3 + 6 + 3 + 1 + 1)
The tall dc stitches in the middle make the petal widest there. The sl st at the end pulls the tip into a point, and the 2 sc keep the base slightly rounded.
Side B (Color B):
- Row 3: Join Color B in the first free loop of the foundation chain at the base. Sc in each free loop to the tip. Ch 1 and turn. (16 sc)
- Row 4 (shaping, tip to base): Sl st in first st, sc in next st, hdc in next 3 sts, dc in next 6 sts, hdc in next 3 sts, sc in last 2 sts. (16 sts)
Row 4 mirrors Row 2, so both halves come to a point at the tip. Do not fasten off. Go straight to the Border section and edge this petal before you make the next one.
Pocket (make 4: 2 in Color A, 2 in Color B)
Join each round with a sl st to the first sc and ch 1, which does not count as a stitch. Do not turn. Working every round from the right side stacks the single crochet into neat vertical columns.
- Rnds 1–4: Work as Rnds 1–4 of the center disc. (24 sts)
- Rnd 5: Sc in the BLO of each st around. (24 sts)
- Rnds 6–19: Sc in each st around. (24 sts in each round; 14 rounds)
- Rnd 20: Rev sc in each st around. (24 sts)
Fasten off and leave a 30 in (76.2 cm) tail. Rnd 5 makes a crisp fold, so the base sits flat and the wall stands up. Rnds 5–20 add 16 rounds, which gives 3½ in (8.9 cm) of wall. Rnd 20 rolls slightly outward to form the corded rim.
Make All Pieces
Count your pieces before assembly:
- Center disc: 1 in Color C
- Petals: 14, each with Side A in Color A, Side B in Color B and edging in Color B
- Pockets: 2 in Color A and 2 in Color B
Layout (front view, petals numbered clockwise from the top):
                [1]  + loop
          [14]        [2]
       [13]              [3]
      [12]    ( DISC )    [4]
       [11]              [5]
          [10]  ___   [6]
         |B| |A| |B| |A|   <- pockets
                [8]
           [9]       [7]
Petal 1 points straight up and petal 8 points straight down. Pockets run left to right in the order B, A, B, A. Place every petal with Side A (pale lavender) on its clockwise edge, so the two-tone pattern turns the same way all around the flower.
Joining
Method: Whipstitch the disc’s last round to the petals, then tack the petals and pockets from the back.
- Place 14 markers on Rnd 14 of the disc, one every 6 stitches. Put the first marker at the top center. That gives 14 sections of 6 stitches each (14 × 6 = 84).
- Lay the disc face up. Slide one petal under each section, centered, with ¾ in (1.9 cm) of the petal base hidden under the disc. Pin all 14 before you sew. Each visible petal then extends 3¾ in (9.5 cm) beyond the disc.
- Use the plum tail to whipstitch through both loops of each Rnd 14 stitch and down into the petal underneath. Make one stitch per disc stitch, which is 6 per petal and 84 in total.
- Turn the piece over. Tack each petal’s base edge to the back of the disc with Color B. Where neighboring petals touch, about 1 in (2.5 cm) out from the disc, join them with one small stitch.
Pockets:
- Mark 8 consecutive stitches on each pocket’s rim as the back panel. The other 16 stitches bulge forward.
- Line the pockets up side by side, with the rims ¾ in (1.9 cm) below the center of the disc. Pockets 2 and 3 meet at the vertical center line.
- With each pocket’s own tail, whipstitch up one edge column of the back panel, along the Rnd 5 ridge for those 8 stitches, and up the other edge column. Tack the 8 rim stitches down as well.
- Where neighboring pocket rims touch, join them with two small stitches.
Tension: Pull each stitch just snug. If you pull too hard, the disc edge puckers. If you sew too loosely, the petals will droop when the pockets are full.
Size checkpoint: Measure across the flower from petal tip to petal tip. It should be 13¾ in (34.9 cm). The row of pockets should span about 10 in (25.4 cm) and hang about 1 in (2.5 cm) below the edge of the disc.
Border: Petal Edging
This round goes around each petal straight after Row 4, before any joining. It is described here because it follows its own count.
Border gauge: The same as the main gauge, 4 sc per inch (2.5 cm). Each long side is 4 in (10.2 cm), so it takes 16 sc.
Edging round (Color B): Ch 1, but do not turn.
- Base: 3 sc evenly across the row ends.
- Side A: 1 sc in each st of Row 2, from base to tip. (16 sc)
- Tip: 3 sc in the tip point.
- Side B: 1 sc in each st of Row 4, from tip to base. (16 sc)
- Finish: Sl st to the first sc. (38 sts: 3 + 16 + 3 + 16)
Fasten off and weave in the ends.
Why the math works: Each side gets exactly one sc per existing stitch, so the outline never stretches or gathers the shaped row. The 3 sc at the tip and at the base turn those points without adding fullness along the sides. The round adds ¼ in (0.6 cm) all around, taking the petal from 4 in × 1½ in (10.2 cm × 3.8 cm) to 4½ in × 2 in (11.4 cm × 5.1 cm).
Hanging loop (Color B): Join yarn in the center sc of petal 1’s tip and ch 24. Sl st into the same tip stitch. Work 30 sc over the chain loop, then sl st into the tip again. Fasten off and weave the end securely into the petal. The loop hangs 3 in (7.6 cm) tall.
Final Blocking
- Weave in all remaining ends on the back.
- Lay the organizer face up on a blocking mat.
- Pin the disc into a true 6¼ in (15.9 cm) circle.
- Pin each petal tip so it sits 3¾ in (9.5 cm) beyond the disc edge and points straight outward.
- Spray everything lightly with water until damp, but not soaked.
- Stuff each pocket with a rolled washcloth so it dries rounded.
- Let it dry completely, which takes at least 12 hours.
- Optional: glue or stitch a 6 in (15.2 cm) felt circle to the back of the disc for extra stiffness.
Final Quality-Control Checklist
- [ ] Disc is 6¼ in (15.9 cm) across, with 84 sts in Rnd 14
- [ ] All 14 petals have 16 sts in each of Rows 1–4 and 38 sts in the edging round
- [ ] Each petal is 4½ in × 2 in (11.4 cm × 5.1 cm)
- [ ] Side A faces clockwise on every petal
- [ ] Petals are evenly spaced, one per 6-stitch section
- [ ] All four pockets have 24 sts per round and are 3½ in (8.9 cm) tall
- [ ] Pocket colors run B, A, B, A from left to right
- [ ] Pocket rims are level and ¾ in (1.9 cm) below the disc center
- [ ] Overall span is 13¾ in (34.9 cm)
- [ ] Hanging loop is secure, and no ends show on the front
Troubleshooting
- The disc ruffles: Your tension is loose, or the increases are stacked. Use a smaller hook and stagger the increases exactly as written.
- The disc cups: Your tension is tight. Go up a hook size, or check that each round has its full count.
- Petals are too round: Check Row 2 and Row 4. Each should end at the tip with a sl st and start the shaping with a single sc next to it.
- Petal halves are lopsided: Row 4 must mirror Row 2 stitch for stitch, reading from the tip.
- The outline waves: You have more than 16 sc on a side. Work exactly one sc per stitch.
- Pockets slump forward: Sew the full 8-stitch back panel, including the rim, and consider adding felt backing.
- The joint between disc and petals shows gaps: Make one whipstitch in every Rnd 14 stitch and none in between.
- The flower tilts on the wall: Check that the loop sits on the exact center stitch of petal 1’s tip.
Care
Spot clean with mild soap and cool water. Press out the excess water, reshape, and dry flat with the pockets stuffed. Do not tumble dry.
Final Notes
The measurements build on each other, so checking each stage keeps the finished piece on size:
- Gauge is 16 sc = 4 in (10.2 cm).
- The disc grows to 84 sts and 6¼ in (15.9 cm).
- Each petal is 16 stitches long, 4 in (10.2 cm) before edging and 4½ in (11.4 cm) after its 38-stitch outline.
- Each petal tucks ¾ in (1.9 cm) under the disc and covers 6 of its edge stitches.
- That gives a finished bloom of 13¾ in (34.9 cm), with four 24-stitch pockets 3½ in (8.9 cm) deep across the front.
Measure at each checkpoint and your flower will hang flat, even and ready to hold your favorite tools.
Happy crocheting!