

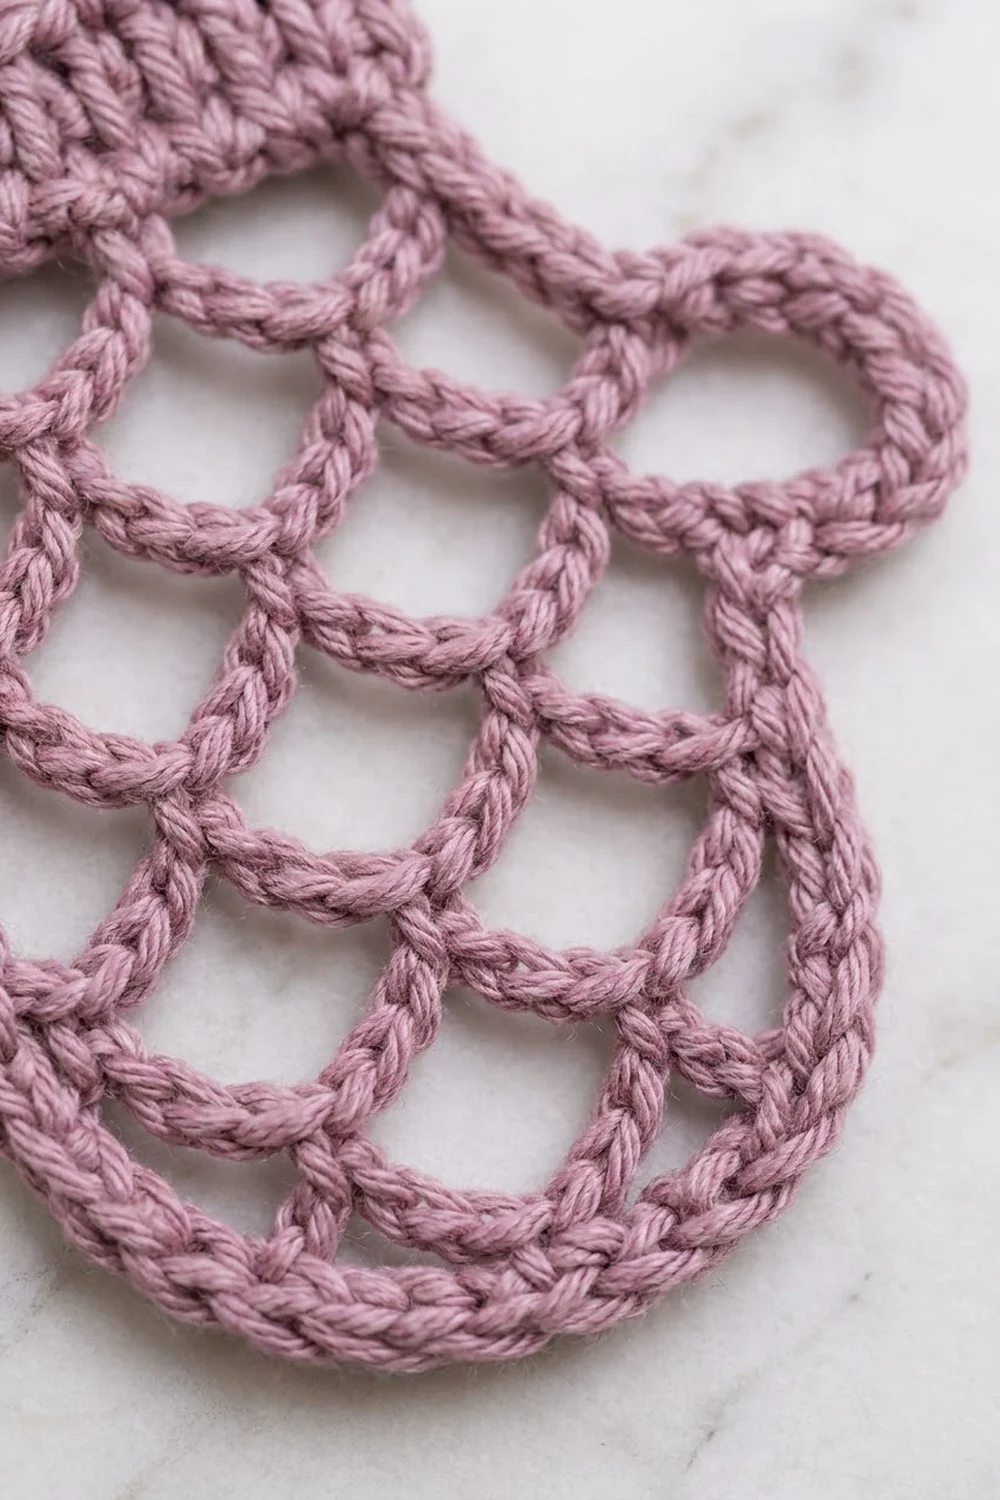
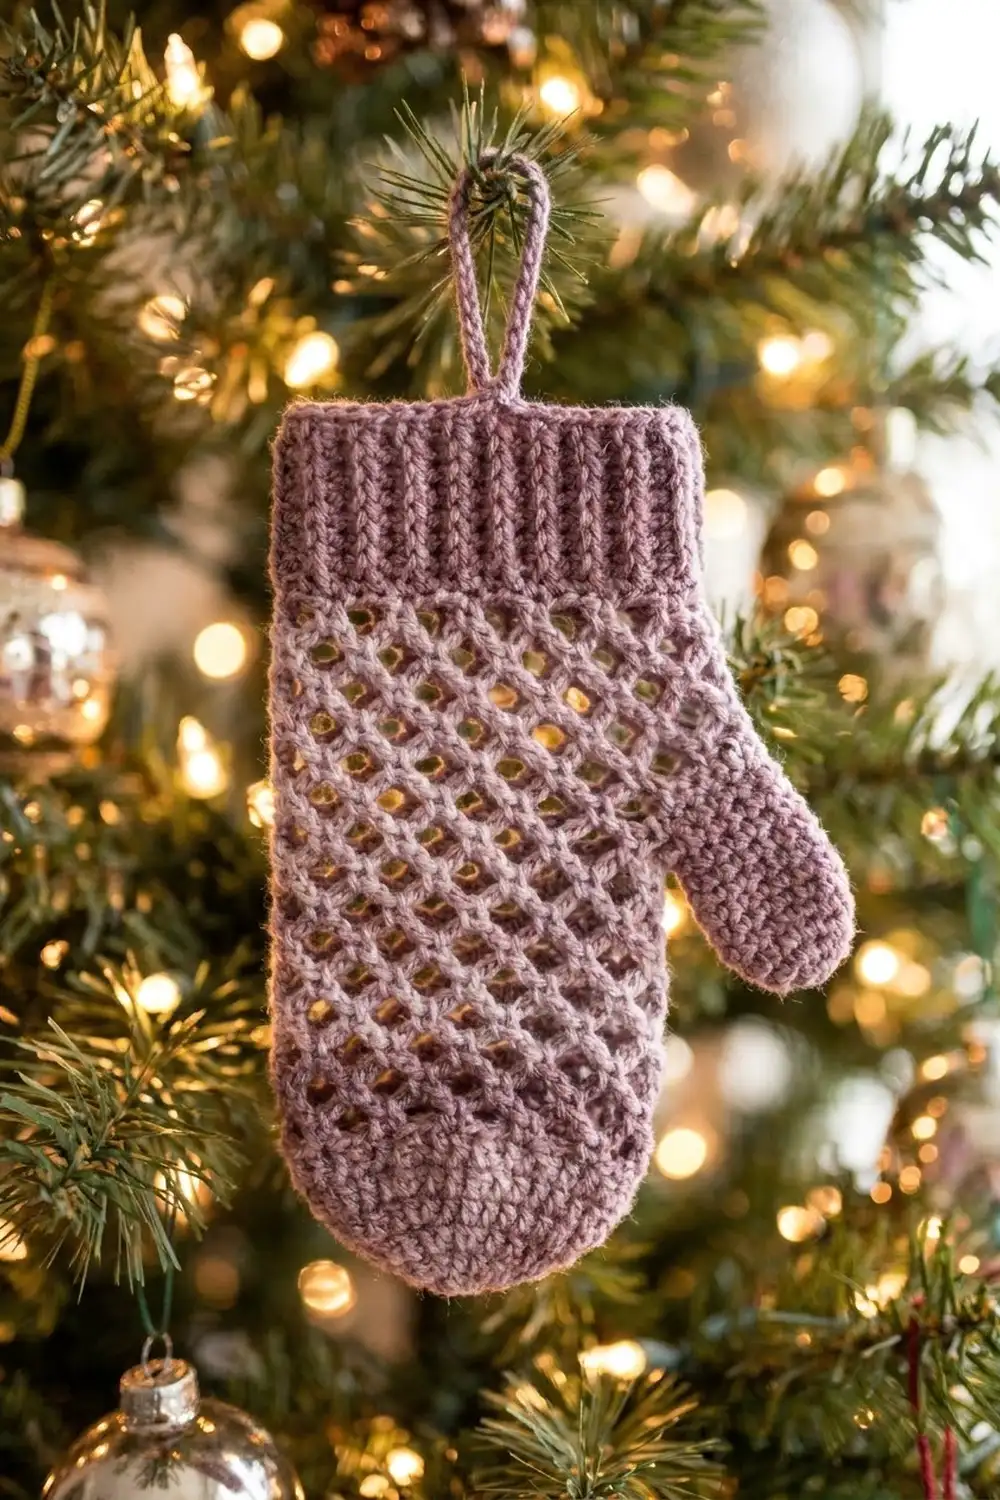
This Sugarplum Scale Mitten is a lacy, flat ornament with a solid ribbed cuff and a body of offset chain arches that look like soft fish scales. A tidy single crochet outline frames the mitten, and an open thumb loop and a hanging loop finish it off.
The sample uses one color, a dusty mauve, which gives it a vintage sugarplum feel against green branches. It also looks good in cream, icy blue, or classic red. Because the whole ornament is one color, there are no color changes and only a few ends to weave in.
The pattern uses US crochet terms. The finished mitten measures 3.5 in (8.9 cm) wide across the body and 4.25 in (10.8 cm) wide including the thumb. It is 5.25 in (13.3 cm) tall without the hanging loop and about 6.5 in (16.5 cm) tall including it.
You’ll work the ribbed cuff sideways first, then crochet the mesh downward from the cuff’s long edge, narrowing it to make the rounded bottom. After that, one round of single crochet outlines the whole shape, and you’ll add the thumb and hanging loop at the end.
Finished Size and Construction
- Finished size: 3.5 in (8.9 cm) wide x 5.25 in (13.3 cm) tall; 4.25 in (10.8 cm) wide including the thumb
- Skill level: Easy–Intermediate
- Terminology: US
- Yarn weight: DK (#3)
- Hook: 3.5 mm (E-4)
- Number of pieces: 1 (single ornament, no joining)
- Layout: cuff at top, mesh body below, thumb on the right side
- Piece size before border: 3 in (7.6 cm) wide x 4.75 in (12.1 cm) tall
- Border depth: 0.25 in (0.6 cm) on every side
Materials
Yarn: Use a smooth DK cotton or cotton blend. Cotton shows the chain arches clearly and holds its shape after blocking. Avoid fuzzy yarns, because they blur the scale pattern.
- Dusty Mauve: 10 g, about 23 m (25 yd)
The quantity includes a margin for your gauge swatch and the extra length you need for weaving in ends.
Tools:
– 3.5 mm (E-4) crochet hook
– Tapestry needle
– Scissors
– Stitch markers (2–3)
– Blocking mat and rustproof pins
– Spray bottle; optional light spray starch
Abbreviations (US Terms)
- ch – chain
- sl st – slip stitch
- sc – single crochet
- dc – double crochet
- BLO – back loop only
- sc2tog – single crochet 2 together
- sk – skip
- sp(s) – space(s)
- st(s) – stitch(es)
Special term:
– Arch: a ch-4 loop anchored by a sc at each end. In the mesh, each new sc goes into the center of an arch from the row before, so the scales offset.
– Half arch: a ch-2 loop at the edge of an offset row. It keeps the side edges straight.
Gauge and Checkpoints
Make the cuff first and measure it before you start the mesh. Everything else is sized from the cuff.
- Cuff gauge: 16 BLO sc rows = 3 in (7.6 cm); 3 sc = 0.75 in (1.9 cm)
- Mesh gauge: 5 arches = 3 in (7.6 cm) wide; 3 mesh rows = 1 in (2.5 cm) tall
- Border gauge: 4 sc = 1 in (2.5 cm)
Checkpoints:
1. After the cuff: 3 in (7.6 cm) x 0.75 in (1.9 cm).
2. After Mesh Row 9: 3 in (7.6 cm) wide x 3.75 in (9.5 cm) tall, including the cuff.
3. After Mesh Row 12: 4.75 in (12.1 cm) tall, including the cuff.
4. After the border: 3.5 in (8.9 cm) x 5.25 in (13.3 cm).
5. After the thumb: 4.25 in (10.8 cm) wide overall.
If the cuff is too big, try a 3.25 mm hook. If it’s too small, try a 3.75 mm hook. If only the mesh is off, change your tension on the chains: loose chains make the scales droop, and tight chains pull the mesh into a narrow strip.
Cuff
The cuff is worked sideways, so the rows stand vertically and the BLO ridges run up and down.
Row 1: Ch 4, sc in 2nd ch from hook and in each ch across. (3 sc)
Rows 2–16: Ch 1, turn, sc BLO in each st across. (3 sc)
Don’t fasten off. The cuff is now 16 rows long, 3 in (7.6 cm) wide and 0.75 in (1.9 cm) tall. Turn the cuff so one long edge of row-ends faces down. The mesh hangs from this edge. The other long edge is the top.
Mesh Body
Work into the 16 row-ends along the bottom long edge of the cuff.
Row 1: Ch 1, sc in first row-end, ch 4, sk 2 row-ends, sc in next row-end; repeat from * 4 more times. (5 arches, 6 sc)
The sc sit in row-ends 1, 4, 7, 10, 13 and 16, so the mesh is exactly as wide as the cuff.
Row 2 (offset row): Ch 5, turn (counts as dc + ch-2 half arch), sc in first ch-4 sp, ch 4, sc in next ch-4 sp; repeat from * 3 more times, ch 2, dc in last sc. (4 full arches + 2 half arches, 5 sc, 2 dc)
Row 3 (full row): Ch 1, turn, sc in first dc, ch 4, sc in next ch-4 sp; repeat from * 3 more times, ch 4, sc in 3rd ch of turning ch-5. (5 arches, 6 sc)
Row 3 skips the ch-2 half arches. Its arches run from the edge to the first full space, between the 4 full spaces, and from the last full space back to the edge, for 1 + 3 + 1 = 5 arches.
Rows 4–9: Repeat Rows 2 and 3 three more times.
- Rows 4, 6, 8: 4 full arches + 2 half arches each
- Rows 5, 7, 9: 5 arches each
Checkpoint: 3 in (7.6 cm) wide x 3.75 in (9.5 cm) tall including the cuff. Both side edges should be straight, with a sc at the edge on odd rows and a dc on even rows.
Rounded Bottom
Each decrease row starts and ends in the center of the end arches, so the edge moves in by half an arch on each side.
Row 10: Turn, sl st in first 2 ch of first ch-4 sp, ch 1, sc in same sp, ch 4, sc in next ch-4 sp; repeat from * 3 more times. (4 arches, 5 sc)
Row 11: Turn, sl st in first 2 ch of first ch-4 sp, ch 1, sc in same sp, ch 4, sc in next ch-4 sp; repeat from * 2 more times. (3 arches, 4 sc)
Row 12: Turn, sl st in first 2 ch of first ch-4 sp, ch 1, sc in same sp, ch 4, sc in next ch-4 sp, ch 4, sc in last ch-4 sp. (2 arches, 3 sc)
Fasten off. The mesh rows are 12 rows / 3 = 4 in (10.2 cm) deep. Adding the 0.75 in (1.9 cm) cuff, the piece before the border is 3 in (7.6 cm) x 4.75 in (12.1 cm).
Border
The border is one round of sc that outlines the mitten. Border gauge: 4 sc = 1 in (2.5 cm). Each corner stitch is counted once, in the segment where it’s worked.
With the front facing, join yarn with a sl st in the top-left row-end of the cuff’s top edge.
Border Round: Ch 1, then work these segments in order:
- Cuff top (16 row-ends): sc in next 2 row-ends, sc2tog over next 2 row-ends; repeat from * 3 more times. (12 sc)
- Right cuff end (3 sts of Row 16): 2 sc in first st, sc in next st, 2 sc in last st. (5 sc)
- Right side, Mesh Rows 1–9: 1 sc in each sc row-end (Rows 1, 3, 5, 7, 9) and 2 sc around each dc post (Rows 2, 4, 6, 8). (5 + 8 = 13 sc)
- Right curve: 2 sc in the uncovered outer half of the end arch of Row 9, Row 10 and Row 11. (6 sc)
- Bottom: 3 sc in each of the 2 arches of Row 12. (6 sc)
- Left curve: 2 sc each in the uncovered outer halves of the end arches of Rows 11, 10 and 9. (6 sc)
- Left side, Mesh Rows 9–1: as Segment 3. (13 sc)
- Left cuff end (3 sts of Row 1): 2 sc in first st, sc in next st, 2 sc in last st. (5 sc)
Join with a sl st to the first sc. Total: 12 + 5 + 13 + 6 + 6 + 6 + 13 + 5 = 66 sc. Don’t fasten off yet if you want to go straight to the thumb. Otherwise, fasten off.
Why the math works:
– Top: 12 sc at 4 sc per in = 3 in (7.6 cm), which matches the 3 in (7.6 cm) cuff. Using sc2tog keeps the 16 row-ends from flaring.
– Sides: 13 sc cover 9 mesh rows, or 3 in (7.6 cm). That’s about 4.3 sc per in, so the sides lie flat.
– Curves and bottom: The extra sc in the curves and on the bottom give the lower edge a smooth, round shape instead of a point.
– Size: The border adds 0.25 in (0.6 cm) all around, so the piece becomes 3 + 0.5 = 3.5 in (8.9 cm) wide and 4.75 + 0.5 = 5.25 in (13.3 cm) tall.
Thumb
On the right side, Segment 3 has 13 sc, numbered from the cuff downward. Place markers in sc #5 and sc #9.
Join yarn with a sl st in sc #5. Ch 12, sk the next 3 sc (#6, #7, #8), and sl st in sc #9.
Without turning, work 18 sc into the ch-12 loop, moving back toward sc #5. Sl st in sc #5 and fasten off. (18 sc)
The thumb sits about 1 in (2.5 cm) along the side, at Mesh Rows 4–6, and sticks out 0.75 in (1.9 cm). That brings the total width to 4.25 in (10.8 cm). Because 18 sc cover 12 ch, the thumb curves outward instead of cupping.
Hanging Loop
On the cuff top, find sc #6 and sc #7 of the 12 sc.
Join yarn with a sl st in sc #6. Ch 14, then sl st in sc #7. Work 18 sc into the ch-14 loop and sl st in sc #6. Fasten off.
The loop stands about 1.25 in (3.2 cm) above the cuff, for a hanging height of about 6.5 in (16.5 cm).
Final Blocking
- Weave in all ends along the border or the cuff, not through the mesh, where they would show.
- Soak the mitten in cool water for 5 minutes, then press out the water in a towel. Don’t wring it.
- Pin the outline to 3.5 in (8.9 cm) x 5.25 in (13.3 cm), with one pin at each cuff corner first.
- Pin the bottom into a smooth, even curve.
- Pin the thumb into a round shape, 0.75 in (1.9 cm) out from the side.
- Gently open each mesh arch with a pin so the scales line up in neat offset rows.
- Mist with light starch if you want a firmer ornament.
- Let it dry completely (6–12 hours) before you unpin it.
Final Quality-Control Checklist
- Cuff is 16 rows with 3 sc per row, and the ridges run vertically
- Mesh Rows 1–9 alternate 5 arches and 4 full + 2 half arches
- Decrease rows have 4, 3 and 2 arches
- The border has 66 sc: 12 / 5 / 13 / 6 / 6 / 6 / 13 / 5
- The thumb has 18 sc over 12 ch and is centered at Mesh Rows 4–6
- The hanging loop is centered on the cuff top
- Blocked size is 3.5 in (8.9 cm) x 5.25 in (13.3 cm), and 4.25 in (10.8 cm) wide with the thumb
- All ends are hidden and trimmed
Troubleshooting
Mesh flares wider than the cuff: Your chains are too loose. Go down a hook size for the mesh only, or tighten your chains.
Side edges wave: Make sure you’re putting 2 sc around each dc post and 1 sc in each sc row-end, no more.
Bottom looks pointed: Use exactly 2 sc per half arch in the curves, and block with extra pins along the curve.
Thumb cups or folds: Work all 18 sc into the loop, and spread them evenly across the 12 chains.
Cuff top ruffles: Check that you used the four sc2tog decreases, for 12 sc.
Scales look uneven: Each sc must go into the center of an arch. Count the chains, and pin the arches open when you block.
Care
Hand wash in cool water, press dry in a towel, and reshape flat to dry. Store flat or hang it by its loop, away from heavy decorations.
Final Notes
Here is how the measurements build: the cuff is 3 in (7.6 cm) x 0.75 in (1.9 cm). The mesh is 5 arches wide, or 3 in (7.6 cm), and 12 rows deep, or 4 in (10.2 cm). That makes the piece 3 in (7.6 cm) x 4.75 in (12.1 cm) before the border. The 66-sc border adds 0.25 in (0.6 cm) on every side, for 3.5 in (8.9 cm) x 5.25 in (13.3 cm). The thumb brings the width to 4.25 in (10.8 cm), and the hanging loop brings the height to 6.5 in (16.5 cm). If you check the cuff gauge before you start, the rest of the sizes should follow.
Happy crocheting!