

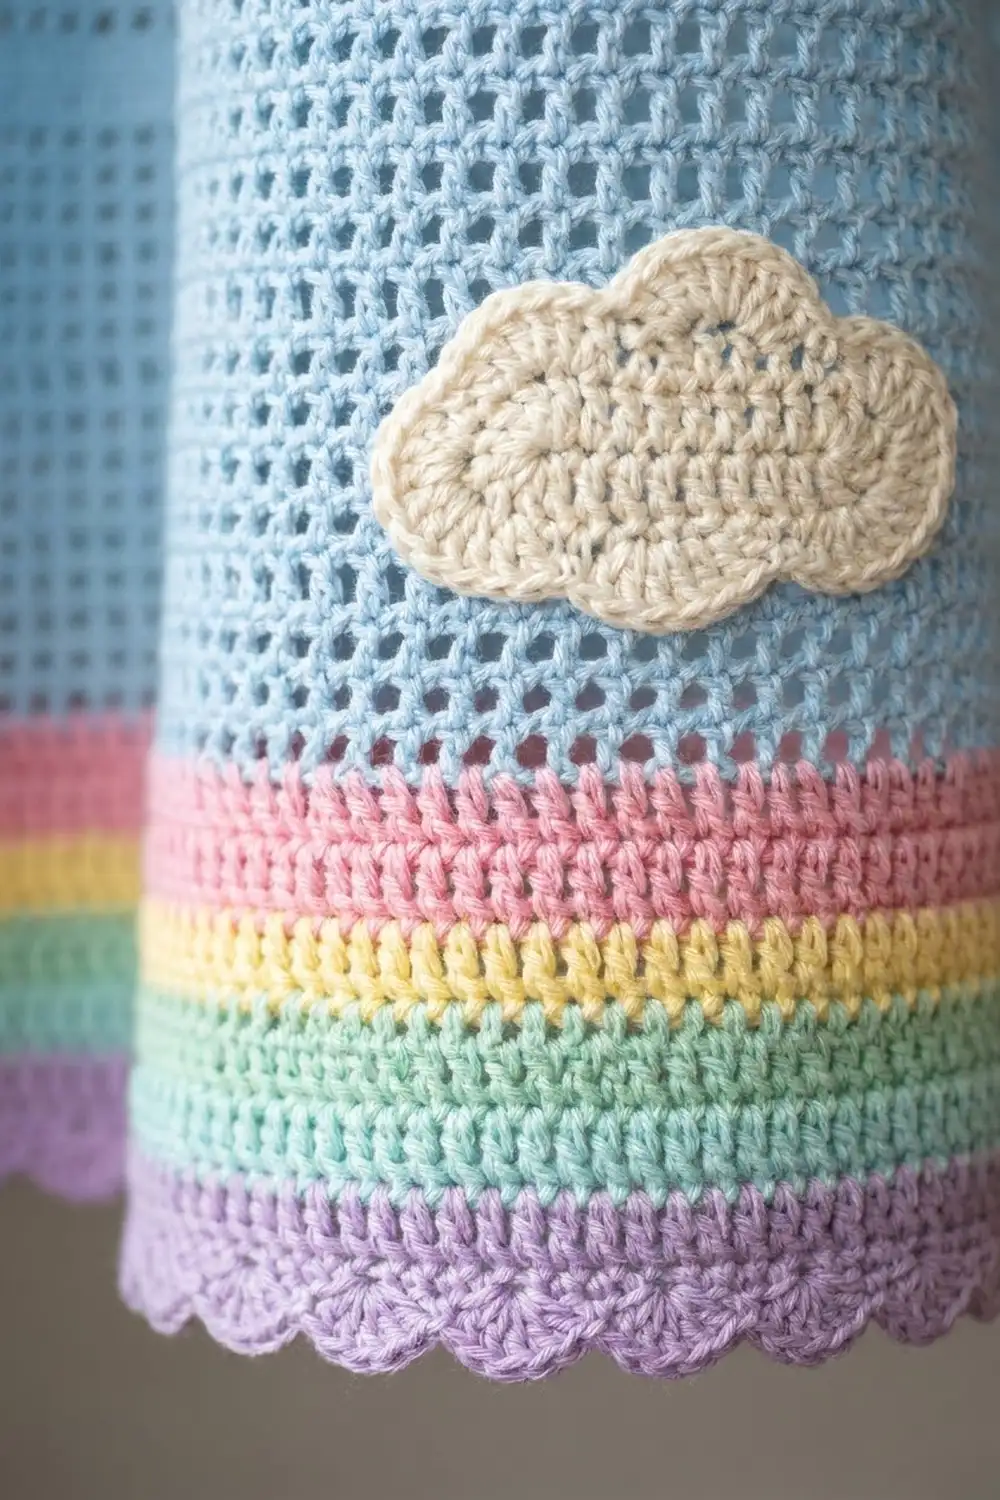
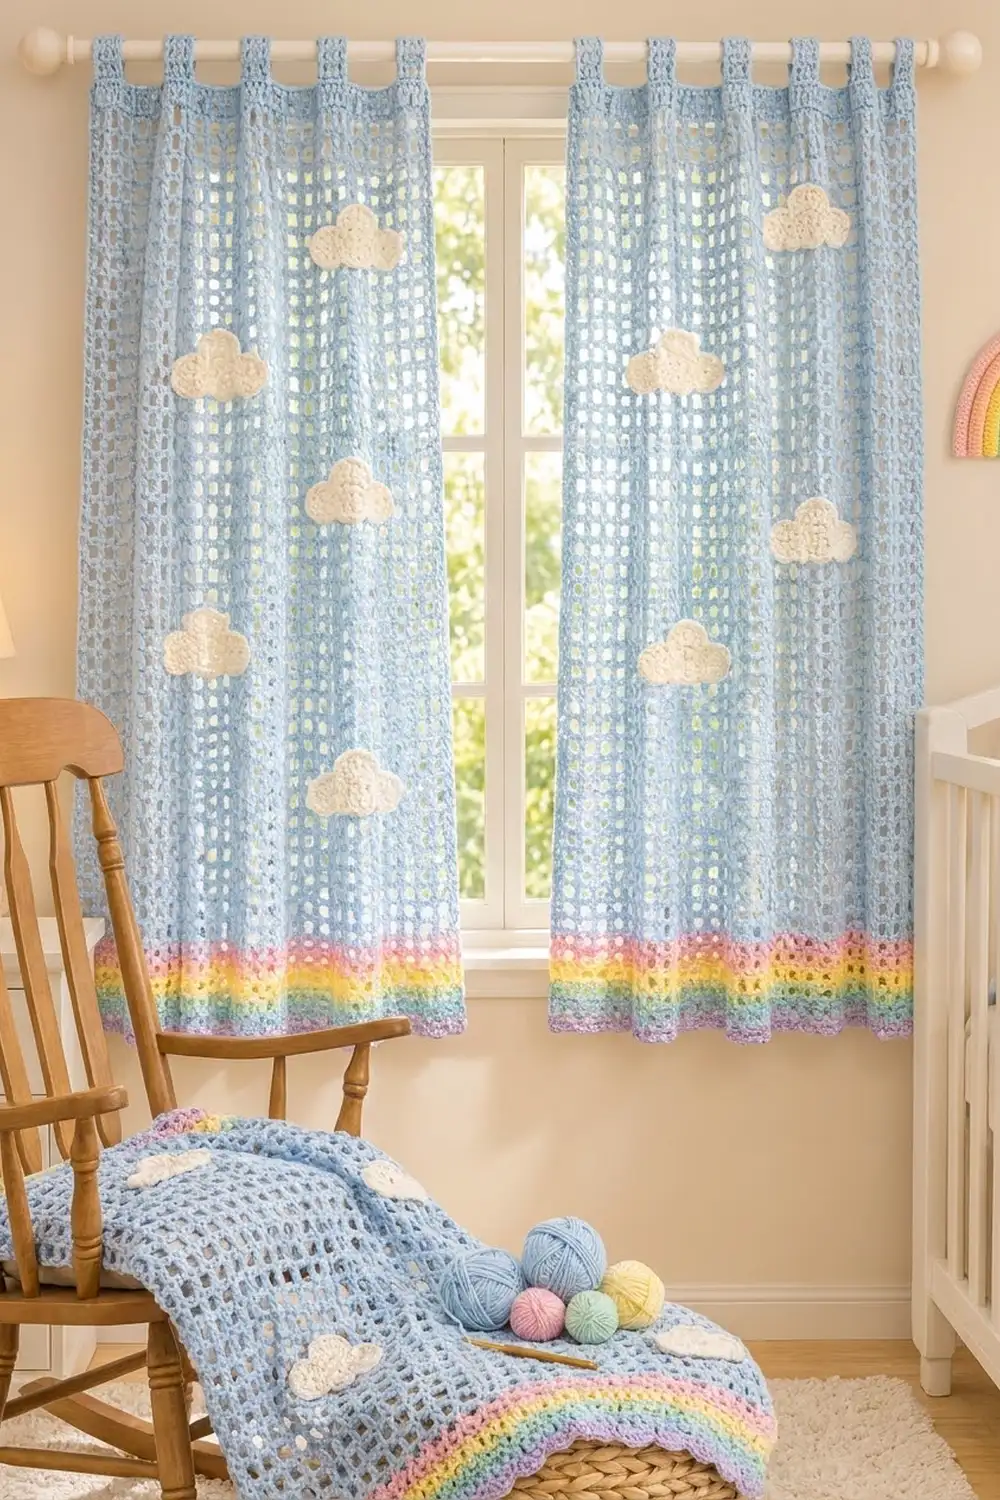
These Rainbow Cloud curtain panels bring a soft, airy sky into a nursery window. A light sky-blue filet mesh lets daylight through, and small cream clouds float across the surface. A pastel rainbow band at the hem finishes each panel with a little lavender scallop.
The palette is calm: sky blue, cream, pink, yellow, mint and lavender. The open mesh keeps the look light and modern, while the stripes and puffy clouds add a playful nursery touch.
This pattern uses US crochet terms. Each finished panel measures 24.5 in (62.2 cm) wide by 49.25 in (125.1 cm) long, plus 2.75 in (7.0 cm) tab loops, for a hanging length of 52 in (132.1 cm) from the top of the rod.
Each panel is worked flat from the bottom up: the rainbow band first, then the blue mesh, then a solid header. A single border round frames the panel, a lavender scallop trims the hem, and seven tabs are worked off the top. Finally, six cream clouds are sewn on per panel. The two panels stay separate so they open and close independently.
Finished Size and Construction
- Finished panel size: 24.5 in x 49.25 in (62.2 cm x 125.1 cm), plus 2.75 in (7.0 cm) tabs
- Skill level: Easy / Intermediate
- Terminology: US crochet terms
- Yarn weight: Worsted (#4)
- Hook: 5.5 mm (US I-9)
- Number of pieces: 2 curtain panels and 12 cloud appliqués
- Layout: 2 separate panels side by side on one rod (not joined)
- Piece size: each cloud 4 in x 2 in (10.2 cm x 5.1 cm)
- Size before border: 24 in x 48 in (61.0 cm x 121.9 cm)
- Border depth: 0.25 in (0.6 cm) on sides and top; 1 in (2.5 cm) at the hem
Materials
Choose a smooth worsted cotton or cotton-acrylic blend. Smooth yarn shows the square mesh clearly and drapes well. Avoid fuzzy yarns, which blur the holes. Quantities below are for both panels and assume about 200 yd (182.9 m) per 100 g.
- Sky Blue (A): 700 g, 1,280 m
- Pastel Pink (B): 50 g, 91 m
- Butter Yellow (C): 50 g, 91 m
- Mint Green (D): 50 g, 91 m
- Lavender (E): 60 g, 110 m
- Cream (F): 60 g, 110 m
All quantities include roughly a 10% margin for swatching and weaving in.
Tools:
– 5.5 mm (US I-9) crochet hook
– Tapestry needle
– Stitch markers
– Rustproof pins
– Measuring tape
– Blocking mats or a clean towel-covered surface
– Spray bottle
– Scissors
– Curtain rod, up to 1.25 in (3.2 cm) in diameter
Abbreviations (US Terms)
- ch – chain
- sl st – slip stitch
- sc – single crochet
- dc – double crochet
- tr – treble crochet
- sk – skip
- sp – space
- st(s) – stitch(es)
- rep – repeat
Special stitch – Mesh: ch 2, sk 2 sts (or sk the ch-2 sp), dc in next dc. Each mesh is 3 stitches wide (1 dc plus 2 ch) and forms one open square.
Gauge and Checkpoints
Gauge in mesh: 4 meshes and 5 rows = 4 in (10.2 cm).
Gauge in solid dc: 12 dc and 5 rows = 4 in (10.2 cm).
Gauge in sc: 12 sc and 16 rows = 4 in (10.2 cm).
Each mesh is 1 in (2.5 cm) wide and each dc row is 0.8 in (2.0 cm) tall.
Test first: Ch 27. Dc in 4th ch from hook and each ch across (25 sts). Work 9 mesh rows of 8 meshes. The swatch should measure 8 in x 8 in (20.3 cm x 20.3 cm). Also make one full cloud before starting the panels; it should measure 4 in x 2 in (10.2 cm x 5.1 cm).
If too big: go down a hook size. If too small: go up a hook size. Width matters most; length can be adjusted by adding or removing mesh rows.
Checkpoints for each panel:
– After Row 8 (rainbow band): 24 in (61.0 cm) wide, 6.4 in (16.3 cm) tall
– After Row 33: 26.4 in (67.1 cm) tall
– After Row 58 (last mesh row): 46.4 in (117.9 cm) tall
– After Row 60: 24 in x 48 in (61.0 cm x 121.9 cm)
Curtain Panel (Make 2)
Change colors on the last yarn over of the final dc of each stripe. Cut the old color, leaving a 6 in (15.2 cm) tail to weave in later. The turning ch-3 counts as a dc throughout.
Rainbow Band
Foundation: With E, ch 75.
Row 1 (E): Dc in 4th ch from hook (skipped chs count as first dc) and in each ch across. (73 sts)
Row 2 (E): Ch 3, turn. Dc in each st across, ending in top of turning ch. (73 sts)
Rows 3–4 (D): Rep Row 2. (73 sts)
Rows 5–6 (C): Rep Row 2. (73 sts)
Rows 7–8 (B): Rep Row 2. Change to A at the end of Row 8. (73 sts)
The band is now 6.4 in (16.3 cm) tall, with lavender at the hem and pink at the top.
Blue Mesh
Row 9 (A), conversion row: Ch 3, turn. *Ch 2, sk 2 sts, dc in next st; rep from * 24 times. (25 dc + 48 ch = 73 sts; 24 meshes)
Row 10: Ch 3, turn. *Ch 2, sk ch-2 sp, dc in next dc; rep from * across, working the last dc in the top of the turning ch. (24 meshes; 73 sts)
Rows 11–58: Rep Row 10. (24 meshes; 73 sts)
You now have 50 mesh rows, 40 in (101.6 cm) of mesh. Rows 9–58 are mesh rows 1–50 for cloud placement.
Solid Header
Row 59, conversion row: Ch 3, turn. *2 dc in ch-2 sp, dc in next dc; rep from * across. (25 dc worked into dc + 48 dc worked into spaces = 73 sts)
Row 60: Ch 3, turn. Dc in each st across. (73 sts)
Do not fasten off. The panel measures 24 in x 48 in (61.0 cm x 121.9 cm).
Cloud Appliqué (Make 12)
Each cloud is one flat piece with a straight bottom and three bumps.
Foundation: With F, ch 12.
Row 1: Sc in 2nd ch from hook and each ch across. (11 sc)
Row 2: Ch 1, turn. Sc in each st across. (11 sc)
Row 3 (bumps): Turn (no ch). Sl st in st 1, sk st 2, 7 dc in st 3, sk st 4, sl st in st 5, 9 tr in st 6, sl st in st 7, sk st 8, 7 dc in st 9, sk st 10, sl st in st 11. (2 small bumps of 7 dc, 1 tall center bump of 9 tr)
Round 4 (edging): Ch 1. Sc in sl st at st 11, sc in each of 7 dc, sl st in valley sl st, sc in each of 9 tr, sl st in valley sl st, sc in each of 7 dc, sc in sl st at st 1. Work 2 sc down the row-ends, 11 sc across the foundation loops, and 2 sc up the other row-ends. Join with sl st to first sc. (40 sc + 2 sl sts = 42 sts)
Fasten off, leaving a 16 in (40.6 cm) tail for sewing. The cloud measures 4 in x 2 in (10.2 cm x 5.1 cm).
Make All Pieces
- Panels: 2, each using A, B, C, D and E
- Clouds: 12 in F (6 per panel)
Cloud layout per panel (C = column of the cloud’s center mesh, counted from the left edge; mesh row = row of the cloud’s bottom edge):
Mesh row 46  | cloud at C8  |              |
Mesh row 39  |              | cloud at C17 |
Mesh row 32  | cloud at C8  |              |
Mesh row 25  |              | cloud at C17 |
Mesh row 18  | cloud at C8  |              |
Mesh row 11  |              | cloud at C17 |
-------------- rainbow band ---------------
Clouds sit 7 mesh rows apart, which is 5.6 in (14.2 cm). For the second panel, mirror the layout: use C17 where the grid shows C8, and C8 where it shows C17.
Attaching the Tabs and Clouds
The panels are never joined to each other. The only assembly is working the tabs and sewing the clouds onto each panel.
Clouds: Pin each cloud in place using the grid. Use the F tail and a whipstitch, going through the back loop of each edge stitch and around the nearest mesh bar or ch behind it. Keep stitches snug but not tight; the mesh should stay flat and square under the cloud. Weave the tail through the back of the cloud.
Tension check: After sewing a panel, lay it flat. It should still measure 24 in (61.0 cm) wide across every cloud row. Puckering means the sewing is too tight, so loosen and re-sew that cloud.
The tabs are worked after the border (below).
Border
Border gauge: 3 sc per inch (12 sc = 4 in / 10.2 cm), matching the mesh, where every 1 in (2.5 cm) mesh holds 3 sts.
Round 1 (A): Continuing from Row 60, ch 1, do not turn. Corner: (sc, ch 1, sc) in the last st of Row 60. Work down the side in row-ends, placing 2 sc in odd-numbered row-ends and 3 sc in even-numbered row-ends (150 sc over 60 rows). Corner: (sc, ch 1, sc) in the first foundation ch. Sc in each of the next 71 foundation chs. Corner: (sc, ch 1, sc) in the last foundation ch. Work up the second side as before (150 sc). Corner: (sc, ch 1, sc) in the first st of Row 60. Sc in each of the next 71 sts. Join to the first sc. Fasten off.
Counts per side, between corner ch-1 sps:
– Top: 1 + 71 + 1 = 73 sc
– Bottom: 1 + 71 + 1 = 73 sc
– Each long side: 1 + 150 + 1 = 152 sc
– Total: 450 sc + 4 corner ch-1 sps
Why the math works: The top and bottom keep the 73-stitch count, so nothing is added or lost. On the sides, 5 sc per 2 rows gives 150 sc over 48 in (121.9 cm), about 3.1 sc per inch. That nearly matches the 3 sc per inch across the width, so the edges lie flat without ruffling or pulling in.
Round 2, hem scallop (E, bottom edge only): Join E in the first sc after the bottom-right corner ch-1 sp. Ch 1, sc in same st. *Sk 2 sc, 5 dc in next sc, sk 2 sc, sc in next sc; rep from * 12 times, ending in the 73rd sc. (12 scallops; 13 sc + 60 dc) Fasten off.
The 73 sts divide as 6 x 12 + 1, so the scallops fit exactly. Each scallop is about 2 in (5.1 cm) wide and 0.75 in (1.9 cm) deep.
Tabs (A, make 7 per panel): Number the 73 top border sc from right to left. Tabs begin at sts 2, 13, 24, 35, 46, 57 and 68. Each tab is 5 sts wide with 6 sts between tabs: 1 + (7 x 5) + (6 x 6) + 1 = 73.
Row 1: Join A in the starting st, ch 1, sc in same st and next 4 sts. (5 sc)
Rows 2–22: Ch 1, turn. Sc in each st across. (5 sc)
Fasten off, leaving a 10 in (25.4 cm) tail. Each tab is 1.6 in (4.1 cm) wide and 5.5 in (14.0 cm) long. Fold it to the back and whipstitch Row 22 to the back of Row 60, directly behind the tab base. This makes a 2.75 in (7.0 cm) loop.
Final Blocking
- Weave in all remaining ends along the stripe edges or into solid stitches.
- Lay one panel face up on blocking mats or a towel-covered surface.
- Pin the long edges straight, measuring to 24.5 in (62.2 cm) wide.
- Pin the length to 49.25 in (125.1 cm), not counting the tabs.
- Pin each scallop point so the hem curves evenly.
- Mist the panel until damp. Press the clouds gently with your palm to flatten the bumps.
- Run your fingers along the mesh rows to square up the holes.
- Let dry completely before unpinning. Repeat for the second panel.
Final Quality-Control Checklist
- Each panel is 24.5 in (62.2 cm) wide and 49.25 in (125.1 cm) long, excluding tabs
- Rows 1–8 and 59–60 contain 73 sts; every mesh row has 24 meshes
- Stripe order from the hem up: lavender, mint, yellow, pink
- Border Round 1 has 73 / 152 / 73 / 152 sc per side
- 12 even scallops along each hem
- 7 tabs per panel, each 1.6 in (4.1 cm) wide with 6-st gaps
- 6 clouds per panel, staggered and mirrored between panels
- No puckering under any cloud
- All ends woven in securely
Troubleshooting
Panel narrows as you go: You are probably missing the last dc in the turning ch. Count 25 dc per mesh row.
Mesh looks slanted: The ch-2 is too tight. Chain a little more loosely.
Side edges ruffle: Switch to 2 sc in every row-end on that side, then re-check flatness.
Side edges pull in: Use 3 sc in every row-end for a few rows where it pulls.
Scallops don’t fit: Recount the bottom; it must be 73 sc between the corner spaces.
Cloud center bump curls: Mist and block it flat, and add more sewing stitches around the edge of the bump.
Tabs twist: Check that each tab is folded straight back before sewing.
Care
Hand wash cold or machine wash on a gentle cycle in a mesh laundry bag, then lay flat to dry. Re-block lightly if the mesh shifts.
Final Notes
The measurement chain is simple. Each mesh is 1 in (2.5 cm) and 3 sts wide, so 24 meshes give 73 sts and 24 in (61.0 cm). Sixty rows at 0.8 in (2.0 cm) each give 48 in (121.9 cm). The border adds 0.25 in (0.6 cm) on the sides and top and 1 in (2.5 cm) at the hem, for a 24.5 in x 49.25 in (62.2 cm x 125.1 cm) panel. The 2.75 in (7.0 cm) tabs bring the hanging length to 52 in (132.1 cm). Check your gauge early, count your meshes, and the clouds will float right where they belong.
Happy crocheting!