

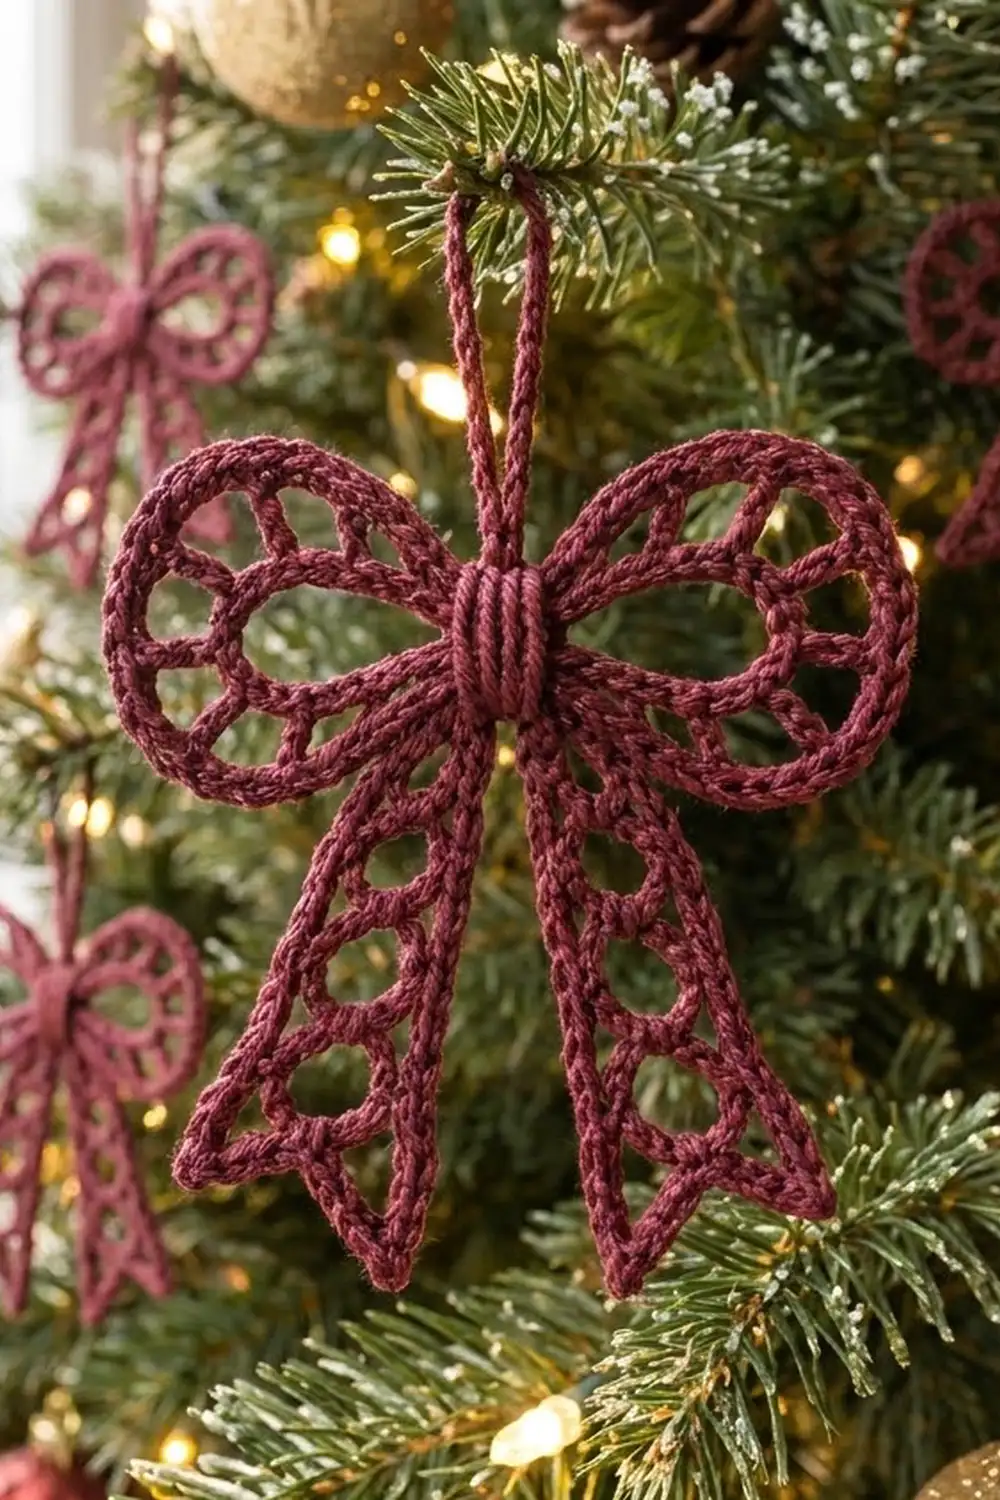
The Mulberry Lattice Bow is a lacy holiday ornament made from thick, rope-like lines of stitches. Two round loops with windows sit on either side of a wrapped center. Two tails with openings hang below, and a sturdy loop at the top lets you hang the bow on a branch, a gift, or a wreath.
The sample uses one solid burgundy yarn. A single deep color shows the lattice clearly against tree lights and greenery. The style is classic and a little vintage, between a ribbon bow and a lace medallion.
The pattern uses US crochet terms. The finished bow measures 4.5 in (11.4 cm) wide and 5.25 in (13.3 cm) tall. The hanging loop adds 1.5 in (3.8 cm), so the total height is 6.75 in (17.1 cm).
Construction is continuous and in one piece. You start with a small center ring and work the left loop into it, then a short top bridge, then the right loop. Next you work a base row along the bottom of the ring, and each tail grows downward from it in rows. Then you edge the tails, add the hanging loop, and finish with a narrow ridged band that wraps the center.
Finished Size and Construction
- Finished size: 4.5 in (11.4 cm) wide × 5.25 in (13.3 cm) tall; 6.75 in (17.1 cm) including the hanging loop
- Skill level: Intermediate (rounds worked into chain loops, shaped rows)
- Terminology: US crochet terms
- Yarn weight: DK (3), cotton or cotton blend
- Hook: 3.5 mm (E-4)
- Number of pieces: 1 (worked continuously, no sewing apart from the center band)
- Layout: 2 loops left and right of a center ring, 2 tails below, hanging loop above
- Loop size: 2 in (5.1 cm) long × 2 in (5.1 cm) tall each
- Size before border: 4.5 in (11.4 cm) wide × 5 in (12.7 cm) tall; tails 3.75 in (9.5 cm) long
- Border depth: 0.25 in (0.6 cm), on the tails only
Materials
Yarn: Use a smooth, tightly plied DK cotton or cotton blend. Mercerized cotton gives the crisp, rope-like stitch definition seen here and holds its shape on a tree. Avoid fuzzy or brushed yarns, because they blur the openings.
- Burgundy: 15 g, about 36 m (39 yd)
These amounts include a margin of roughly 20% for a gauge swatch and weaving in ends. One 50 g ball makes three ornaments.
Tools:
- 3.5 mm (E-4) crochet hook
- Tapestry needle
- Scissors
- 2 stitch markers
- Rust-proof pins and a foam blocking board
- Spray bottle with water
- Optional: fabric stiffener or diluted craft glue
Abbreviations (US Terms)
- ch – chain
- sl st – slip stitch
- sc – single crochet
- hdc – half double crochet
- dc – double crochet
- tr – treble crochet
- sp – space
- st(s) – stitch(es)
- BLO – back loop only
- tch – turning chain
- Rnd – round
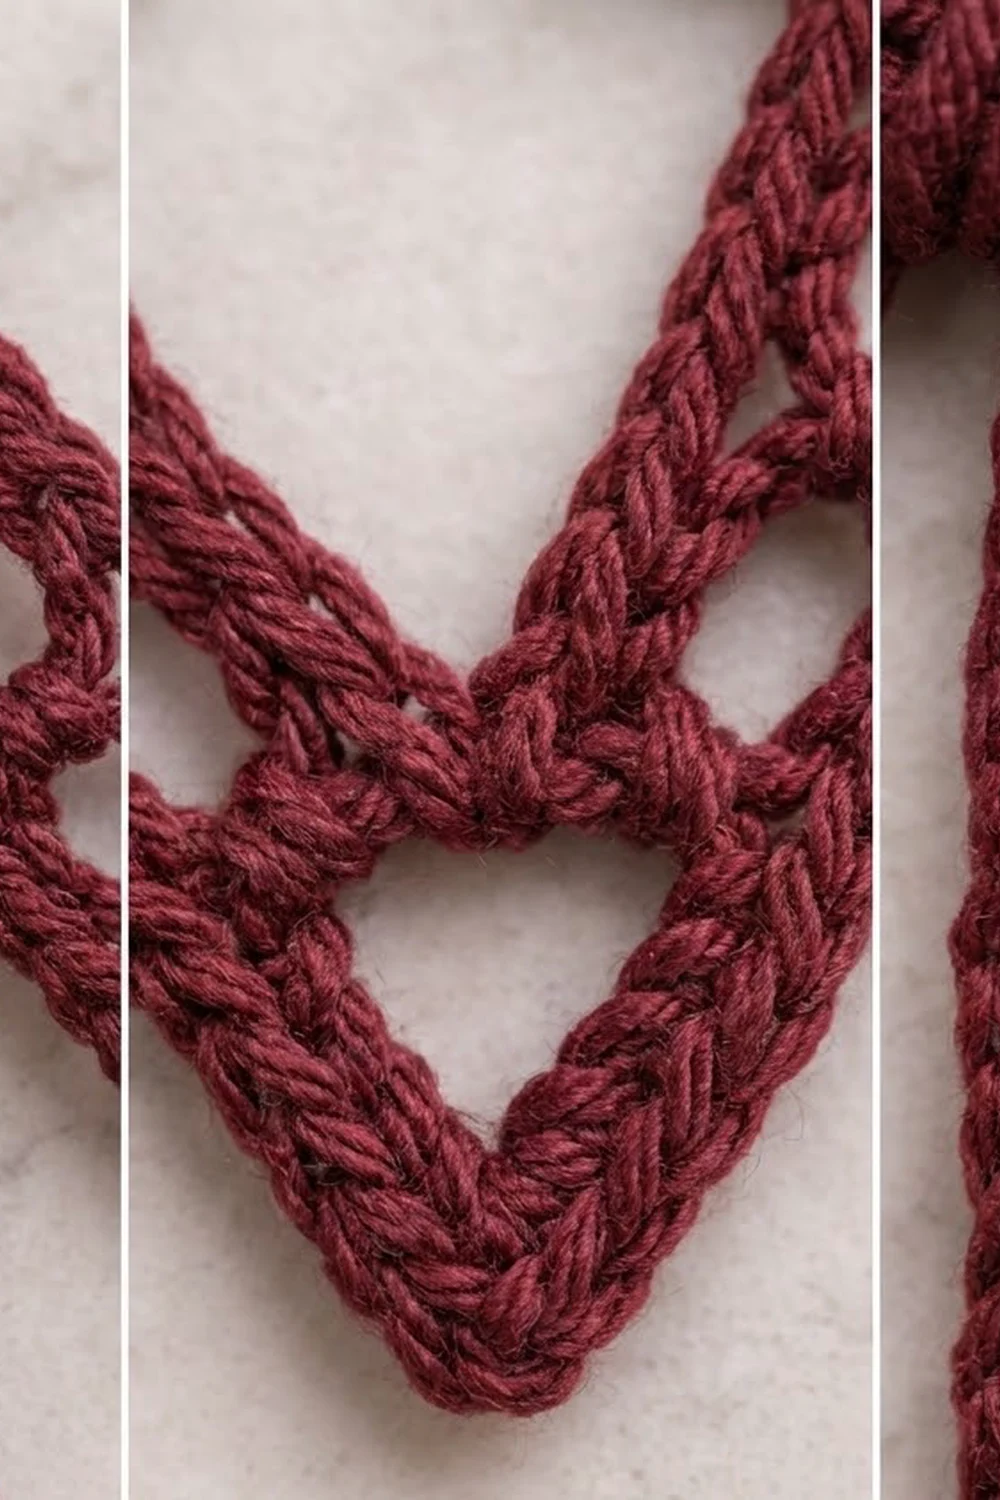
Special technique – working over a chain loop: When told to work sc “over” a chain loop or ring, insert the hook into the open space under the chain, not into the chain stitches. Pack the stitches snugly side by side. This makes the thick cord edge that outlines every part of the bow.
Gauge and Checkpoints
Gauge: 20 sc = 4 in (10.2 cm), 5 sc rows = 1 in (2.5 cm), and 1 dc row = 0.4 in (1.0 cm).
To check, chain 21 and work sc in the 2nd ch from the hook and in each ch across (20 sc). Work 4 more rows of sc. The swatch should measure 4 in (10.2 cm) wide and 1 in (2.5 cm) tall.
Make one full bow before starting a batch. Measure at each checkpoint:
- After Rnd A1b (teardrop): the inner teardrop is 1.25 in (3.2 cm) long from the ring.
- After Rnd A3 (full loop): each loop is 2 in (5.1 cm) long × 2 in (5.1 cm) tall.
- After the right loop: the bow measures 4.5 in (11.4 cm) wide.
- After tail Row 11: each tail is 3.2 in (8.1 cm) long from the ring.
- After tail Row 12: each tail is 3.75 in (9.5 cm) long to the points.
- After the border: each tail is 4 in (10.2 cm) long. The whole bow is 5.25 in (13.3 cm) tall.
If your bow is too big, go down to a 3.25 mm (D-3) hook. If it is too small, go up to a 3.75 mm (F-5) hook. If only the loops are off, change how tightly you pack the sc over the chain loops. Don’t change the stitch counts.
Center Ring and Left Loop
Ring: Ch 12, then sl st in the first ch to form a ring. Hold the ring with the join on the left. The left loop grows from this point.
Rnd A1 (inner teardrop chain): Ch 16, sl st in ring. (1 ch-16 loop)
Rnd A1b (teardrop cord): Ch 1, work 20 sc over the ch-16 loop, sl st in ring. (20 sc)
The chain loop is now a thick teardrop.
Rnd A2 (window bars): Ch 6, skip the first 3 sc, sc in the 4th sc. Ch 6, skip 3 sc, sc in the 8th sc. Ch 6, skip 4 sc, sc in the 13th sc. Ch 6, skip 3 sc, sc in the 17th sc. Ch 6, sl st in ring. (5 ch-6 arches, 4 sc anchors)
The anchor points are symmetrical: 3 sc are left unworked at each end, 3 between the side anchors, and 4 at the tip. The center window sits at the tip of the loop.
Rnd A3 (outer cord): Ch 1, work 7 sc over each ch-6 arch, sl st in ring. (35 sc: 5 arches × 7 sc)
Each arch becomes a smooth curve of the outer edge. The openings between the arches and the teardrop are the 5 windows. Checkpoint: loop is 2 in (5.1 cm) × 2 in (5.1 cm).
Top Bridge and Right Loop
Top bridge: Ch 1, work 5 sc over the top half of the ring, moving toward the right side. (5 sc) Place a marker in the 3rd sc; the hanging loop starts here later.
Right loop: Work Rnds A1, A1b, A2, and A3 exactly as for the left loop, with every sl st going into the right side of the ring. (35 sc on the outer cord)
Checkpoint: the bow measures 4.5 in (11.4 cm) from tip to tip: 2 in (5.1 cm) + 0.5 in (1.3 cm) center + 2 in (5.1 cm).
Tails
Row 1 (base for both tails): Ch 1, work 10 sc over the bottom half of the ring, moving from right to left. (10 sc) Turn.
The first tail is worked on the first 5 sts of this row and the second tail on the last 5.
First tail:
Row 2 (cell): Ch 3 (counts as dc), ch 3, skip 3 sts, dc in next st. (2 dc + 1 ch-3 sp = 5 sts) Turn.
Row 3 (bar): Ch 1, sc in first dc, 3 sc in ch-3 sp, sc in 3rd ch of tch. (5 sc) Turn.
Row 4 (cell): Repeat Row 2. (5 sts)
Row 5 (bar, widening): Ch 1, 2 sc in first dc, 3 sc in ch-3 sp, 2 sc in 3rd ch of tch. (5 worked + 2 added = 7 sc) Turn.
Row 6 (cell): Ch 3 (counts as dc), ch 5, skip 5 sts, dc in last st. (2 dc + 1 ch-5 sp = 7 sts) Turn.
Row 7 (bar): Ch 1, sc in first dc, 5 sc in ch-5 sp, sc in 3rd ch of tch. (7 sc) Turn.
Rows 8 and 10: Repeat Row 6. (7 sts each)
Rows 9 and 11: Repeat Row 7. (7 sc each)
You now have 5 openings: two narrow ones near the top and three wider ones below. Together they form the column of graduated ovals. Checkpoint: the tail measures 3.2 in (8.1 cm) from the ring. That is 6 sc rows × 0.2 in (0.5 cm) plus 5 dc rows × 0.4 in (1.0 cm).
Row 12 (V-notch): Ch 4 (counts as tr), dc in next st, hdc in next st, sl st in next st, hdc in next st, dc in next st, tr in last st. (7 sts) Fasten off.
The stitch heights step down from tr to sl st and back up. The outer corners hang lowest as two points, and the center sl st forms the inner V. Checkpoint: the tail is 3.75 in (9.5 cm) long to the points.
Second tail: Join yarn with a sl st in the 6th sc of Row 1, then work Rows 2–12 on the last 5 sts exactly as for the first tail. Fasten off.
Hanging Loop
Join yarn with a sl st in the marked 3rd sc of the top bridge. Ch 20, sl st in the same st. (1 ch-20 loop)
Ch 1, work 26 sc over the ch-20 loop, sl st in the same st. (26 sc) Fasten off.
The extra sc thicken the loop into a cord that matches the bow loops. Checkpoint: the loop stands 1.5 in (3.8 cm) tall.
Border
The border goes around each tail only. The loops and hanging loop already have their own sc edges.
Border gauge: the same as the main gauge, 5 sc = 1 in (2.5 cm). Hold the yarn a bit more loosely on the row ends so the edge doesn’t pull in.
Tail border (work on each tail): Join yarn at the outer top edge of the tail, where it meets the ring.
- Outer side: Work sc in row ends down to the point, as follows:
- Row 1: 1 sc
- Rows 2, 4, 6, 8, 10: 2 sc in each dc row end (10 sc)
- Rows 3, 5, 7, 9, 11: 1 sc in each sc row end (5 sc)
- Row 12: 3 sc along the tr post
- Total: 1 + 10 + 5 + 3 = 19 sc
- First point: Ch 2.
- Bottom edge: Sc in the tr, sc in the dc, sc in the hdc, sl st in the sl st, sc in the hdc, sc in the dc, sc in the tr. (6 sc + 1 sl st = 7 sts)
- Second point: Ch 2.
- Inner side: Work up to the ring the same way as the outer side, in reverse order. (19 sc)
- Sl st into Row 1 at the ring and fasten off.
Total per tail: 19 + 7 + 19 = 45 sts, plus 2 ch-2 points.
Why the math works: each row end gets sc to match its height. An sc row is 0.2 in (0.5 cm), which takes 1 sc. A dc row is 0.4 in (1.0 cm), which takes 2 sc. A tr row end takes 3 sc. At 5 sc per inch, the 19 sc cover the side of the tail without stretching or ruffling. The bottom edge gets one stitch per stitch, so it keeps the notch shape. The ch-2 at each point gives the sharp tips without adding bulk. The border adds 0.25 in (0.6 cm) all around. The tails grow from 3.75 in (9.5 cm) to 4 in (10.2 cm) long. The bottom width grows from 1.4 in (3.6 cm) to 1.9 in (4.8 cm), and the top width from 1 in (2.5 cm) to 1.5 in (3.8 cm).
Center Band
The center band is worked directly off the back of the bow, so the ornament stays in one piece.
With the back of the bow facing, join yarn with a sl st in Row 1 between the two tails.
Row 1: Ch 5, sc in 2nd ch from hook and in next 3 ch. (4 sc) Turn.
Rows 2–8: Ch 1, sc BLO in each st across. (4 sc each row) Turn after each row.
The BLO rows make the horizontal ridges seen on the wrapped center. Checkpoint: the band is 0.8 in (2.0 cm) wide × 1.6 in (4.1 cm) long.
Take the band up the back, over the top bridge, and down the front over the ring. Pull it snug so the loops pinch in at the center. Sew the last row to the base at the back with the tail end. Weave in all ends.
Final Blocking
- Lightly spray the bow with water until it is damp but not dripping.
- Lay it face up on the blocking board.
- Pin the center first so it sits straight.
- Shape each loop into a rounded teardrop 2 in (5.1 cm) long. Pin the outer cord at the tip and at the top and bottom curves.
- Open each window with the tip of a pin so the bars sit evenly spaced.
- Splay the tails slightly outward so the outer points sit about 4.5 in (11.4 cm) apart, in line with the loop tips.
- Pin each tail point sharply, and pin the center of the V-notch upward.
- Pin the hanging loop into a neat teardrop 1.5 in (3.8 cm) tall.
- Optional: brush on diluted fabric stiffener for a firmer ornament.
- Let the bow dry completely, at least 12 hours, before unpinning.
Final Quality-Control Checklist
- Bow measures 4.5 in (11.4 cm) wide × 5.25 in (13.3 cm) tall.
- Each loop has a 20-sc teardrop, 5 even windows, and a 35-sc outer cord.
- Each tail has 5 openings, 2 narrow over 3 wide.
- Each tail border has 19 sc per side, 7 sts across the bottom, and 2 sharp points.
- The V-notch is centered on each tail.
- The center band is snug and its ridges run horizontally.
- The hanging loop is centered over the band.
- All ends are woven in invisibly at the back.
Troubleshooting
The loops cup or curl. The sc over the arches are too tight. Redo Rnd A3 with a looser grip or one hook size up.
The windows look uneven. Recount the skipped sc in Rnd A2 (3, 3, 4, 3, and 3 left at the end).
The tails ruffle along the sides. You added extra sc on the row ends. Keep strictly to 1 sc per sc row, 2 per dc row, and 3 on the tr row.
The tails pull in at the sides. You missed row ends. Recount for 19 sc per side.
The V-notch is shallow. Make sure Row 12 uses a true tr at each corner and a sl st at the center.
The center looks loose. Pull the band tighter before sewing, or add one less row.
The bow droops on the tree. Use stiffener, or switch to mercerized cotton.
Care
Hand wash in cool water, press out the water in a towel, and reshape flat to dry. Stiffened ornaments should only be spot cleaned.
Final Notes
The measurements build on each other. Gauge is 20 sc = 4 in (10.2 cm). Each loop is 2 in (5.1 cm), and the bow is 4.5 in (11.4 cm) wide. The tails are 3.2 in (8.1 cm) after Row 11 and 3.75 in (9.5 cm) after Row 12, then 4 in (10.2 cm) after the border. The finished bow is 5.25 in (13.3 cm) tall, or 6.75 in (17.1 cm) with the hanging loop. If you check each stage, the finished ornament will come out right, and every bow in a batch will match.
Happy crocheting!