

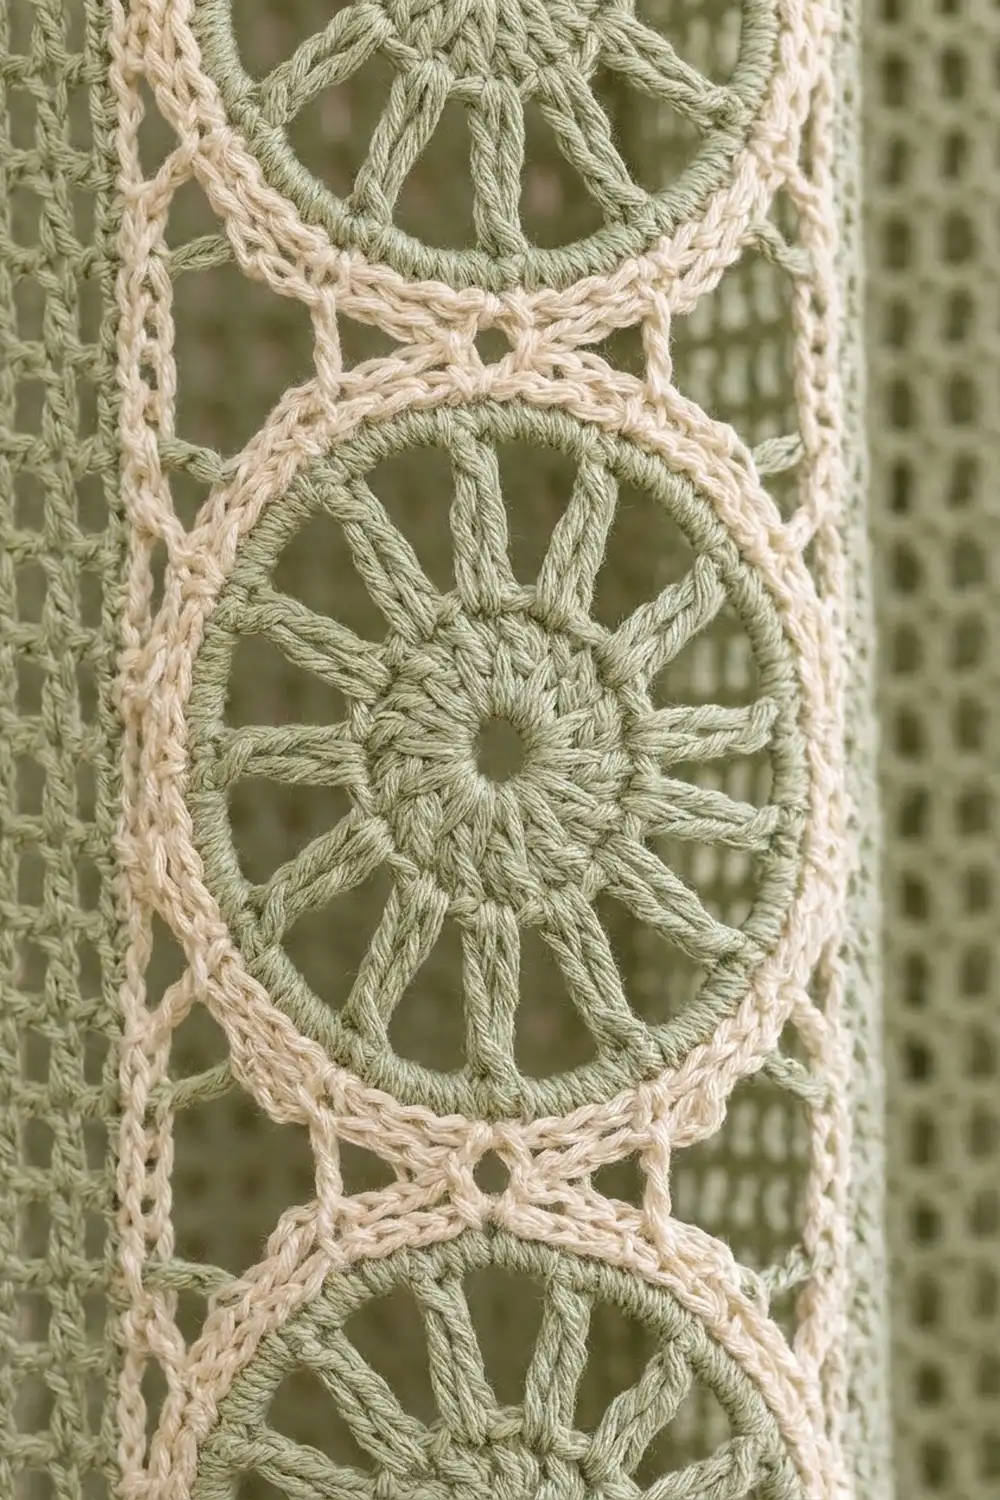
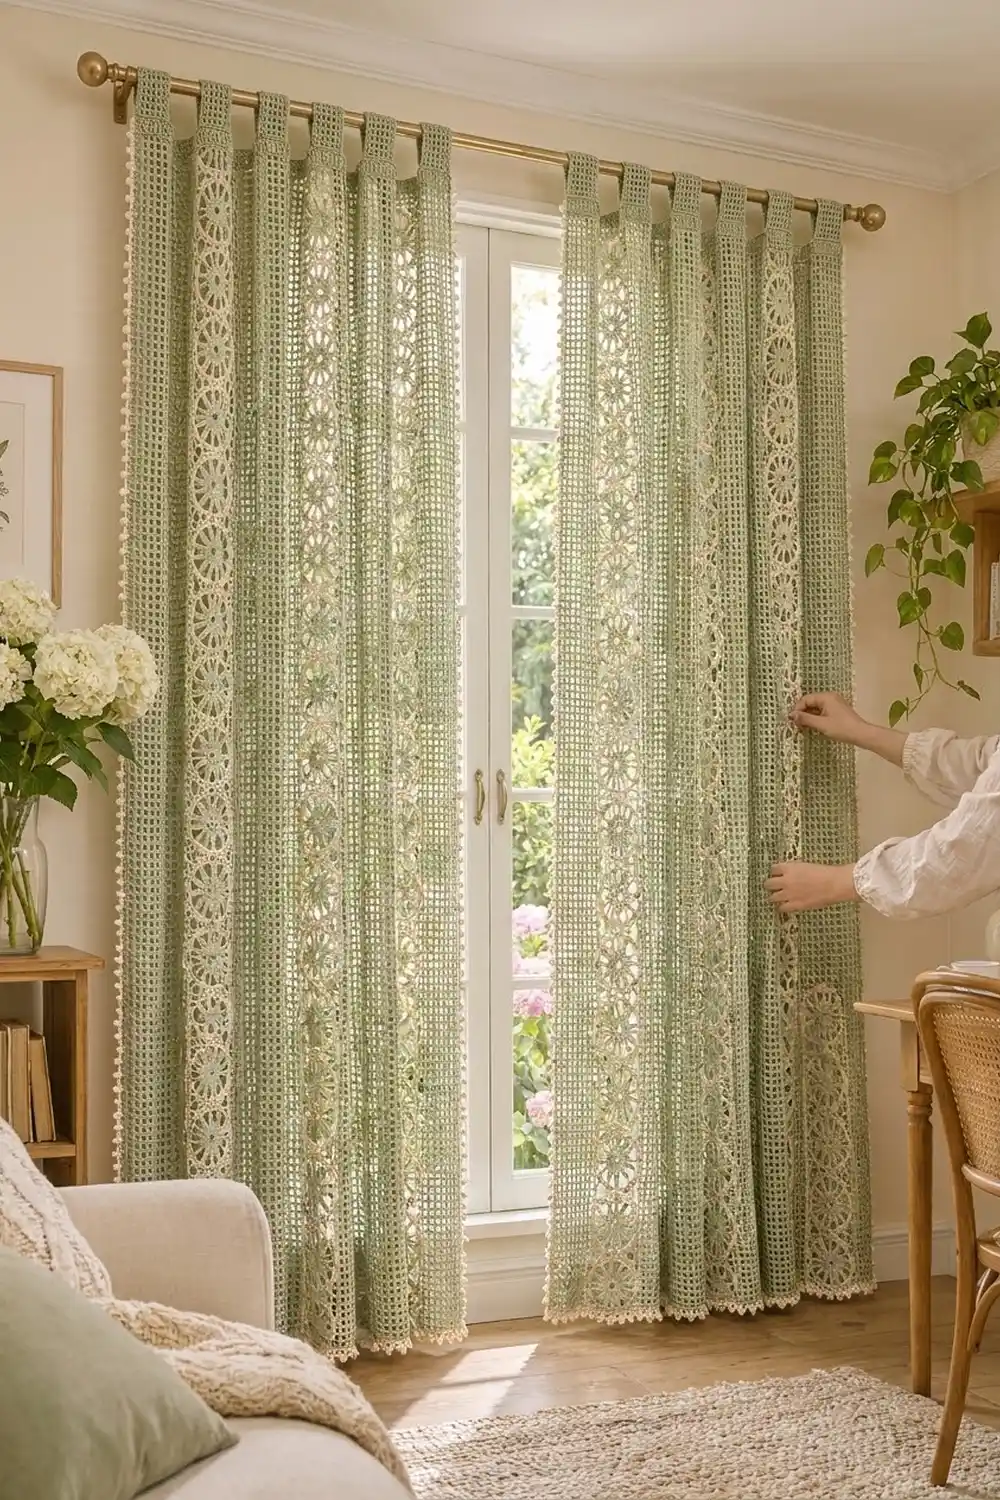
This curtain panel pairs soft sage-green filet mesh with columns of round wheel motifs. Each wheel has a sage center with twelve spokes, and a cream lace ring squares it off so the motifs line up in neat vertical columns. A row of cream bobble picots runs down both sides and across the hem, and sage mesh tabs at the top slide straight onto a curtain rod.
The palette is just two colors, sage and cream, so the panel looks light and cottage-style. It lets daylight through the mesh and still gives a room some privacy. Hang one panel on a small window or make two for a full pair.
The pattern uses US crochet terms. One finished panel measures 33 x 73 in (83.8 x 185.4 cm), not counting the tabs, which add a loop about 3 in (7.6 cm) tall.
To build the panel, you make 48 wheel motifs and join them into 3 vertical strips of 16. Then you work 4 long filet mesh strips and join them between the motif strips with a cream single-crochet ridge. A cream single-crochet round, a bobble-picot edging and seven mesh tabs finish the panel.
Finished Size and Construction
- Finished size: 33 x 73 in (83.8 x 185.4 cm), plus tabs
- Skill level: Intermediate
- Terminology: US crochet terms
- Yarn weight: DK (light worsted, #3) cotton
- Hook: 4 mm (US G-6)
- Number of pieces: 48 wheel motifs, 4 mesh strips, 7 tabs (the tabs are worked directly onto the panel)
- Layout: 7 vertical strips: mesh, motifs, mesh, motifs, mesh, motifs, mesh
- Piece size: each motif is 4.5 x 4.5 in (11.4 x 11.4 cm); each mesh strip is 4.5 x 72 in (11.4 x 182.9 cm)
- Size before border: 31.5 x 72 in (80.0 x 182.9 cm)
- Border depth: 0.25 in (0.6 cm) at the top; 0.75 in (1.9 cm) on the sides and bottom
Materials
Mercerized or combed DK cotton works best. It holds the spokes crisp, blocks flat and hangs without sagging. Avoid acrylic blends that stretch, because a long curtain hangs from its own weight.
Quantities below are for one panel. Double them for a pair.
- Sage green: 650 g, approx. 1,495 m (13 balls of 50 g / 115 m)
- Cream: 350 g, approx. 805 m (7 balls of 50 g / 115 m)
These amounts include about a 10% margin for swatching and differences in tension.
Tools:
- 4 mm (US G-6) crochet hook
- Tapestry needle
- Scissors
- Locking stitch markers
- Rust-proof pins and blocking mats
- Measuring tape
- Spray bottle
Abbreviations (US Terms)
- ch – chain
- sl st – slip stitch
- sc – single crochet
- hdc – half double crochet
- dc – double crochet
- tr – treble crochet
- sk – skip
- sp(s) – space(s)
- st(s) – stitch(es)
- RS / WS – right side / wrong side
Special stitch – bobble picot (bp): Sc in the next st, ch 3. In the 3rd ch from the hook, work a 4-dc bobble: yo, insert hook, pull up a loop, yo, pull through 2 loops, repeat 3 more times, then yo and pull through all 5 loops. Sl st into the top of the sc you just made. Each bp uses 1 stitch of the round below and sticks out as a small round ball.
Gauge and Checkpoints
Mesh gauge: 10 mesh squares and 10 rows = 4.5 x 4.5 in (11.4 x 11.4 cm). Each square is 0.45 in (1.1 cm) wide and tall.
Motif gauge: One finished motif = 4.5 in (11.4 cm) square.
The whole layout depends on these two gauges matching, because each motif sits beside exactly 10 mesh rows. Before you start the strips, test one motif and work 10 rows of mesh.
Checkpoints:
- After Round 4, the sage circle measures 3.25 in (8.3 cm) across.
- After Round 6, the motif is 4.5 in (11.4 cm) square.
- Ten mesh rows measure 4.5 in (11.4 cm).
- A finished strip of 16 motifs measures 72 in (182.9 cm).
If your pieces are too big, go down a hook size, to 3.75 mm. If they are too small, go up to 4.5 mm. The mesh and the motifs need to match each other more than they need to match the numbers exactly. If they differ by more than 0.25 in (0.6 cm) over 4.5 in, change the hook for just one of them.
Wheel Motif (Make 48)
Start with sage.
Round 1: Make a magic ring. Ch 3 (counts as dc), work 11 dc into the ring, then sl st to the top of the ch-3. (12 dc)
Round 2: Ch 3 (counts as dc), dc in the same st, then 2 dc in each st around. Sl st to the top of the ch-3. (24 dc)
Round 3: Ch 4 (counts as tr), ch 3, sk next st, tr in next st, ch 3, sk next st; repeat from * 10 more times. Sl st to the top of the ch-4. (12 tr, 12 ch-3 sps) These are the 12 spokes.
Round 4: Sl st into the first ch-3 sp, ch 1, then work 4 sc in each ch-3 sp around. Sl st to the first sc. (48 sc) Fasten off sage. The circle should measure 3.25 in (8.3 cm).
Change to cream.
Round 5: Join cream with a sc in any sc. Ch 3, sk next sc, sc in next sc; repeat from * 22 more times, then ch 3, sk last sc, and sl st to the first sc. (24 sc, 24 ch-3 loops) This is the cream lace ring.
Round 6 (squaring round): Sl st into the first ch-3 loop. Ch 4 (counts as tr), then work (tr, ch 2, 2 tr) in the same loop to make the first corner. Then work the side: 3 dc in the next loop, 3 hdc in the next loop, 3 sc in the next loop, 3 hdc in the next loop, 3 dc in the next loop; in the next loop work (2 tr, ch 2, 2 tr) for a corner. Repeat the side and corner around, ending with one more side, and sl st to the top of the ch-4. Fasten off.
Count: 76 sts and 4 ch-2 corner sps. Each side has 19 sts between its corner sps: 2 tr + 15 + 2 tr. The tall tr in the corners and the short sc in the middle of each side turn the circle into a square.
Checkpoint: 4.5 in (11.4 cm) square. Weave in all ends now.
Mesh Strip (Make 4)
Use sage.
Row 1: Ch 24. Dc in the 6th ch from the hook (the 5 skipped chs count as 1 dc and 1 ch-1 sp). Ch 1, sk 1 ch, dc in next ch; repeat from * to the end. Turn. (11 dc, 10 ch-1 sps = 21 sts, 10 squares)
Row 2: Ch 4 (counts as dc and ch 1), dc in the next dc, ch 1, dc in the next dc; repeat from * across, working the last dc into the turning ch. Turn. (11 dc, 10 ch-1 sps)
Rows 3–160: Repeat Row 2. Fasten off.
Checkpoints: After Row 10, the strip measures 4.5 x 4.5 in (11.4 x 11.4 cm). After Row 160, it measures 4.5 x 72 in (11.4 x 182.9 cm). Place a marker every 10 rows; each marker lines up with one motif later.
Make All Pieces
For one panel:
- Wheel motifs: 48 (Rounds 1–4 in sage, Rounds 5–6 in cream)
- Mesh strips: 4, all sage
For a pair, make 96 motifs and 8 strips.
Layout grid (M = mesh strip, W = wheel motif; this pattern repeats for 16 rows):
M | W | M | W | M | W | M
M | W | M | W | M | W | M
M | W | M | W | M | W | M
... (16 motifs tall in total)
Joining
Step 1: Join the motifs into strips
Hold two motifs with RS together. With cream, sl st through both loops of both layers: in the corner sp, in each of the 19 side sts, and in the next corner sp. (21 sl sts per join) Join 16 motifs in a column, which takes 15 joins per strip. Make 3 strips.
Step 2: Join the mesh and motif strips
Hold one mesh strip and one motif strip with WS together, so that the cream ridge sits on the front like the outlines in the finished curtain. Start at the bottom. Join cream through both layers and work sc through both pieces at once:
- Motif side: Work 1 sc in the outer bottom corner sp, then 1 sc in each of the 19 side sts. At each seam between motifs, work 1 sc through both corner sps held together, then 1 sc in each of the next 19 sts. Finish with 1 sc in the top outer corner sp. That gives 20 positions per motif, plus 1 at the top: (16 x 20) + 1 = 321 positions.
- Mesh side: Work 2 sc around each row-end post, for 160 x 2 = 320 positions, and put 1 more sc into the top of the last dc of Row 160. That gives 321 positions.
Each block of 10 mesh rows (20 sc) lines up with one motif (1 corner or seam + 19 sts = 20 sc), so your markers should meet the motif seams. (321 sc per seam)
Join the strips in the order M-W-M-W-M-W-M, for 6 seams in total.
Tension: Keep the sc loose enough that the seam is as long as the strips. If the seam pulls in, work the joining sc with a hook one size larger.
Checkpoint: The panel measures 31.5 x 72 in (80.0 x 182.9 cm).
Border
Border gauge: About 4.5 sc per inch (2.5 cm) along the edges. The top edge is 147 sc over 31.5 in, and each side is 320 sc over 72 in.
Round 1 (cream): Join cream at the top right corner, RS facing.
- Top: Work 1 sc in each of the 21 positions of each strip. On a mesh strip, that means each dc and each ch-1 sp. On a motif strip, it means the corner sp, the 19 sts and the corner sp. Do not work into the seam ridges. 7 strips x 21 = 147 sc. Ch 2 for the corner.
- Side: Work 2 sc around each row end: 160 x 2 = 320 sc. Ch 2.
- Bottom: Work 1 sc in each foundation position, 21 per strip: 147 sc. Ch 2.
- Second side: 320 sc. Ch 2, then sl st to the first sc. Fasten off.
Total: 934 sc + 4 ch-2 corner sps. The panel now measures 32 x 72.5 in (81.3 x 184.2 cm).
Why the math works: Every strip has 21 positions across, so the top and bottom are simply 7 x 21. No stitches are added at the seams, because the seam ridges stay behind the border. The side count matches the 2-sc-per-row rule used in the joining seams, so the sides hang the same length as the inner seams.
Round 2 (bobble edging, sides and bottom only): With RS facing, join cream with a sc in the top left ch-2 corner sp.
- Left side (320 sts): Sc in the next st, bp, sc in next 3 sts, bp; repeat from * 78 more times, then sc in the last 2 sts. (80 bp; 1 + 80 + 237 + 2 = 320)
- Bottom corner: (sc, bp, sc) in the ch-2 sp.
- Bottom (147 sts): Sc in the next 3 sts, bp, sc in next 3 sts, bp; repeat from * 34 more times, then sc in the last 3 sts. (36 bp; 3 + 36 + 105 + 3 = 147) The bobbles are spaced evenly, with 3 sc at each end.
- Bottom corner: (sc, bp, sc) in the ch-2 sp.
- Right side (320 sts): Sc in the next 2 sts, bp, sc in next 3 sts; repeat from * 78 more times, then bp and sc in the last st. (80 bp; 2 + 316 + 2 = 320) Sc in the top right corner sp. Fasten off.
Total: 198 bobble picots. The panel now measures 33 x 73 in (83.8 x 185.4 cm).
Tabs (Make 7)
On the 147 top sc, the tabs start on sts 1, 24, 47, 70, 93, 116 and 139. Each tab uses 9 sts, with 14 sts between tabs (7 x 9 + 6 x 14 = 147).
Row 1: With RS facing, join sage in the first st of the tab. Ch 4 (counts as dc and ch 1), sk 1, dc in next st, [ch 1, sk 1, dc in next st] 3 times. Turn. (5 dc, 4 ch-1 sps)
Rows 2–14: Ch 4 (counts as dc and ch 1), dc in next dc, [ch 1, dc in next dc] twice, ch 1, dc in the 3rd ch of the turning ch. Turn. (5 dc, 4 sps)
Each tab measures 1.8 x 6.3 in (4.6 x 16.0 cm). Fold the tab to the WS and sew Row 14 to the back of the cream top round. This makes a loop about 3 in (7.6 cm) tall.
Final Blocking
- Weave in all remaining ends along the seam ridges, going in two directions.
- Soak the panel in cool water for 15 minutes, then gently press the water out. Do not wring it.
- Roll it in towels to remove more water.
- Lay it flat on mats, with the WS up so the ridges stay rounded.
- Pin it to 33 x 73 in (83.8 x 185.4 cm). Pin the mesh columns straight and pull each wheel round.
- Pin each bobble along the hem so they all point down.
- Let it dry completely, which takes 24–48 hours.
Final Quality-Control Checklist
- Each motif has 12 spokes and 19 sts per side.
- Each mesh strip has 160 rows, with markers every 10 rows.
- Each strip seam has 321 sc, and the motif seams line up with the mesh markers.
- Border Round 1 has 147 / 320 / 147 / 320 sc.
- There are 198 bobble picots: 80 + 1 + 36 + 1 + 80.
- There are 7 tabs, evenly spaced, each with 5 dc per row.
- The panel blocks to 33 x 73 in (83.8 x 185.4 cm).
Troubleshooting
- Motif cups: Round 3 is too tight. Loosen the tr or change the ch 3 to a ch 4.
- Motif ruffles: Use a hook one size smaller for Rounds 5–6.
- Corners are rounded: Make sure each corner has 2 tr and ch 2 on each side of the corner.
- Mesh leans: Always work the last dc into the turning ch.
- Strips end at different lengths: Compare the markers with the motif seams. Add or remove mesh rows only in groups of 10.
- Hem flares: Work the bobble edging with a hook one size smaller.
- Bobbles go flat: Close them firmly and sl st tightly into the sc.
Care
Hand wash cool and dry flat, or machine wash on a gentle cycle inside a mesh bag and then reshape. Do not tumble dry, because a heavy wet curtain can stretch.
Final Notes
Every measurement in this panel builds on the one before. Ten mesh squares across and ten rows tall make 4.5 in (11.4 cm), which matches one 4.5 in (11.4 cm) wheel motif. Sixteen motifs make a 72 in (182.9 cm) strip, and seven strips make 31.5 x 72 in (80.0 x 182.9 cm). The sc round brings it to 32 x 72.5 in (81.3 x 184.2 cm), and the bobble edging finishes it at 33 x 73 in (83.8 x 185.4 cm). If your first motif and your first 10 mesh rows both measure 4.5 in, the rest of the panel will fit.
Happy crocheting!