

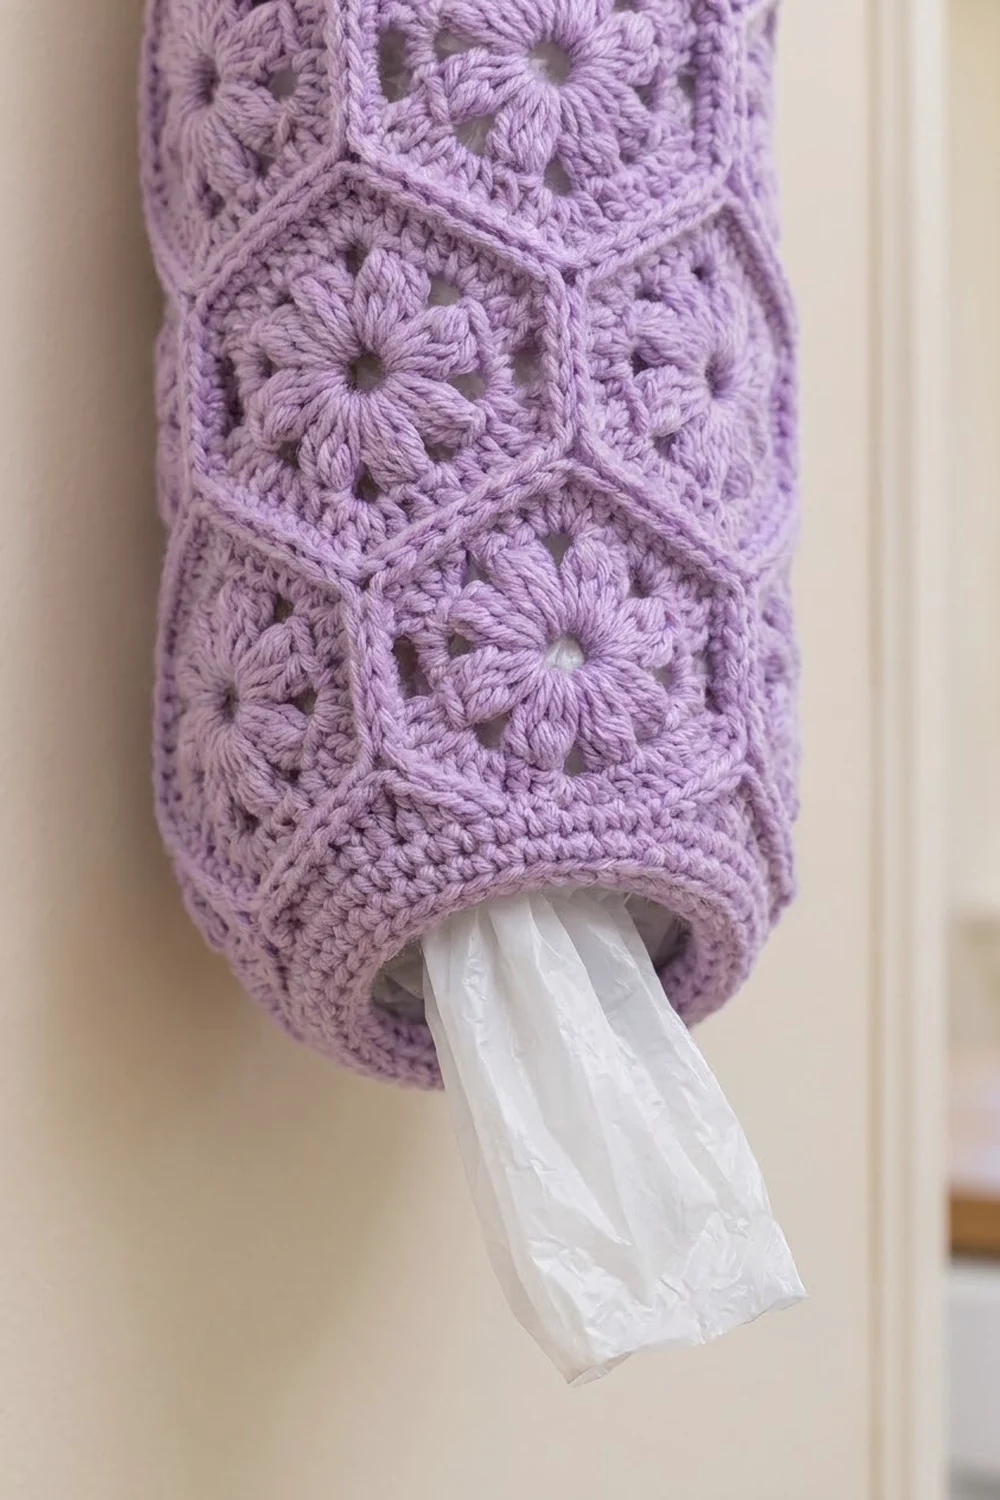
This grocery bag holder is a tall, soft tube made from flower hexagons in one calm shade of lavender. Each hexagon has a small open center, a ring of twelve puffy cluster petals, and a crisp single crochet outline. Once joined, the body looks like a honeycomb from every side.
The top has a solid single crochet band and a strap for hanging it on a hook. The bottom band narrows to a smaller opening, so you stuff bags in at the top and pull them out one at a time from the bottom.
The pattern uses US crochet terms. The finished holder is about 7 in (17.8 cm) wide when flat, 14 in (35.6 cm) around, and 18.6 in (47.2 cm) tall, not counting the strap.
You make 20 hexagons and join them into five rings of four. Then you stack the rings in a honeycomb offset and level and finish the top and bottom edges with bands worked onto the tube.
Finished Size and Construction
- Finished size: 7 in (17.8 cm) wide flat, 14 in (35.6 cm) around, 18.6 in (47.2 cm) tall
- Skill level: Easy intermediate
- Terminology: US crochet terms
- Yarn weight: Worsted (#4), cotton or cotton blend
- Hook: 5 mm (H-8)
- Number of pieces: 20 hexagons, joined into one tube
- Layout: 5 rings of 4 hexagons, point-up, with every other ring offset by half a hexagon
- Piece size: 3.5 in (8.9 cm) flat-to-flat, 4 in (10.2 cm) point-to-point, 2 in (5.1 cm) per side
- Size before bands: 14 in (35.6 cm) around, 16 in (40.6 cm) tall from top point to bottom point
- Band depth: 1.3 in (3.3 cm) at the top and 1.3 in (3.3 cm) at the bottom
Materials
Choose a smooth worsted-weight cotton or cotton blend. Cotton holds its shape when the holder is full and shows the cluster petals clearly. Avoid fuzzy yarns, which hide the hexagon outlines.
- Lavender: 200 g, about 380 m (415 yd)
Quantities include a margin of about 15 percent for gauge swatches and joining.
Tools:
- 5 mm (H-8) crochet hook
- Yarn needle
- Scissors
- Stitch markers
- Measuring tape
- Spray bottle and a rolled towel for blocking
Abbreviations (US Terms)
- ch – chain
- sl st – slip stitch
- sc – single crochet
- hdc – half double crochet
- dc – double crochet
- tr – treble crochet
- sc2tog – single crochet 2 together
- BLO – back loop only
- st(s) – stitch(es)
- sp – space
- rnd – round
Special stitches:
- cl (3-dc cluster): [Yarn over, insert hook in st, pull up a loop, yarn over, pull through 2 loops] 3 times in the same st, yarn over, pull through all 4 loops on hook.
- beg cl (beginning cluster): Ch 2, then [yarn over, insert hook in same st, pull up a loop, yarn over, pull through 2 loops] 2 times, yarn over, pull through all 3 loops on hook.
Gauge and Checkpoints
Gauge: 16 sc and 18 rnds = 4 in (10.2 cm) in sc worked in the round.
Make one complete hexagon before you make all 20. Measure it after each round:
- After Rnd 1: 1.25 in (3.2 cm) across
- After Rnd 2: 2.25 in (5.7 cm) across
- After Rnd 3: 3.5 in (8.9 cm) point-to-point
- After Rnd 4: 4 in (10.2 cm) point-to-point, 3.5 in (8.9 cm) flat-to-flat, 2 in (5.1 cm) per side
If your hexagon is larger than 3.5 in (8.9 cm) flat-to-flat, go down half a millimeter in hook size. If it is smaller, go up half a millimeter. A difference of 0.25 in (0.6 cm) per hexagon adds up to 1 in (2.5 cm) around the tube, so it’s worth checking.
Hexagon (Make 20)
Rnd 1: Make a magic ring. Ch 3 (counts as dc), work 11 dc in the ring. Pull the ring closed, leaving a small hole in the center. Join with sl st to top of ch-3. (12 dc)
Rnd 2: Beg cl in the same st as join, ch 2, cl in next st, ch 2; repeat from * 10 more times. Join with sl st to top of beg cl. (12 clusters, 12 ch-2 sps)
Rnd 3: Sl st into the first ch-2 sp. Ch 3 (counts as dc), (dc, ch 2, 2 dc) in the same sp for the first corner, 3 dc in the next ch-2 sp, (2 dc, ch 2, 2 dc) in the next ch-2 sp, 3 dc in the next ch-2 sp; repeat from * 4 more times. Join with sl st to top of ch-3. (42 dc, 6 ch-2 corner sps; 7 dc per side)
The corners go in every other ch-2 space, which turns the round flower into a hexagon. Each side holds 2 dc from one corner, 3 dc from the side space, and 2 dc from the next corner, for 7 dc.
Rnd 4: Sl st in the next dc and into the ch-2 corner sp. Ch 1, (sc, ch 2, sc) in the same sp, sc in each of the next 7 dc, (sc, ch 2, sc) in the next ch-2 sp; repeat from * 4 more times, sc in each of the last 7 dc. Join with sl st to the first sc. Fasten off and weave in ends. (54 sc, 6 ch-2 corner sps; 9 sc per side)
Each side’s 9 sc are the 7 sc worked over the dc plus 1 corner sc at each end. The ch-2 corner spaces don’t count as stitches.
Block each hexagon lightly to 3.5 in (8.9 cm) flat-to-flat before joining. Flat, even pieces make the seams much easier to line up.
Make All Pieces
You need 20 hexagons, all in lavender. Sort them into five groups of four, one group for each ring.
Layout (shown flat, as if the tube were opened along one seam; each hexagon is point-up):
Ring 1 (top):    A1  A2  A3  A4
Ring 2:            B1  B2  B3  B4
Ring 3:          C1  C2  C3  C4
Ring 4:            D1  D2  D3  D4
Ring 5 (bottom): E1  E2  E3  E4
Rings 2 and 4 are shifted half a hexagon. B1 sits in the notch below A1 and A2. Once the ring is closed, B4 sits in the notch below A4 and A1. The same offset continues all the way down.
Joining
Method: Whipstitch through the BLO with a yarn needle and lavender yarn, right sides facing up. This leaves the front loops as a raised ridge on the outside, which matches the hexagon outlines.
Stitch-to-stitch logic: Every seam joins one full side to one full side. Start in the center ch of a corner ch-2 sp, whipstitch through each of the 9 sc pairs, and finish in the center ch of the next corner. That makes 11 matched pairs per seam, with no skipped or doubled stitches.
Step 1 – Rings: Join A1 to A2, A2 to A3, A3 to A4, and A4 back to A1 along their vertical sides. Make all five rings this way. (4 seams per ring, 20 seams total)
Step 2 – Stacking: Turn Ring 2 so each B hexagon sits in a notch of Ring 1. Join the two upper sloped sides of each B hexagon to the lower sloped sides of the two A hexagons above it. Work all the way around in one zigzag. (8 seams per ring junction, 32 seams total)
Repeat to join Ring 3 to Ring 2, Ring 4 to Ring 3, and Ring 5 to Ring 4. The tube now has 52 seams in total.
Tension: Keep the whipstitch snug but not tight. Pull each stitch only until the edges touch. Tight seams pucker the tube and shorten it. Loose seams show gaps.
Size checkpoint: The joined tube should measure 14 in (35.6 cm) around and 7 in (17.8 cm) flat. It should be 16 in (40.6 cm) from the top point of Ring 1 to the bottom point of Ring 5. Because the offset rings overlap by half a side, each ring after the first adds 3 in (7.6 cm) of height: 4 in + 4 × 3 in = 16 in (40.6 cm).
Border: Top and Bottom Bands
Border gauge: 16 sc = 4 in (10.2 cm), or 4 sc per in. To match the tube’s 14 in (35.6 cm) circumference, the finished band needs 14 × 4 = 56 sc.
Each edge of the tube is a zigzag of 4 points and 4 valleys. The valleys are where two hexagons meet, about 1 in (2.5 cm) below the points. The first band round fills the valleys with tall stitches and uses short stitches at the points.
Each edge hexagon has 2 free sides of 9 sc each, plus 3 corner spaces (the point and the two valley corners). That’s 9 + 9 + 3 = 21 sts per hexagon, and 4 × 21 = 84 sts per edge. You don’t add extra stitches at the seams.
Top Band
Rnd 1 (leveling): With the right side facing, join yarn in the valley corner ch-2 sp on the right side of any Ring 1 hexagon. Tr in the corner sp, tr in next 2 sts, dc in next 2 sts, hdc in next 2 sts, sc in next 3 sts, sc in the point ch-2 sp, sc in next 3 sts, hdc in next 2 sts, dc in next 2 sts, tr in next 2 sts, tr in the valley corner sp; repeat from * 3 more times. Use a standing tr (or ch 4) for the very first tr. Join with sl st to the first tr. (84 sts: 4 × 21)
The two tr in each valley sit side by side, one in each hexagon’s corner space, which fills the dip evenly.
Rnd 2 (conversion): Ch 1, sc in next st, sc2tog; repeat from * 27 more times. Join. (28 sc + 28 sc2tog = 56 sts)
This reduces the edge from 84 sts to the 56 sts that match the band gauge.
Rnds 3–6: Ch 1, sc in each st around. Join. (56 sc each rnd)
The top band now has 6 rnds and is 1.3 in (3.3 cm) deep above the hexagon points.
Hanging Strap
Row 1: Don’t fasten off. Ch 1, sc in the next 4 sts, turn. (4 sc)
Rows 2–36: Ch 1, sc in each st across, turn. (4 sc each row)
The strap is 8 in (20.3 cm) long and 1 in (2.5 cm) wide. Fasten off, leaving a 10 in (25.4 cm) tail. Fold the strap into a loop and sew the end to the inside of the band, right over the same 4 base sts. The finished loop stands about 4 in (10.2 cm) tall.
Bottom Band
Rnd 1 (leveling): Turn the tube upside down. Join yarn in a valley corner sp of any Ring 5 hexagon and work exactly as Top Band Rnd 1. (84 sts: 4 × 21)
Rnd 2 (conversion): Work as Top Band Rnd 2. (28 sc + 28 sc2tog = 56 sts)
Rnd 3 (decrease): Ch 1, sc in next 2 sts, sc2tog; repeat from * 13 more times. Join. (28 sc + 14 sc2tog = 42 sts)
Rnd 4 (decrease): Ch 1, sc in next st, sc2tog; repeat from * 13 more times. Join. (14 sc + 14 sc2tog = 28 sts)
Rnds 5–6: Ch 1, sc in each st around. Join. (28 sc each rnd)
Fasten off and weave in ends. The opening is 7 in (17.8 cm) around, or about 2.2 in (5.6 cm) across. That’s snug enough to keep the bags in but stretchy enough to pull one through.
Why the math works: The zigzag edge is longer than the straight circumference, so it takes 84 leveling sts to cover it. Reducing to 56 sts at 4 sc per in gives exactly 14 in (35.6 cm), the same as 4 hexagons × 3.5 in (8.9 cm). The bottom then drops to half that, 28 sts or 7 in (17.8 cm), for the opening.
Final Blocking
- Weave in every remaining tail along a seam line.
- Roll a bath towel into a cylinder about 7 in (17.8 cm) wide when flattened.
- Slide the holder over the towel roll.
- Spray the whole holder evenly until it’s damp, not soaked.
- Smooth each hexagon with your fingers, pressing the cluster petals outward and straightening the outlines.
- Check that the body measures 16 in (40.6 cm) between the bands and 18.6 in (47.2 cm) overall.
- Let it dry completely, at least 24 hours, before hanging.
Final Quality-Control Checklist
- 20 hexagons, each 3.5 in (8.9 cm) flat-to-flat with 9 sc per side
- 5 rings of 4, each ring offset by half a hexagon
- 52 seams, each with 11 matched pairs and no gaps
- Top and bottom leveling rnds have 84 sts each
- Top band has 56 sts; bottom band ends at 28 sts
- Total height 18.6 in (47.2 cm), width 7 in (17.8 cm) flat
- Strap is 4 sts wide and firmly sewn, and the loop stands about 4 in (10.2 cm) tall
- All tails woven into seams, none visible from the outside
Troubleshooting
Hexagon cups or curls: Rnd 3 is too tight. Go up half a hook size for Rnds 3–4 only.
Hexagon ruffles: Your clusters are too loose. Tighten your tension in Rnd 2 or go down half a hook size.
Seams don’t line up: Recount Rnd 4. Every side must have exactly 9 sc between the corner spaces.
Top edge stays wavy after Rnd 1: If the valleys still dip, change one dc to a tr on each side of each valley. If the points rise too high, use hdc instead of dc near the points.
Band flares outward: Your sc gauge is loose. Rework Rnd 2 with a 4.5 mm (7) hook.
Bags slide out too easily: Add one more decrease round at the bottom: (sc 5, sc2tog) 4 times, for 24 sts.
Care
Hand wash in cool water and dry it over a towel roll. Cotton can also go in the washing machine on a gentle cycle inside a mesh bag; reshape it while damp.

Final Notes
The measurement chain is short and easy to check. One hexagon is 3.5 in (8.9 cm) flat-to-flat with 9 sc per side. Four hexagons make a 14 in (35.6 cm) ring. Five offset rings make a 16 in (40.6 cm) body. Two 1.3 in (3.3 cm) bands bring the total to 18.6 in (47.2 cm), with 56 sts at the top and 28 sts at the bottom opening.
Check each step of that chain as you go, and the holder will come out straight, even, and ready to hang.
Happy crocheting!