

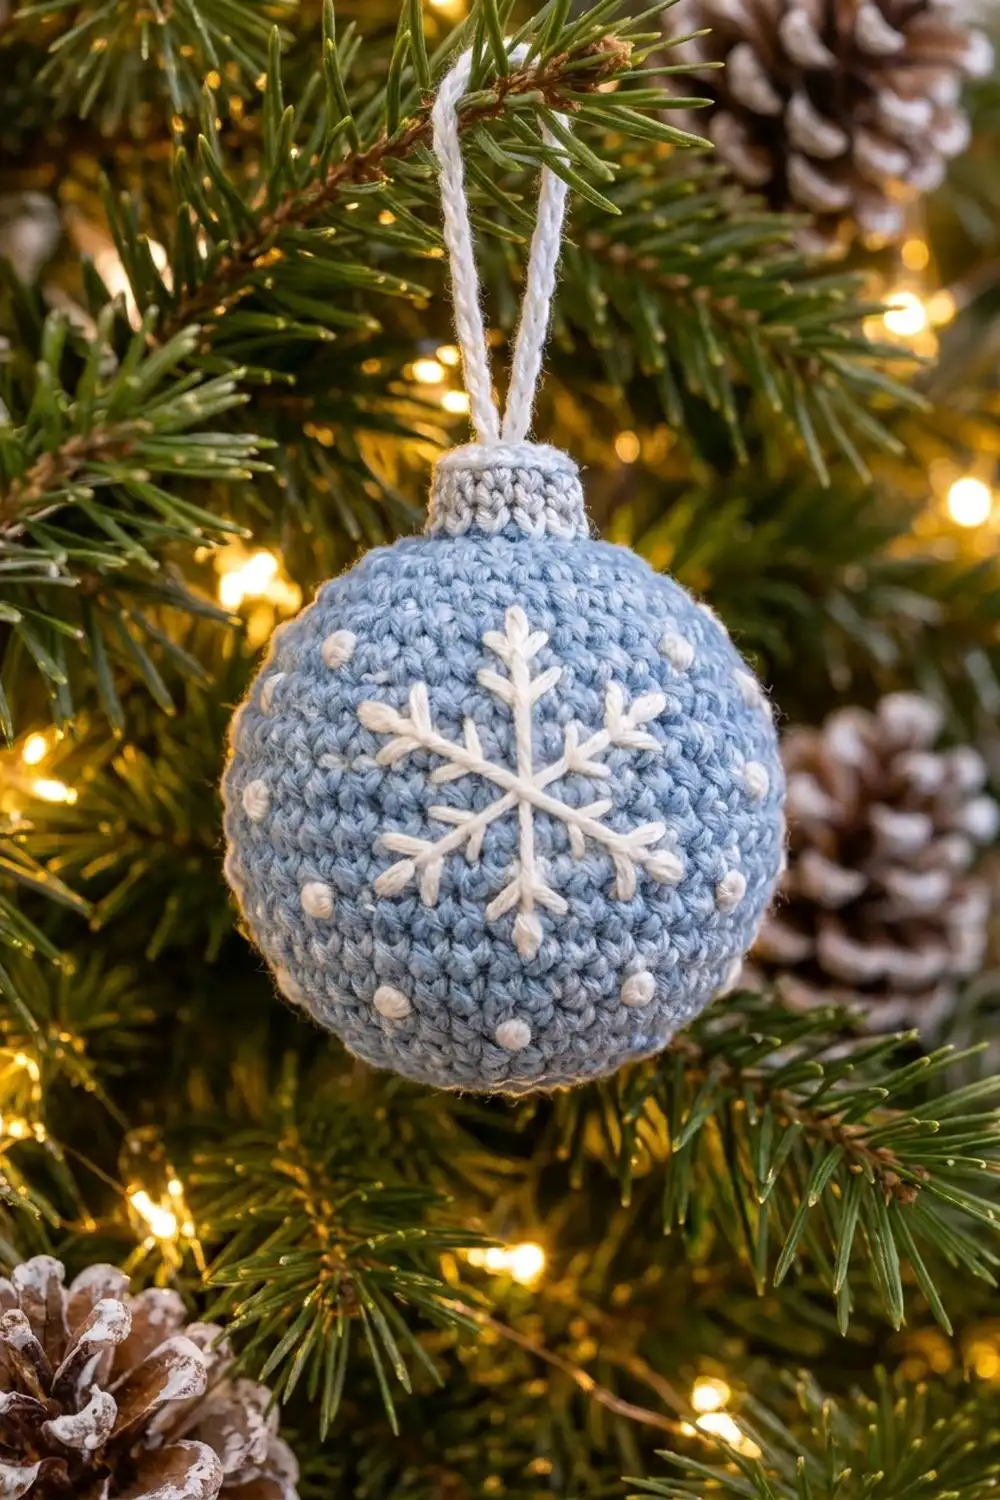
This little ornament is a classic round Christmas ball in soft light blue. It has a pale gray cap with a white rim, a white hanging loop and a crisp white snowflake on the front. Rings of tiny white French-knot dots finish the snowy look. The style is calm, wintry and simple enough to make in one sitting.
The pattern uses US crochet terms throughout. The finished ball is about 2.9 in (7.4 cm) across and 9 in (22.9 cm) around at the widest point. With the cap and loop, the ornament hangs about 4.9 in (12.4 cm) tall.
The ornament is a single seamless piece. You work the ball in continuous single crochet spirals from the bottom up. Next you decrease and stuff it, then change color and work the cap straight off the top of the ball. A white rim round closes the cap and a chain loop is crocheted in place. All embroidery is added last, on the stuffed ball.
There is no sewing of separate parts, so the shape stays smooth and sturdy for years of hanging.
Finished Size and Construction
- Finished size: 2.9 in (7.4 cm) diameter ball; 3.4 in (8.6 cm) tall with cap; 4.9 in (12.4 cm) tall including loop
- Skill level: Easy / advanced beginner
- Terminology: US crochet terms
- Yarn weight: DK (weight 3), cotton or acrylic
- Hook: 3.0 mm (US C/2 or D/3)
- Number of pieces: 1 (ball and cap worked as one piece)
- Layout: Single sphere with a cylindrical cap on top
- Piece size: 54 stitches around at the widest point = 9 in (22.9 cm) circumference
- Size before border: Ball closed down to a 12-stitch opening, 2 in (5.1 cm) around
- Border depth: Cap and rim add 0.5 in (1.3 cm) of height
Materials
Use a smooth DK yarn so the stitches stay tight and the embroidery sits cleanly on top. Cotton gives the crispest stitch definition. Acrylic is lighter and slightly softer.
- Light blue (main color): 15 g, about 35 m
- Pale gray (cap): 2 g, about 5 m
- White (rim, loop, embroidery): 4 g, about 10 m
All quantities include a small safety margin.
Tools:
– 3.0 mm crochet hook
– Fiberfill stuffing, about 10 g
– Stitch marker
– Tapestry needle with a blunt tip
– Sharp embroidery needle (optional, for French knots)
– Scissors
– Water-soluble marker or pins for marking the embroidery
Abbreviations (US Terms)
- ch – chain
- sl st – slip stitch
- sc – single crochet
- inc – 2 sc in the same stitch
- dec – invisible decrease (see below)
- BLO – back loop only
- FLO – front loop only
- MR – magic ring
- st(s) – stitch(es)
- Rnd – round
Invisible decrease (dec): Insert the hook into the front loop of the next stitch. Then insert it into the front loop of the following stitch (3 loops on hook). Yarn over and draw through both front loops (2 loops on hook). Yarn over and draw through both loops. You now have one stitch made from two, with no gap.
Gauge and Checkpoints
Gauge: 6 sc and 6 rounds = 1 in (2.5 cm) in continuous rounds.
Test with the first part of the ball. Work Rnds 1–6 (36 sts) and lay the piece flat. It should measure about 2 in (5.1 cm) across. A tight, dense fabric matters here because loose stitches let the stuffing show through.
Checkpoints:
– After Rnd 6: flat disc, 2 in (5.1 cm) across
– After Rnd 9: the disc begins to cup and is about 3 in (7.6 cm) across
– After Rnd 16: open cup, 9 in (22.9 cm) around and about 1.75 in (4.4 cm) tall
– After stuffing and Rnd 23: firm ball, 2.9 in (7.4 cm) across
If the piece is too big: go down to a 2.75 mm hook. If it is too small: go up to a 3.25 mm hook. If you see gaps between stitches, go down a hook size, even if the size is correct.

Ball (Light Blue)
Work in continuous spirals without joining. Place a marker in the first stitch of each round and move it up as you go.
Rnd 1: 6 sc in MR. (6)
Rnd 2: inc in each st around. (12)
Rnd 3: (sc 1, inc) 6 times. (18)
Rnd 4: (sc 2, inc) 6 times. (24)
Rnd 5: (sc 3, inc) 6 times. (30)
Rnd 6: (sc 4, inc) 6 times. (36)
Rnd 7: (sc 5, inc) 6 times. (42)
Rnd 8: (sc 6, inc) 6 times. (48)
Rnd 9: (sc 7, inc) 6 times. (54)
Pull the starting tail to close the magic ring tightly and weave it in on the inside.
Rnds 10–16: sc in each st around. (54) That is 7 rounds worked even.
Checkpoint: the cup measures 9 in (22.9 cm) around.
Rnd 17: (sc 7, dec) 6 times. (48)
Rnd 18: (sc 6, dec) 6 times. (42)
Rnd 19: (sc 5, dec) 6 times. (36)
Rnd 20: (sc 4, dec) 6 times. (30)
Rnd 21: (sc 3, dec) 6 times. (24)
Stuff the ball firmly now. Push the stuffing out toward the sides so the widest part (Rnds 10–16) is fully round.
Rnd 22: (sc 2, dec) 6 times. (18)
Top up the stuffing through the opening.
Rnd 23: (sc 1, dec) 6 times. (12)
Add a final pinch of stuffing so the top feels firm. Do not fasten off. The 12-stitch opening becomes the base of the cap.
Border: Cap, Rim and Hanging Loop
On this ornament, the cap is the “border”. It finishes the opening of the ball the way a border finishes the edge of a flat piece.
Border gauge: same as the ball, 6 sts = 1 in (2.5 cm). The 12-stitch base is 2 in (5.1 cm) around, which gives a cap about 0.7 in (1.8 cm) across.
Rnd 24 (gray): Change to pale gray on the last yarn over of Rnd 23. Work sc in BLO in each st around. (12) Cut the blue yarn and weave the tail in on the inside. Working in the back loop leaves a small ridge where the ball meets the cap, and the cap starts to rise straight up.
Rnds 25–26 (gray): sc in each st around. (12) That is 2 rounds worked even.
These two rounds form the straight cylinder of the cap. Each quarter of the round has exactly 3 sts, so the cap stays a neat tube and does not flare or pucker.
Rnd 27 (white rim): Change to white on the last yarn over of Rnd 26. Work (dec in BLO) 6 times. (6) Cut the gray yarn and weave it in.
This round turns the edge in to make a flat top. The leftover front loops of Rnd 26 sit just below it, so the white edge shows as a rim around the top of the cap.
Hanging loop: With white still on the hook, ch 20. Skip 2 sts of Rnd 27 and sl st into the 3rd st, which sits directly opposite where you started. Then sl st back into the back bump of each of the 20 ch. (20 sl st)
The loop is now twice as thick and about 1.5 in (3.8 cm) tall. Sl st into the first st of Rnd 27 and fasten off, leaving a 10 in (25.4 cm) tail.
Close the top: Thread the tail onto a tapestry needle and weave it through the front loop of all 6 sts of Rnd 27. Pull it snug to close the center, then bury the tail deep inside the ball.
Why the math works: The ball decreases by exactly 6 sts per round, from 54 down to 12. The cap stays at 12 sts, so it is 2 in (5.1 cm) around. That is about a quarter of the ball’s 9 in (22.9 cm) circumference, the same proportion as a real glass ornament cap. Three rounds at 6 rounds per inch give 0.5 in (1.3 cm) of cap height.
Embroidery
Use a single strand of white DK yarn and stitch between the crochet stitches so the yarn does not split.
Mark the center: Choose the side where the color-change jog is least visible. The snowflake center sits on Rnd 13, the middle of the even section.
Snowflake arms: Work 6 arms that start at the center and are spaced evenly like the spokes of a wheel.
– Top arm: go straight up 4 rounds, to Rnd 17.
– Bottom arm: go straight down 4 rounds, to Rnd 9.
– The four side arms each run diagonally about 4 sts out from the center.
Each arm is about 0.7 in (1.8 cm) long. Work each one in back stitch: 2 stitches per arm, each covering 2 crochet stitches. Keep the stitch tension the same so all arms lie flat.
Branches: On each arm, about halfway along, make a V. Work 2 short straight stitches angled outward toward the tip, each covering 1 crochet stitch. That is 12 branch stitches in total. If you like, add one more short V near the tip of each arm for a lacier snowflake.
French-knot dots: Wrap the yarn around the needle twice for each knot.
– Lower ring: 7 knots on Rnd 7, one in every 6th st (42 sts ÷ 6 = 7).
– Upper ring: 6 knots on Rnd 19, one in every 6th st (36 sts ÷ 6 = 6).
– Back: 3 knots on Rnd 13, spaced across the back of the ball, away from the snowflake.
Total: 16 knots. To finish each knot or stitch, run the tail through the ball and out the other side, then trim it close.
Final Blocking
- Roll the ball between your palms for about 30 seconds to spread the stuffing evenly.
- Press lightly on any flat areas and pinch any bumps to even out the round shape.
- Hold a steamer or steam iron 1 in (2.5 cm) away and steam the ball briefly. Do not touch it with the iron.
- While it is still warm, roll it again and set it on a small cup to cool, cap up.
- Gently steam the loop and pull it straight, then let it dry.
- Check that the ball measures 2.9 in (7.4 cm) across in both directions.
Final Quality-Control Checklist
- Ball measures 9 in (22.9 cm) around and 2.9 in (7.4 cm) across
- No stuffing shows between stitches
- Cap is a straight tube, 0.5 in (1.3 cm) tall, with a visible BLO ridge at the base
- White rim lies flat and the top center is fully closed
- Loop is 1.5 in (3.8 cm) tall and anchored on opposite sides of the cap
- Snowflake has 6 even arms of about 0.7 in (1.8 cm), each with a V-branch
- 16 French knots: 7 on Rnd 7, 6 on Rnd 19, 3 on the back
- All tails are buried inside, with none visible
Troubleshooting
Ball looks like a lemon or an egg: You stuffed it unevenly or worked too many rounds even. Make sure Rnds 10–16 add up to exactly 7 rounds, and roll the ball to shift the stuffing.
Holes at the decreases: Use the invisible decrease, working in front loops only, and pull each stitch snug.
Cap flares outward: Your tension is loose. Work Rnds 25–26 more tightly or drop to a 2.75 mm hook just for the cap.
Visible jog at the color changes: Change color on the last yarn over of the previous round. Then work the first stitch of the new round slightly tighter.
Snowflake looks crooked: Mark all 6 arm tips with pins before you start stitching.
French knots pull through: Wrap the yarn twice and re-enter the fabric one strand away from where it came out, not in the same hole.
Care
Spot clean with cool water and mild soap, then reshape and air dry. Store wrapped in tissue so the loop and embroidery do not get crushed.
Final Notes
The measurement chain is simple. The gauge is 6 sts = 1 in (2.5 cm). The 54-stitch widest rounds give 9 in (22.9 cm) around and a 2.9 in (7.4 cm) ball. Decreasing to 12 sts gives a 2 in (5.1 cm) cap base. Three cap rounds add 0.5 in (1.3 cm) and the loop adds 1.5 in (3.8 cm), for 4.9 in (12.4 cm) in total. If you hit the gauge, every other measurement follows. Make one for your tree or a whole flurry to give away.
Happy crocheting!