

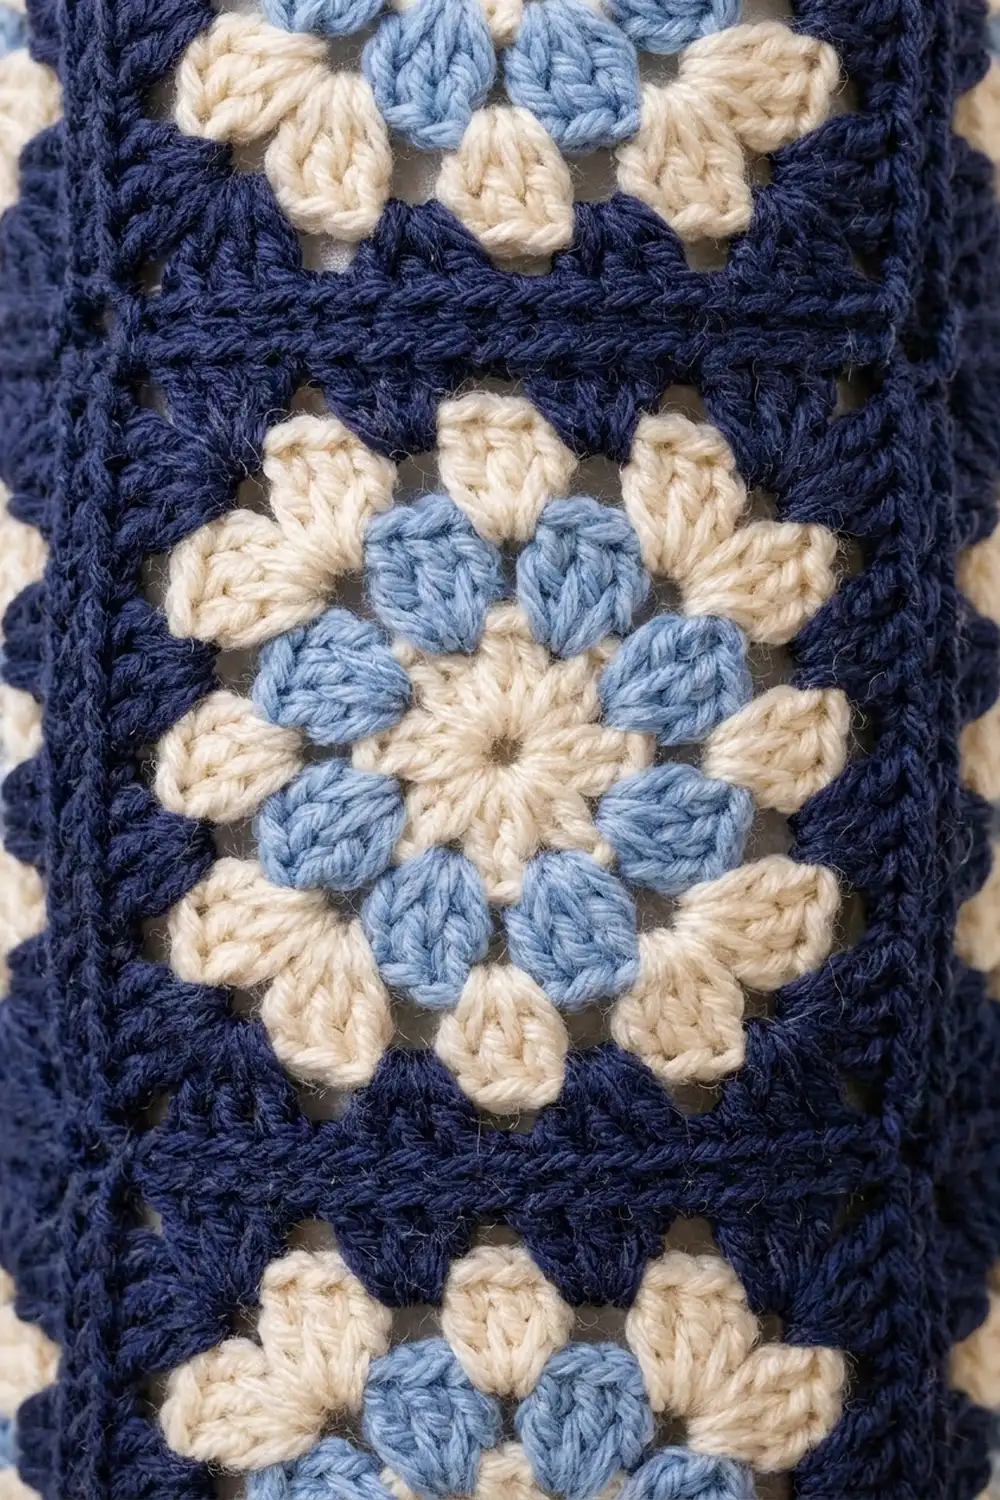
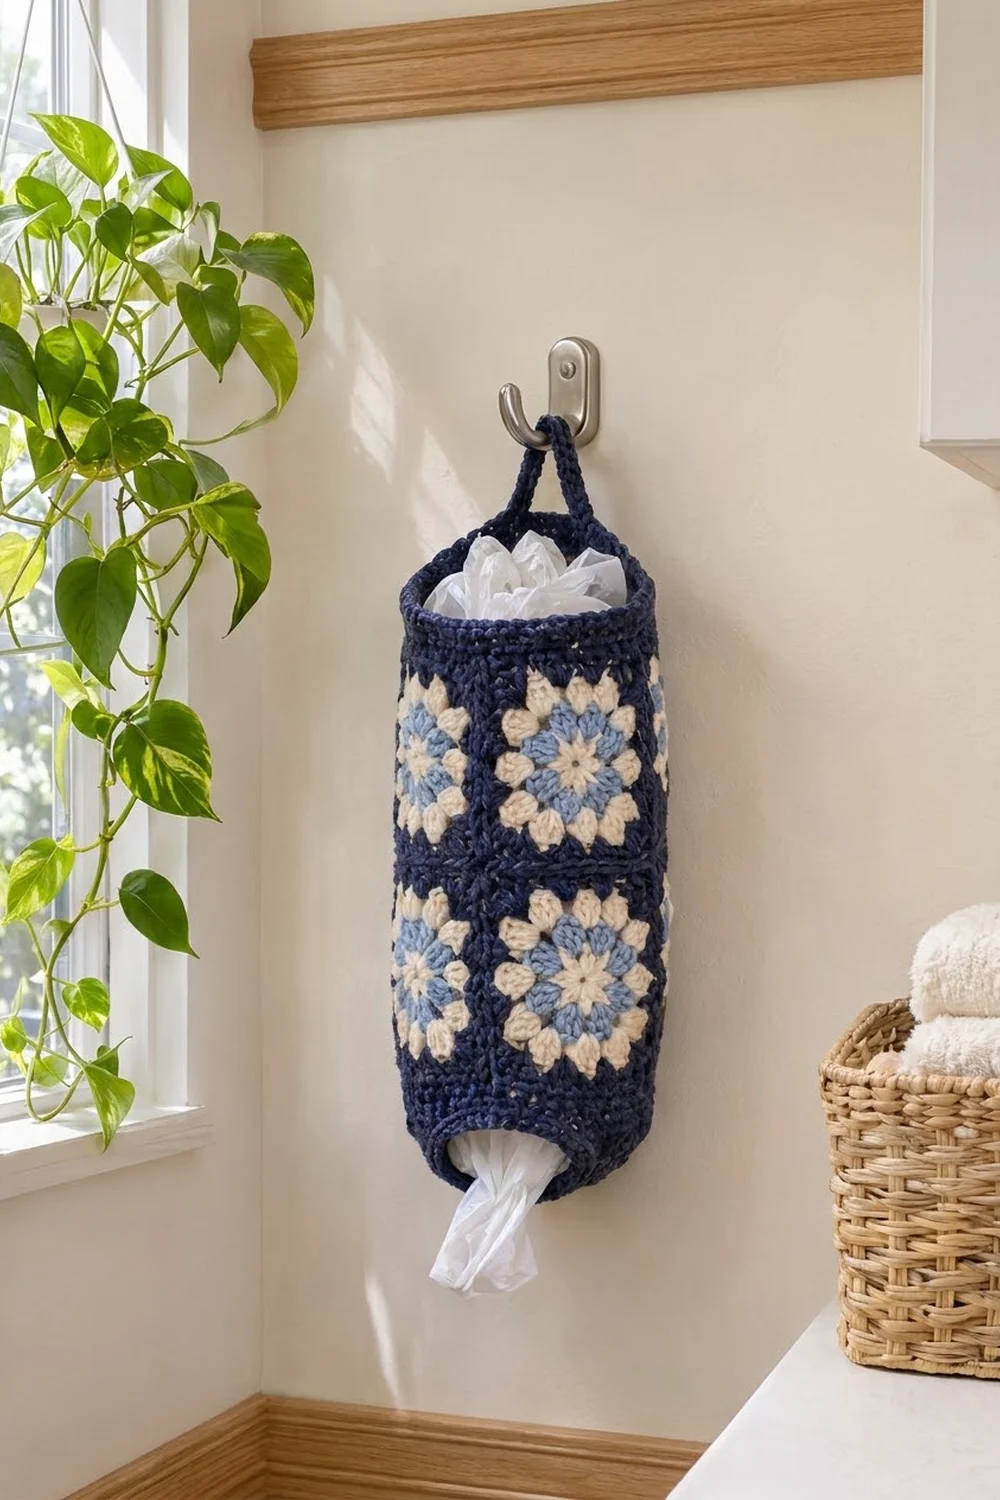
The Indigo Bloom Bag Holder is a hanging grocery-bag dispenser made from eight small granny squares joined into a tube. Each square has a cream center, a ring of soft light blue clusters, a cream ring around that, and a deep navy frame. The tube is finished with a solid navy band at the top, a tapered navy base with a round opening for pulling bags out, and one strap that hangs from a wall hook.
The colors are calm and classic: navy, cream, and light blue. They suit a kitchen, a laundry room, or a pantry door. The cotton yarn keeps the holder firm and easy to wash.
This pattern uses US crochet terms. The finished holder measures about 16 in (40.6 cm) around and 11.25 in (28.6 cm) tall, not counting the strap. Laid flat, it is about 8 in (20.3 cm) wide.
Construction is simple. You make eight identical 4 in (10.2 cm) squares and join them into a strip that is 4 squares wide and 2 squares tall. Then you close the strip into a tube. Last, you work a navy band and strap around the top edge and a decreasing base around the bottom edge.
Finished Size and Construction
- Finished size: 16 in (40.6 cm) around x 11.25 in (28.6 cm) tall; 8 in (20.3 cm) wide when flat
- Skill level: Easy to intermediate
- Terminology: US crochet terms
- Yarn weight: Worsted (#4), cotton or cotton blend
- Hook: 5.0 mm (H-8)
- Number of pieces: 8 granny squares, plus a top band, strap, and base worked directly onto the tube
- Layout: 4 squares around x 2 squares tall
- Piece size: 4 in (10.2 cm) square
- Size before border: 16 in (40.6 cm) around x 8 in (20.3 cm) tall
- Border depth: top band 1.25 in (3.2 cm); base 2 in (5.1 cm); strap about 7.5 in (19.1 cm) long
Materials
Choose a smooth worsted-weight cotton or cotton blend with about 170 m per 100 g. Cotton holds the tube shape well and does not stretch much when the holder is full. Acrylic also works, but the tube will be softer and may sag.
- Navy (MC): 120 g, about 204 m
- Cream (CC1): 35 g, about 60 m
- Light blue (CC2): 25 g, about 43 m
Tools:
- 5.0 mm (H-8) crochet hook
- Tapestry needle
- 4 stitch markers
- Scissors
- Measuring tape
- Blocking mat and pins
- Spray bottle
All yarn amounts include a margin of about 15 percent for gauge testing and weaving in ends.
Abbreviations (US Terms)
- ch: chain
- sl st: slip stitch
- sc: single crochet
- hdc: half double crochet
- dc: double crochet
- sc2tog: single crochet 2 together
- hdc2tog: half double crochet 2 together
- sp: space
- st(s): stitch(es)
- RS: right side
- BLO: back loop only
Special stitch: Cluster (cl). Yarn over and insert the hook in the stitch or space. Yarn over, pull up a loop, yarn over, and pull through 2 loops. Repeat 2 more times in the same place. Yarn over and pull through all 4 loops on the hook.
Beginning cluster (beg cl). Ch 2, then work a cluster with only 2 dc instead of 3. The ch 2 counts as the first dc.
Gauge and Checkpoints
Make one complete square before you make the rest. Gauge matters here because the tube and the band both depend on the square size.
Gauge: one finished square = 4 in (10.2 cm) per side, with 13 sc along each side.
Checkpoints for the test square:
- After Round 1: about 1.25 in (3.2 cm) across
- After Round 2: about 2 in (5.1 cm) across
- After Round 3: about 3 in (7.6 cm) across
- After Round 4: about 3.5 in (8.9 cm) per side
- After Round 5: 4 in (10.2 cm) per side
If your square is larger than 4 in (10.2 cm), change to a 4.5 mm hook. If it is smaller, change to a 5.5 mm hook. Being off by only 0.25 in (0.6 cm) per square adds up to 1 in (2.5 cm) around the tube, so it is worth checking.
Granny Square (Make 8)
Round 1 (CC1, cream): Make a magic ring. Ch 3 (counts as dc), then work 15 dc in the ring. Sl st to the top of the beginning ch-3 and pull the ring closed. (16 dc) Fasten off.
Round 2 (CC2, light blue): Join in any sp between two dc. Work a beg cl in that sp, ch 2. Skip the next sp, cl in the following sp, ch 2. Repeat from * to * 6 more times. Sl st to the top of the beg cl. (8 clusters, 8 ch-2 sps) Fasten off.
These eight clusters are the light blue petals.
Round 3 (CC1, cream): Join in any ch-2 sp. Ch 3 (counts as dc), 2 dc in the same sp, ch 1. 3 dc in the next ch-2 sp, ch 1. Repeat from * to * 6 more times. Sl st to the top of the beginning ch-3. (24 dc in 8 groups, 8 ch-1 sps) Fasten off.
This round makes the cream ring around the blue petals.
Round 4 (MC, navy): This conversion round turns the circle into a square. Join in any ch-1 sp. Ch 3 (counts as dc), then work (2 dc, ch 2, 3 dc) in the same sp for the first corner, ch 1. 3 dc in the next ch-1 sp, ch 1, (3 dc, ch 2, 3 dc) in the next ch-1 sp for a corner, ch 1. Repeat from * to * 2 more times. 3 dc in the last ch-1 sp, ch 1. Sl st to the top of the beginning ch-3. Do not fasten off.
Count: 4 corner groups x 6 dc = 24 dc, plus 4 side groups x 3 dc = 12 dc. (36 dc total, 4 ch-2 corner sps, 8 ch-1 sps) Each side has 9 dc and 2 ch-1 sps between its two corners.
Round 5 (MC, navy): Sl st into the next 2 dc and into the corner ch-2 sp. Ch 1, (sc, ch 2, sc) in the corner sp. Sc in each dc and each ch-1 sp across the side (11 sc), (sc, ch 2, sc) in the next corner sp. Repeat from * to * 2 more times. Sc in each dc and each ch-1 sp across the last side (11 sc). Sl st to the first sc. Fasten off, leaving a 6 in (15.2 cm) tail.
This is a trim round. Count: 36 sc worked 1 per existing dc + 8 sc added in the ch-1 sps + 8 sc added in the corners = 52 sc. Each side has 13 sc: 11 across the side plus 1 corner sc at each end. The ch-2 corner sps do not count as stitches.
Weave in all ends except the navy tail, which you can use for joining.
Make All Pieces
Make 8 squares in total. Every square uses all three colors in the same order.
- Cream: Rounds 1 and 3 on all 8 squares
- Light blue: Round 2 on all 8 squares
- Navy: Rounds 4 and 5 on all 8 squares
Layout before closing into a tube:
[ A1 ][ A2 ][ A3 ][ A4 ]   <- top row
[ B1 ][ B2 ][ B3 ][ B4 ]   <- bottom row
When you close the strip, the right edges of A4 and B4 join to the left edges of A1 and B1.
Joining
Use a slip stitch join through the back loops with navy. Hold two squares with the RS facing you, edges side by side, and work through the back loop of each square. This leaves a thin navy ridge on the RS that frames each flower.
Stitch-to-stitch logic: Each side has 13 sc. Start in the matching corner ch-2 sps. Then sl st through the BLO of each pair of sc, one to one, for all 13 sc. End in the matching corner ch-2 sps. Nothing is skipped and nothing is added.
- Make columns: Join the bottom edge of A1 to the top edge of B1. Repeat for A2/B2, A3/B3, and A4/B4. You now have 4 columns of 2 squares each.
- Join the columns: Join column 1 to column 2 along the long edge. That is 26 sc per edge, plus the corner sps where the squares meet. Repeat for columns 2 and 3, then for columns 3 and 4.
- Close the tube: Bring the right edge of column 4 to the left edge of column 1 and join them the same way.
Tension advice: Keep each slip stitch the same height as the sc it joins. If the seam is too tight, the tube will pucker; if it is too loose, the seam will gap. If your slip stitches tend to be tight, it’s fine to go up one hook size for joining only.
Size checkpoint: The joined tube should measure 16 in (40.6 cm) around and 8 in (20.3 cm) tall. Laid flat, it should be 8 in (20.3 cm) wide.
Border: Top Band, Strap, and Base
Border gauge: 13 sc = 4 in (10.2 cm), the same as one square side. Work joined rounds with the RS facing you. Every round starts with ch 1 (sc rounds) or ch 2 (hdc rounds), and the starting chain does not count as a stitch.
Why the math works: The top edge has 4 squares and so does the bottom edge. Each square has 13 sc along that side, so each edge has 4 x 13 = 52 stitches. You don’t work into the ch-2 corner sps at the seams, so no stitches are added there. Since 52 stitches match the square gauge exactly, the band lies flat without flaring or pulling in.
Top Band (MC, navy)
Place a marker at each of the 4 top seams.
Round 1: Join navy in the first sc after any seam. Ch 1, then sc in each of the 13 sc of each square, skipping the corner sps. Sl st to the first sc. (52 sc; 13 per square)
Rounds 2-4: Ch 2, hdc in each st around. Sl st to the first hdc. (52 hdc; 13 per square)
Round 5: Ch 1, sc in the BLO of each st around. Sl st to the first sc. (52 sc; 13 per square) Do not fasten off.
The band should be 1.25 in (3.2 cm) deep.
Strap (MC, navy)
The strap runs from one side of the rim to the other.
Row 1: Ch 30. Count 26 sts along the rim from your starting point and sl st into the 26th st, which is directly opposite. Sl st into the next 2 sts of the rim. Turn.
Row 2: Sc in each of the 30 ch. (30 sc) Sl st into the rim st where the strap began. Fasten off.
The strap should be about 7.5 in (19.1 cm) long. It holds the bag holder on a wall hook.
Base (MC, navy)
Turn the tube upside down and work into the bottom edge.
Round 1: Join navy in the first sc after any seam. Ch 1, then sc in each of the 13 sc of each square, skipping the corner sps. Sl st to the first sc. (52 sc; 13 per square)
Round 2: Ch 2, hdc in each st around. (52 hdc; 13 per square)
Round 3: Ch 2, hdc in the next 11 sts, hdc2tog. Repeat 3 more times. (48 hdc; 12 per square)
Round 4: Ch 2, hdc in the next 4 sts, hdc2tog. Repeat 7 more times. (40 hdc; 10 per square)
Round 5: Ch 2, hdc in the next 3 sts, hdc2tog. Repeat 7 more times. (32 hdc; 8 per square)
Round 6: Ch 1, sc in the next 2 sts, sc2tog. Repeat 7 more times. (24 sc; 6 per square)
Round 7: Ch 1, sc in each st around. Sl st to the first sc. (24 sc) Fasten off and weave in.
The base should be 2 in (5.1 cm) deep. The opening is about 7.4 in (18.8 cm) around and about 2.4 in (6.1 cm) across. That size lets you pull bags out one at a time.
Final Blocking
- Weave in all remaining ends along the seams.
- Fill the tube loosely with a rolled towel so it holds a round shape.
- Mist the squares and band with water until they are damp but not soaked.
- Gently pat each square into shape and check that each side measures 4 in (10.2 cm).
- Shape the base into a smooth curve around the opening.
- Straighten the strap and pin it flat.
- Let everything dry completely, then remove the towel.
Final Quality-Control Checklist
- 8 squares, each 4 in (10.2 cm) per side with 13 sc per side
- Each flower has 8 light blue clusters and a full cream ring
- All seams lie flat with an even navy ridge
- Tube measures 16 in (40.6 cm) around
- Top band has 52 sts in every round and is 1.25 in (3.2 cm) deep
- Strap is centered across the rim and firmly attached at both ends
- Base ends with 24 sc and a round opening
- Total height is 11.25 in (28.6 cm), not counting the strap
- All ends are woven in securely
Troubleshooting
Square curls or cups. Round 4 is too tight. Loosen your tension or use a larger hook for Rounds 4 and 5 only.
Square ruffles. Your dc are too tall or too loose. Use a smaller hook for the navy rounds.
Seams pucker. The slip stitches are too tight. Redo the seam with a larger hook.
Seams don’t line up. Count the 13 sc on each edge before joining. Put a marker in the middle sc of each edge so the squares line up.
Top band flares. You probably worked into the corner sps. Make sure Round 1 has exactly 52 sc.
Base opening is too big or too small. To make it smaller, add one more decrease round. To make it larger, skip Round 6 and work Round 7 into all 32 sts.
Strap stretches. Add a row of sl sts along the strap, or use a firmer cotton.
Care
Hand wash in cool water with mild soap, press out the water, and lay flat to dry. Reshape the tube while it is damp.
Final Notes
The measurement chain is simple. One square is 4 in (10.2 cm) with 13 sc per side. Four squares around give 52 sts and 16 in (40.6 cm). Two squares tall give 8 in (20.3 cm). The 1.25 in (3.2 cm) band and the 2 in (5.1 cm) base bring the total height to 11.25 in (28.6 cm). If your first square measures correctly, the rest of the holder will follow.
Happy crocheting!