

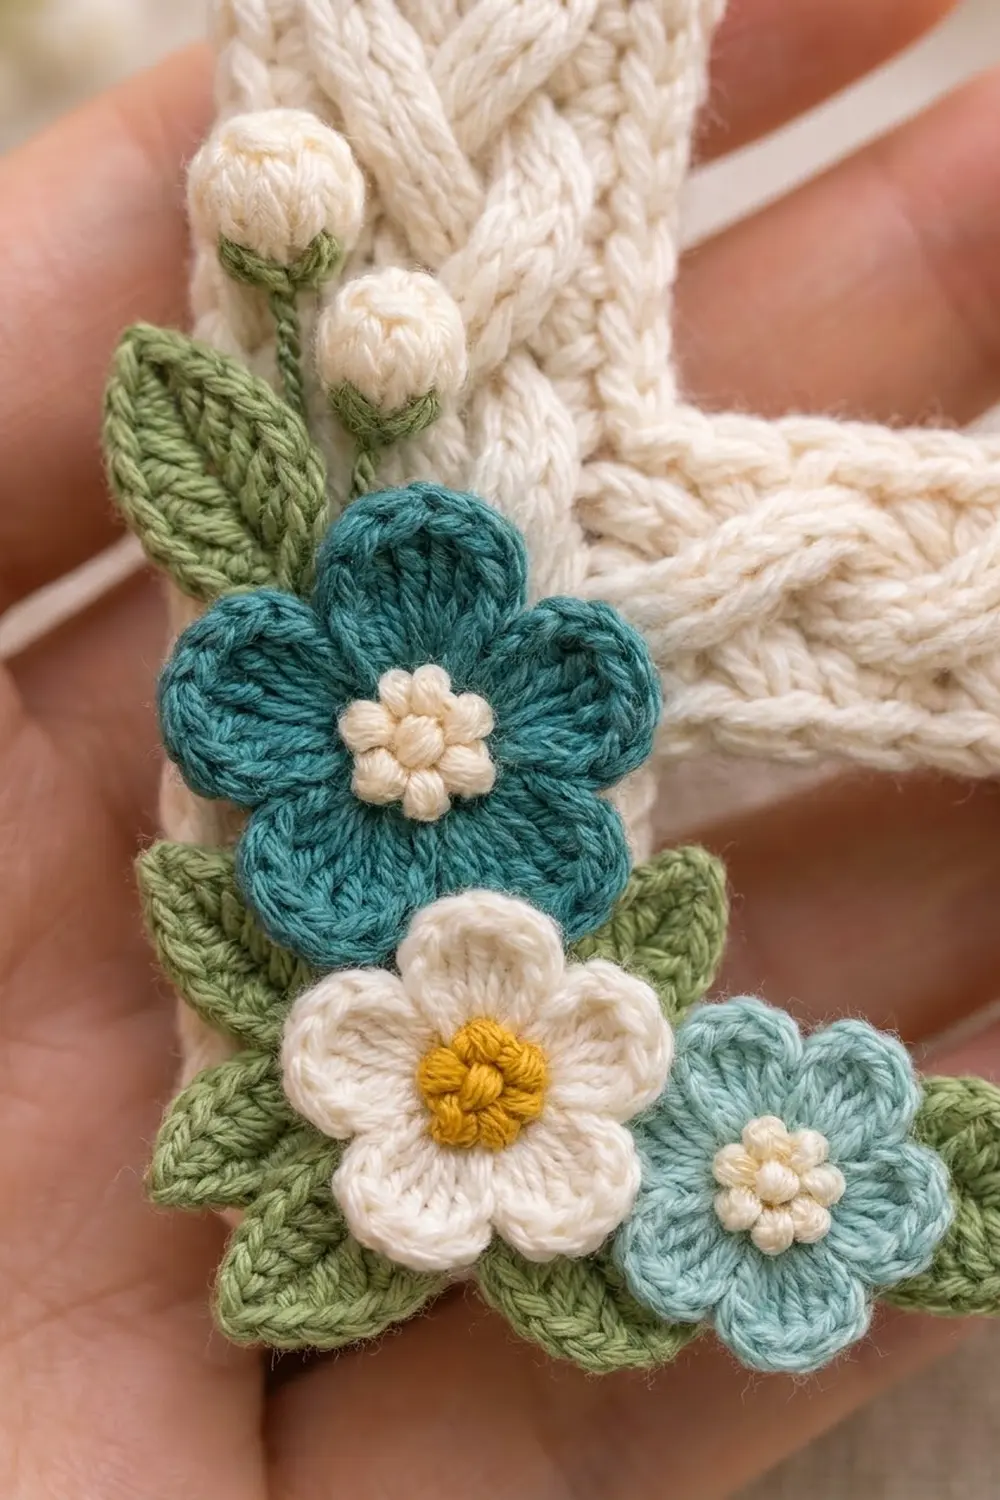
This little letter H keychain combines two things crocheters love: a crisp braided cable and a small bouquet of flowers. Each cream leg has a raised three-strand braid running down its length. The crossbar carries the same braid sideways, so the letter reads as one continuous woven shape.
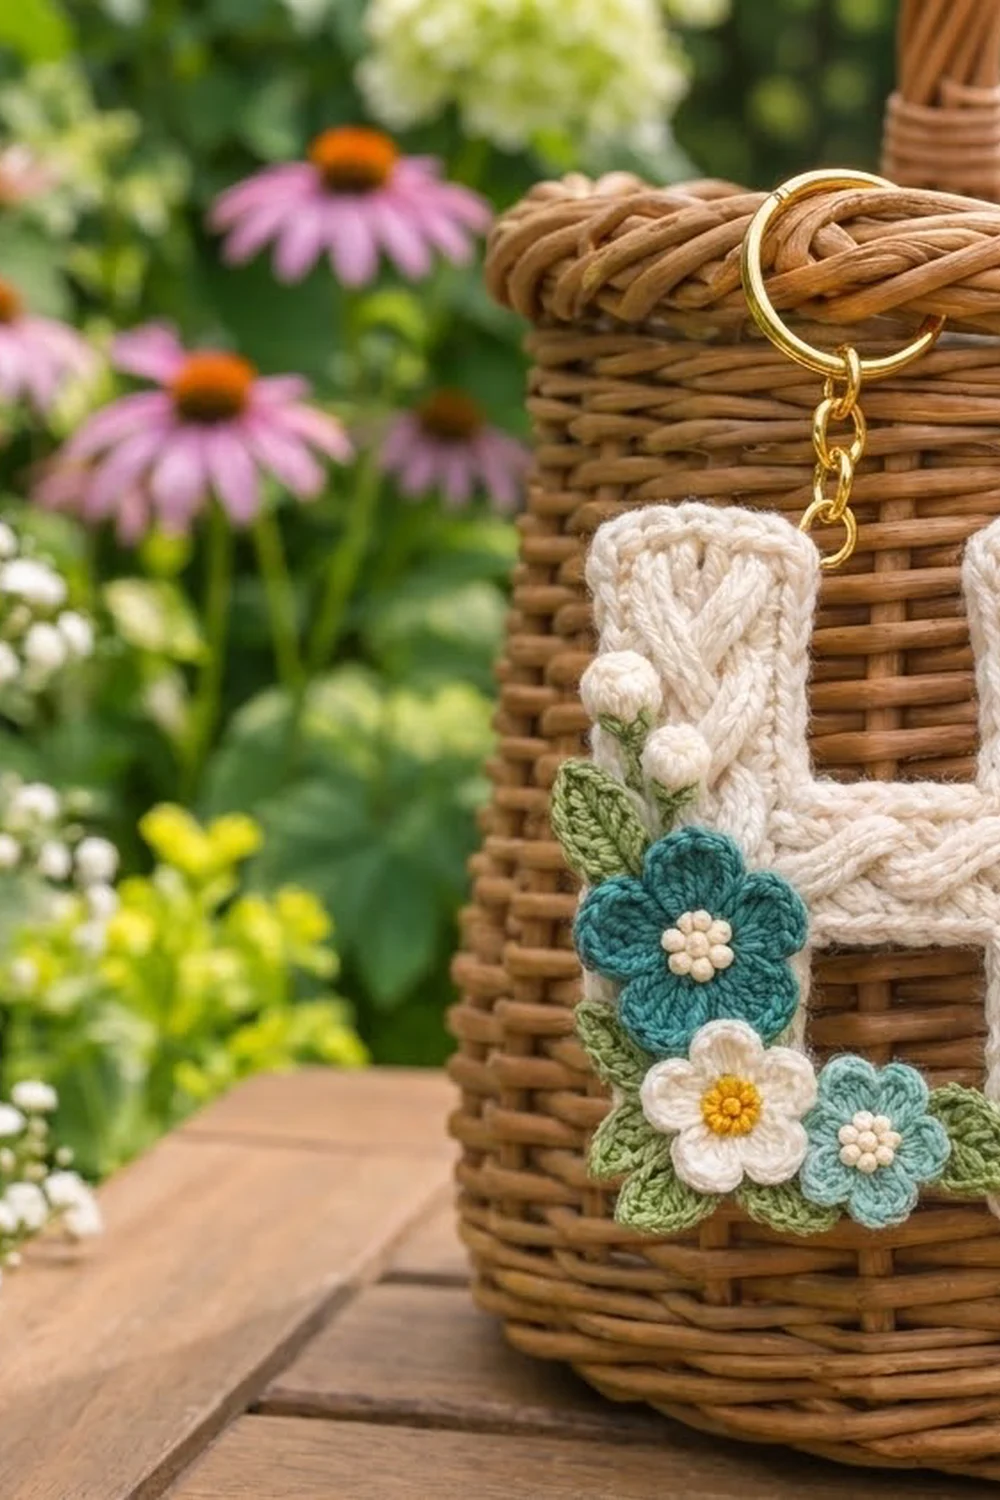
The color palette is soft and garden-like. The cream letter is the base, and in the lower left corner sits a cluster of a dark teal flower, a soft-white flower with a mustard center, a light aqua flower, four sage-green leaves, and two tiny cream buds. A gold split ring and short chain make it ready for keys, a bag, or a basket handle.
The pattern uses US crochet terms. The finished keychain measures 3.25 in (8.3 cm) wide by 3.75 in (9.5 cm) tall.
The construction is simple. You work both legs flat in rows with front-post cables. Then you work the crossbar sideways off the inner edge of the left leg and sew it to the right leg. One round of single crochet border makes the letter a single piece, and the small appliqués are sewn on last.
Finished Size and Construction
- Finished size: 3.25 in x 3.75 in (8.3 cm x 9.5 cm)
- Skill level: Intermediate (front-post cables, small appliqués)
- Terminology: US crochet terms
- Yarn weight: Sport weight (2) cotton
- Hook: 2.5 mm
- Number of pieces: One letter (two legs plus a crossbar, joined into one piece before the border), plus appliqués
- Layout: One H shape: two upright legs with a crossbar centered between them
- Leg size: 1 in x 3.5 in (2.5 cm x 8.9 cm), 8 sts x 28 rows
- Crossbar size: 1 in x 1 in (2.5 cm x 2.5 cm), 8 sts x 8 rows
- Size before border: 3 in x 3.5 in (7.6 cm x 8.9 cm)
- Border depth: 0.125 in (0.3 cm) on every edge, 1 round
Materials
Yarn: Use a smooth, mercerized or combed sport weight cotton. Cotton keeps the cables crisp and survives life on a key ring better than acrylic. Avoid fuzzy yarns, because they blur the braid.
- Cream (main color): 12 g / 36 m (letter, border, teal and aqua flower centers, buds)
- Dark teal: 2 g / 6 m
- Soft white: 2 g / 6 m
- Light aqua: 1 g / 3 m
- Mustard yellow: 1 g / 3 m
- Sage green: 2 g / 6 m
All quantities include a margin of about 25% for swatching and sewing tails.
Tools:
– 2.5 mm crochet hook
– Tapestry needle
– Stitch markers (4)
– Gold split key ring, 1 in (2.5 cm), with a 0.75 in (1.9 cm) chain
– 2 small jump rings and flat-nose pliers
– Blocking mat, rustproof pins, spray bottle
– Scissors and a ruler
Abbreviations (US Terms)
- ch – chain
- sl st – slip stitch
- sc – single crochet
- hdc – half double crochet
- dc – double crochet
- sc2tog – single crochet 2 together
- FPdc – front post double crochet
- FPtr – front post treble crochet
- MR – magic ring
- st(s) – stitch(es)
- RS / WS – right side / wrong side
Special stitches:
- Post stitches two rows below: Every post stitch in this pattern is worked around a stitch two rows below, because there is a WS sc row in between. Skip the stitch of the current row that sits behind each post stitch, so the count stays at 8.
- Cross X (front cross, moving right): Skip 2 sts. FPtr around each of the next 2 sts. Then, working in front of the sts just made, FPtr around each of the 2 skipped sts.
- Cross Y (front cross, moving left): Skip 2 sts. FPtr around each of the next 2 sts. Then, working behind the sts just made, FPtr around each of the 2 skipped sts.
- 4-dc bobble: (Yarn over, insert hook, pull up a loop, yarn over, pull through 2 loops) 4 times in the same st. Yarn over and pull through all 5 loops.
Gauge and Checkpoints
Gauge: 8 sts and 8 rows = 1 in (2.5 cm) in the braid pattern.
The best gauge swatch is the first leg itself. Work Rows 1–8, then measure.
- After leg Row 8: 1 in (2.5 cm) wide, 1 in (2.5 cm) tall.
- Finished leg (Row 28): 1 in x 3.5 in (2.5 cm x 8.9 cm).
- Finished crossbar (Row 8): 1 in (2.5 cm) long from the leg edge.
- Joined letter before border: 3 in x 3.5 in (7.6 cm x 8.9 cm).
- After border: 3.25 in x 3.75 in (8.3 cm x 9.5 cm).
If your leg is too wide (over 1.125 in / 2.9 cm), go down to a 2.25 mm hook. If it is too narrow (under 0.875 in / 2.2 cm), go up to a 2.75 mm hook. Small errors multiply three times across the width of the letter, so fix gauge before you start the second leg.
Legs (Make 2)
Use cream. Both legs are worked identically, from the bottom up, and the RS is always the side facing you on odd rows.
Row 1 (RS): Ch 9. Sc in the 2nd ch from the hook and in each ch across, turn. (8 sts)
Row 2 (WS): Ch 1, sc in each st across, turn. (8 sts)
Row 3 (RS, setup): Ch 1. Sc in the first st, FPdc around each of the next 6 sts of Row 1, sc in the last st, turn. (8 sts: 2 sc, 6 FPdc)
Row 4 (WS): Ch 1, sc in each st across, turn. (8 sts)
Row 5 (RS, Cross X): Ch 1. Sc in the first st. Work Cross X over the next 4 post sts. FPdc around each of the next 2 post sts. Sc in the last st, turn. (8 sts)
Row 6 (WS): Ch 1, sc in each st across, turn. (8 sts)
Row 7 (RS, Cross Y): Ch 1. Sc in the first st. FPdc around each of the next 2 post sts. Work Cross Y over the next 4 post sts. Sc in the last st, turn. (8 sts)
Row 8 (WS): Ch 1, sc in each st across, turn. (8 sts)
Checkpoint: 1 in x 1 in (2.5 cm x 2.5 cm).
Rows 9–24: Repeat Rows 5–8 four more times. (8 sts each row)
Row 25 (RS): Repeat Row 5 (Cross X). (8 sts)
Row 26 (WS): Ch 1, sc in each st across, turn. (8 sts)
Row 27 (RS, finish): Ch 1. Sc in the first st, FPdc around each of the next 6 post sts, sc in the last st, turn. (8 sts)
Row 28 (WS): Ch 1, sc in each st across. Fasten off. (8 sts)
Each leg has 11 crossings, with alternating X and Y crosses forming the braid. The plain FPdc rows at each end make the braid taper neatly into the top and bottom edges.
Checkpoint: 1 in x 3.5 in (2.5 cm x 8.9 cm). Weave in the ends.
Mark the crossbar position. Lay both legs RS up, side by side, with Row 1 at the bottom.
- On the left leg, place markers in the right-edge row-ends of Row 11 and Row 18.
- On the right leg, place markers in the left-edge row-ends of Row 11 and Row 18.
This leaves 10 rows below the crossbar and 10 rows above it on each leg.
Crossbar
The crossbar is worked sideways in rows. Its post stitches stack horizontally, so the braid runs from left to right.
Row 1 (RS): With the RS of the left leg facing, join cream in the right-edge row-end of Row 11. Ch 1. Sc in the same row-end and in each row-end up to and including Row 18, turn. (8 sts)
Row 2 (WS): Ch 1, sc in each st across, turn. (8 sts)
Row 3 (RS, Cross X): Ch 1. Sc in the first st. Work Cross X around the next 4 sc of Row 1. FPdc around each of the next 2 sc of Row 1. Sc in the last st, turn. (8 sts)
Row 4 (WS): Ch 1, sc across, turn. (8 sts)
Row 5 (RS, Cross Y): Ch 1. Sc in the first st. FPdc around each of the next 2 post sts. Work Cross Y over the next 4 post sts. Sc in the last st, turn. (8 sts)
Row 6 (WS): Ch 1, sc across, turn. (8 sts)
Row 7 (RS, Cross X): Repeat Row 3, working around the post sts of Row 5. (8 sts)
Row 8 (WS): Ch 1, sc across. Fasten off, leaving a 12 in (30.5 cm) tail. (8 sts)
Checkpoint: The crossbar extends 1 in (2.5 cm) from the left leg and is 1 in (2.5 cm) tall.
Joining the crossbar to the right leg: Lay the right leg beside the crossbar, RS up and bottoms level. Use the tail and mattress stitch to sew the 8 sts of crossbar Row 8 to the 8 marked row-ends (Rows 11–18) of the right leg, matching 1 stitch to 1 row-end. Pull snug but not tight.
The letter is now one piece. Checkpoint: 3 in x 3.5 in (7.6 cm x 8.9 cm).
Border
Border gauge: One sc round adds 0.125 in (0.3 cm) to every edge. The rule is 1 sc per stitch, 1 sc per row-end, 3 sc in each outer corner stitch, and 1 sc2tog at each inner corner.
Rnd 1 (RS): Join cream in the bottom-left corner st of the left leg (the first foundation ch). Work all around the letter as follows:
- Left leg bottom: 3 sc in the corner st, sc in the next 6 sts, 3 sc in the corner st. (12)
- Left leg inner edge, below crossbar: Sc in the row-ends of Rows 1–9. (9)
- Inner corner: Sc2tog over the Row 10 row-end and the first crossbar row-end. (1)
- Crossbar bottom: Sc in the next 6 crossbar row-ends. (6)
- Inner corner: Sc2tog over the last crossbar row-end and the Row 10 row-end of the right leg. (1)
- Right leg inner edge, below crossbar: Sc in the row-ends of Rows 9 down to 1. (9)
- Right leg bottom: 3 sc in the corner, sc in the next 6, 3 sc in the corner. (12)
- Right leg outer edge: Sc in each of the 28 row-ends. (28)
- Right leg top: 3 sc in the corner, sc in the next 6, 3 sc in the corner. (12)
- Right leg inner edge, above crossbar: Sc in the row-ends of Rows 28 down to 20. (9)
- Inner corner: Sc2tog over the Row 19 row-end and the first crossbar row-end. (1)
- Crossbar top: Sc in the next 6 crossbar row-ends. (6)
- Inner corner: Sc2tog over the last crossbar row-end and the Row 19 row-end of the left leg. (1)
- Left leg inner edge, above crossbar: Sc in the row-ends of Rows 20–28. (9)
- Left leg top: 3 sc in the corner, sc in the next 6, 3 sc in the corner. (12)
- Left leg outer edge: Sc in each of the 28 row-ends. (28)
Sl st to the first sc and fasten off. (156 sts)
Why the math works: The letter has 144 edge positions:
- 8 sts across each of 4 leg ends: 32
- 28 row-ends on each of 2 outer sides: 56
- 10 row-ends on each of 4 inner leg edges: 40
- 8 row-ends on each of 2 crossbar edges: 16
The 8 outer corners add 2 sc each (+16), for 160. The 4 inner-corner sc2tog each remove 1 (−4), for 156.
The border:
– adds 3 sts per short leg end to keep the outer corners square;
– keeps the long sides at exactly 1 sc per row so they don’t ripple;
– tightens the inner corners so they don’t cup.
Checkpoint: 3.25 in x 3.75 in (8.3 cm x 9.5 cm). The openings above and below the crossbar measure 0.75 in (1.9 cm) wide.
Appliqués
Large Teal Flower (Make 1)
- Rnd 1: With cream, work 5 sc in a MR. Sl st to the first sc and fasten off. (5 sts)
- Rnd 2: Join dark teal in any st. Ch 1, 2 sc in each st around, sl st to the first sc. (10 sts)
- Rnd 3: *(Hdc, 3 dc, hdc) in the next st, sl st in the next st*. Repeat 5 times. (5 petals, 30 sts)
Fasten off with a 10 in (25.4 cm) tail. Size: 1.125 in (2.9 cm) across.
White Flower (Make 1)
- Rnd 1: With mustard yellow, work 5 sc in a MR, sl st to join, and fasten off. (5 sts)
- Rnd 2: Join soft white. Ch 1, 2 sc in each st, sl st to join. (10 sts)
- Rnd 3: *(Hdc, dc, hdc) in the next st, sl st in the next st*. Repeat 5 times. (5 petals, 20 sts)
Size: 0.875 in (2.2 cm) across.
Small Aqua Flower (Make 1)
- Rnd 1: With cream, work 5 sc in a MR, sl st to join, and fasten off. (5 sts)
- Rnd 2: Join light aqua. *(Sl st, hdc, dc, hdc) in the next st*. Repeat 5 times, then sl st to the first sl st. (5 petals, 20 sts)
Size: 0.75 in (1.9 cm) across.
Leaves (Make 4)
With sage green, ch 7.
- Sc in the 2nd ch from the hook, then hdc, dc, dc, hdc, and sc in the remaining chs. (6 sts)
- Ch 2 for the tip.
- Working along the other side of the foundation chain: sc, hdc, dc, dc, hdc, sc. (6 sts)
- Sl st to the first sc. (12 sts plus the ch-2 tip)
Size: 0.75 in (1.9 cm) long. The foundation chain forms a center vein.
Buds (Make 2)
With cream, ch 2. Work a 4-dc bobble in the 2nd ch from the hook, then ch 1 and fasten off. Size: 0.25 in (0.6 cm).
Placement and Sewing
Pin each piece in place before sewing.
- Teal flower: Center it on the lower half of the left leg, with its upper petal level with the crossbar and its left petals overlapping the outer border by 0.125 in (0.3 cm).
- White flower: Tuck it below and slightly right of the teal flower, overlapping the bottom border.
- Aqua flower: Place it to the right of the white flower, so it laps onto the bottom of the gap edge.
- Leaves: Slide them under the petals:
- one above the teal flower, pointing up and left;
- one at the left between the teal and white flowers;
- one under the white flower, pointing down;
- one to the right of the aqua flower.
- Buds: Sew the buds 0.375 in (1.0 cm) above the top leaf. Embroider green straight-stitch stems 0.375 in (1.0 cm) long down to the leaf.
Sew each piece with matching yarn, using small stitches through the back loops only so nothing shows on the RS.
Hardware: Open a jump ring and pass it through the top-left corner sc group of the left leg. Attach the chain and split ring, then close the jump ring flat.
Final Blocking
- Weave in all ends except the appliqué sewing tails, which you should already have hidden.
- Mist the letter evenly until it is damp, avoiding the flowers.
- Pin it RS up on the blocking mat at 3.25 in x 3.75 in (8.3 cm x 9.5 cm).
- Pin each of the 8 outer corners square, and check that both legs are 1.25 in (3.2 cm) wide including the border.
- Use your fingertips to lift the braids so they stand proud. Do not flatten the cables.
- Let it dry completely, at least 6 hours.
- Unpin it and fluff the petals by hand.
Final Quality-Control Checklist
- [ ] Both legs are 8 sts x 28 rows with 11 crossings each.
- [ ] The crossbar has 3 crossings and sits on Rows 11–18 of both legs.
- [ ] The border has exactly 156 sts.
- [ ] The finished size is 3.25 in x 3.75 in (8.3 cm x 9.5 cm).
- [ ] The inner corners lie flat, without puckers or points.
- [ ] Every flower has 5 even petals.
- [ ] Appliqué stitches are invisible from the front.
- [ ] The jump ring is fully closed and the hardware is secure.
Troubleshooting
- The braid looks like twisted ropes, not a braid: Every Cross X goes in front, and every Cross Y goes behind. Check that you alternate them.
- The leg is curling: Your post stitches are too tight. Pull each post loop up to the height of the row.
- The stitch count drifts to 7 or 9: You either forgot to skip the stitch behind a post stitch or skipped an extra one. Count after every RS row.
- The inner corners cup: Rework the sc2tog more loosely, or replace it with 1 sc.
- The border ripples along the sides: You worked more than 1 sc in some row-ends. Use exactly 28 on each outer side.
- The petals flop: Go down 0.25 mm in hook size for the flowers only.
Care
Hand wash in cool water with mild soap, press out the water in a towel, and dry flat, reshaping the braids. Do not machine wash, and keep the hardware dry where possible.
Final Notes
The measurement chain is simple:
- Each leg is 8 sts x 28 rows = 1 in x 3.5 in (2.5 cm x 8.9 cm).
- The crossbar adds 8 rows = 1 in (2.5 cm), giving 3 in x 3.5 in (7.6 cm x 8.9 cm).
- The 156-stitch border adds 0.125 in (0.3 cm) all around, for 3.25 in x 3.75 in (8.3 cm x 9.5 cm).
If you hit your gauge on the first leg, everything after it falls into place. Then you can enjoy the fun part, which is arranging the flowers.
Happy crocheting!