

This hanging holder has three tulip-shaped cups stacked on one strap, and each cup holds a standard toilet roll. The cup bodies are worked in a dense knit-look stitch in warm rust. Cream inner petals with small bobble tips rise above the rim.
The palette is just rust and cream, so it suits neutral, boho, and farmhouse bathrooms. The style is sculptural but practical: sturdy cotton fabric that holds its shape and is easy to wash.
This pattern uses US crochet terms. Each cup is about 5 in (12.7 cm) across and 6.25 in (15.9 cm) tall. The full hanger is about 21.25 in (54.0 cm) long, including the 3 in (7.6 cm) wooden ring.
Construction overview: you crochet each cup body in joined rounds from the base up. Then you work six cream triangles off the rim in rows. Six rust petals are made separately and sewn around the outside. A cream edging with bobbles finishes each crown, and the cups are sewn onto one long strap that wraps around a wooden ring.
Finished Size and Construction
- Finished size: 5 in (12.7 cm) wide × 21.25 in (54.0 cm) long, ring included
- Skill level: Intermediate
- Terminology: US
- Yarn weight: Worsted (#4) cotton
- Hook: 5.0 mm (H-8)
- Number of pieces: 22 (3 cups, 18 petals, 1 strap)
- Layout: 3 cups stacked vertically on one strap
- Piece size (one cup body): 15.4 in (39.1 cm) around × 3.75 in (9.5 cm) tall
- Cup size before border: 5.75 in (14.6 cm) tall to the triangle tips
- Border depth: 0.25 in (0.6 cm) of edging plus a 0.25 in (0.6 cm) bobble at each tip
Materials
Use a 100% cotton or cotton-blend worsted yarn. Cotton gives the firm, washable fabric this holder needs. Avoid very soft or fuzzy acrylic, because the petals will droop.
- Rust: 250 g, about 425 m (cup bodies, petals, strap)
- Cream: 100 g, about 170 m (triangles, all edging, bobbles)
These quantities include a margin of roughly 20%.
Tools:
– 5.0 mm (H-8) crochet hook
– Tapestry needle
– Locking stitch markers (at least 12)
– 3 in (7.6 cm) wooden ring
– Scissors and a measuring tape
– Blocking pins and a spray bottle
Abbreviations (US Terms)
- ch – chain
- sl st – slip stitch
- sc – single crochet
- sc2tog – single crochet 2 together
- sc3tog – single crochet 3 together
- st(s) – stitch(es)
- rnd – round
- wst – waistcoat stitch
- bp – bobble picot
Waistcoat stitch (wst): Insert the hook through the center of the “V” of the stitch below, between its two front legs and out the back. Yarn over, pull up a loop, then yarn over and pull through both loops. This makes the dense knit-look texture of the cup.
Bobble picot (bp): Ch 3. In the 3rd ch from the hook, work 4 dc, leaving the last loop of each on the hook. Yarn over and pull through all 5 loops. Sl st into the same stitch at the base of the ch-3. This makes a small round knob.
Gauge and Checkpoints
Gauge: 14 sts and 16 rnds = 4 in (10.2 cm) in waistcoat stitch, and the same in sc rows. That means 3.5 sts per inch and 4 rows per inch, or 0.25 in (0.6 cm) per row.
Make one complete cup body before starting the others, and check it against these numbers:
- After Rnd 9: the flat base measures about 4.5 in (11.4 cm) across.
- After Rnd 24: the circumference is 15.4 in (39.1 cm) and the sides are 3.75 in (9.5 cm) tall.
- Each triangle: 2.6 in (6.6 cm) wide at the base and 2 in (5.1 cm) tall.
- Each petal: 2.6 in (6.6 cm) wide and 3.5 in (8.9 cm) tall.
If your cup comes out too big, go down a hook size. If it is too small and a roll won’t fit, go up a hook size. Waistcoat stitch is naturally tight, so keep your loops relaxed on the hook.
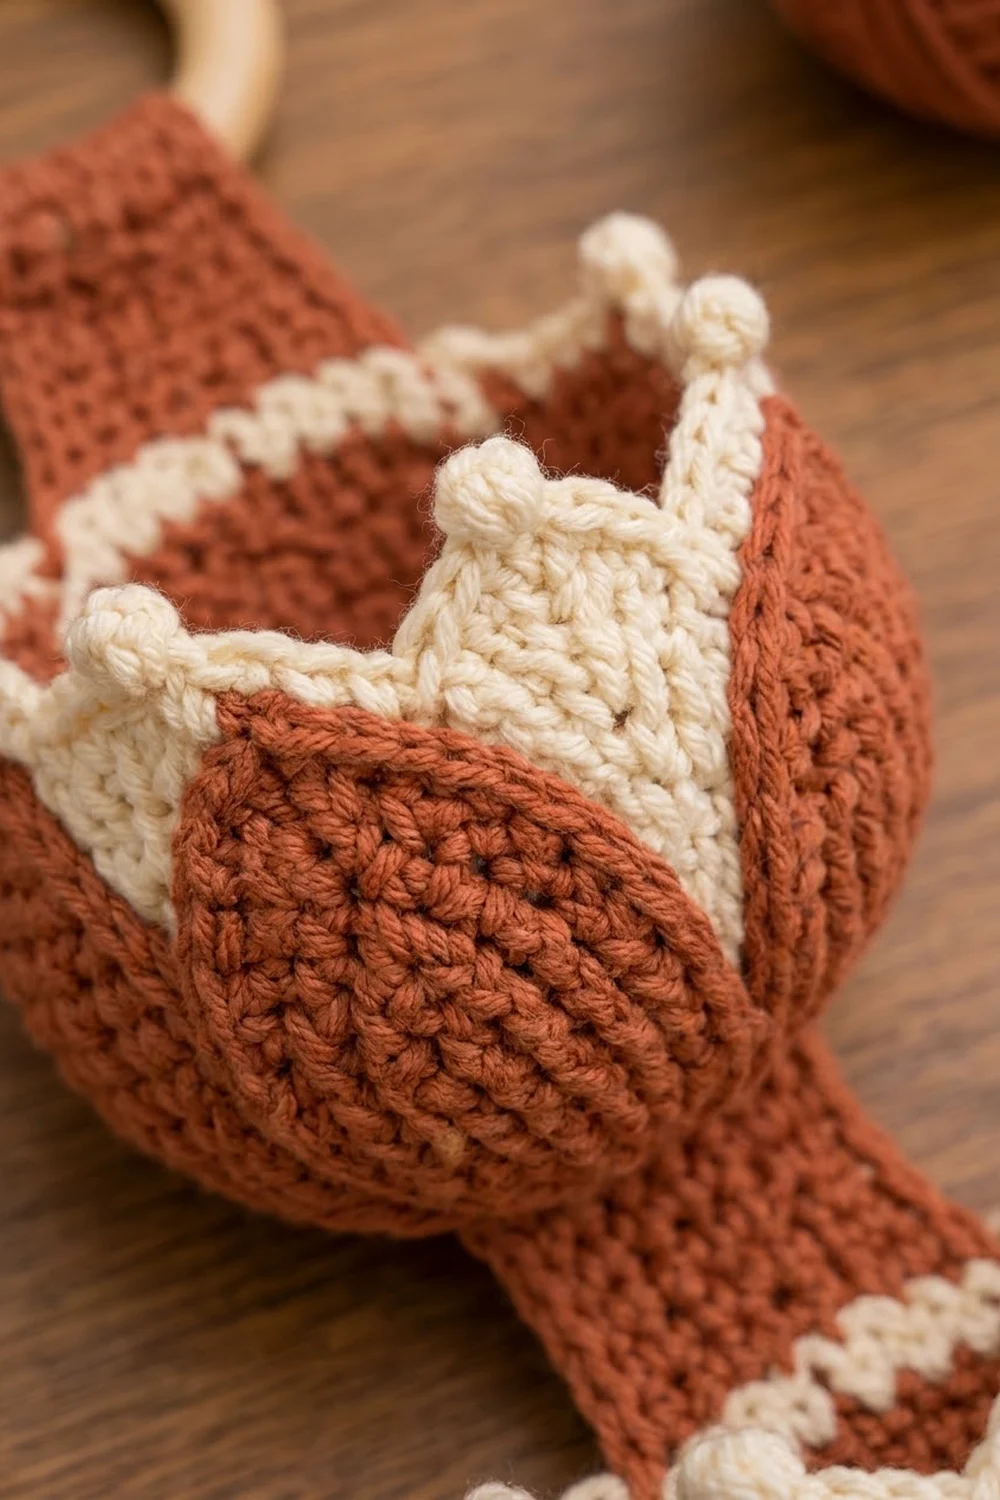
Cup Body (Make 3, Rust)
Work in joined rounds and do not turn. Ch 1 at the start of each round does not count as a stitch. Join each round with a sl st to the first st.
Rnd 1: Magic ring, 6 sc in ring, join. (6)
Rnd 2: 2 wst in each st around. (12)
Rnd 3: wst, 2 wst in next st; rep 6 times. (18)
Rnd 4: wst in next 2 sts, 2 wst in next st; rep 6 times. (24)
Rnd 5: wst in next 3 sts, 2 wst in next st; rep 6 times. (30)
Rnd 6: wst in next 4 sts, 2 wst in next st; rep 6 times. (36)
Rnd 7: wst in next 5 sts, 2 wst in next st; rep 6 times. (42)
Rnd 8: wst in next 6 sts, 2 wst in next st; rep 6 times. (48)
Rnd 9: wst in next 7 sts, 2 wst in next st; rep 6 times. (54)
Checkpoint: the base is about 4.5 in (11.4 cm) across.
Rnds 10–24: Wst in each st around. (54 each round)
The first few side rounds curve up naturally and give the cup its rounded bottom. That makes 15 side rounds, 3.75 in (9.5 cm) tall. Fasten off.
Mark the sections: Place a marker in every 9th st of Rnd 24, starting at the join. This divides the rim into 6 sections of 9 sts each (6 × 9 = 54).
Inner Triangles (6 per cup, Cream)
Work each triangle in rows over one 9-st section. Turn at the end of each row, and ch 1 at the start of each row (it does not count).
Row 1: Join cream in the first st of the section, sc in the same st and the next 8 sts. (9)
Row 2: Sc2tog, sc in next 5 sts, sc2tog. (7)
Row 3: Sc across. (7)
Row 4: Sc2tog, sc in next 3 sts, sc2tog. (5)
Row 5: Sc across. (5)
Row 6: Sc2tog, sc in next st, sc2tog. (3)
Row 7: Sc across. (3)
Row 8: Sc3tog. (1)
Fasten off. Repeat for all six sections. The triangles touch at their bases and use all 54 rim stitches. Each triangle is 8 rows, or 2 in (5.1 cm) tall.
Outer Petals (18 total, Rust with Cream Edging)
Work in rows. Turn at the end of each row, and ch 1 at the start of each row (it does not count).
Row 1: Ch 2, 3 sc in 2nd ch from hook. (3)
Row 2: 2 sc in first st, sc, 2 sc in last st. (5)
Row 3: 2 sc in first st, sc in next 3 sts, 2 sc in last st. (7)
Row 4: 2 sc in first st, sc in next 5 sts, 2 sc in last st. (9)
Rows 5–8: Sc across. (9 each row)
Row 9: Sc2tog, sc in next 5 sts, sc2tog. (7)
Row 10: Sc across. (7)
Row 11: Sc2tog, sc in next 3 sts, sc2tog. (5)
Row 12: Sc across. (5)
Row 13: Sc2tog, sc, sc2tog. (3)
Row 14: Sc3tog. (1)
Fasten off rust. The petal is 2.6 in (6.6 cm) wide and 3.5 in (8.9 cm) tall.
Petal edging (cream): With the right side facing, join cream at the row-end of Row 7 on one side. Work 1 sc in each row-end of Rows 7–13 (7 sc). In the Row 14 st, work (sc, bp, sc). Then work 1 sc in each row-end of Rows 13–7 down the other side (7 sc). That gives 16 sc + 1 bp. Fasten off, leaving a 12 in (30.5 cm) rust tail at the base for sewing.
Make All Pieces
- Rust: 3 cup bodies, 18 petals, 1 strap
- Cream: 18 triangles (worked onto the cups), 18 petal edgings, 3 crown edgings
Layout grid (front view, top to bottom):
        [ RING ]
        | tab  |   2 in (5.1 cm)
      [  CUP 1  ]  3.75 in body
        | gap  |   2.5 in (6.4 cm), crown of cup 2 rises here
      [  CUP 2  ]  3.75 in body
        | gap  |   2.5 in (6.4 cm)
      [  CUP 3  ]  3.75 in body
Strap (Make 1, Rust)
Row 1: Ch 8, sc in 2nd ch from hook and in each ch across. (7)
Rows 2–80: Ch 1, turn, sc across. (7 each row)
The strap is 2 in (5.1 cm) wide and 20 in (50.8 cm) long. Fasten off.
Joining
Petals to cups: Pin 6 petals around each cup. Center each petal over the point where two triangles meet, so its tip sits 1 in (2.5 cm) above the rim and its base sits 2.5 in (6.4 cm) below it. The petals are 9 sts wide, the same as one section, so they sit edge to edge with no gaps. Whipstitch each petal’s lower curve and sides up to the rim, and leave the top 1 in (2.5 cm) free. The cream triangles now show as diamond shapes between the rust tips.
Strap to ring: Fold the top 7 rows, 1.75 in (4.4 cm), over the ring and whipstitch the last row to the back of the strap. The visible strap is now 18.25 in (46.4 cm) long.
Cups to strap: Leave the 2 in (5.1 cm) tab below the ring, then place the top rim of Cup 1. Center the strap on the back of the cup. Its width spans 7 of the 54 rim sts, so put the cup’s join at the back to hide it. Whipstitch both long edges of the strap to the cup body. The strap’s row-ends and the cup’s side rounds are both 4 rows per inch, so match 1 row-end to 1 round, 15 per edge. Leave a 2.5 in (6.4 cm) gap, then attach Cup 2 the same way, then another 2.5 in (6.4 cm) gap and Cup 3. The strap ends at the base of Cup 3. Tack its last row to the base.
Tension: Sew firmly enough to hold a full roll, but not so tightly that the cup puckers.
Size checkpoint: 2 + 3.75 + 2.5 + 3.75 + 2.5 + 3.75 = 18.25 in (46.4 cm) of strap below the ring. Add the 3 in (7.6 cm) ring for 21.25 in (54.0 cm) in total.
Border (Crown Edging, Cream)
Border gauge: Work 1 sc in each triangle row-end. Each triangle side is 8 rows, so it gets 8 sc.
Edging Rnd 1: Join cream at the base of any triangle, where it meets the next one. Work 1 sc in each of the 8 row-ends going up the side. In the tip st (Row 8), work (sc, bp, sc). Work 1 sc in each of the 8 row-ends going down the other side. Repeat from * to * around all six triangles. Do not add stitches where the triangles meet: the last sc of one triangle and the first sc of the next sit in neighboring Row 1 row-ends. Join with a sl st and fasten off.
Count: 6 triangles × 18 sc = 108 sc + 6 bp.
Why the math works: Each triangle side climbs 2 in (5.1 cm) and moves inward 1.3 in (3.3 cm), so its slanted length is about 2.4 in (6.1 cm). Eight sc at 3.5 per inch cover 2.3 in (5.8 cm). That is close enough for the edge to lie flat without ruffling or cupping.
Final Blocking
- Fill each cup with a toilet roll or a rolled towel the same size.
- Spray the crowns and petals until they are damp, not soaked.
- Push each triangle and petal tip upward and slightly outward.
- Roll each bobble between your fingers to round it.
- Lay the hanger flat with the cups stuffed and let it dry completely.
- Remove the stuffing and check that the strap hangs straight.
Final Quality-Control Checklist
- Each cup body has 54 sts and is 15.4 in (39.1 cm) around.
- Each crown has six triangles, each 2 in (5.1 cm) tall.
- Six petals sit edge to edge on each cup, with tips 1 in (2.5 cm) above the rim.
- Each crown edging has 108 sc and 6 bobbles.
- Every petal edging has 16 sc and 1 bobble.
- The gaps between cups are an even 2.5 in (6.4 cm).
- All joins are on the back, and all yarn tails are woven in securely.
Troubleshooting
- Roll won’t fit: your gauge is too tight. Remake the cup body with a 5.5 mm hook.
- Cup is floppy: your gauge is too loose. Go down a hook size or use a firmer cotton.
- Triangles lean or twist: check that each triangle starts exactly on a section marker.
- Edging ruffles: you added stitches where the triangles meet. Rework it with exactly 8 sc per side.
- Petals gap apart: check that each petal is 9 sts wide at Rows 5–8.
- Hanger tilts: re-center the strap on the back of each cup.
Care
Hand wash in cool water or machine wash on a gentle cycle in a laundry bag. Reshape while damp and lay flat to dry.
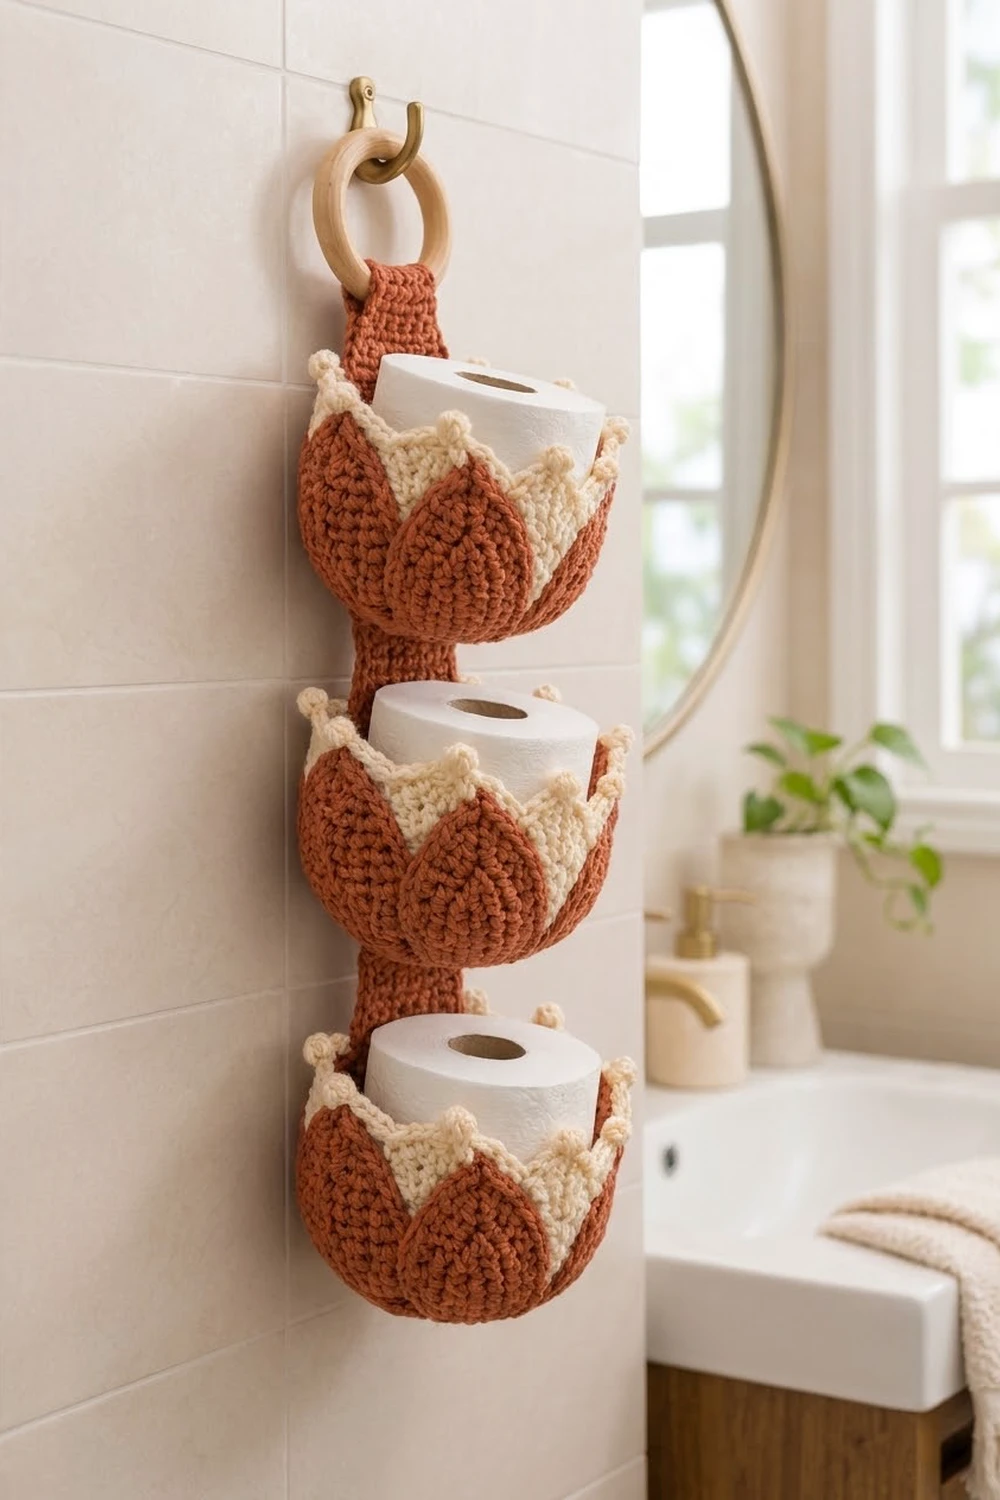
Final Notes
Everything in this pattern depends on the gauge of 3.5 sts and 4 rows per inch. That gauge gives a 54-st rim measuring 15.4 in (39.1 cm), which divides into six 9-st sections. Each section supports a 2 in (5.1 cm) triangle and a matching 2.6 in (6.6 cm) petal. The cups are spaced so that 18.25 in (46.4 cm) of strap plus the ring gives a 21.25 in (54.0 cm) hanger. Check each measurement as you go and the finished holder will come out right.
Happy crocheting!