

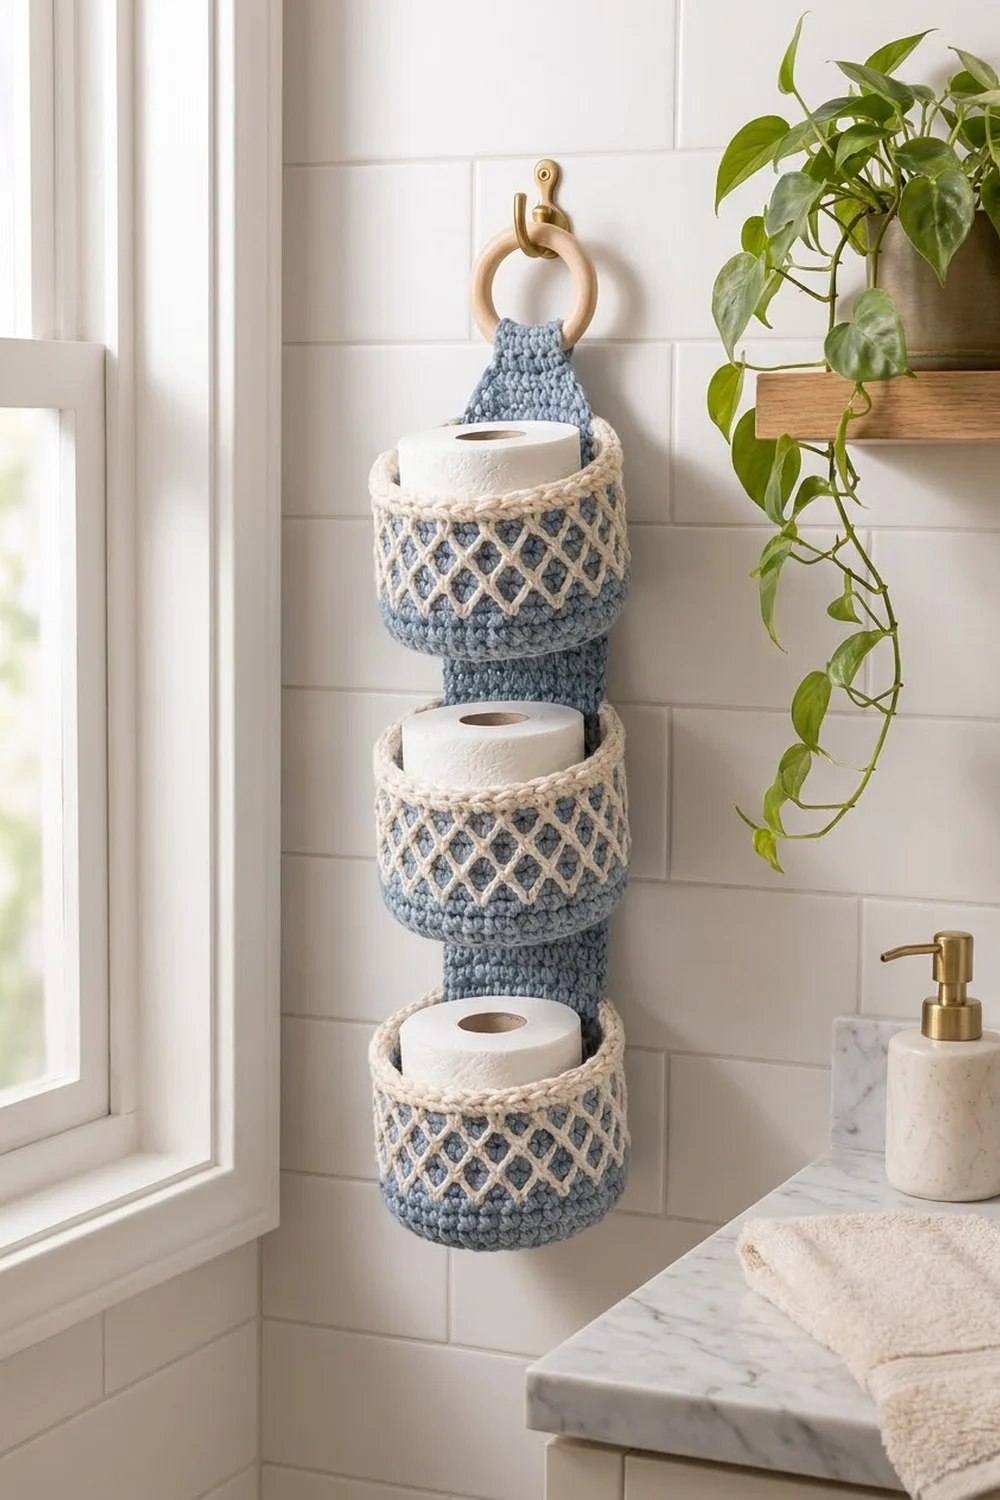
This hanging holder keeps three spare rolls tidy on the wall. It is a long dusty-blue strap with three round baskets sewn up the front and a wooden ring at the top, so it hangs from any hook or towel peg.
Each basket has a solid blue base, a band of raised cream diamond lattice, and a thick cream rim with a rope-like edge. The colors are soft and coastal. The texture looks more involved than it is.
This pattern uses US crochet terms. The finished holder is 4.0 in (10.2 cm) wide at the strap and 5.5 in (14.0 cm) wide at the baskets. It hangs 17.4 in (44.2 cm) from the bottom of the strap to the ring, or 20.4 in (51.8 cm) including a 3 in (7.6 cm) ring.
You make three baskets in continuous rounds and one flat strap in rows. Then you add a one-round border to the strap, sew the baskets on, and fold the top tab over the ring.
Finished Size and Construction
- Finished size: 4.0 in (10.2 cm) strap width, 5.5 in (14.0 cm) basket width, 17.4 in (44.2 cm) hanging length plus the ring
- Skill level: Intermediate (front post stitches, carrying a second color, sewing)
- Terminology: US
- Yarn weight: Worsted (#4) cotton
- Hook: 5.0 mm (US H-8)
- Number of pieces: 4 crocheted pieces (1 strap, 3 baskets) plus 1 wooden ring
- Layout: 3 baskets stacked in one column on the strap
- Piece size: each basket is 5.5 in (14.0 cm) across x 3.7 in (9.4 cm) tall; the strap is 3.4 in (8.6 cm) x 19.4 in (49.3 cm) unfolded
- Strap size before border: 3.4 in (8.6 cm) x 19.4 in (49.3 cm)
- Border depth: 1 round of sc, 0.3 in (0.8 cm)
Materials
Use a smooth, firm worsted-weight cotton or cotton blend. Cotton holds the basket shape and won’t stretch under the weight of the rolls. Avoid fuzzy or very soft acrylics, because they let the baskets slump.
- Color A, dusty blue: 150 g (about 255 m)
- Color B, cream: 60 g (about 102 m)
- 5.0 mm (US H-8) crochet hook
- 1 wooden ring, 3 in (7.6 cm) outer diameter
- 4 stitch markers
- Tapestry needle, scissors, measuring tape
- Pins or clips
These amounts include a margin of about 20%. The margin covers differences in gauge and the cream yarn you carry through the lattice rounds.
Abbreviations (US Terms)
- ch – chain
- sc – single crochet
- sc2tog – single crochet 2 together
- inc – 2 sc in the same stitch
- BLO – back loop only
- rev sc – reverse single crochet (crab stitch)
- FPtr – front post treble crochet
- MR – magic ring
- sl st – slip stitch
- st(s) – stitch(es)
- Rnd – round
Special stitch: FPtr2tog (lattice point). This stitch joins two posts into one point.
1. Yarn over twice. Insert the hook from front to back to front around the post of the first named stitch. Yarn over and pull up a loop. [Yarn over and pull through 2 loops] twice.
2. Repeat step 1 around the post of the second named stitch.
3. Yarn over and pull through all 3 loops.
Always skip the stitch behind it in the current round.
Color carrying: In Rnds 14–20, work the blue sc over the cream strand so the cream stays hidden. To change color, finish the last yarn over of the stitch before with the new color.
Gauge and Checkpoints
Gauge: 14 sc and 14 rows = 4 in (10.2 cm) in blue.
To check gauge, chain 17. Work 16 sc across, then 16 rows total. Measure 4 in (10.2 cm) across the center. The gauge is square (the same number of stitches and rows per inch), so one sc per row end on the strap border lies flat.
Make one basket first. It is the piece most sensitive to gauge, and it has to fit your rolls.
- After Rnd 5 (30 sts): the base is 2.7 in (6.9 cm) across.
- After Rnd 10 (60 sts): the base is 5.5 in (14.0 cm) across and lies flat.
- After Rnd 20: the wall is 2.9 in (7.4 cm) tall.
- Finished basket: 3.7 in (9.4 cm) tall and 17.1 in (43.4 cm) around.
- Strap after Row 49: 14.0 in (35.6 cm) x 3.4 in (8.6 cm).
If the basket is too big, use a 4.5 mm (US 7) hook. If it’s too small, use a 5.5 mm (US I-9) hook. Don’t add stitches. The lattice needs a stitch count that divides by 4.
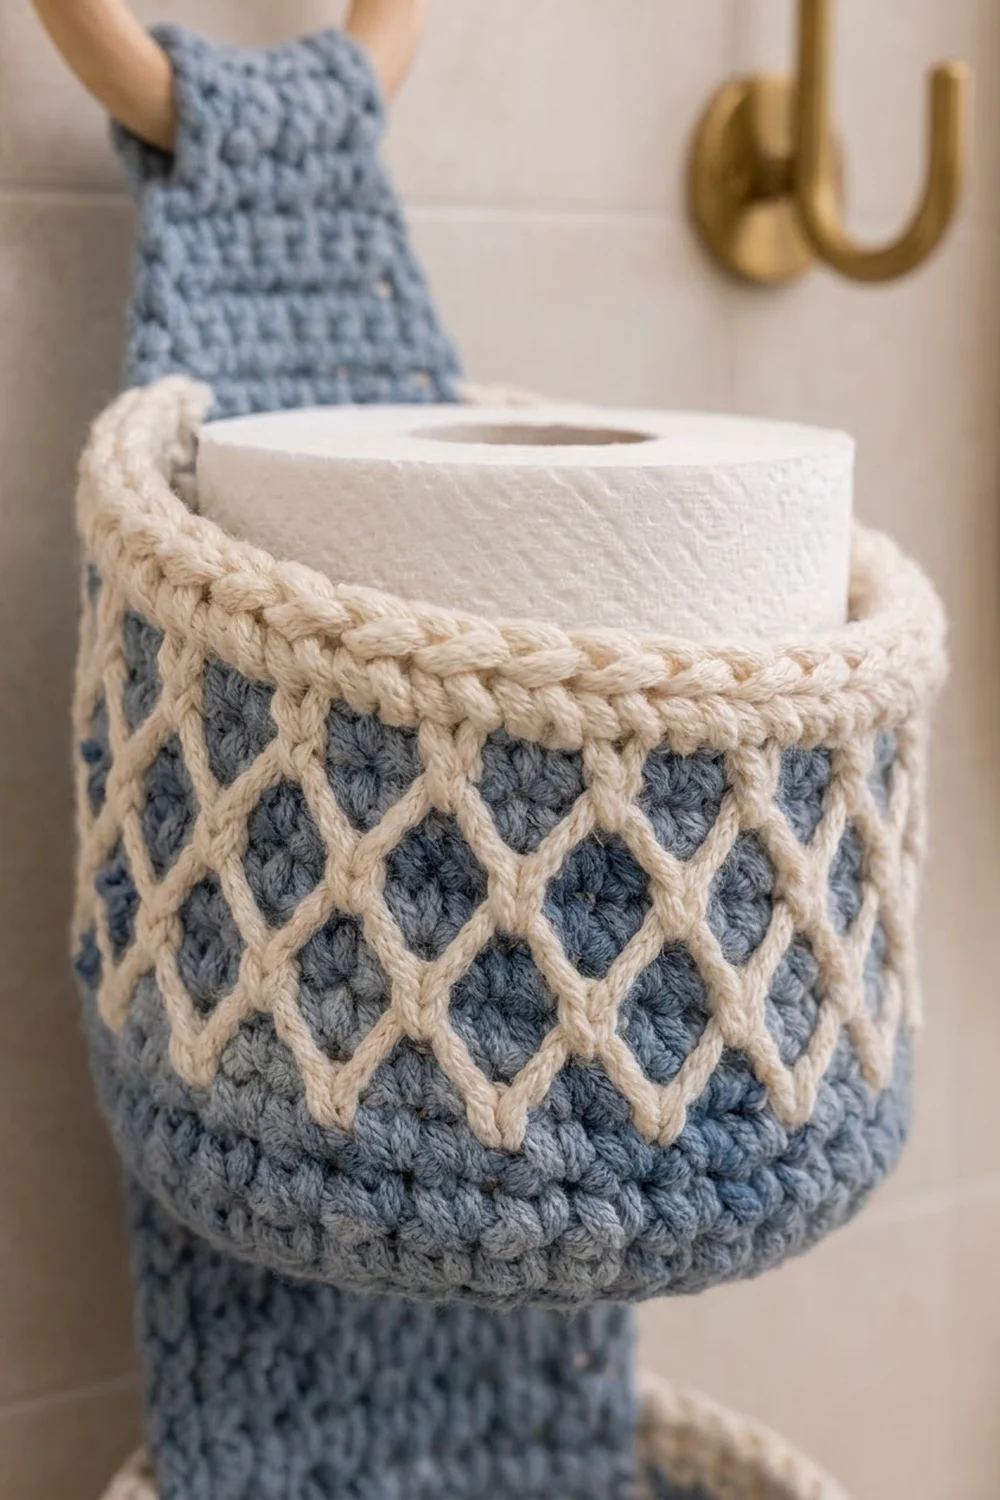
Basket (Make 3)
Work in continuous spirals without joining the rounds. Mark the first stitch of each round with a stitch marker. The start of Rnd 11 is the center back of the basket, so the color jog will be hidden against the strap.
Base
With blue, make a MR.
- Rnd 1: 6 sc in MR. (6)
- Rnd 2: Inc in each st. (12)
- Rnd 3: [Sc 1, inc] 6 times. (18)
- Rnd 4: [Sc 2, inc] 6 times. (24)
- Rnd 5: [Sc 3, inc] 6 times. (30)
- Rnd 6: [Sc 4, inc] 6 times. (36)
- Rnd 7: [Sc 5, inc] 6 times. (42)
- Rnd 8: [Sc 6, inc] 6 times. (48)
- Rnd 9: [Sc 7, inc] 6 times. (54)
- Rnd 10: [Sc 8, inc] 6 times. (60)
Wall
- Rnd 11: Sc in BLO of each st. (60) This turns the wall upward and leaves a ridge of front loops around the base edge.
- Rnds 12–13: Sc in each st. (60)
Lattice Band
Join cream at the start of Rnd 14 and carry it through Rnd 20. Work every lattice stitch in cream and every sc in blue.
- Rnd 14 (Lattice 1): [Sc in next 3 sts; FPtr around the st in Rnd 12 directly below the next st, skip the st behind] 15 times. (45 sc + 15 FPtr = 60)
- Rnd 15: Sc in each st. (60)
- Rnd 16 (Lattice 2): Sc in next st. [FPtr2tog with legs around the Lattice 1 sts 2 sts back and 2 sts ahead, skip the st behind; sc in next 3 sts] 14 times. FPtr2tog the same way, skip the st behind, sc in last 2 sts. (45 sc + 15 FPtr2tog = 60)
- Rnd 17: Sc in each st. (60)
- Rnd 18 (Lattice 3): [Sc in next 3 sts; FPtr2tog with legs around the Lattice 2 sts 2 sts back and 2 sts ahead, skip the st behind] 15 times. (45 sc + 15 FPtr2tog = 60)
- Rnd 19: Sc in each st. (60)
- Rnd 20 (Lattice 4): Repeat Rnd 16, but anchor the legs around the Lattice 3 sts. (45 sc + 15 FPtr2tog = 60) Cut blue.
Each new lattice point splits its legs diagonally to the two points below it. This forms 3 rows of blue diamonds, 15 diamonds around. In Rnds 16 and 18, the legs at the start and end of the round reach across the round’s starting point to the nearest lattice stitch.
Rim
- Rnds 21–22: With cream, sc in each st. (60)
- Rnd 23: Rev sc in each st. (60) Sl st to the first st and fasten off.
The lattice band is 2.0 in (5.1 cm) tall. The finished basket is 5.5 in (14.0 cm) across and 3.7 in (9.4 cm) tall.
Strap (Make 1)
With blue, ch 13.
- Row 1: Sc in 2nd ch from hook and in each ch across, turn. (12)
- Rows 2–49: Ch 1, sc in each st across, turn. (12)
- Row 50: Ch 1, sc2tog, sc 8, sc2tog, turn. (10)
- Row 51: Ch 1, sc across, turn. (10)
- Row 52: Ch 1, sc2tog, sc 6, sc2tog, turn. (8)
- Rows 53–68: Ch 1, sc across, turn. (8)
Don’t fasten off. Before the border, the strap is 19.4 in (49.3 cm) long and 3.4 in (8.6 cm) wide, and the tab is 2.3 in (5.8 cm) wide.
Make All Pieces
- Baskets: 3, each using about 32 g blue and 14 g cream
- Strap: 1, using about 26 g blue including the border
- Ring: 1
[ Rows 61–68 + border ]  tab folded behind ring
[ Rows 50–60 ]           taper + tab, 3.1 in (7.9 cm)
[ Rows 37–49 ]           TOP BASKET
[ Rows 32–36 ]           gap, 1.4 in (3.6 cm)
[ Rows 19–31 ]           MIDDLE BASKET
[ Rows 14–18 ]           gap, 1.4 in (3.6 cm)
[ Rows 1–13 ]            BOTTOM BASKET
[ border ]               bottom edge
Joining
Work the strap border (next section) before you sew. Sew the baskets on with blue yarn and a whipstitch.
Stitch-to-stitch logic: Each basket wall has 13 rounds (Rnds 11–23). Each basket position on the strap has 13 rows. Because the gauge is square, you sew 1 basket round to 1 strap row, and nothing needs easing.
- On each basket, mark the 8 center-back sts: the last 4 and first 4 sts of the round.
- On the strap, mark columns 3 and 10 of the original 12 sts. That gives 8 sts between them, counting both marked columns.
- Pin the bottom basket with its base ridge on Row 1 and its rim on Row 13. Flatten the 8 back sts against the strap.
- Whipstitch up column 3, 13 stitches. Whipstitch across the 8 rim sts to Row 13. Whipstitch down column 10, 13 stitches. Whipstitch the 8 front loops of the base ridge to Row 1.
- Repeat for the middle basket on Rows 19–31 and the top basket on Rows 37–49.
- Pass the tab through the ring. Fold Rows 61–68 and the top border to the back so the edge lands on Row 53. Whipstitch along both sides and across the edge.
Tension: Keep the stitches snug but not tight. The basket should sit flat without puckering the strap.
Size checkpoint: The strap shows 17.4 in (44.2 cm) below the ring, and the gaps are 1.4 in (3.6 cm).
Border
Border gauge: The border uses the same sc gauge of 14 sts per 4 in (10.2 cm). Rows and stitches are the same size, so one sc per row end lies flat.
Border round (blue): After Row 68, ch 1 and work around the whole strap.
- Top edge: 3 sc in the first st (corner), sc in next 6 sts, 3 sc in the last st (corner).
- Long side 1: Sc in each row end. (68)
- Bottom edge: 3 sc in the first foundation st (corner), sc in next 10 sts, 3 sc in the last st (corner).
- Long side 2: Sc in each row end. (68)
- Sl st to the first sc and fasten off.
Count: 6 + 68 + 10 + 68 = 152 sts between the corners, plus 4 corners x 3 = 12, for 164 sts total.
Why the math works: Each corner group goes into an existing end stitch, so the top uses its 8 sts and the bottom uses its 12 sts, and no stitch is counted twice. The border adds one stitch on each side, so the strap becomes 14 sts or 4.0 in (10.2 cm) wide, and the tab becomes 10 sts or 2.9 in (7.4 cm). It also adds one row at each end, so the strap is 70 rows or 20.0 in (50.8 cm) long unfolded.
Final Blocking
- Weave in all ends on the inside of the baskets and the back of the strap.
- Mist the holder until it is damp, not soaked.
- Lay it face up and pat the strap straight to 4.0 in (10.2 cm) wide.
- Fill each basket with a roll or a rolled towel.
- Nudge the lattice points so they line up evenly.
- Let it dry for at least 12 hours before hanging.
Final Quality-Control Checklist
- Every wall round has 60 sts.
- Each basket has 15 diamonds around in 3 even rows.
- No carried yarn shows through.
- Each basket is 3.7 in (9.4 cm) tall.
- The strap is 4.0 in (10.2 cm) wide and its edges lie flat.
- Each basket has 13 stitches per side seam.
- Both gaps measure 1.4 in (3.6 cm).
- The ring tab is sewn securely.
Troubleshooting
- The base cups or ruffles: Recount Rnds 1–10. If the counts are right, change hook size.
- The lattice lines are slack: Keep your loops short, and skip the stitch behind each lattice stitch.
- The diamonds are lopsided: A leg went around the wrong post. Count exactly 2 sts back and 2 sts ahead.
- The carried cream peeks through: Hold the strand at the back of the hook and work firmly over it.
- The rim flares: Work Rnd 23 a little tighter.
- The strap edge waves: Make sure you worked exactly one sc per row end.
Care
Hand wash in cool water with mild soap. Reshape the baskets around a roll and dry flat.
Final Notes
The measurements build on each other. A gauge of 14 sts and 14 rows per 4 in (10.2 cm) gives a 60-stitch base 5.5 in (14.0 cm) across and a 13-round wall 3.7 in (9.4 cm) tall. Each wall’s 13 rounds match 13 strap rows. The 12-stitch strap is 4.0 in (10.2 cm) wide after the border and shows 17.4 in (44.2 cm) below the ring. If you check each stage as you go, the holder will hang straight.
Happy crocheting!