

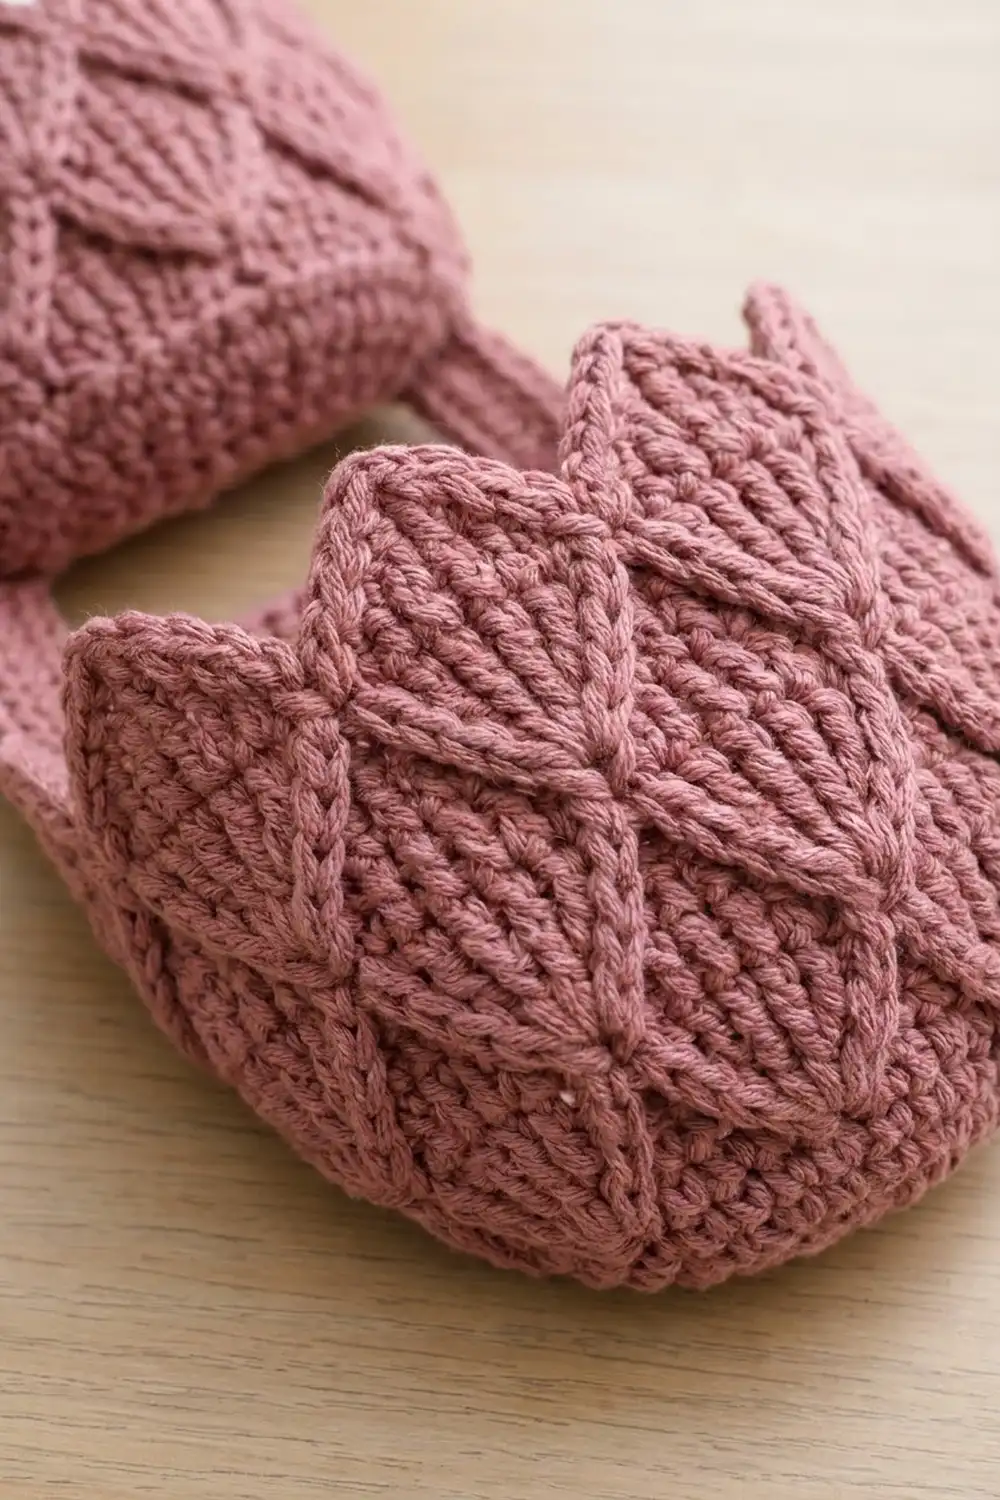
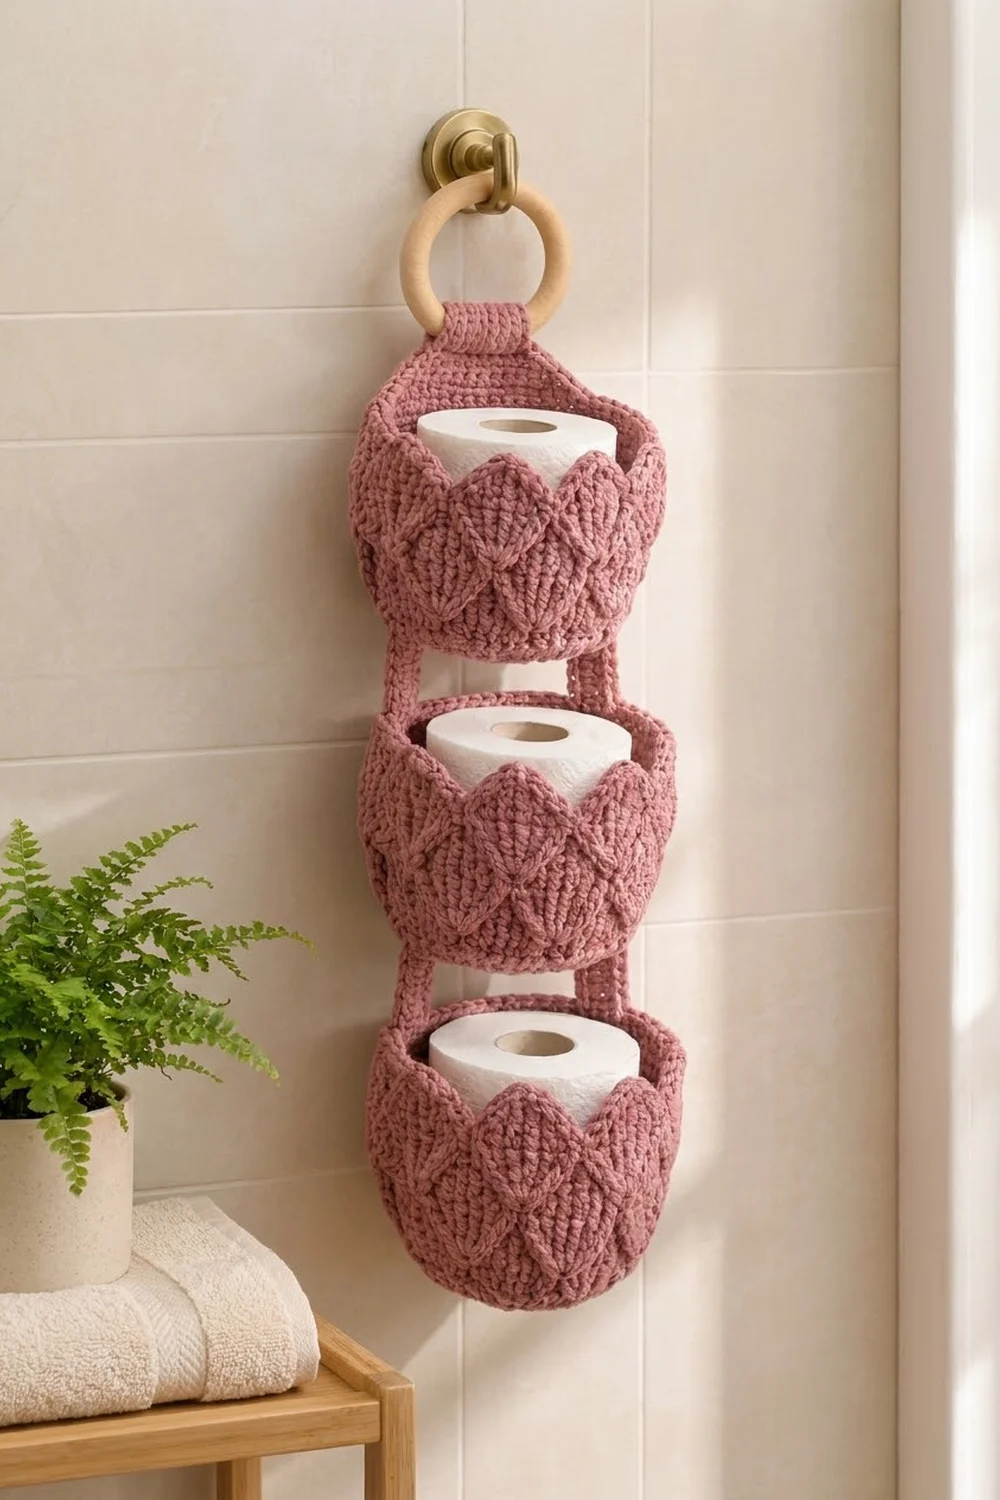
This hanging holder stores three spare rolls in a small strip of wall space. Each round pocket is covered in overlapping, pointed petal scales, and the top row of petals forms a lotus-shaped rim around the roll.
The sample is worked in one dusty rose color, which suits warm neutral bathrooms and brass fixtures. The look is soft and textured but still neat, and the stacked pockets read as one tidy vertical column. This pattern uses US crochet terms.
The finished holder measures about 5.25 in (13.3 cm) wide and about 21 in (53.3 cm) long from the top of the ring to the bottom pocket. Each pocket is 4.5 in (11.4 cm) tall and fits standard rolls up to about 4.5 in (11.4 cm) across.
You’ll make three identical pockets in joined rounds: a flat base, a short single crochet wall, then four tiers of petals. Next come two simple single crochet straps and one hanging tab, each finished with a one-round border. The pockets are sewn onto the straps, and the tab is folded around a wooden ring and sewn to the top pocket.
Finished Size and Construction
- Finished size: about 5.25 in (13.3 cm) wide x 21 in (53.3 cm) long
- Skill level: Intermediate (post stitches, working around posts)
- Terminology: US crochet terms
- Yarn weight: Worsted (#4), cotton or cotton blend
- Hook: 4.5 mm (US 7)
- Number of pieces: 6 crocheted pieces (3 pockets, 2 straps, 1 tab) plus 1 purchased wooden ring
- Layout: 3 pockets stacked in 1 column, with 1.5 in (3.8 cm) gaps between them
- Pocket size: 4.75 in (12.1 cm) base diameter, 5.25 in (13.3 cm) wide across the petals, 4.5 in (11.4 cm) tall
- Size before border: each strap is 0.75 x 16 in (1.9 x 40.6 cm); the tab is 2 x 5.5 in (5.1 x 14.0 cm)
- Border depth: 0.25 in (0.6 cm) on every edge of the straps and tab
Materials
Yarn: Use a smooth worsted-weight cotton or cotton/acrylic blend. Cotton keeps the petals crisp and stands up to bathroom humidity. Avoid fuzzy yarn, because it hides the petal outlines.
- Dusty Rose: 140 g / 250 m (about 273 yd)
These quantities include a margin of roughly 40 percent. The petal rounds use a lot of yarn, so it’s safer to buy one extra skein from the same dye lot.
Tools:
– 4.5 mm (US 7) crochet hook
– Wooden ring, 3 in (7.6 cm) outer diameter
– Tapestry needle
– 6–8 locking stitch markers
– Measuring tape
– Spray bottle, rust-proof pins, and one spare toilet roll for blocking
Abbreviations (US Terms)
- ch – chain
- sl st – slip stitch
- sc – single crochet
- dc – double crochet
- inc – 2 sc in the same stitch
- blo – back loop only
- MR – magic ring
- sp – space
- st(s) – stitch(es)
- rnd – round
Special stitches
- Pair: 2 dc worked in the same stitch or space.
- Petal: Work 5 dc around the post of the first dc of a pair, starting at its base and moving upward. Ch 2 (this is the tip). Then work 5 dc around the post of the second dc of the same pair, starting at its top and moving down. Each petal has 10 dc and 1 ch-2 tip, and its tip points up.
Gauge and Checkpoints
Gauge: 16 sc and 16 rows = 4 in (10.2 cm) with a 4.5 mm hook. That works out to 4 sts and 4 rows per inch.
Make one complete pocket before starting the others. The checkpoints are:
- After Rnd 10 (flat base): 4.75 in (12.1 cm) across, and lying flat
- After Rnd 13 (wall): 0.75 in (1.9 cm) of straight wall
- After Rnd 15 (tier 1): 1.5 in (3.8 cm) wall height
- After Rnd 17 (tier 2): 2.25 in (5.7 cm)
- After Rnd 19 (tier 3): 3 in (7.6 cm)
- After Rnd 20: 3.75 in (9.5 cm); after Rnd 21, it’s 4.5 in (11.4 cm) to the petal tips
If the base is too big: go down 0.5 mm. If it’s too small, or a roll won’t drop in: go up 0.5 mm. Don’t add base rounds to fix the size. The 60-st count is what the 20 pairs are built on.
Pocket (make 3)
All rounds are joined with a sl st to the first st. Keep each join in line, because that seam will become the center back of the pocket.
Base
- Rnd 1: 6 sc in MR, join. (6)
- Rnd 2: Ch 1, inc in each st, join. (12)
- Rnd 3: Ch 1, sc 1, inc; rep around, join. (18)
- Rnd 4: Ch 1, sc 2, inc; rep around, join. (24)
- Rnd 5: Ch 1, sc 3, inc; rep around, join. (30)
- Rnd 6: Ch 1, sc 4, inc; rep around, join. (36)
- Rnd 7: Ch 1, sc 5, inc; rep around, join. (42)
- Rnd 8: Ch 1, sc 6, inc; rep around, join. (48)
- Rnd 9: Ch 1, sc 7, inc; rep around, join. (54)
- Rnd 10: Ch 1, sc 8, inc; rep around, join. (60)
Checkpoint: the base should be 4.75 in (12.1 cm) across.
Wall
- Rnd 11: Ch 1, sc in blo of each st, join. (60) This turns the edge up into a wall.
- Rnds 12–13: Ch 1, sc in each st, join. (60)
Tier 1
- Rnd 14 (pair round): Ch 3 (counts as dc), dc in same st as join, ch 1, skip 2 sts. 2 dc in next st, ch 1, skip 2 sts; rep from * 18 more times. Join to the top of the beginning ch-3. (20 pairs = 40 dc, plus 20 ch-1 sps)
The math: each pair plus its ch-1 uses 3 base sts, and 20 x 3 = 60.
- Rnd 15 (petal round): Sl st one step back into the last ch-1 sp, the one just before the beginning ch-3. Petal over the next pair, sl st in the next ch-1 sp, ch 2, skip the next pair, sl st in the next ch-1 sp; rep from * 9 more times. The last sl st lands in the starting sp. (10 petals, 10 ch-2 gap sps)
Each skipped pair now sits under a ch-2 “gap” between two petals.
Tier 2
- Rnd 16 (pair round): Sl st in each of the 5 dc on the rising side of the first petal, then sl st in its ch-2 tip. Ch 3 (counts as dc), dc in the same tip sp, ch 1. 2 dc in the next ch-2 gap sp, ch 1, 2 dc in the tip of the next petal, ch 1; rep from * 8 more times. Finish with 2 dc in the last gap sp, ch 1, and join. (20 pairs = 40 dc, plus 20 ch-1 sps)
This round has 10 “tip pairs” and 10 “gap pairs,” alternating.
- Rnd 17 (petal round): Sl st one step back into the last ch-1 sp. Skip the first pair, which is a tip pair. Rep the Rnd 15 pattern so that petals are worked on the 10 gap pairs and the 10 tip pairs are skipped under ch-2. (10 petals, 10 ch-2 gap sps)
The new petals sit between the Tier 1 petals, which gives the staggered, diamond-like look.
The alternation rule: In every petal round after Rnd 15, petals always go on pairs that were worked into ch-2 gap sps. Pairs worked into petal tips are always skipped.
Tier 3
- Rnd 18: Work as Rnd 16. (20 pairs, 20 ch-1 sps)
- Rnd 19: Work as Rnd 17. (10 petals, 10 ch-2 gap sps) These petals line up above Tier 1.
Tier 4 (rim)
- Rnd 20: Work as Rnd 16. (20 pairs, 20 ch-1 sps)
- Rnd 21: Work as Rnd 17. (10 petals, 10 ch-2 gap sps) These petals line up above Tier 2.
Fasten off and weave in the ends. The 10 upward petal tips of Rnd 21 form the pointed lotus rim.
Strap (make 2)
- Row 1: Ch 4, sc in the 2nd ch from the hook and in the next 2 ch. (3)
- Rows 2–64: Ch 1, turn, sc in each st. (3)
Don’t fasten off. Each strap now measures 0.75 x 16 in (1.9 x 40.6 cm).
Hanging Tab (make 1)
- Row 1: Ch 9, sc in the 2nd ch from the hook and in each ch across. (8)
- Rows 2–22: Ch 1, turn, sc in each st. (8)
Don’t fasten off. The tab now measures 2 x 5.5 in (5.1 x 14.0 cm).
Make All Pieces
All pieces are Dusty Rose:
- Pockets: 3
- Straps: 2
- Hanging tab: 1
Here is the layout, viewed from the front. The straps run behind the pockets.
            ( RING )
             [TAB]
   |S|   [ POCKET 1 ]   |S|
   |S|      1.5 in      |S|
   |S|   [ POCKET 2 ]   |S|
   |S|      1.5 in      |S|
   |S|   [ POCKET 3 ]   |S|
Work the borders on the straps and tab (see “Border” below) before joining, so they’re measured at their final size.
Joining
Method: Backstitch each strap down its center stitch column, through the pocket wall. Because only the center column is stitched down, both bordered edges stay free and flat.
Placement on the straps: Measure from the top border edge of each strap and place a marker at each of these points:
- 0 in: tips of Pocket 1
- 4.5 in (11.4 cm): Rnd 11 base edge of Pocket 1
- 6 in (15.2 cm): tips of Pocket 2
- 10.5 in (26.7 cm): base edge of Pocket 2
- 12 in (30.5 cm): tips of Pocket 3
- 16.5 in (41.9 cm): base edge of Pocket 3
Placement on the pockets: Turn each pocket so its round seam is at the center back. Mark two vertical lines on the back, each 2.125 in (5.4 cm) from the seam, so they’re 4.25 in (10.8 cm) apart. Line up each strap’s center column on one of these lines. This leaves the inner strap edges 3 in (7.6 cm) apart.
Stitch logic: Work one backstitch per strap row, so there are 4 stitches per inch, matching the row gauge. On each pocket, sew from Rnd 20 down to Rnd 11, catching the wall sts behind the petals. Don’t sew through the Rnd 21 petal tips. Each pocket is attached along 4.5 in (11.4 cm) of strap, and both straps carry an equal share.
Tension: Keep the stitches snug but not tight. If they’re pulled hard, the pocket backs pucker, and the gaps go uneven.
Tab: Fold the tab over the ring with the ends together. The doubled tab is 3 in (7.6 cm) long. Whipstitch the side edges together just below the ring. Center the bottom 1 in (2.5 cm) of the doubled tab on the back of Pocket 1, between the straps and overlapping the top of the pocket. Sew around all four sides of that overlap.
Size checkpoint: The pocket column should measure 16.5 in (41.9 cm), and the gaps should be 1.5 in (3.8 cm) each. The whole holder hangs about 21 in (53.3 cm) to the top of the ring.
Border
Border gauge: The border is 1 sc per row end along the long sides and 1 sc per stitch along the short ends, at 4 sts per inch. Corners are ch-1 sps and aren’t counted as stitches.
Strap border (on each strap, continuing from the last row):
- Rnd 1: Ch 1, then work around the strap in this order:
- top end: sc in each of the 3 sts (3 sc), ch 1
- long side: 64 sc, one in each row end, ch 1
- bottom end: 3 sc across the foundation ch, ch 1
- second long side: 64 sc, ch 1
- join to the first sc.
Total: 134 sc (64 + 3 + 64 + 3) plus 4 corner ch-1 sps. The finished strap is 1.25 x 16.5 in (3.2 x 41.9 cm).
Tab border:
- Rnd 1: Work the same way, with 8 sc across each short end and 22 sc along each long side, plus a ch 1 at each corner. Join.
Total: 60 sc (8 + 22 + 8 + 22) plus 4 corner ch-1 sps. The finished tab is 2.5 x 6 in (6.4 x 15.2 cm).
Why the math works: At this gauge, sc stitches and sc rows are both 4 per inch. So one sc per row end lies perfectly flat, without ruffling or pulling in. The corners are chains rather than stitches, so the side counts stay exactly the same as the row and stitch counts. The border adds 0.25 in (0.6 cm) all around, so each strap goes from 0.75 x 16 in (1.9 x 40.6 cm) to 1.25 x 16.5 in (3.2 x 41.9 cm). That length matches the 16.5 in (41.9 cm) pocket column exactly.
Because the border is worked on single strips, not around joined pieces, no seam stitches enter the count.
Final Blocking
- Mist the whole holder until it’s damp but not soaked.
- Wrap a spare roll in a plastic bag and set it into each pocket so the walls dry round.
- Pin the holder flat on a board, with the straps straight and the gaps at 1.5 in (3.8 cm).
- Shape each petal with your fingers. Push the Rnd 21 tips upward and slightly outward, and smooth the lower petals flat.
- Pin the tab straight up from the top pocket, and center the ring.
- Let it dry completely, usually overnight, before you unpin it.
Final Quality-Control Checklist
- Each pocket has a base of 60 sts and 4.75 in (12.1 cm) across
- Every pair round has 20 pairs, and every petal round has 10 petals
- The petals alternate tier by tier, with no two stacked directly on top of each other
- Each pocket is 4.5 in (11.4 cm) tall to the petal tips
- The straps are 1.25 x 16.5 in (3.2 x 41.9 cm), with 134 sc in each border
- The tab border has 60 sc
- Both gaps are 1.5 in (3.8 cm)
- The holder hangs straight, and all ends are woven in
Troubleshooting
- The base cups: Your tension is too tight. Go up 0.5 mm.
- The base ruffles: Go down 0.5 mm.
- The petals flop forward: Work the petal dc more snugly around the posts, then block over a roll.
- The petals stack instead of staggering: You worked a petal on a tip pair. Rip back to the pair round and follow the alternation rule.
- The holder tilts: One strap was sewn lower than the other. Re-sew from the markers.
- The gaps are uneven: Re-measure from the strap’s top border edge, not from Row 1.
- The roll is tight: Block the pocket over a slightly larger roll, or remake it with a 5.0 mm hook.
Care
Hand wash in cool water with mild soap, press out the water in a towel, and dry the holder flat with a roll inside each pocket. Don’t tumble dry.
Final Notes
The measurements build on each other. A 60-st base is 4.75 in (12.1 cm) across. It carries 20 pairs and 10 petals per tier, and four tiers plus the wall make a 4.5 in (11.4 cm) pocket. Three pockets and two 1.5 in (3.8 cm) gaps add up to 16.5 in (41.9 cm), which matches the 64-row strap plus its 0.25 in (0.6 cm) border. With the tab and ring on top, the holder hangs about 21 in (53.3 cm) long. Check the first pocket carefully, and the rest will follow.
Happy crocheting!