

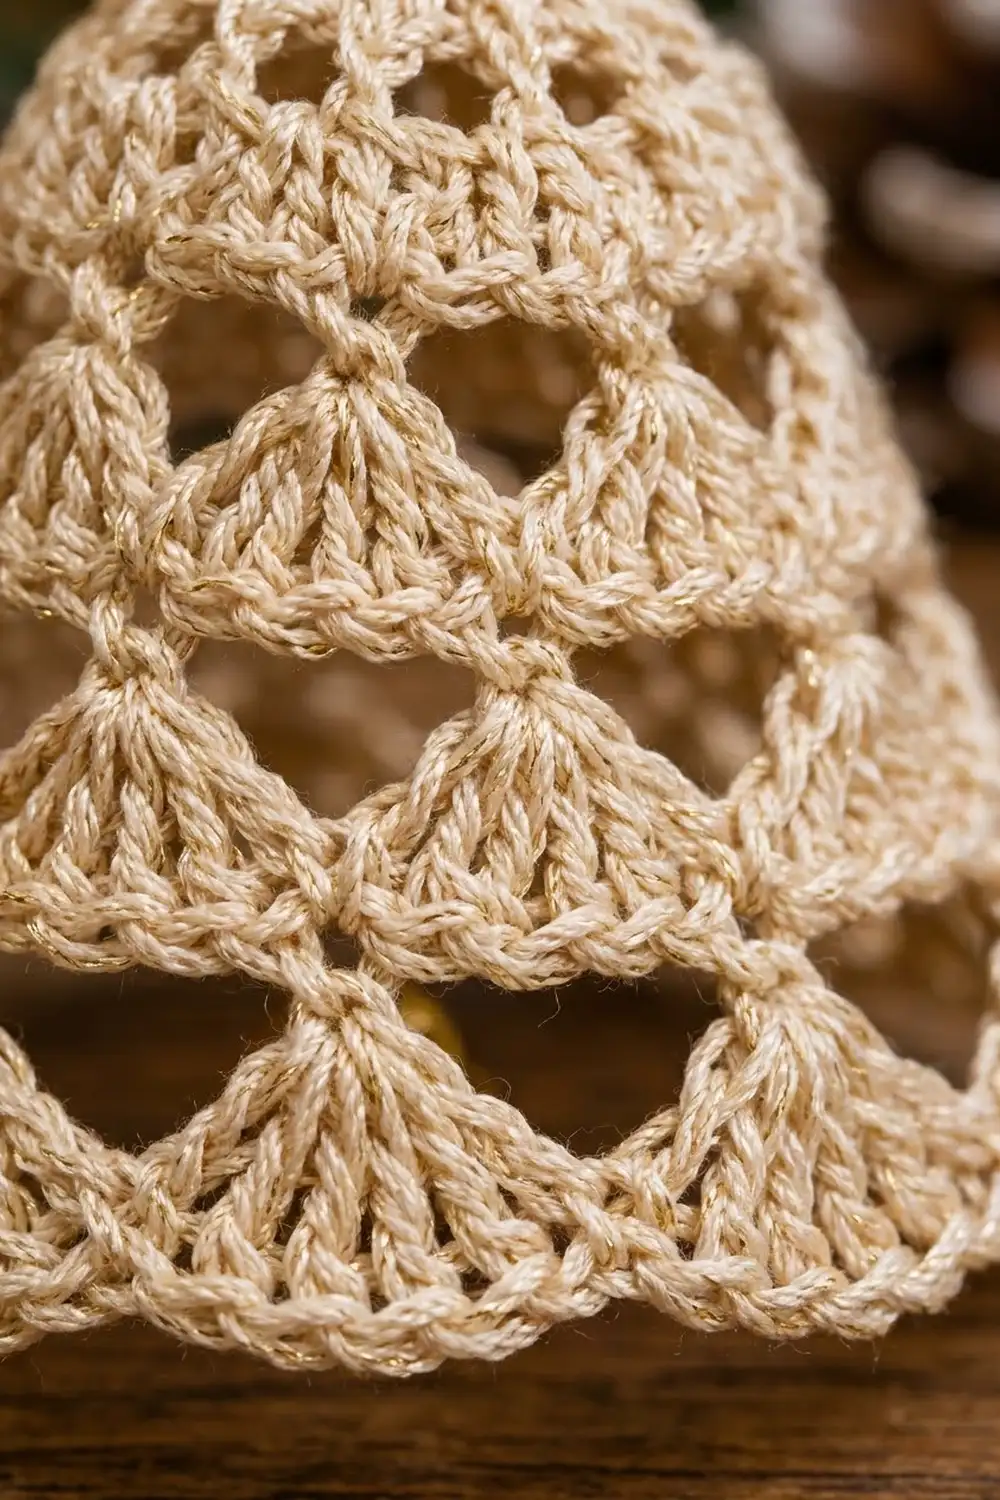
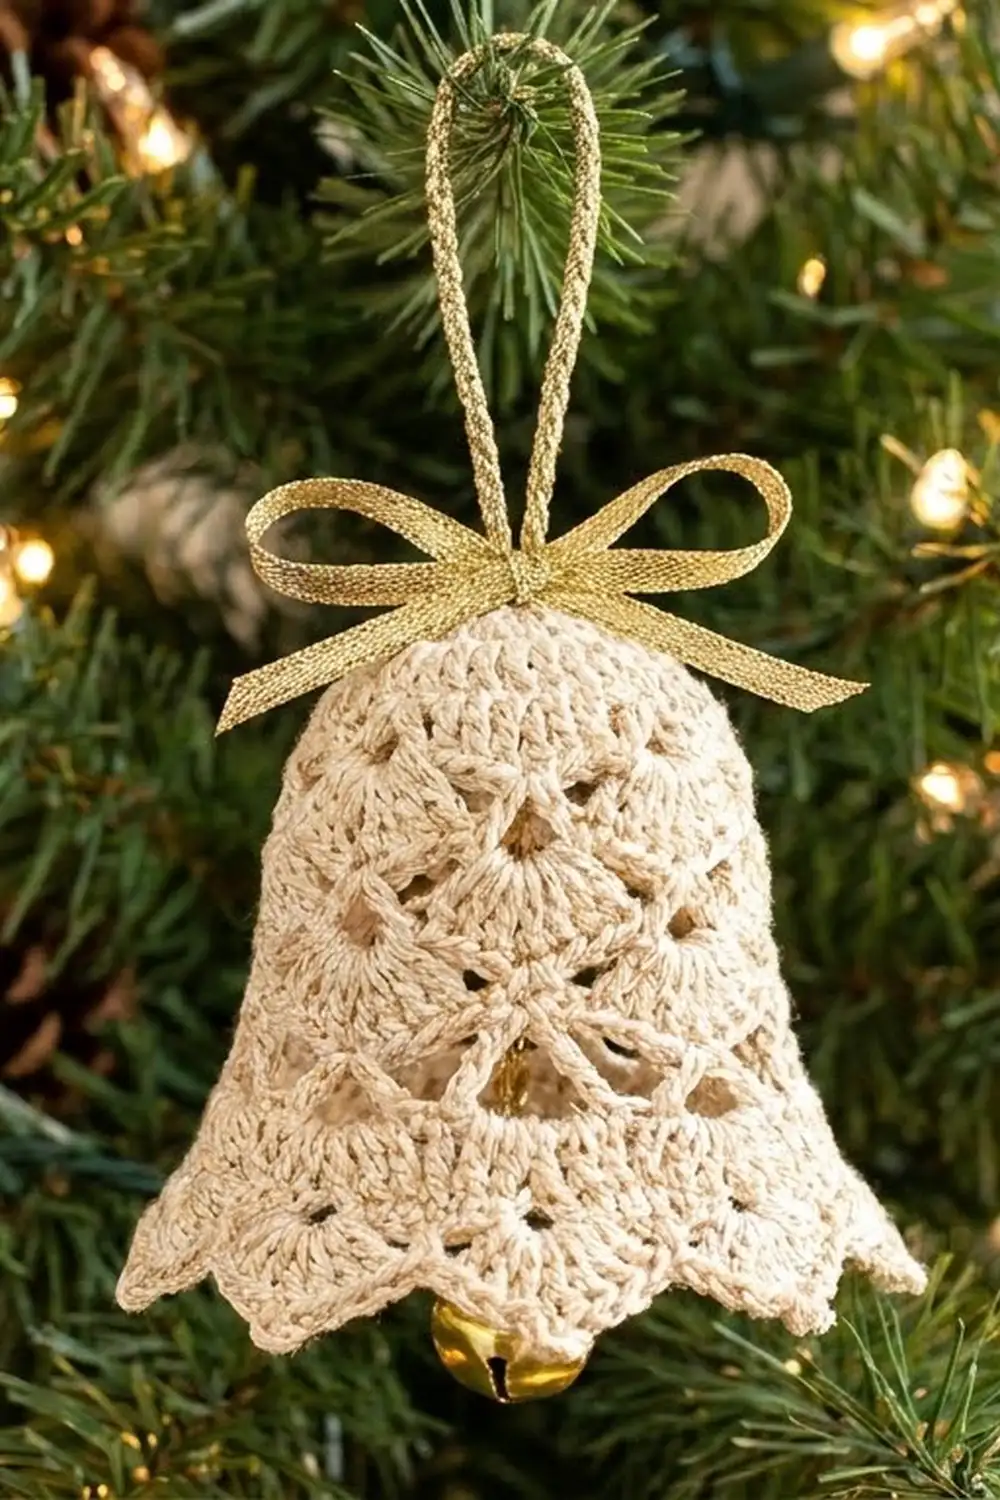
The Golden Chime Bell is a small lace ornament that hangs well on a tree, a gift package or a door wreath. It has four rounds of fan-shaped shells that get wider down the bell. Each shell round sits offset from the one above, so a row of triangular openings forms between them. The hem flares into a ring of little picot scallops.
The bell is worked in a champagne-cream thread with a soft gold shimmer. A gold metallic ribbon bow, a twisted gold hanging loop and a small gold jingle bell finish it. The look is classic and a little vintage, and it suits both a rustic tree and a formal one.
The pattern uses US crochet terms. The finished bell measures 3¼ in (8.3 cm) tall and 3½ in (8.9 cm) across the hem, not counting the hanging loop.
You work the bell top-down in the round as a single piece. You start with a sc ring, alternate shell rounds with chain-loop rounds, and finish with a two-round scalloped edging. After that you stiffen the bell over a form and add the loop, bow and jingle bell.
Finished Size and Construction
- Finished size: 3¼ in (8.3 cm) tall × 3½ in (8.9 cm) wide at the hem
- Skill level: Easy-intermediate (you should be comfortable with fine thread)
- Terminology: US crochet terms
- Yarn weight: Size 3 crochet thread (Lace, weight 0)
- Hook: 2.25 mm (US B-1)
- Number of pieces: 1 (a single bell)
- Layout: One seamless piece worked in joined rounds
- Piece size: 3¼ in (8.3 cm) × 3½ in (8.9 cm)
- Size before border (after Rnd 8): 2¾ in (7.0 cm) tall × 3 in (7.6 cm) wide
- Border depth: ½ in (1.3 cm), worked in 2 rounds
Materials
Yarn advice: Use a mercerized cotton size 3 thread. If you can find one with a fine metallic strand, it gives the soft gold sparkle shown. Mercerized cotton keeps the shells crisp and takes stiffener well. Avoid fuzzy or very stretchy fibers, because they blur the triangular openings.
- Color A, Champagne Cream (shimmer): 12 g / 36 m (39 yd)
- Color B, Gold Metallic thread (for the hanging loop): 1 g / 3 m (3¼ yd)
The quantities above include a margin of roughly 30% for swatching and tails.
Tools and notions:
– 2.25 mm (US B-1) crochet hook
– Tapestry needle and a fine sewing needle
– Gold metallic ribbon, ⅜ in (1.0 cm) wide, 14 in (35.6 cm) long
– 1 gold jingle bell, ½ in (1.3 cm)
– Fabric stiffener, or a starch solution
– A bell-shaped form, such as a small plastic cup or a cone wrapped in plastic wrap
– Rust-proof pins, scissors and a stitch marker
Abbreviations (US Terms)
- ch – chain
- sl st – slip stitch
- sc – single crochet
- hdc – half double crochet
- dc – double crochet
- sp(s) – space(s)
- st(s) – stitch(es)
- rep – repeat
- Rnd – round
Special stitches:
– Shell: the stated number of dc worked into one stitch, such as “5-dc shell” or “9-dc shell.”
– Picot: ch 3, then sl st in the 3rd ch from the hook.
– Center dc: the middle dc of a shell. This is the 3rd dc of a 5-dc shell, the 4th of a 7-dc shell and the 5th of a 9-dc shell.
Gauge and Checkpoints
Gauge matters here, because the shells only flare correctly at the right tension. Work Rnds 1–4 as a test first. If those checkpoints match, keep going on the same piece.
Gauge: Rnds 1–2 measure 1¼ in (3.2 cm) across, laid flat.
Measurement checkpoints (laid flat, without stretching):
– After Rnd 1: the ring measures ¾ in (1.9 cm) across.
– After Rnd 2: 1¼ in (3.2 cm) across.
– After Rnd 4: 1¼ in (3.2 cm) tall, 2 in (5.1 cm) wide.
– After Rnd 8: 2¾ in (7.0 cm) tall, 3 in (7.6 cm) wide.
– After Rnd 10: 3¼ in (8.3 cm) tall, 3½ in (8.9 cm) wide.
If your piece is too big, go down to a 2.0 mm hook. If it is too small, go up to a 2.5 mm hook. Shell rounds that ruffle mean your dc are too loose. Shell rounds that cup inward too sharply mean your chains are too tight.
Bell Body
Join each round with a sl st in the first stitch unless stated otherwise. Do not turn. The right side faces you throughout.
Rnd 1 (ring): With Color A, ch 8 and sl st in the first ch to form a ring. Ch 1, work 16 sc in the ring, then join to the first sc. (16 sc)
Rnd 2 (5-dc shells): Ch 3 (this counts as the first dc) and work 4 dc in the same st. Sc in the next sc. 5 dc in the next sc, sc in the next sc; rep from * 6 more times. Join to the top of the beginning ch-3. (8 shells of 5 dc + 8 sc = 48 sts)
The sc between the shells are the “valleys.”
Rnd 3 (ch-3 loops): Sl st in the next 2 dc so you reach the center dc of the first shell. Ch 1, sc in the same dc, ch 3, sc in the next valley sc, ch 3. Sc in the center dc of the next shell, ch 3, sc in the next valley sc, ch 3; rep from * 6 more times. Join. (16 sc, 16 ch-3 sps)
The sc pairs now alternate: the first sc of each pair sits over a shell center and the second sits over a valley.
Rnd 4 (7-dc shells, offset): Ch 1, sc in the first sc (over the shell center) and ch 1. Work 7 dc in the next sc (over the valley) and ch 1. Sc in the next sc, ch 1, 7 dc in the next sc, ch 1; rep from * 6 more times. Join. (8 shells of 7 dc + 8 sc + 16 ch-1 sps = 56 dc, 8 sc)
The ch-3 loops of Rnd 3 are skipped. They frame the first ring of triangular openings beneath the new shells. Each new shell now sits between two shells of Rnd 2, which creates the offset pattern.
Checkpoint: 1¼ in (3.2 cm) tall, 2 in (5.1 cm) wide.
Rnd 5 (ch-4 loops): Sl st in the next ch-1 sp and in the next 4 dc so you reach the center dc. Ch 1, sc in the same dc, ch 4, sc in the next sc, ch 4. Sc in the center dc of the next shell, ch 4, sc in the next sc, ch 4; rep from * 6 more times. Join. (16 sc, 16 ch-4 sps)
Rnd 6 (9-dc shells, offset): Ch 1, sc in the first sc and ch 2. Work 9 dc in the next sc and ch 2. Sc in the next sc, ch 2, 9 dc in the next sc, ch 2; rep from * 6 more times. Join. (8 shells of 9 dc + 8 sc + 16 ch-2 sps = 72 dc, 8 sc)
These shells sit directly above the Rnd 2 shells, so the offset continues.
Rnd 7 (ch-5 loops): Sl st in the next ch-2 sp and in the next 5 dc so you reach the center dc. Ch 1, sc in the same dc, ch 5, sc in the next sc, ch 5. Sc in the center dc of the next shell, ch 5, sc in the next sc, ch 5; rep from * 6 more times. Join. (16 sc, 16 ch-5 sps)
Rnd 8 (9-dc shells with ch-3, offset): Ch 1, sc in the first sc and ch 3. Work 9 dc in the next sc and ch 3. Sc in the next sc, ch 3, 9 dc in the next sc, ch 3; rep from * 6 more times. Join. (8 shells of 9 dc + 8 sc + 16 ch-3 sps = 72 dc, 8 sc; 128 sts including chains)
The shell size stays at 9 dc here. The longer ch-3 sides carry the flare, so the shells don’t ruffle.
Checkpoint (size before border): 2¾ in (7.0 cm) tall, 3 in (7.6 cm) wide.
Border: Scalloped Picot Hem
Border gauge: One finished scallop measures about ⅝ in (1.6 cm) along the hem, and the border adds ½ in (1.3 cm) of depth.
The bell is round, so the border is counted per repeat rather than per side. Rnd 8 has 8 repeats, and each repeat (one shell plus one valley sc) gives exactly 2 anchor points: one center dc and one valley sc. That makes 8 × 2 = 16 loops, and each loop becomes 1 scallop.
Rnd 9 (ch-5 hem loops): Sl st in the next ch-3 sp and in the next 5 dc so you reach the center dc. Ch 1, sc in the same dc, ch 5, sc in the next sc, ch 5. Sc in the center dc of the next shell, ch 5, sc in the next sc, ch 5; rep from * 6 more times. Join. (16 sc, 16 ch-5 sps)
Rnd 10 (scallops): Sl st in the first ch-5 sp and ch 1. Work (sc, hdc, 2 dc, picot, 2 dc, hdc, sc) in the same sp. Work (sc, hdc, 2 dc, picot, 2 dc, hdc, sc) in the next ch-5 sp; rep from * 14 more times. Join to the first sc. (16 scallops × 8 sts = 128 sts + 16 picots)
Fasten off and weave in the ends.
Why the math works: Each ch-5 loop is 5 chains long and holds 8 stitches plus a picot. That is more stitches than chains, so the hem flares and forms a gentle ruffle. It doesn’t flip, because the 16 loops are anchored evenly at every center dc and valley. Rnd 10’s 128 stitches match Rnd 8’s 128-stitch circumference (counting chains), so the hem flares outward instead of pulling in. The measured result is 3½ in (8.9 cm) across.
Checkpoint: 3¼ in (8.3 cm) tall, 3½ in (8.9 cm) wide.
Final Blocking
- Mix the fabric stiffener as the label directs. For starch, a strong solution works best.
- Soak the bell completely and gently squeeze out the excess. Don’t wring it.
- Cover your bell form with plastic wrap. Its base should be about 3 in (7.6 cm) across, and it should be about 3 in (7.6 cm) tall.
- Slide the bell over the form so the ring sits centered at the top.
- Ease each shell into a straight vertical column and open each triangular opening with a fingertip.
- Flare the hem slightly outward and pin out each picot so the 16 scallops are evenly spaced.
- Check the size: 3¼ in (8.3 cm) tall and 3½ in (8.9 cm) across the hem.
- Let the bell dry completely, usually for 12–24 hours, then remove the form.
Finishing:
1. Jingle bell: Thread a 10 in (25.4 cm) length of Color A through the jingle bell’s loop. Pass both ends up through the Rnd 1 ring and tie them on top. Adjust the strand so it is 2½ in (6.4 cm) from the ring to the top of the jingle bell, which sits the bell just inside the hem.
2. Hanging loop: Cut 2 strands of Color B, each 36 in (91.4 cm) long. Twist them tightly, fold the twist in half and let it ply back on itself, which makes a cord of about 9 in (22.9 cm). Use 6 in (15.2 cm) of the cord, folded, as a 3 in (7.6 cm) loop. Knot the ends through the top of the ring.
3. Bow: Tie the ribbon around the base of the loop, right at the crown, in a bow with loops of about 1½ in (3.8 cm). Cut the ribbon tails on an angle and add a dab of fray stopper if you like.
Final Quality-Control Checklist
- The ring is closed and centered at the top, with no gap.
- Rnd 2 has 8 shells of 5 dc; Rnd 4 has 8 shells of 7 dc; Rnds 6 and 8 each have 8 shells of 9 dc.
- Each shell round is offset from the one before.
- Every triangular opening is open and evenly sized.
- The hem has 16 scallops with 16 picots, evenly spaced.
- The bell measures 3¼ in (8.3 cm) × 3½ in (8.9 cm).
- The bell is stiff enough to hold its shape when hung.
- The jingle bell hangs freely and doesn’t stick out below the scallops.
- The bow is centered and the loop is secure.
Troubleshooting
- The shells lean in a spiral: You probably started on the wrong stitch after the sl sts. Recount the sl sts so each round begins at a center dc.
- The shells line up instead of offsetting: In the shell rounds, the shell goes into the second sc of each pair, which is the one over the valley.
- The hem curls up: Your Rnd 10 stitches are too tight. Loosen your dc, or use the next hook size up for Rnds 9–10 only.
- The hem ruffles too much: Your chains are too loose. Go down a hook size for the chains, or work ch 4 instead of ch 5 in Rnd 9.
- The bell is floppy after drying: Re-soak it in a stronger stiffener solution and dry it again on the form.
- The top is too wide: Rework Rnd 1 with a tighter ch-8 ring and close the ring firmly.
Care
Dust the bell gently or spot-clean it with a damp cloth. Store it flat or stuffed with tissue in a box. If it softens over time, re-stiffen it on its form.
Final Notes
Here is the measurement chain in short. The ring measures ¾ in (1.9 cm). After Rnd 2 the bell measures 1¼ in (3.2 cm) across. After Rnd 4 it measures 1¼ in (3.2 cm) tall and 2 in (5.1 cm) wide. After Rnd 8 it measures 2¾ in (7.0 cm) tall and 3 in (7.6 cm) wide. The two-round border adds ½ in (1.3 cm) of depth, for a finished bell of 3¼ in (8.3 cm) × 3½ in (8.9 cm).
Check each stage as you go and the shells will line up. Once the first bell is done, the next ones go faster.
Happy crocheting!