

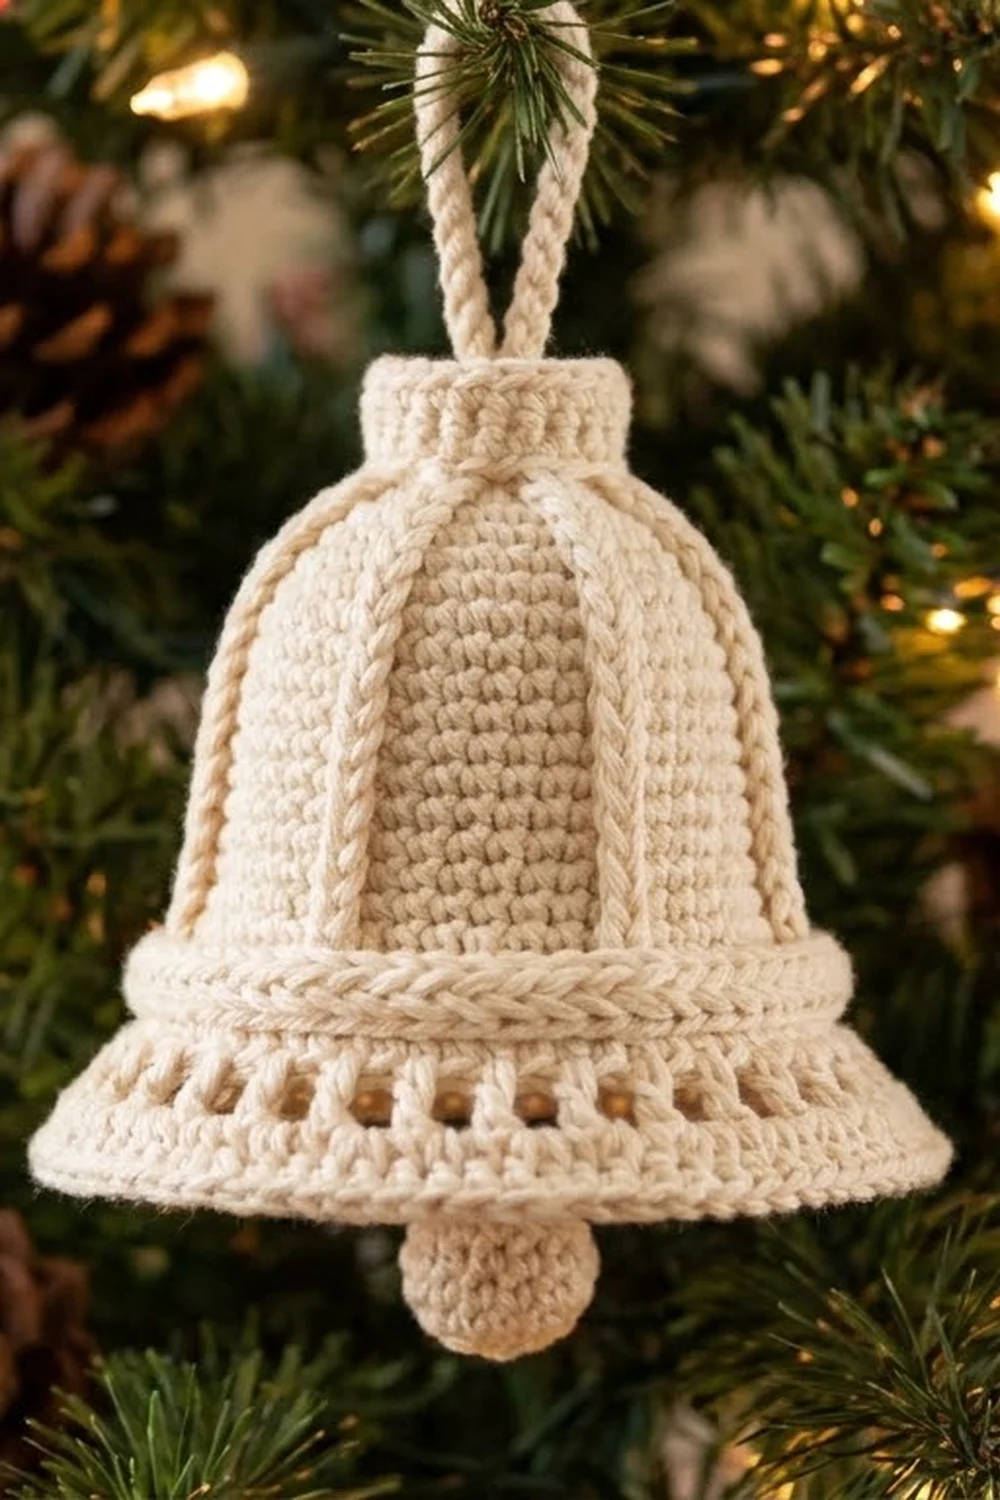
The Ivory Chime Bell is a small, airy Christmas ornament in a single shade of cream cotton. It isn’t a solid bell. It’s a crocheted outline: a small crown at the top, five rope-like ribs that trace the bell’s curve, an arched crossbar, and a flared brim with a ladder of double crochet. A tiny round clapper hangs from the center of the brim.
The look is soft and minimal, like a bell drawn in string. It suits natural or farmhouse trees and also works as a gift topper. Because there’s only one color, the texture does all the work, so neat stitches and careful blocking matter.
This pattern uses US crochet terms. The bell body measures about 3 3/4 in (9.5 cm) wide at the brim and 3 1/2 in (8.9 cm) tall from crown to brim edge. With the hanging loop and clapper, the ornament is about 5 5/8 in (14.3 cm) tall.
You make a small crown tab first and set it aside. Next you work the brim from the bottom up in rows, add the crossbar, and climb up to the crown with chain-and-slip-stitch cords for the ribs. A border, a hanging loop, and a clapper ball finish the piece, and stiffener holds the shape.
Finished Size and Construction
- Finished size: bell body 3 3/4 in (9.5 cm) wide x 3 1/2 in (8.9 cm) tall; 5 5/8 in (14.3 cm) tall overall
- Skill level: Easy-intermediate
- Terminology: US crochet terms
- Yarn weight: Light worsted / DK (#3) cotton
- Hook: 4.0 mm (US G-6)
- Number of pieces: 1 finished ornament (the bell body is built onto a small crown tab, and a clapper ball is attached during finishing)
- Layout: Single flat bell hung from a loop at the crown
- Piece size: Crown tab 1 1/4 in (3.2 cm) wide x 2/3 in (1.7 cm) tall; brim 3 3/4 in (9.5 cm) wide at the bottom and 3 1/4 in (8.3 cm) at the top
- Size before border: 3 3/4 in (9.5 cm) wide; brim about 1 in (2.5 cm) deep
- Border depth: about 1/4 in (0.6 cm) added at the bottom edge
Materials
Choose a smooth, matte cotton or cotton blend in light worsted / DK weight. Cotton keeps the stitches crisp and takes stiffener well. Avoid fuzzy acrylic, which blurs the rope texture.
- Cream (ivory): 15 g, about 35 m (38 yd)
That amount includes a margin for a test crown, tails, and the clapper. One ornament uses about 8–9 g.
Tools:
- 4.0 mm (US G-6) crochet hook
- Tapestry needle
- Scissors
- 2 locking stitch markers
- A pinch of fiberfill or cream yarn scraps
- Blocking mat or folded towel and rust-proof pins
- Fabric stiffener or a starch-and-water mix
- Ruler or tape measure
Abbreviations (US Terms)
- ch: chain
- sl st: slip stitch
- sc: single crochet
- dc: double crochet
- dc2tog: double crochet 2 together
- sc2tog: single crochet 2 together
- rev sc: reverse single crochet (crab stitch)
- MR: magic ring
- st(s): stitch(es)
- RS: right side
Special stitches:
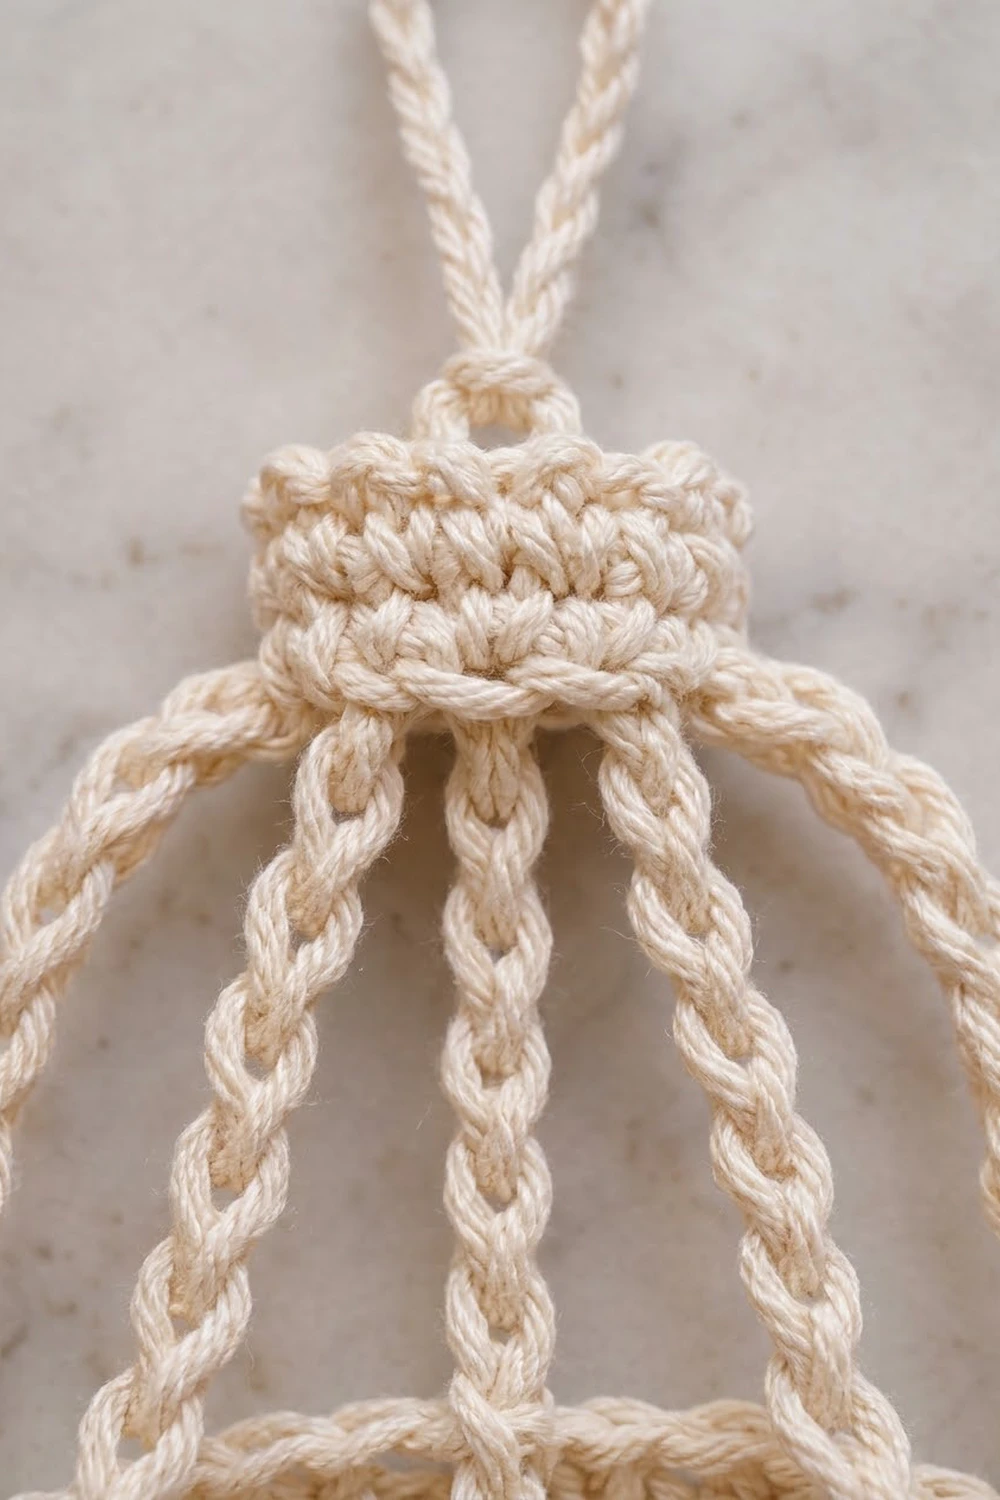
- Rope cord: Ch the number stated and sl st into the target st. Then work back along the chain with a sl st in the back bump of each ch until you reach where the chain began. The slip stitches wrap the chain and give it a braided, rope-like look.
- Rev sc: Work from left to right. Insert the hook into the next st to the right, yarn over, pull up a loop, yarn over, and pull through both loops.
Directions are written for right-handed crocheters. If you crochet left-handed, use the same counts and swap left and right.
Gauge and Checkpoints
Gauge: 16 sc x 18 rows = 4 in (10.2 cm) with a 4.0 mm hook. One dc row is about 1/2 in (1.3 cm) tall. A rope cord measures 8 ch = 1 in (2.5 cm).
The crown tab doubles as your gauge test. Make it first and measure it.
Checkpoints:
- Crown tab: 1 1/4 in (3.2 cm) x 2/3 in (1.7 cm).
- Brim Row 1: 3 3/4 in (9.5 cm) wide.
- Brim Row 3: 3 1/4 in (8.3 cm) wide; brim about 1 in (2.5 cm) tall.
- Outer rib: 2 1/8 in (5.4 cm) long.
- Finished bell body: 3 3/4 in (9.5 cm) x 3 1/2 in (8.9 cm).
Too big? Use a 3.75 mm hook. Too small? Use a 4.5 mm hook. Change hooks before you start the brim. The rib lengths are counted in chains, so they depend on your chain gauge as well as your sc gauge.
Pattern
Part 1: Crown Tab
Ch 6.
Row 1: Sc in the 2nd ch from the hook and in each ch across. (5 sc)
Row 2: Ch 1 (does not count), turn, sc in each st across. (5 sc)
Row 3: Ch 1, turn, sc in each st across. (5 sc)
Fasten off and weave in the tails. The tab should measure 1 1/4 in (3.2 cm) x 2/3 in (1.7 cm).
Lay the tab RS up with Row 3 at the top. Along the bottom edge are 5 foundation-chain loops under the Row 1 stitches. Number them 1–5 from left to right. These are the anchor points for the ribs. Set the tab aside.
Part 2: Brim (worked bottom-up)
Row 1: Ch 16. Sc in the 2nd ch from the hook and in each ch across. (15 sc)
Checkpoint: 3 3/4 in (9.5 cm) wide.
Row 2: Ch 2 (does not count), turn. Dc2tog over the first 2 sts, dc in each of the next 11 sts, dc2tog over the last 2 sts. (13 dc: 1 + 11 + 1)
This is the ladder row. The two decreases pull the top edge in, so the brim flares out at the bottom.
Row 3: Ch 1, turn, sc in each st across. (13 sc)
Checkpoint: 3 1/4 in (8.3 cm) wide at the top and about 1 in (2.5 cm) tall. Don’t fasten off. Your hook is now at the top-left corner of the brim.
Part 3: Crossbar
Ch 15. Sl st into the first sc of Row 3, at the top-right corner.
Ch 1 (does not count), turn, and sc in each of the 15 ch. (15 sc) Sl st into the last sc of Row 3, at the top-left corner.
The bar is 15 sc long, or 3 3/4 in (9.5 cm), but its ends sit only 3 1/4 in (8.3 cm) apart. The extra 1/2 in (1.3 cm) lets the bar arch upward. Once the ribs are attached, the center of the bar rises about 3/4 in (1.9 cm) above the brim.
Number the bar sts 1–15 from left to right. Don’t fasten off.
Part 4: Ribs
Hold the crown tab RS up and centered about 1 5/8 in (4.1 cm) above the top edge of the brim. Each rib attaches to one crown anchor point.
Outer left rib: Sl st into bar st 1. Rope cord: ch 17, sl st into crown anchor 1, then sl st back down all 17 ch. Sl st into bar st 1 again.
Sl st in each of the next 3 bar sts. (now at bar st 4)
Inner left rib: Rope cord: ch 11, sl st into crown anchor 2, then sl st back down all 11 ch. Sl st into bar st 4 again.
Sl st in each of the next 4 bar sts. (now at bar st 8)
Center rib: Rope cord: ch 7, sl st into crown anchor 3, then sl st back down all 7 ch. Sl st into bar st 8 again.
Center tie: Ch 6 and sl st into the 7th sc of brim Row 3, which is the center st. Sl st back up all 6 ch, then sl st into bar st 8 again. This short cord carries the center rib down through the opening below the bar.
Sl st in each of the next 4 bar sts. (now at bar st 12)
Inner right rib: Rope cord: ch 11, sl st into crown anchor 4, then sl st back down all 11 ch. Sl st into bar st 12 again.
Sl st in each of the next 3 bar sts. (now at bar st 15)
Outer right rib: Rope cord: ch 17, sl st into crown anchor 5, then sl st back down all 17 ch. Sl st into the first sc of brim Row 3, at the top-right corner. Fasten off and weave in the tail.
Rib length check:
- Outer ribs: 2 1/8 in (5.4 cm)
- Inner ribs: 1 3/8 in (3.5 cm)
- Center rib: 7/8 in (2.2 cm)
- Center tie: 3/4 in (1.9 cm)
Together, the center rib and tie measure 1 5/8 in (4.1 cm), which matches the distance from the crown down to the brim. The outer ribs are a little longer than a straight line, so they bow out into the bell’s curve. The slip stitches you worked along the bar make it slightly heavier, which helps it read as a rim.
Border
The border runs down the left side of the brim, across the bottom, and up the right side, all in one pass.
Border gauge: 1 sl st per sc row end, 2 sl sts per dc row end, and 1 rev sc per foundation-chain loop.
With RS facing, join the yarn with a sl st at the top-left corner of the brim (the end of Row 3).
- Left side: The joining sl st sits in the end of Row 3. Work 2 sl sts into the end of Row 2 and 1 sl st into the end of Row 1. (4 sl sts)
- Corner: Ch 1 (does not count as a st).
- Bottom: Working into the 15 foundation-chain loops under Row 1, rev sc in each loop from left to right. (15 rev sc)
- Right side: Work 1 sl st into the end of Row 1, 2 sl sts into the end of Row 2, and 1 sl st into the end of Row 3. (4 sl sts)
Total: 4 + 15 + 4 = 23 sts, plus 1 uncounted corner chain. Fasten off.
Why the math works: The bottom gets exactly one rev sc per foundation stitch, so it stays at 15 sts and 3 3/4 in (9.5 cm) without ruffling. The first and last rev sc go into the corner loops, so no extra corner stitches are added. A dc row is about twice as tall as an sc row, which is why it gets 2 sl sts per row end and the sc rows get 1. That keeps the sides flat. The rev sc adds about 1/4 in (0.6 cm), so the brim ends up about 1 1/4 in (3.2 cm) deep.
Hanging Loop and Clapper
Hanging loop: Join the yarn with a sl st in st 2 of crown Row 3. Ch 22 and sl st into st 4 of crown Row 3. Sl st into the back bump of each of the 22 ch, working back around the loop, then sl st into st 2. Fasten off and weave in. The loop stands about 1 1/8 in (2.9 cm) tall.
Clapper ball:
Rnd 1: 6 sc in MR. (6 sc)
Rnd 2: *Sc in next st, 2 sc in next st; repeat from * 2 more times. (9 sc)
Rnd 3: Sc in each st around. (9 sc)
Rnd 4: *Sc in next st, sc2tog; repeat from * 2 more times. (6 sc)
Stuff the ball firmly. Don’t fasten off. Ch 3 for the stem, then fasten off, leaving an 8 in (20.3 cm) tail. Use the tail to close the ball. Then run it through the stem and sew the stem end to the 8th rev sc, which is the center of the bottom edge. The ball is about 5/8 in (1.6 cm) across, and the stem is about 3/8 in (1.0 cm) long.
Final Blocking
- Weave in any remaining tails along the ribs or inside the crown.
- Soak the ornament in stiffener, squeeze out the excess, and blot it with a towel so no film fills the openings.
- Lay it RS up on the mat.
- Pin the bottom of the brim straight at 3 3/4 in (9.5 cm) and the top at 3 1/4 in (8.3 cm).
- Center the crown 1 5/8 in (4.1 cm) above the top of the brim and pin it level.
- Push the bar into a smooth arc about 3/4 in (1.9 cm) high at the center.
- Ease the outer ribs into an even, mirrored bell curve.
- Fan the inner ribs and the center rib evenly from the crown.
- Pin the loop upright and let the clapper hang centered.
- Let it dry for at least 12 hours before you unpin it.
Final Quality-Control Checklist
- The bell body measures 3 3/4 in (9.5 cm) x 3 1/2 in (8.9 cm).
- The crown is level and centered.
- There are five ribs, one on each of the five crown anchors.
- The inner ribs sit on bar sts 4 and 12, and the center rib sits on bar st 8.
- The bar arches evenly, and the two sides mirror each other.
- The rev sc edge lies flat.
- The clapper hangs from the exact center.
- All tails are woven in and no stiffener film is left in the openings.
Troubleshooting
Ribs are slack or wavy: Your chains are loose. Work the slip stitches back more snugly, or use one fewer chain per rib.
Crown is tilted: The paired ribs don’t match. Recount the chains on both outer ribs and both inner ribs.
Bar lies flat: Check that the bar has 15 sc and the center rib is only 7 ch.
Bottom edge ruffles: Work exactly one rev sc per foundation loop.
Ornament is floppy after drying: Use a stronger stiffener mix, or add a second coat and block again.
Care
Dust gently with a soft brush. If it needs washing, hand wash it in cool water, then reshape, re-stiffen, and dry it flat.
Final Notes
Every part of this bell comes from one chain of measurements:
- A 5-stitch crown sets the top width at 1 1/4 in (3.2 cm).
- Fifteen sc set the brim bottom at 3 3/4 in (9.5 cm), and two decreases bring the top to 3 1/4 in (8.3 cm).
- A 15-sc bar arches 3/4 in (1.9 cm).
- Cords of 17, 11, and 7 ch bridge the 1 5/8 in (4.1 cm) gap to the crown.
- A 23-stitch border, a loop, and a clapper bring the ornament to 5 5/8 in (14.3 cm) tall.
If you check each stage against its number, every bell will match.
Happy crocheting!