

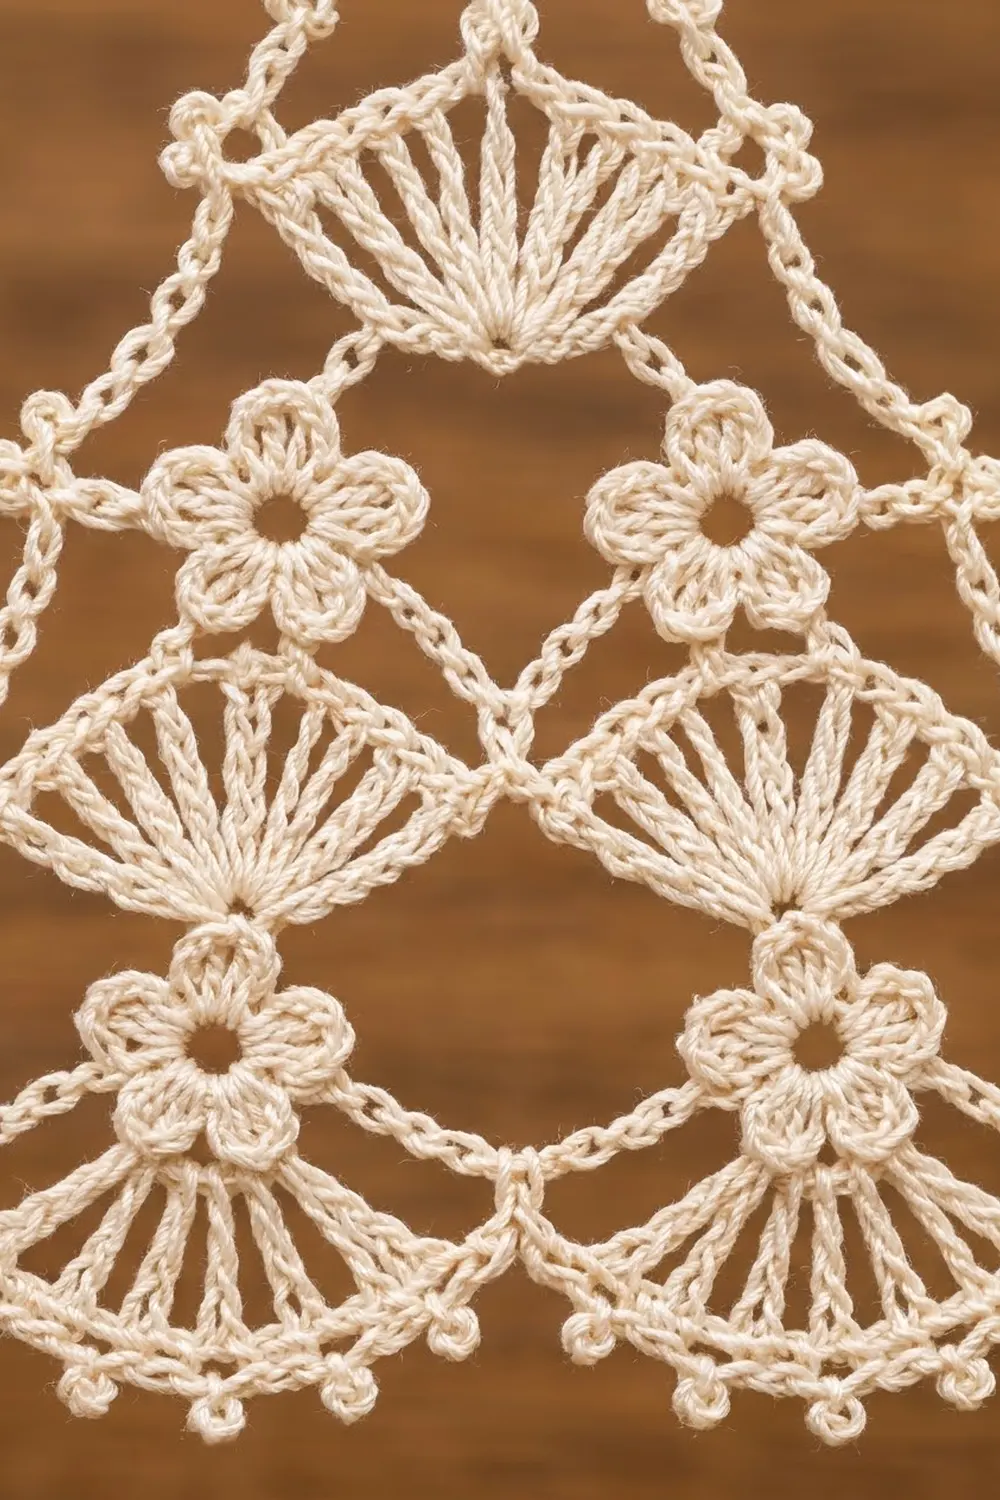
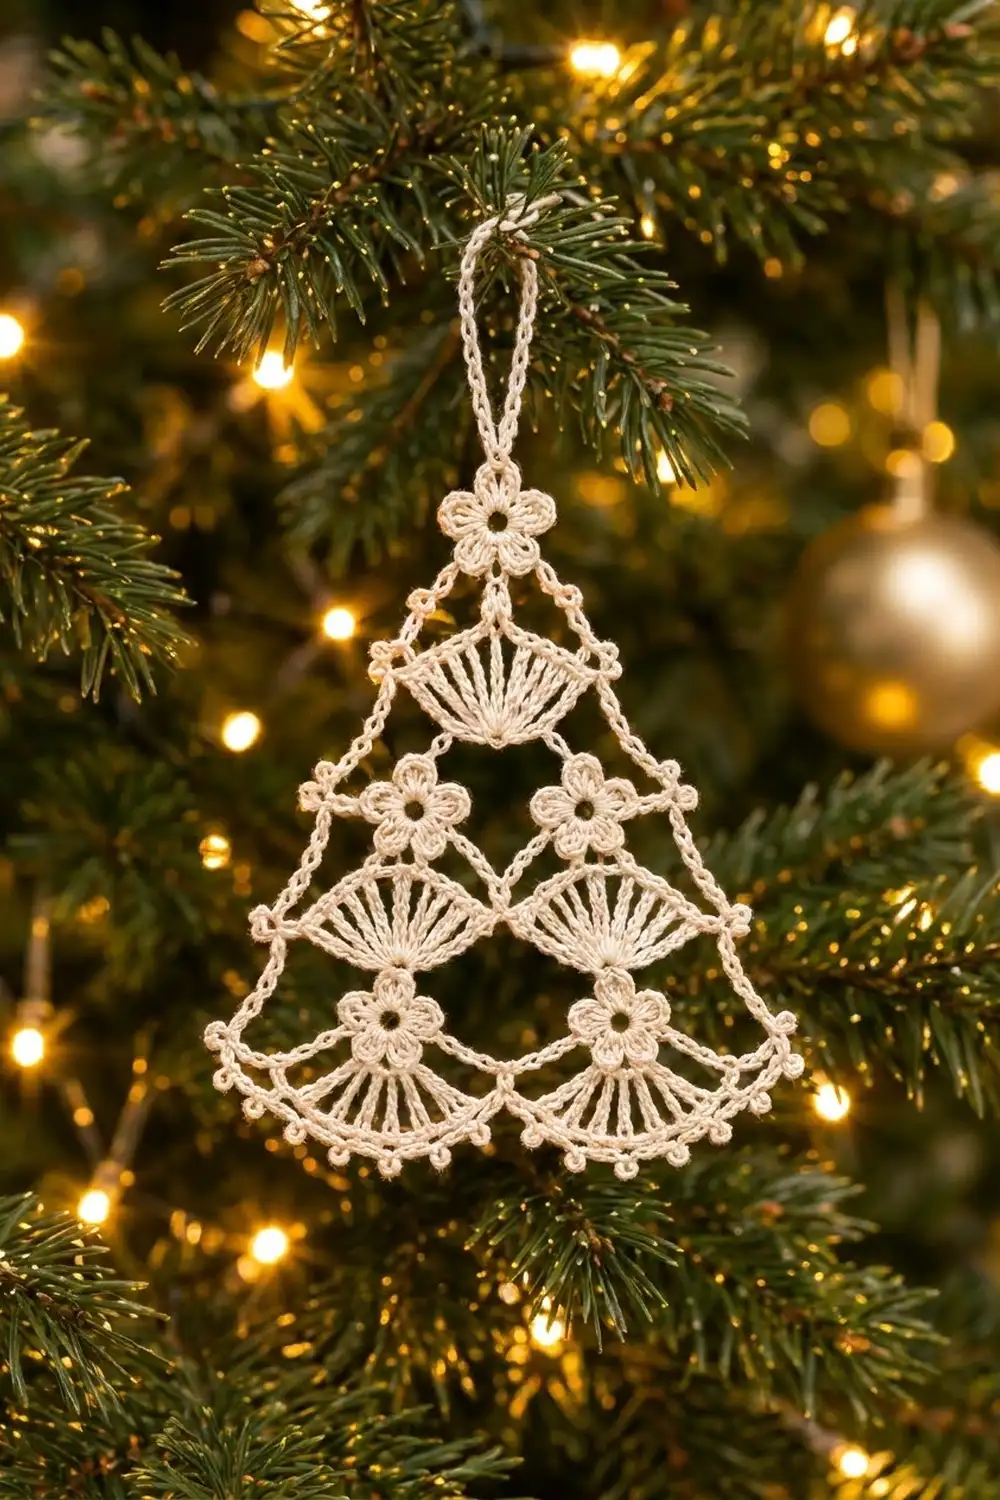
This little lace tree is a single flat ornament worked in ivory cotton thread. Five-petal flowers alternate with half-circle fans of tall spokes, so it reads as a tiny Christmas tree: one flower and one fan at the top, then two columns of flower-and-fan below. A slim chain frame runs down both sides, and a picot edge finishes the two-scallop hem.
The look is classic and soft, like heirloom tatting or a vintage doily. One color, cream or ivory, keeps it elegant on a green tree and lets the fan spokes and flower holes show up against the lights. Starched, it hangs flat and holds its shape.
The pattern uses US crochet terms. The finished tree body measures 3 in (7.6 cm) wide by 3.75 in (9.5 cm) tall, plus a 1 in (2.5 cm) hanging loop, for an overall length of 4.75 in (12.1 cm).
Construction is modular but the result is one piece. You make the top flower and loop, then hang each fan from the flower above it. The lower flowers are crocheted directly onto stems coming off the fans, and the lower fans are joined at their inner tips. A two-row frame and picot edging go around the sides and hem last.
Finished Size and Construction
- Finished size: 3 in (7.6 cm) wide x 3.75 in (9.5 cm) tall, plus 1 in (2.5 cm) loop
- Skill level: Intermediate (thread work, joining, working along a stem)
- Terminology: US
- Yarn weight: Size 10 cotton crochet thread (lace weight)
- Hook: 1.5 mm steel hook
- Number of pieces: 1 single ornament, built in stages with no separate pieces to sew
- Layout: 5 flowers and 5 fans in three tiers: 1 flower + 1 fan, then 2 flowers + 2 fans, then 2 flowers + 2 fans
- Flower size: 0.5 in (1.3 cm) across
- Fan size: 1.25 in (3.2 cm) wide x 0.6 in (1.5 cm) deep
- Size before border: 2.5 in (6.4 cm) wide x 3.5 in (8.9 cm) tall
- Border depth: 0.25 in (0.6 cm) at each side and along the hem
Materials
Use mercerized cotton crochet thread in size 10. Mercerized thread has a soft sheen, holds starch well and shows stitch definition clearly. Avoid fuzzy or acrylic thread, because the spokes and picots blur.
- Ivory / cream (main and only color): 6 g, about 50 m (55 yd)
These quantities include a margin for a gauge swatch and for weaving in tails.
Tools:
- 1.5 mm steel crochet hook (labeled US 7 or 8 depending on brand)
- Fine tapestry needle or sewing needle with a large eye
- Small sharp scissors
- Stitch marker or a short piece of contrast thread
- Fabric stiffener or spray starch
- Blocking board or foam with plastic wrap, and rustproof pins
Abbreviations (US Terms)
- ch – chain
- sl st – slip stitch
- sc – single crochet
- dc – double crochet
- dtr – double treble crochet: yarn over 3 times, insert hook, pull up a loop, (yarn over, pull through 2 loops) 4 times
- sp(s) – space(s)
- sk – skip
- st(s) – stitch(es)
- RS – right side
- FO – fasten off
Special stitches:
- Petal: (ch 2, 3 dc, ch 2, sl st) all in the same st. The center dc of the 3 is the petal tip.
- Picot: ch 3, sl st in 3rd ch from hook.
- Inline flower ring: at the end of a chain, sl st in the 4th ch from hook. The 4 ch closest to the hook form the flower ring and the remaining ch form the stem.
Gauge and Checkpoints
Gauge matters because the fans must fit side by side under each flower. Make one flower and one fan first and measure them before going on.
- Chain gauge: 10 ch = 1 in (2.5 cm)
- Sc gauge: 12 sc = 1 in (2.5 cm)
- One flower: 0.5 in (1.3 cm) across, petal tip to petal tip
- One fan: 1.25 in (3.2 cm) wide x 0.6 in (1.5 cm) deep, measured lightly flattened
Checkpoints:
- After Flower 1: 0.5 in (1.3 cm) across.
- After Fan 1: 1.25 in (3.2 cm) wide; Flower 1 plus Fan 1 is 1.1 in (2.8 cm) tall.
- After Flowers 2 and 3: piece is 1.6 in (4.1 cm) tall.
- After Fans 2 and 3: 2.5 in (6.4 cm) wide x 2.2 in (5.6 cm) tall.
- After Fans 4 and 5: 2.5 in (6.4 cm) wide x 3.5 in (8.9 cm) tall.
- After the border: 3 in (7.6 cm) wide x 3.75 in (9.5 cm) tall.
If your fan is too big, change to a 1.25 mm hook. If it is too small, change to a 1.75 mm hook. A fan that is off by 0.1 in (0.3 cm) adds up to 0.2 in (0.5 cm) across the lower tiers, and the fans will overlap or gap at the center join.
The Pattern
Flower Numbering
Every flower has 10 sc in Round 1 and 5 petals in Round 2. With the joining sc at the top, the petals are numbered in working order: Petals 1 and 5 are the upper side petals, Petals 2 and 4 are the lower side petals, and Petal 3 points straight down. Each fan hangs from the tip of Petal 3.
Part 1: Flower 1 and Hanging Loop
Ch 4, sl st in first ch to form a ring.
Rnd 1: Ch 1, 10 sc in ring, sl st in first sc. (10 sc)
Rnd 2: *Petal in next sc, sl st in next sc; repeat from * 4 more times. The last sl st lands in the joining sc. (5 petals, 15 dc, 5 sl st)
Loop: Ch 20, sl st in the same joining sc. FO.
The joining sc is now the top of the flower. Checkpoint 1: 0.5 in (1.3 cm) across.
Part 2: Fan 1 and Flower 3
Fan Row 1: With RS facing, join thread with sl st in the center dc of Petal 3. Ch 5 (counts as first dtr), (ch 1, dtr) 10 times in the same st. (11 dtr, 10 ch-1 sps)
Spread the fan into a half circle opening downward, so the first and last spokes lie horizontally and form a straight top edge under the flower. Let the beginning ch-5 spoke point to the right.
Fan Row 2: Ch 1, turn. Sc in first dtr, *sc in next ch-1 sp, sc in next dtr; repeat from * 9 more times, working the last sc in top of the beginning ch-5. (21 sc)
Number the arc sc from 1 to 21 in working order. Sc 11 is the bottom center of the arc. You are now at the right tip (sc 21).
Flower 3: Ch 10, sl st in 4th ch from hook to form the ring (6-ch stem). Work Rnds 1 and 2 of the flower into this ring, joining at the sc beside the stem. FO.
Checkpoint 2: Fan 1 is 1.25 in (3.2 cm) wide and the piece is 1.1 in (2.8 cm) tall without the loop.
Part 3: Flower 2
Join thread with sl st in sc 1 of Fan 1 (the left tip). Ch 10, sl st in 4th ch from hook. Work Rnds 1 and 2 of the flower. FO.
Flowers 2 and 3 hang straight below the fan tips on 0.6 in (1.5 cm) stems. Checkpoint 3: 1.6 in (4.1 cm) tall.
Part 4: Fan 2 with Flower 4
Row 1: Join with sl st in the center dc of Petal 3 of Flower 2. Ch 5, (ch 1, dtr) 10 times in the same st. (11 dtr, 10 ch-1 sps)
Spread as before, but let the beginning ch-5 spoke point inward toward the center of the tree, and the last dtr point outward.
Row 2: Ch 1, turn. Sc in first dtr, (sc in ch-1 sp, sc in next dtr) 5 times. That makes sc 1 to 11, with sc 1 at the outer tip.
Flower 4: Ch 6, sl st in 4th ch from hook (2-ch stem). Work Rnds 1 and 2 of the flower. Then sl st in each of the 2 stem ch and sl st in sc 11.
Continue Row 2: (sc in next ch-1 sp, sc in next dtr) 5 times, ending in the beginning ch-5. (21 sc, plus Flower 4 hanging from sc 11) FO.
Sc 21 is the inner tip.
Part 5: Fan 3 with Flower 5
Work as Fan 2, joining into Petal 3 of Flower 3 and making Flower 5 at sc 11. Again, let the beginning ch-5 point inward so Row 2 starts at the outer tip.
After sc 21, sl st in sc 21 of Fan 2 to join the inner tips at the center line. FO. (21 sc)
Checkpoint 4: 2.5 in (6.4 cm) wide x 2.2 in (5.6 cm) tall.
Part 6: Fans 4 and 5
Fan 4: Join with sl st in the center dc of Petal 3 of Flower 4. Work Rows 1 and 2 as Fan 2, with no flower at sc 11. (11 dtr; 21 sc) FO.
Fan 5: Join into Petal 3 of Flower 5. Work Rows 1 and 2. After sc 21, sl st in sc 21 of Fan 4. FO. (11 dtr; 21 sc)
Checkpoint 5: 2.5 in (6.4 cm) wide x 3.5 in (8.9 cm) tall. Both pairs of fans meet at one point on the center line, and their arcs form the two scallops of the hem.
Border
The border is two rows worked around the sides and hem. It does not go across the top flower. Border gauge: the frame chain must match 10 ch = 1 in (2.5 cm). In Row 2 you work one sc per chain.
Row 1: Chain Frame
With RS facing, join with sl st in the center dc of the outer lower side petal on the right side of Flower 1.
Right side (5 segments):
- Ch 4, sc in the outer tip of Fan 1 (S1).
- Ch 8, sc in the outer lower side petal tip of Flower 3 (S2).
- Ch 4, sc in sc 1 of Fan 3 (S3).
- Ch 10, sc in the outer lower side petal tip of Flower 5 (S4).
- Ch 4, sc in sc 1 of Fan 5 (S5).
Hem:
- Fan 5: (ch 3, sk 1 sc, sc in next sc) 7 times, ending in sc 15.
- Bridge: ch 5, sc in sc 15 of Fan 4.
- Fan 4: (ch 3, sk 1 sc, sc in next sc) 7 times, ending in sc 1.
Left side: Mirror the right side: ch 10, sc in the Flower 4 petal; ch 4, sc in sc 1 of Fan 2; ch 8, sc in the Flower 2 petal; ch 4, sc in the outer tip of Fan 1. Ch 4, sl st in the matching petal of Flower 1.
Row 1 counts:
- Each side: 30 ch in 5 sps (4 + 8 + 4 + 10 + 4)
- Hem: 14 ch-3 loops plus 1 ch-5 bridge
- Anchors: 24 sc plus the 2 sl sts at the ends, for 25 sps total
Row 2: Picot Edging
Ch 1, turn. Work every ch-sp as follows and sc in every anchor sc.
Left side, top to bottom:
- S1 ch-4: 4 sc.
- S2 ch-8: 8 sc.
- S3 ch-4: 2 sc, picot, 2 sc.
- S4 ch-10: 3 sc, picot, 4 sc, picot, 3 sc.
- S5 ch-4: 2 sc, picot, 2 sc.
That gives 30 sc in the sps plus 4 anchor sc, for 34 sc and 4 picots.
Hem: In each ch-3 loop work (sc, picot, sc). In the ch-5 bridge work 2 sc, picot, 2 sc. Count: 16 anchor sc + 28 loop sc + 4 bridge sc = 48 sc, 15 picots.
Right side, bottom to top: Work S5, S4, S3, S2 and S1 as for the left side. (34 sc, 4 picots)
Sl st in the Flower 1 petal. FO. Row 2 total: 34 + 48 + 34 = 116 sc, 23 picots.
Why the math works: On the sides, one sc per chain is slightly snug, because the sc gauge (12 per inch) is denser than the chain gauge (10 per inch). That keeps the frame taut and straight, so it doesn’t sag away from the flowers. On the hem, each ch-3 loop spans only 2 arc sc, so (sc, picot, sc) lets it arch outward into a beaded scallop. The frame adds 0.25 in (0.6 cm) per side and below, which takes 2.5 x 3.5 in (6.4 x 8.9 cm) to 3 x 3.75 in (7.6 x 9.5 cm).
Final Blocking
- Weave in all tails along the stems or the backs of the arc sc, then trim.
- Soak the ornament in fabric stiffener, or wet it and plan to spray starch.
- Press out excess liquid in a towel. Don’t wring it.
- Lay it RS up on a covered board. Pin the top flower and the two hem corners first, so the body is 3 in (7.6 cm) wide x 3.75 in (9.5 cm) tall.
- Pin each fan spoke so the spokes radiate evenly, and pin each petal round.
- Pin each hem picot outward, and the frame chains straight.
- Pin the loop flat as a 1 in (2.5 cm) oval.
- Leave it to dry completely, at least 12 hours, then unpin.
Final Quality-Control Checklist
- 5 flowers, each with 5 petals and an open center hole
- 5 fans, each with 11 spokes and a 21-sc arc
- Flowers 2 and 4 stacked in one column, Flowers 3 and 5 in the other
- Inner tips of Fans 2/3 and 4/5 meeting at the center line
- Side frame: 34 sc and 4 picots each
- Hem: 48 sc and 15 picots
- Body 3 in (7.6 cm) x 3.75 in (9.5 cm); loop 1 in (2.5 cm)
- No visible tails, and the piece lies flat
Troubleshooting
- Fan cups or ruffles: your dtr height doesn’t suit the 21-sc arc. Check the 12 sc = 1 in (2.5 cm) gauge, and keep the ch-1 sps even.
- Fans overlap at the center: the fans are too wide. Go down a hook size, or tighten your dtr.
- Gap at the center join: the fans are too narrow. Go up a hook size, or add slack to the stems.
- Flower twists on its stem: block it with Petal 3 pinned straight down.
- Side frame pulls inward: your chains are tight. Chain with a larger hook, or add 1 ch to S2 and S4 and 1 sc to the matching Row 2 groups.
- Hem picots flop: use more starch and pin each picot while wet.
Care
Hand wash in cool water with mild soap, then re-starch and block flat. Store flat in tissue paper, away from humidity and direct sunlight.
Final Notes
Everything rests on the measurement chain. A 0.5 in (1.3 cm) flower carries a 1.25 in (3.2 cm) fan. Two fans side by side make the 2.5 in (6.4 cm) lower tiers, and three tiers give 3.5 in (8.9 cm) of height. The 0.25 in (0.6 cm) border brings the body to 3 x 3.75 in (7.6 x 9.5 cm). Check the flower and fan first, and the rest falls into place.
Happy crocheting!