

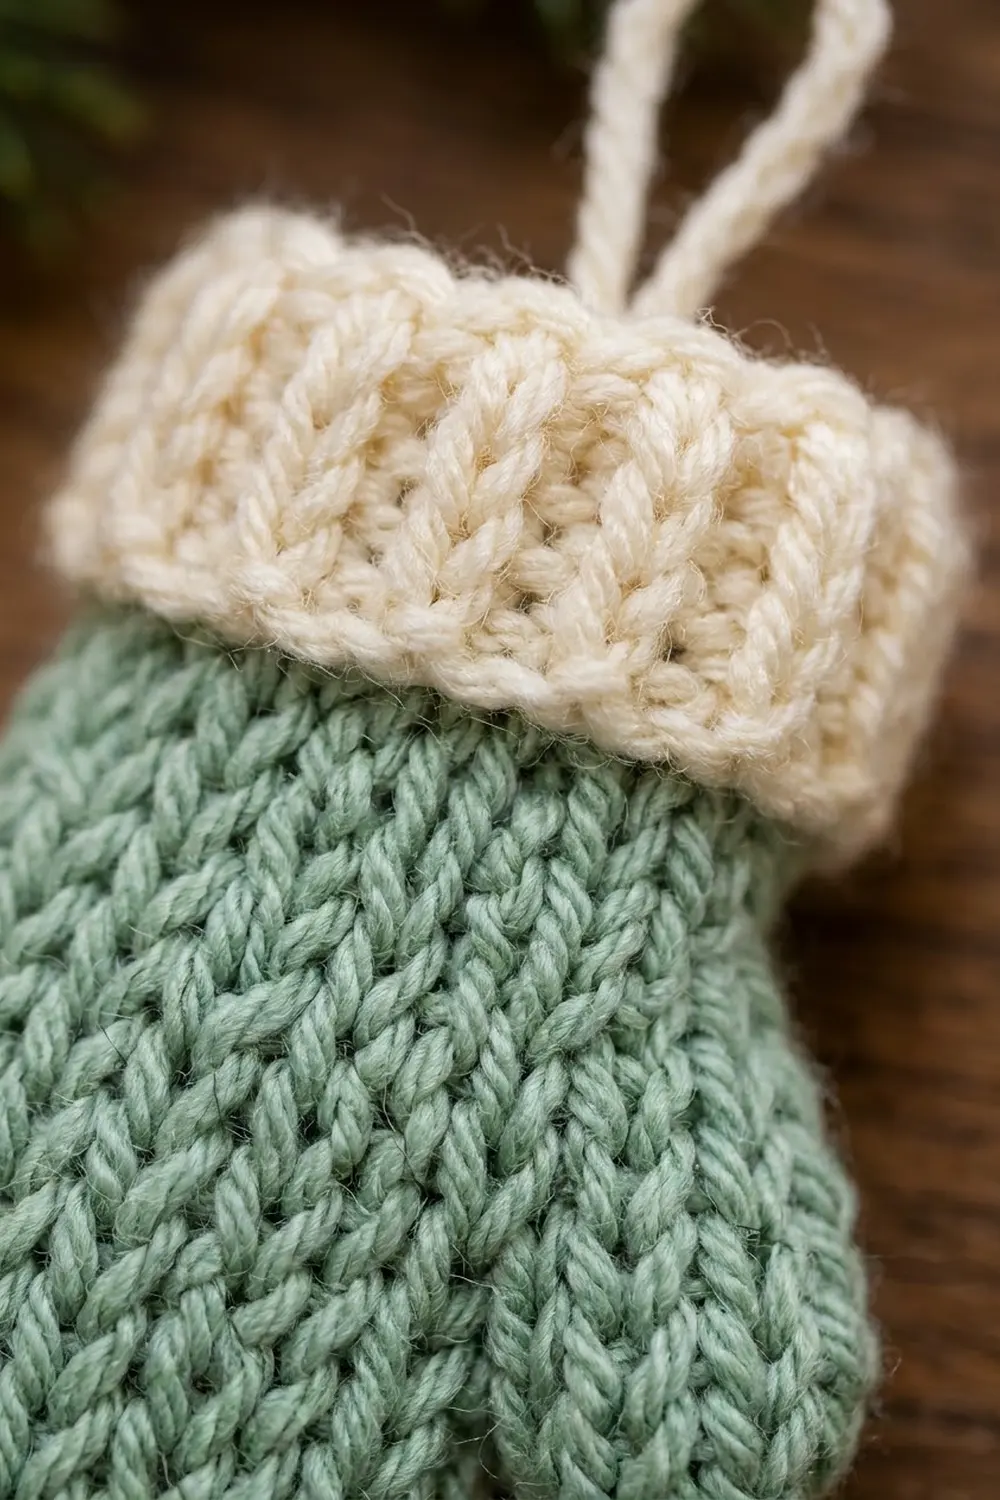
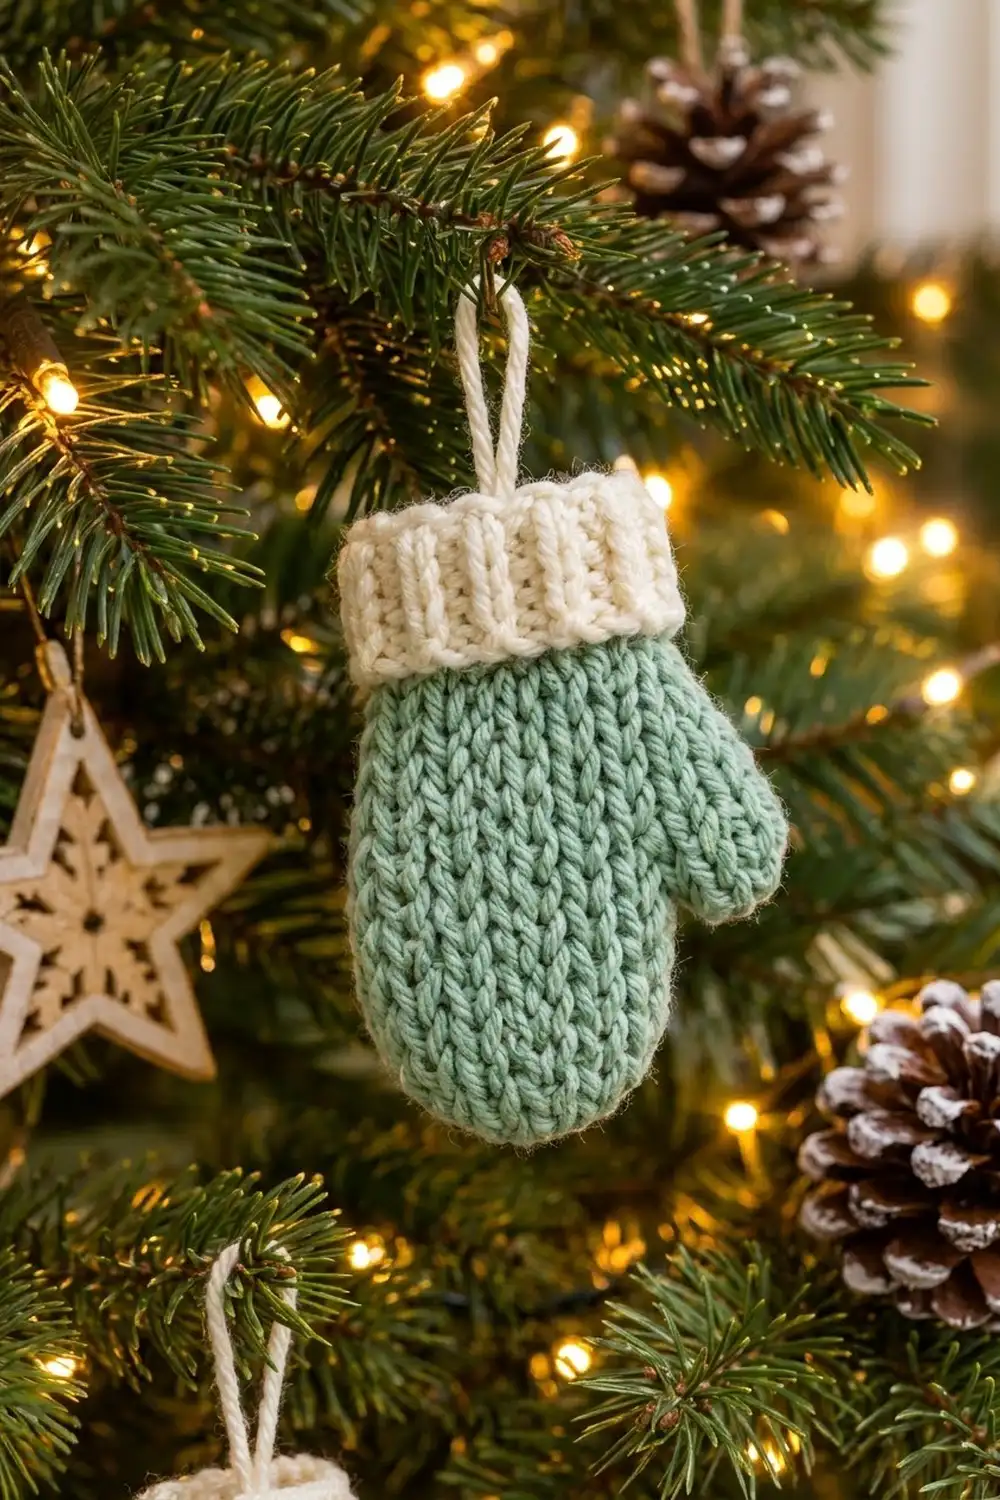
This little mitten looks hand-knit, but it is fully crocheted. The green hand is worked in waistcoat stitch, which makes neat rows of V’s like stockinette. The cream cuff is made of back-loop single crochet ribs. A simple chain loop at the top lets you hang it on a tree, a gift tag, or a wreath.
The colors are a soft sage green and a warm cream. The style is cozy Scandinavian: muted, tidy and textured. The pattern uses US crochet terms throughout.
The finished ornament is about 3.5 in (8.9 cm) tall without the loop. The hand is 2 in (5.1 cm) wide, and the thumb takes the overall width to about 2.5 in (6.4 cm). The cuff is 2.2 in (5.6 cm) wide and 0.8 in (2.0 cm) deep.
You start by crocheting the cuff as a short ribbed strip and seaming it into a ring. Then you work the green hand in rounds straight off one edge of the cuff. You leave a thumb opening, close the top with decreases, and work the thumb in rounds around the opening. A chain loop sewn inside the cuff finishes the ornament.
Finished Size and Construction
- Finished size: 3.5 in (8.9 cm) tall × 2.5 in (6.4 cm) wide including the thumb, not counting the loop
- Skill level: Easy / advanced beginner
- Terminology: US crochet terms
- Yarn weight: DK (#3 light)
- Hook: 3.5 mm (E-4)
- Number of pieces: 1 ornament (the cuff, hand and thumb make one continuous piece; the loop is sewn on)
- Layout: Single mitten, worked in the round and pressed flat
- Piece size: hand 2 in (5.1 cm) wide × 2.7 in (6.9 cm) tall
- Size before border: 2 in × 2.7 in (5.1 cm × 6.9 cm), which is the green hand alone
- Border depth: The cream ribbed cuff acts as the finishing band and is 0.8 in (2.0 cm) deep
Materials
Choose a smooth DK yarn with good stitch definition, such as a cotton blend, acrylic or soft merino. Avoid fuzzy or boucle yarns because they hide the V texture. Hairy fibers also make it hard to see the center of each stitch when you work waistcoat stitch.
- Color A, sage green: 8 g / about 18 m (20 yd) for the hand and thumb
- Color B, cream: 4 g / about 9 m (10 yd) for the cuff and hanging loop
These amounts include a margin of about 30% for your gauge swatch and tails. One 50 g ball of each color makes several ornaments.
Tools:
– 3.5 mm (E-4) crochet hook
– 1 locking stitch marker
– Tapestry needle
– Scissors
– A small pinch of polyester fiberfill (optional, for light puffiness)
– Pins and a blocking surface
Abbreviations (US Terms)
- ch: chain
- sl st: slip stitch
- sc: single crochet
- BLO: back loop only
- sk: skip
- st(s): stitch(es)
- rnd(s): round(s)
- wst: waistcoat stitch (see below)
- wst2tog: waistcoat stitch two together (see below)
Waistcoat stitch (wst): Look at the sc below. Its front shows a V. Insert your hook from front to back through the center of that V, between its two legs and under the horizontal top bars. Yarn over, pull up a loop, yarn over and pull through both loops on the hook.
Waistcoat stitch two together (wst2tog): Insert your hook through the center of the next stitch and pull up a loop. Insert it through the center of the following stitch and pull up a loop. Yarn over and pull through all 3 loops. This uses 2 stitches and makes 1.
Tip: Waistcoat stitch is tight. Keep your loops a little looser than usual so the hook can get through the center of each V.
Gauge and Checkpoints
Waistcoat stitch gauge: 20 sts × 22 rnds = 4 in (10.2 cm) when worked in the round. That is 5 sts and 5.5 rnds per 1 in (2.5 cm).
Ribbing gauge: BLO sc rows give 5 rows per 1 in (2.5 cm). Each row is 4 sc tall, which measures 0.8 in (2.0 cm).
Make one mitten as your test piece before you make a batch. Measure at each checkpoint:
- Cuff strip before seaming: 4.4 in (11.2 cm) long × 0.8 in (2.0 cm) deep
- After body Rnd 5: about 0.9 in (2.3 cm) of green below the cuff, and 2 in (5.1 cm) wide when flattened
- After body Rnd 12: about 2.2 in (5.6 cm) of green below the cuff
- Finished hand: 2.7 in (6.9 cm) tall, so the whole mitten is 3.5 in (8.9 cm)
If it is too big: Go down to a 3.25 mm or 3 mm hook, or tighten your loops. If it is too small, or you can’t get through the center of the V’s, go up to a 3.75 mm hook. Keep the stitch counts the same and change only the hook.
Cuff (Color B, Cream)
The cuff is a flat strip worked in short rows. The BLO stitches make raised ribs that run up and down once the strip becomes a ring.
Foundation: Leave an 8 in (20.3 cm) tail. Ch 5.
Row 1: Sc in the 2nd ch from the hook and in each remaining ch. Ch 1 and turn. (4 sc)
Rows 2–22: Sc BLO in each st across. Ch 1 and turn. (4 sc per row)
You now have 22 rows. Each pair of rows makes one visible rib, so there are 11 ribs.
Checkpoint: The strip should be 4.4 in (11.2 cm) long and 0.8 in (2.0 cm) wide.
Seam: Fold the strip so Row 22 meets the foundation chain, with the wrong side out. Sl st through the back loops of Row 22 and the free loops of the foundation chain. (4 sl sts) Fasten off. Turn the ring right side out.
The cuff is now a tube. It is 4.4 in (11.2 cm) around, which lies flat at 2.2 in (5.6 cm) wide. It has 22 row ends along each edge.
Hand (Color A, Sage Green)
The hand is worked in a continuous spiral with the right side facing you. Place your marker in the first stitch of each round and move it up as you go.
Rnd 1: Join Color A with a sl st at the cuff seam on either edge. Ch 1. Work 1 sc into each row end around the edge, skipping row end 11 and row end 22. Don’t join. (20 sc)
Skipping 2 row ends pulls the hand in slightly. That makes the cuff flare a little wider than the hand, as in the photo.
Rnds 2–5: Wst in each st around. (20 sts per rnd)
Checkpoint: About 0.9 in (2.3 cm) of green, and 2 in (5.1 cm) wide when flattened.
Rnd 6 (thumb opening): Wst in each of the next 17 sts, ch 3, sk the last 3 sts. (17 wst + 3 ch = 20 sts)
Rnd 7: Wst in each of the next 17 sts. Then work 1 sc into each of the 3 chains. (17 wst + 3 sc = 20 sts)
Use regular sc into the chains in Rnd 7. A chain has no V for waistcoat stitch.
Rnds 8–12: Wst in each st around. (20 sts per rnd)
Checkpoint: About 2.2 in (5.6 cm) of green.
Rnd 13: *Wst in each of the next 3 sts, wst2tog; repeat from * 3 more times. (16 sts)
Rnd 14: *Wst in each of the next 2 sts, wst2tog; repeat from * 3 more times. (12 sts)
Rnd 15: Wst2tog 6 times. (6 sts)
Fasten off and leave a 6 in (15.2 cm) tail. Thread it through the front loops of the last 6 sts, pull tight to close the top, and weave it in on the inside.
The decreases are spread evenly over 4 points, which gives the top a smooth, rounded shape instead of a point.
Flatten the hand: Press it flat so the thumb opening sits right on one side fold. The 10 sts on each side of the fold make the front and the back.
Thumb (Color A, Sage Green)
The thumb opening has 3 skipped stitches along its bottom edge, the 3 chains along its top edge, and a small gap at each end.
Rnd 1: Join Color A with a sl st at the bottom corner of the opening. Ch 1. Sc in each of the 3 skipped stitch tops along the bottom edge, and sc in the corner gap. Sc in the underside of each of the 3 chains along the top edge, and sc in the other corner gap. Don’t join. (8 sc)
Working into both corner gaps closes the small holes that tend to form at the base of a thumb.
Rnds 2–4: Wst in each st around. (8 sts per rnd)
Rnd 5: Wst2tog 4 times. (4 sts)
Fasten off. Close the top the same way as the hand and weave the tail in on the inside.
The thumb is 0.8 in (2.0 cm) wide when flattened and about 0.9 in (2.3 cm) long. It sticks out about 0.5 in (1.3 cm) past the side of the hand.
Optional stuffing: Before you weave in the last tails, push in a small pinch of fiberfill, no bigger than a grape. This gives the light puffiness seen in the photo. Keep the mitten flat enough to hang straight.
Border (Cuff Edge Finish and Hanging Loop)
This ornament doesn’t have an added border round. The cream ribbed cuff is the finishing band, and it was worked first. This section explains the cuff math and adds the loop.
Border gauge: 5 rows per 1 in (2.5 cm) of ribbing, with each row 0.8 in (2.0 cm) tall.
Count per side: The ring has 22 rows. When it is flat, 11 rows lie across the front and 11 across the back. That gives 11 ÷ 5 = 2.2 in (5.6 cm) per side.
Count per side for the hand join: The 20 sc of Rnd 1 split into 10 on the front and 10 on the back. That gives 10 ÷ 5 = 2 in (5.1 cm) per side.
Why the math works: The cuff has 22 row ends, and skipping 2 of them gives exactly 20 sts. That matches the hand’s 20-stitch round with no extra or missing stitches. The 0.2 in (0.5 cm) difference between the cuff and the hand gives the gentle flare. It is too small to cause ruffling.
Hanging loop (Color B): Leave a 6 in (15.2 cm) tail. Ch 16 and fasten off, leaving another 6 in (15.2 cm) tail. The chain is about 2.7 in (6.9 cm) long.
Fold the chain in half. Thread both tails to the inside of the cuff at the top center of the back. Sew each end down securely about 0.25 in (0.6 cm) below the top edge so the stitches don’t show on the front. The loop stands about 1.3 in (3.3 cm) above the cuff.
Weave the remaining Color B tail from the cuff into the ribbing seam.
Final Blocking
- Lightly mist the mitten with water, or hold a steam iron 1 in (2.5 cm) above it. Don’t let the iron touch the yarn, especially acrylic.
- Lay it flat on a blocking surface with the thumb pointing to one side.
- Pin the hand to 2 in (5.1 cm) wide and 2.7 in (6.9 cm) tall from the cuff edge to the top.
- Pin the cuff to 2.2 in (5.6 cm) wide and 0.8 in (2.0 cm) deep. Keep the ribs straight and vertical.
- Gently shape the thumb so it angles slightly upward.
- Let it dry completely, then remove the pins.
- Pinch the loop straight up so it stands centered over the cuff.
Final Quality-Control Checklist
- Total height is 3.5 in (8.9 cm) without the loop.
- The hand measures 2 in (5.1 cm) wide, and the cuff measures 2.2 in (5.6 cm).
- The V columns run straight up the hand. A slight lean is normal in a spiral.
- The cuff seam sits at the side or back, and the 11 ribs show clearly on the front.
- There are no holes at either corner of the thumb.
- The top of the hand and the tip of the thumb are fully closed.
- The loop is centered, secure, and doesn’t pull the cuff out of shape.
- All tails are woven in on the inside.
Troubleshooting
The V’s are hard to find or the hook won’t go through. Loosen your tension or go up a hook size. Keep the loop on the hook pulled up to its full height.
The columns lean noticeably. This is natural in a waistcoat-stitch spiral. Block the mitten firmly, or flatten it so the lean runs toward the back.
There are gaps beside the thumb. Use the tail to sew a small stitch across each gap from the inside.
The cuff ruffles. You probably worked into all 22 row ends. Check that Rnd 1 has exactly 20 sc.
The top is pointed instead of round. Make sure the Rnd 13 and Rnd 14 decreases are spread evenly, 4 per round.
The ribbing looks flat. Check that every row after Row 1 is worked in the back loop only.
Care
Spot clean with cool water and mild soap, then press flat and let air dry. Store the ornament flat in tissue paper so the loop and cuff keep their shape.
Final Notes
Here is how the measurements fit together. The cuff is 22 rows, giving 4.4 in (11.2 cm) around and 2.2 in (5.6 cm) flat. The hand picks up 20 sts, giving 2 in (5.1 cm) flat. Twelve straight rounds and three decrease rounds make the hand 2.7 in (6.9 cm) tall. Adding the 0.8 in (2.0 cm) cuff gives a total height of 3.5 in (8.9 cm). The 8-stitch thumb brings the width to 2.5 in (6.4 cm). If your gauge matches at each checkpoint, every mitten you make will match.
Happy crocheting!