

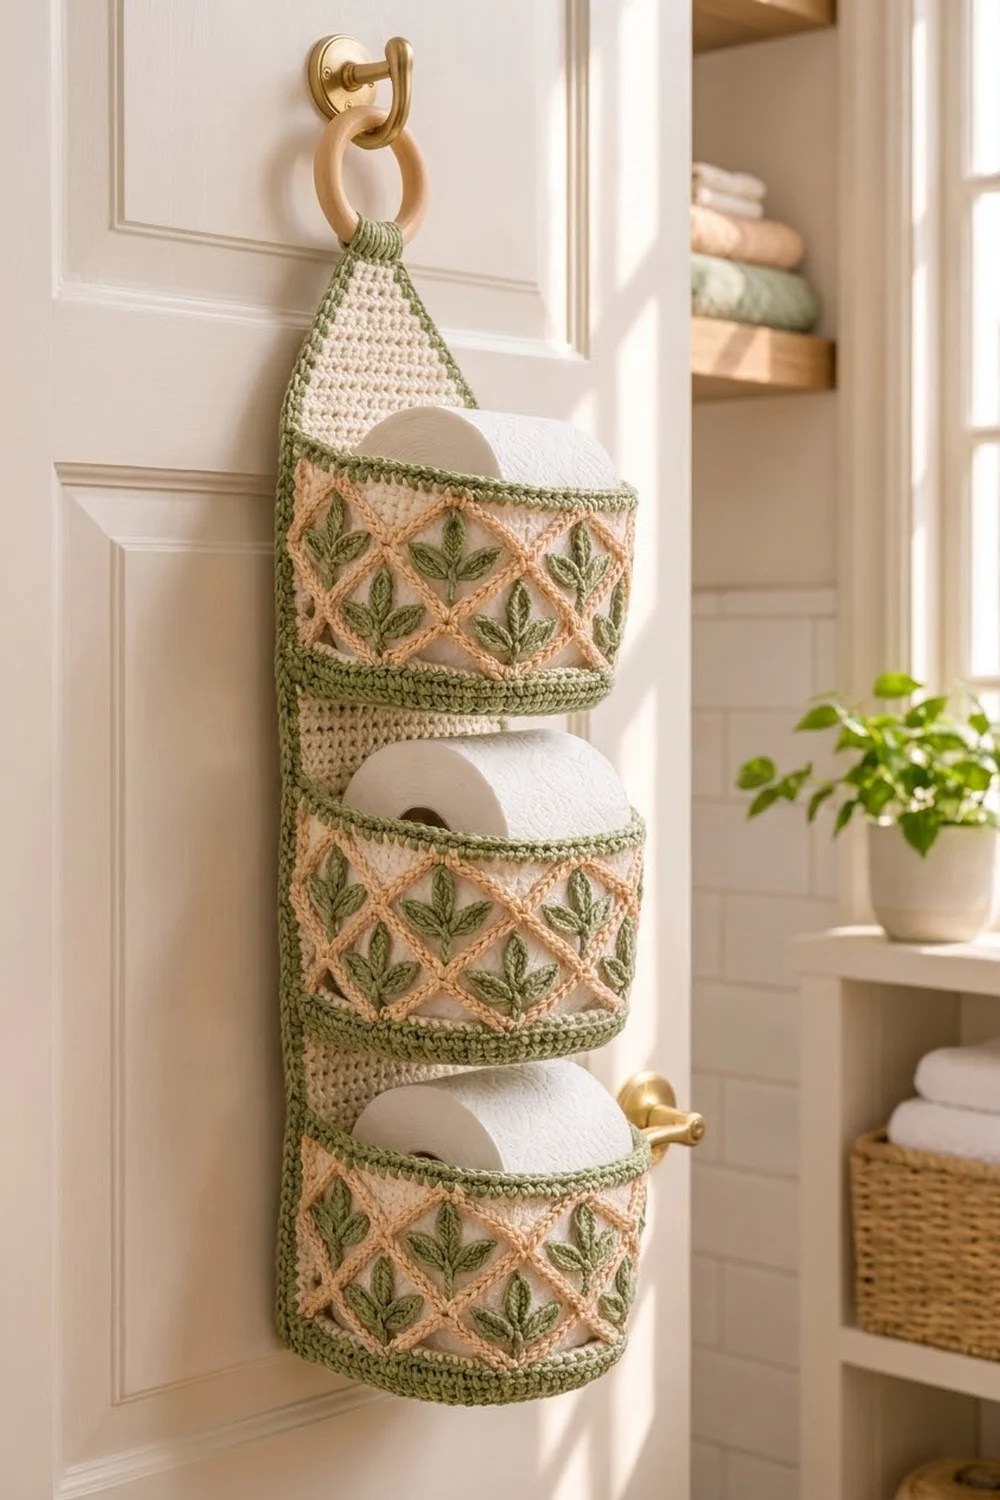
This hanging holder keeps three spare rolls tidy and in easy reach. It’s a long cream backing panel with a sage-green edge, three rounded pockets stacked down the front, and a wooden ring at the top for a door hook or wall peg.
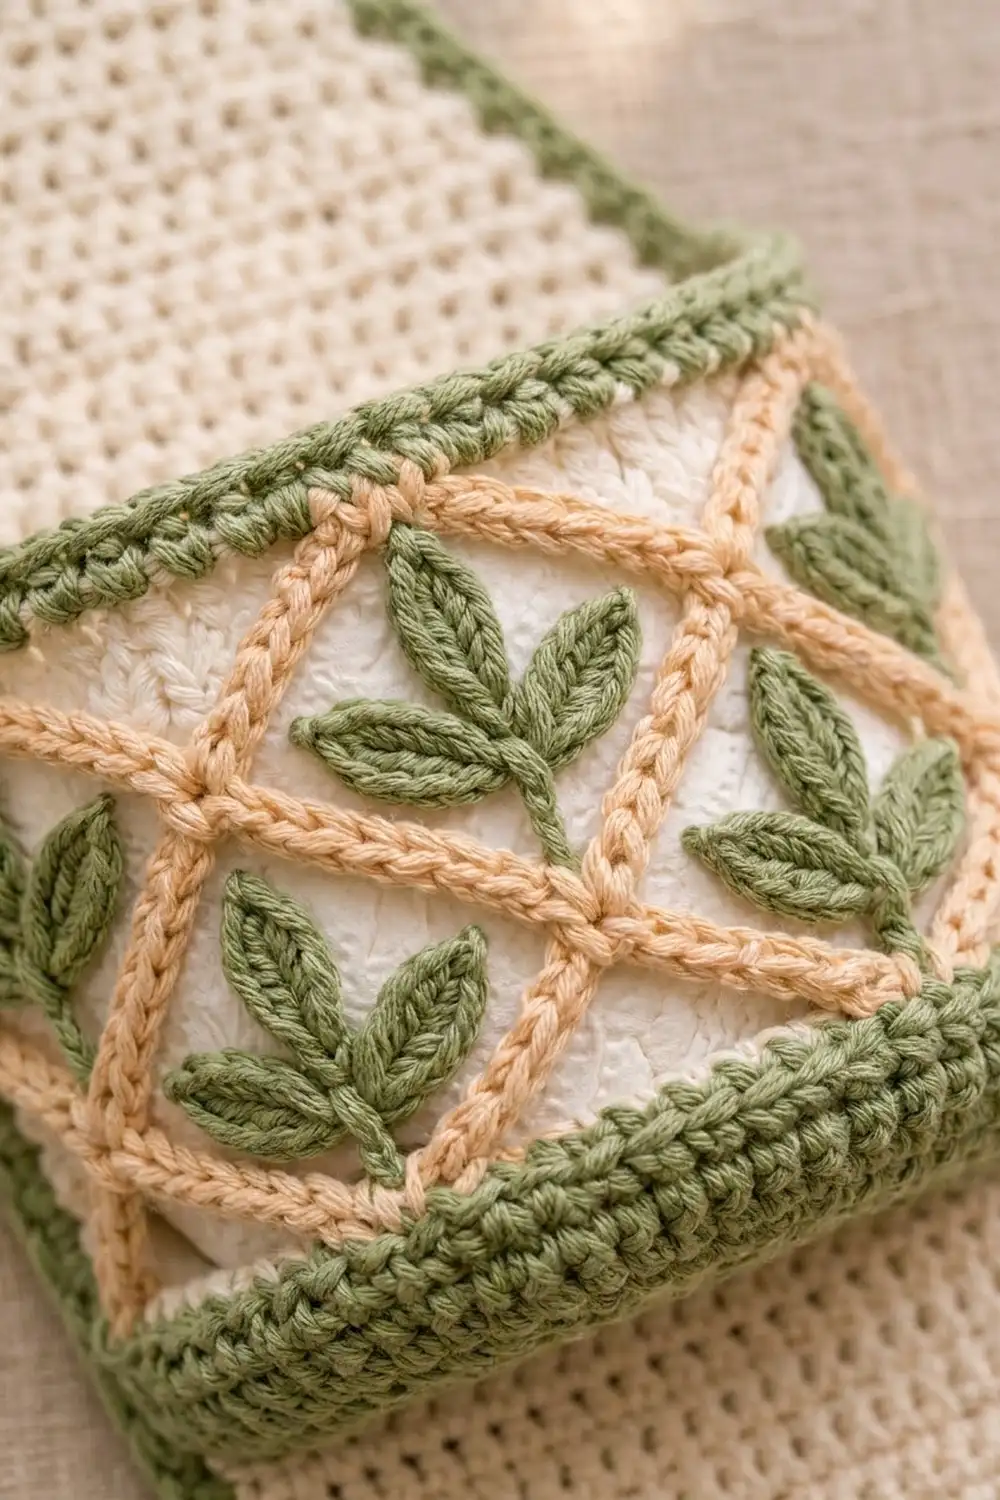
Each pocket has a green base and green bands, with a cream middle crossed by a peach slip-stitch trellis. A small three-leaf sprig sits inside each front diamond. The colors are soft and natural, so it suits a cottage-style or modern farmhouse bathroom.
The pattern uses US crochet terms. The finished holder measures about 8.3 in (21.1 cm) wide and 22.5 in (57.2 cm) long, or about 25 in (63.5 cm) including the ring.
Here’s how it’s built. Each pocket is a single-crochet oval basket worked in joined rounds. You add the trellis and leaves afterward. The backing panel is worked flat in rows and then tapered to a tab. It gets a two-round border before you sew the pockets on stitch to stitch.
Finished Size and Construction
- Finished size: 8.3 in x 22.5 in (21.1 cm x 57.2 cm), plus a 2.5 in (6.4 cm) ring
- Skill level: Intermediate
- Terminology: US crochet terms
- Yarn weight: Worsted (#4), cotton or cotton blend
- Hook: 5.0 mm (H-8)
- Number of pieces: 1 backing panel, 3 pockets, 15 leaf appliqués per pocket (45 total)
- Layout: 3 pockets stacked vertically on one panel
- Pocket size: 7.5 in (19.1 cm) across the back, 4 in (10.2 cm) tall, 20 in (50.8 cm) around
- Panel size before border: 7.5 in x 23.1 in (19.1 cm x 58.7 cm), tab unfolded
- Border depth: 0.4 in (1.0 cm)
Materials
Use a smooth, mercerized or matte worsted-weight cotton. Cotton holds the pocket shape, resists stretching, and handles bathroom humidity well. Avoid fuzzy yarns, because they blur the trellis lines.
- Cream (main): 120 g / about 216 m
- Sage green: 80 g / about 144 m
- Peach: 20 g / about 36 m
All quantities include a safety margin of roughly 20%.
Tools:
– 5.0 mm (H-8) crochet hook
– Wooden ring, 2.5 in (6.4 cm) diameter
– Tapestry needle
– 4 stitch markers
– Scissors
– Measuring tape
– Blocking mat and pins
– Spray bottle
Abbreviations (US Terms)
- ch – chain
- sl st – slip stitch
- sc – single crochet
- hdc – half double crochet
- sc2tog – single crochet 2 together
- BLO – back loop only
- rev sc – reverse single crochet (crab stitch)
- st(s) – stitch(es)
- rnd – round
- RS / WS – right side / wrong side
Surface slip stitch: Hold the yarn behind the fabric. Insert the hook from front to back through the center of the stated stitch and pull up a loop. Then insert the hook into the next stated stitch, pull up a loop, and draw it through the loop on your hook. Keep each loop about one stitch tall.
Leaf: Ch 5. Sc in 2nd ch from hook, hdc in next ch, sc in next ch, sl st in last ch. Working along the opposite side of the chain: sc in next ch, hdc in next ch, sc in next ch, sl st in the turning ch (this is the tip). Fasten off, leaving a 6 in (15.2 cm) tail. Each leaf is about 1 in (2.5 cm) long.
Gauge and Checkpoints
Gauge: 16 sc and 18 rows (or rnds) = 4 in (10.2 cm).
Make one complete pocket before you start the panel. It confirms your gauge in rounds and shows you the finished shape.
Checkpoints:
– Pocket base after Rnd 6: about 7 in x 3 in (17.8 cm x 7.6 cm)
– Pocket circumference after Rnd 9: 20 in (50.8 cm)
– Pocket wall after Rnd 24: 4 in (10.2 cm) tall
– Panel width after Row 5: 7.5 in (19.1 cm)
– Panel length after Row 72: 16 in (40.6 cm)
– Panel length after Row 96: 21.3 in (54.1 cm)
If your pieces come out too big, go down 0.5 mm. If they come out too small, go up 0.5 mm. Don’t add or remove stitches, because the pocket back must stay exactly 30 sts to match the panel.
Pocket (Make 3)
Work in joined rounds with the RS facing. Ch 1 at the start of each round doesn’t count as a stitch. Join each round with a sl st to the first sc.
Base (green)
Rnd 1: Ch 19. 2 sc in 2nd ch from hook, sc in next 16 ch, 4 sc in last ch. Working along the opposite side of the chain: sc in next 16 ch, 2 sc in the same ch as the first sts. Join. (40 sts)
Rnd 2: Ch 1. 2 sc in each of next 2 sts, sc in next 16, 2 sc in each of next 4, sc in next 16, 2 sc in each of last 2. Join. (48 sts)
Rnd 3: Ch 1. [Sc, 2 sc in next] 2 times, sc in next 16, [sc, 2 sc in next] 4 times, sc in next 16, [sc, 2 sc in next] 2 times. Join. (56 sts)
Rnd 4: Ch 1. [Sc in next 2, 2 sc in next] 2 times, sc in next 16, [sc in next 2, 2 sc in next] 4 times, sc in next 16, [sc in next 2, 2 sc in next] 2 times. Join. (64 sts)
Rnd 5: Ch 1. [Sc in next 3, 2 sc in next] 2 times, sc in next 16, [sc in next 3, 2 sc in next] 4 times, sc in next 16, [sc in next 3, 2 sc in next] 2 times. Join. (72 sts)
Rnd 6: Ch 1. [Sc in next 4, 2 sc in next] 2 times, sc in next 16, [sc in next 4, 2 sc in next] 4 times, sc in next 16, [sc in next 4, 2 sc in next] 2 times. Join. (80 sts)
The base should now be a flat oval, about 7 in x 3 in (17.8 cm x 7.6 cm). Stitch positions:
– Sts 1–12: first half of the left end
– Sts 13–28: front straight side
– Sts 29–52: right end
– Sts 53–68: back straight side
– Sts 69–80: second half of the left end
Wall
Rnd 7 (green): Ch 1, sc BLO in each st. Join. (80 sts) This creates a crisp turning ridge.
Rnds 8–9 (green): Ch 1, sc in each st. Join. (80 sts) On the final join of Rnd 9, change to cream.
Rnds 10–20 (cream): Ch 1, sc in each st. Join. (80 sts) That’s 11 cream rounds. On the final join of Rnd 20, change to green.
Rnds 21–23 (green): Ch 1, sc in each st. Join. (80 sts)
Rnd 24 (green): Ch 1, rev sc in each st. Join. (80 sts) Fasten off.
The wall is 18 rounds (Rnds 7–24), which comes to 4 in (10.2 cm). Weave in the ends.
Mark the back section: Place markers in sts 46 and 75 of Rnd 23. These 30 sts are the back of the pocket, and they’re centered on the back straight side. The other 50 sts (76–80 and 1–45) form the front.
Peach Trellis
Columns are the stitch positions 1–80 and run straight up the wall. Every line has 11 surface sl sts, one in each cream round from Rnd 10 to Rnd 20.
- Right-leaning lines: Start in Rnd 10 at column 1. Move up one round and one column to the right with each stitch, ending in Rnd 20 at column 11. Repeat, starting at columns 11, 21, 31, 41, 51, 61, and 71. Columns wrap past 80 to 1. (8 lines)
- Left-leaning lines: Start at the same 8 columns in Rnd 10. Move up one round and one column to the left with each stitch, ending in Rnd 20 at the starting column minus 10. (8 lines)
That gives 16 lines and 176 surface sl sts per pocket. Lines from neighboring starting points cross in Rnd 15 (for example, at column 6). At a crossing, work the second line through the same stitch. The result is 8 full diamonds, each 10 sts wide and 11 rnds tall, centered on columns 1, 11, 21, 31, and so on. Small triangles fill the gaps along the top and bottom bands.
Leaf Sprigs (front diamonds only)
Add sprigs to the 5 front diamonds, centered on columns 1, 11, 21, 31, and 41.
- Stem: With green, work 4 surface sl sts up the center column, Rnds 11–14.
- Leaves: Make 3 leaves. Sew one tip-up along the center column, covering Rnds 15–19. Sew the other two from the top of the stem, angled up and out so their tips point toward the diamond’s side corners in Rnd 17.
Each pocket uses 15 leaves. Sew through both loops along each leaf’s center so the leaf stays slightly raised.
Backing Panel
Work flat in rows. Ch 1 at the start of each row doesn’t count as a stitch.
Row 1 (cream): Ch 31. Sc in 2nd ch from hook and in each ch across. (30 sts)
Rows 2–72: Ch 1, turn, sc in each st across. (30 sts)
The panel now measures 7.5 in x 16 in (19.1 cm x 40.6 cm).
Taper:
– Row 73: Ch 1, turn, sc2tog, sc in each st to the last 2, sc2tog. (28 sts)
– Row 74: Ch 1, turn, sc in each st across. (28 sts)
– Rows 75–96: Repeat Rows 73–74 eleven more times. Each odd row loses 2 sts.
This gives 12 decrease rows in all (24 sts removed). Row 96 has 6 sts. The panel should now be 21.3 in (54.1 cm) long. Change to green on the last stitch of Row 96.
Tab (green), Rows 97–104: Ch 1, turn, sc in each st across. (6 sts) Don’t fasten off.
The panel now measures 7.5 in x 23.1 in (19.1 cm x 58.7 cm) with the tab unfolded.
Make All Pieces
- Pockets: 3. Each takes about 15 g green, 15 g cream, and 6 g peach.
- Leaves: 45 in green, 15 per pocket
- Backing panel: 1. Mostly cream, with the green tab.
Layout (front view):
        ( RING )
         [TAB]          rows 97-104, green
        /     \         taper, rows 73-96
       |       |        rows 67-72, open cream
       |POCKET3|        sides on rows 50-66
       |POCKET2|        sides on rows 28-44
       |POCKET1|        sides on rows 6-22
       |       |        rows 1-5, open cream
Border
Work this border before you attach the pockets.
Border gauge: Along straight side edges, work 8 sc for every 9 row-ends. That’s 16 sc per 18 rows, which matches the 16 sts per 4 in stitch gauge, so the edge lies flat. The taper edges are diagonal and longer than their row count suggests, so work 1 sc per row-end there.
Rnd 1 (green): Continue from the tab with the RS facing, and work around the whole panel:
– 3 sc in the tab corner, 4 sc across the top of the tab, 3 sc in the next tab corner
– First long side: 7 sc down the tab edge (8 rows), 24 sc down the taper edge (24 rows), 64 sc down the straight edge (72 rows)
– 3 sc in the bottom corner, 28 sc across the bottom, 3 sc in the next bottom corner
– Second long side: 64 sc up the straight edge, 24 sc up the taper edge, 7 sc up the tab edge
Join to the first sc. (234 sts)
Check: 4 corners x 3 = 12, plus 28 bottom, plus 4 tab top, plus 2 sides x 95 = 190. Total 234. The bottom and tab-top counts (28 and 4) leave out the corner stitches (sts 1 and 30 on the bottom row, sts 1 and 6 on the tab), which become the 3-sc corners.
Rnd 2 (green): Ch 1, rev sc in each st. Join. (234 sts) Fasten off.
The border adds 0.4 in (1.0 cm) on each side. That makes the panel 8.3 in (21.1 cm) wide.
Joining
Place the panel RS up with the bottom edge toward you. Use cream for the side seams and green for the rims, and whipstitch through both loops on both pieces.
Pocket 1:
1. Rim: Line up the 30 back sts of the pocket’s Rnd 23 (marked sts 46–75) with the 30 sts of panel Row 22. Sew one-to-one, from st 1 to st 30.
2. Sides: Sew pocket column 46 to panel st 30, and pocket column 75 to panel st 1. Work down from Rnd 23 to Rnd 7, which matches panel Row 22 down to Row 6. Both pieces have the same row gauge, so it’s exactly 17 rounds to 17 rows.
3. Base: Tack the center of the base’s back edge to Row 6 with three small stitches.
Pocket 2: Attach the rim to Row 44, with the sides covering Rows 28–44.
Pocket 3: Attach the rim to Row 66, with the sides covering Rows 50–66.
Keep your tension relaxed. Pulled seams pucker the panel and pinch the pockets’ opening. The front 50 sts will bow out about 3.5 in (8.9 cm) into a rounded D shape.
Size checkpoint: The panel should still lie flat and measure 8.3 in (21.1 cm) across.
Ring: Slide the ring over the tab. Fold Rows 101–104 to the back and sew the top edge across the Row 97 line. The folded tab is about 0.9 in (2.3 cm) long.
Final Blocking
- Before joining, mist the panel and pockets until they’re evenly damp.
- Pin the panel to 8.3 in x 22.5 in (21.1 cm x 57.2 cm), measuring with the tab folded.
- Smooth the border so the rev sc rope lies flat and straight.
- Stand each pocket on its base and fill it with a toilet roll or a rolled towel.
- Shape the leaves with your fingers so the tips point cleanly.
- Let everything dry completely, then sew the pieces together.
Final Quality-Control Checklist
- Each pocket has exactly 80 sts in every wall round.
- The 16 trellis lines cross cleanly in Rnd 15 and meet at the diamond tips.
- There are 5 sprigs per pocket, all centered on the front.
- The panel is 30 sts wide through Row 72 and 6 sts across the tab.
- Border Rnd 1 has 234 sts.
- Pocket rims sit on Rows 22, 44, and 66.
- The ring is secure and the folded tab is stitched firmly.
- All ends are woven in on the WS.
Troubleshooting
- Base cups or ruffles: Check your counts for Rnds 2–6. If it still cups, go up a hook size for the base only.
- Wall leans outward: Rnd 7 must be worked in the BLO.
- Trellis lines look loose: Shorten the pulled-up loops so each one is the height of one round.
- Diamonds look uneven: Count the columns again from st 1. Every line starts at a column ending in 1.
- Border waves: Check the 8-sc-per-9-row ratio on the straight edges.
- Pocket opening gapes: Tighten the side seam slightly near the rim.
Care
Hand wash in cool water, press out the moisture in a towel, and dry flat. Reshape the pockets with a roll while they’re damp.
Final Notes
The sizes all build on each other:
– Gauge is 16 sc x 18 rows = 4 in (10.2 cm).
– The pocket base grows to 80 sts, making a wall 20 in (50.8 cm) around and 4 in (10.2 cm) tall.
– The pocket’s 30 back sts match the panel’s 30 sts exactly.
– The 72 straight rows give 16 in (40.6 cm), with room for three pockets placed 22 rows apart.
– The 234-st border brings the panel to 8.3 in (21.1 cm) wide.
If you keep each checkpoint on target, the finished holder will hang straight, the pockets will sit level, and the trellis will line up all the way around.
Happy crocheting!