

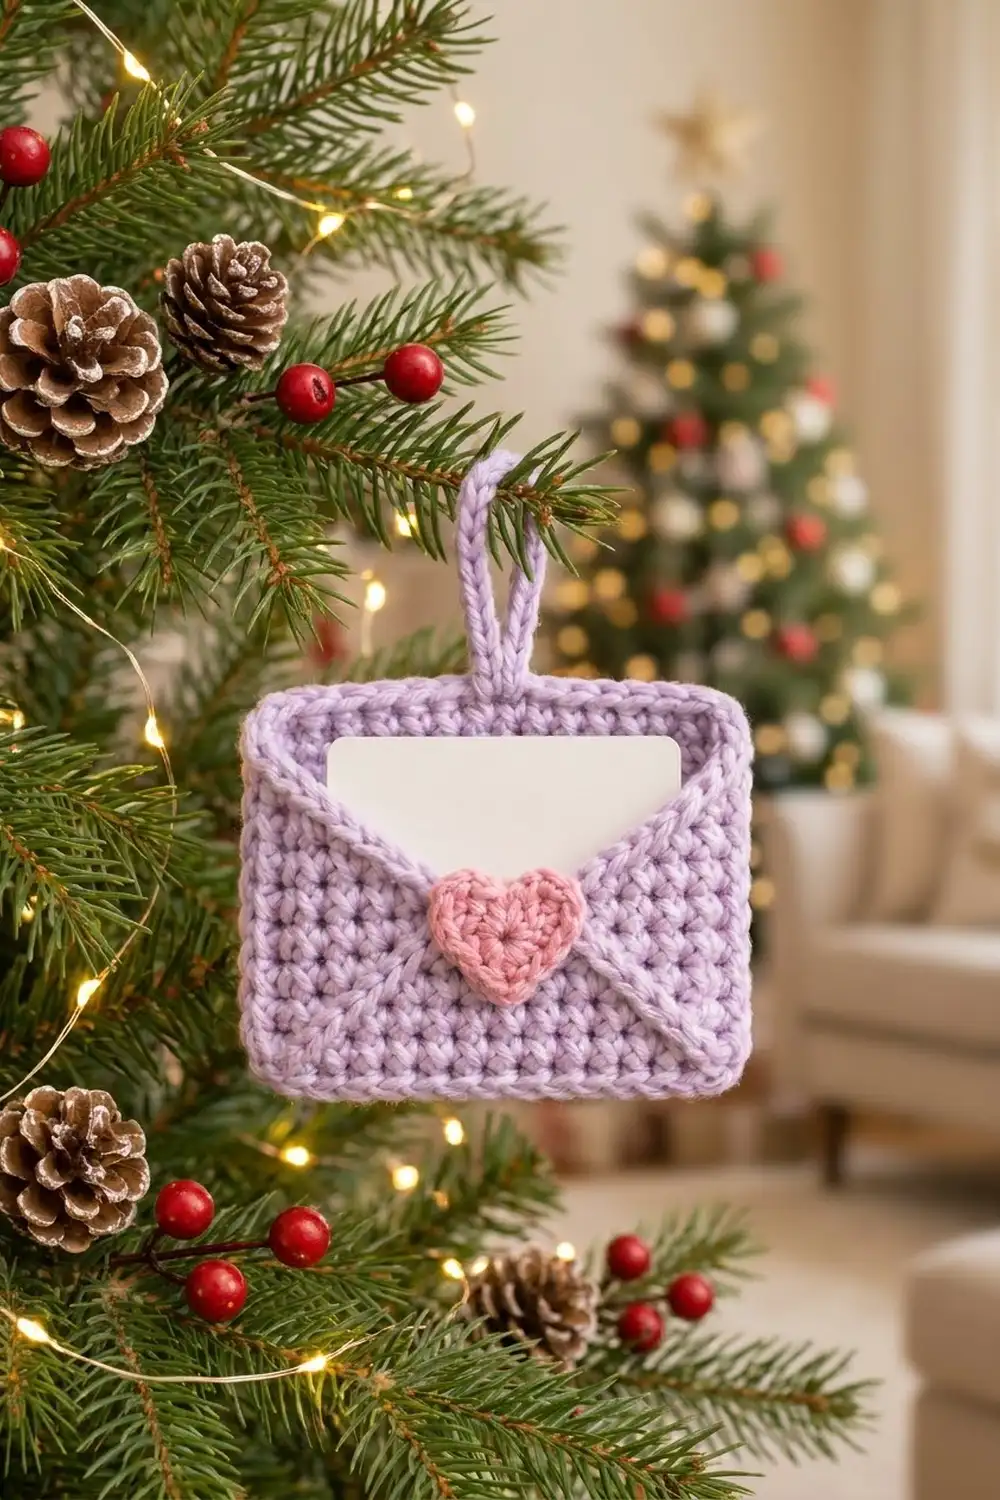
This little envelope is a gift card holder and a tree ornament in one. It’s a small, firm rectangle of lavender single crochet. The front pocket has a V-shaped top, like an envelope flap folded open. A soft pink heart sits at the point of the V like a wax seal, and a braided-looking lavender loop at the top lets you hang it on a branch.
The look is clean and gently textured. Raised lavender lines run along the V opening and from each bottom corner up to the heart, so the pocket looks like a real envelope. The body, loop and lines are lavender, and the heart is rose pink. Pink, sage green and light blue versions with pink hearts look lovely too.
The pattern uses US crochet terms. The finished envelope measures 4 in wide x 3 in tall (10.2 x 7.6 cm), not counting the loop. It holds a standard 3.375 x 2.125 in (8.6 x 5.4 cm) gift card.
Construction is simple. You crochet a back panel and a front pocket in rows, then add a trim row and surface slip stitch lines to the front. Next you work one border round that joins the pocket to the back and edges the whole envelope. A small two-round heart and a slip stitch loop finish it.
Finished Size and Construction
- Finished size: 4 x 3 in (10.2 x 7.6 cm), plus a loop about 1.5 in (3.8 cm) tall
- Skill level: Easy
- Terminology: US crochet terms
- Yarn weight: DK (light worsted, #3)
- Hook: 3.5 mm (E-4)
- Number of pieces: one finished envelope made from 4 parts (back panel, front pocket, heart, loop)
- Layout: front pocket placed directly over the back panel, heart at the V point, loop at top center
- Back panel size before border: 3.6 x 2.67 in (9.1 x 6.8 cm)
- Front pocket size before border: 3.6 x 2.5 in (9.1 x 6.4 cm), measured at the tips
- Border depth: about 0.2 in (0.5 cm) on the left and right, about 0.17 in (0.4 cm) at top and bottom
Materials
Choose a smooth, tightly plied DK cotton or cotton blend. Cotton holds its shape, so the pocket stays flat and the card slides in easily. Avoid fuzzy or very stretchy yarn. It hides the raised lines and lets the pocket sag.
- Lavender (main color): 12 g / 28 m
- Rose pink (heart): 2 g / 5 m
These amounts include a comfortable margin for swatching and weaving in ends.
Tools:
- 3.5 mm (E-4) crochet hook
- Tapestry needle
- Scissors
- Stitch marker
- Ruler or tape measure
- Pins and a blocking mat or folded towel
- A gift card or card-sized piece of cardstock for test fitting
Abbreviations (US Terms)
- ch – chain
- sl st – slip stitch
- sc – single crochet
- hdc – half double crochet
- dc – double crochet
- sc2tog – single crochet 2 together
- st(s) – stitch(es)
- RS / WS – right side / wrong side
- MR – magic ring
Surface slip stitch: Hold the working yarn behind the fabric. Insert the hook from front to back through the fabric, pull up a loop, and draw it through the loop on the hook. Each surface sl st makes one chain-like “V” on the front.
Gauge and Checkpoints
Gauge: 5 sc and 6 rows = 1 in (2.5 cm) in sc worked in rows. A 4 in (10.2 cm) square has 20 sts and 24 rows.
Make the back panel first and use it as your test piece. Every other measurement depends on it.
Checkpoints:
- Back panel, Row 1: 18 sts = 3.6 in (9.1 cm).
- Back panel, Row 16: 3.6 x 2.67 in (9.1 x 6.8 cm).
- Front pocket, Row 8: 3.6 x 1.33 in (9.1 x 3.4 cm).
- Front pocket, Row 15: tips reach 2.5 in (6.4 cm) from the bottom edge.
- Finished envelope: 4 x 3 in (10.2 x 7.6 cm).
If your panel is too big, switch to a 3.25 mm hook. If it’s too small, switch to a 3.75 mm hook. Don’t change the stitch counts, because the border math depends on 18 sts and 16 rows. The inside must stay at least 3.5 in (8.9 cm) wide so the card fits.

Back Panel
With lavender, ch 19.
Row 1 (RS): Sc in 2nd ch from hook and in each ch across, turn. (18 sc)
Rows 2–16: Ch 1 (does not count as a st), sc in each st across, turn. (18 sc)
Fasten off and weave in the ends. Check the size: 3.6 x 2.67 in (9.1 x 6.8 cm).
Front Pocket
The pocket starts as a rectangle, then splits into two tapered halves that form the V opening.
With lavender, ch 19.
Row 1 (RS): Sc in 2nd ch from hook and in each ch across, turn. (18 sc)
Rows 2–8: Ch 1, sc in each st across, turn. (18 sc)
Checkpoint: 3.6 x 1.33 in (9.1 x 3.4 cm). Place a marker between st 9 and st 10 of Row 8. This marks the center point of the V.
Left Half
Row 9: Ch 1, sc in first 7 sts, sc2tog over sts 8 and 9, turn. Leave the remaining 9 sts unworked. (8 sts)
Row 10: Ch 1, sc2tog, sc in each st to end, turn. (7 sts)
Row 11: Ch 1, sc in each st to last 2 sts, sc2tog, turn. (6 sts)
Row 12: Repeat Row 10. (5 sts)
Row 13: Repeat Row 11. (4 sts)
Row 14: Repeat Row 10. (3 sts)
Row 15: Repeat Row 11. (2 sts)
Fasten off. Every decrease falls on the center edge, so the outer edge stays straight and the inner edge slants.
Right Half
Row 9: Join lavender in st 10 of Row 8 (the first unworked st). Ch 1, sc2tog over sts 10 and 11, sc in last 7 sts, turn. (8 sts)
Row 10: Ch 1, sc in each st to last 2 sts, sc2tog, turn. (7 sts)
Row 11: Ch 1, sc2tog, sc in each st to end, turn. (6 sts)
Rows 12–15: Repeat Rows 10 and 11 alternately. (5, 4, 3, then 2 sts)
Don’t fasten off. Each half is 7 rows deep, so the V is about 1.17 in (3.0 cm) deep.
V Trim Row
This row makes the raised rim along the opening.
Trim Row (RS): Ch 1. Sc in each of the 2 sts of the right tip. Work down the inner slant with 7 sc in the row ends of Rows 15 through 9. Work 1 sc into the center point at the marker. Work up the other inner slant with 7 sc in the row ends of Rows 9 through 15. Sc in each of the 2 sts of the left tip. Fasten off.
Count: (4 sts worked 1 per existing tip st) + (15 sts worked into row ends and the center point) = 19 sc.
The tips now reach the height of Row 16 on the back panel.
Diagonal Envelope Lines
With RS facing, hold lavender behind the pocket. Work surface sl sts in a diagonal from the bottom left corner to the center point. Make 1 surface sl st in each row and move 1 st toward the center each time: Row 1 st 2, Row 2 st 3, Row 3 st 4, and so on to Row 8 st 9. (8 surface sl sts)
Fasten off and pull the tail to the back. Repeat on the right side as a mirror image: Row 1 st 17, Row 2 st 16, and so on to Row 8 st 10. (8 surface sl sts)
The two lines meet under the V point, which gives the folded-envelope look. Keep the stitches relaxed so the fabric doesn’t pucker. Weave all ends into the WS.
Heart
With rose pink, make a MR.
Rnd 1: Ch 2 (does not count as a st), 12 dc in ring. Pull the ring closed and sl st to the first dc. (12 dc)
Checkpoint: about 0.6 in (1.5 cm) across.
Rnd 2: Sl st in same st as join (st 1, the top dip). Then work:
– st 2: (hdc, dc)
– st 3: 2 dc
– st 4: 2 dc
– st 5: (dc, hdc)
– st 6: sc
– st 7, the bottom point: (hdc, dc, hdc)
– st 8: sc
– st 9: (hdc, dc)
– st 10: 2 dc
– st 11: 2 dc
– st 12: (dc, hdc)
Sl st to the first sl st. (22 sts)
Count check: 1 + 2 + 2 + 2 + 2 + 1 + 3 + 1 + 2 + 2 + 2 + 2 = 22.
Fasten off and leave a 10 in (25.4 cm) tail for sewing. The heart is about 1.1 in wide x 1.0 in tall (2.8 x 2.5 cm).
Hanging Loop
With lavender, ch 21.
Row 1: Sl st in the back bump of the 2nd ch from hook and in each back bump across. (20 sl sts)
Fasten off and leave an 8 in (20.3 cm) tail. The strip is about 3.3 in (8.4 cm) long and looks braided on the front.
Border
The border is one round of sc. On the sides and bottom, you work it through the pocket and the back panel together, which joins them. On the top, you work it through the back panel only, so the pocket stays open.
Border gauge: Same as the body: 5 sc = 1 in (2.5 cm) across the top and bottom. On the sides you work 1 sc into each row end, so the sides follow the row gauge of 6 rows = 1 in (2.5 cm).
Setup: Place the pocket on the back panel with both RS facing you. Line up the bottom and side edges and pin the corners. The 18 foundation chains of the pocket match the 18 foundation chains of the back stitch for stitch. Rows 2–15 of the pocket match Rows 2–15 of the back row for row.
Border Rnd (RS): Join lavender in st 1 of Row 16 of the back panel, at the top right corner.
- Top (back only): Ch 1, 3 sc in st 1 (corner), sc in next 16 sts, 3 sc in st 18 (corner).
- Left side (both layers): Work 14 sc into the row ends of Rows 15 through 2. Insert the hook through the pocket and the back together.
- Bottom (both layers): 3 sc in first foundation ch (corner), sc in next 16 ch, 3 sc in last foundation ch (corner).
- Right side (both layers): Work 14 sc into the row ends of Rows 2 through 15.
Sl st to the first sc. Fasten off and weave in the ends. (72 sc)
Per-side counts: Including both corner center stitches, the top and bottom each have 20 sts (1 + 1 + 16 + 1 + 1). Each side has 18 sts (1 + 1 + 14 + 1 + 1). The 4 corner stitches are shared by two sides, so the total is 20 + 20 + 18 + 18 − 4 = 72. The same total also equals 4 corners x 3 sc, plus 16 + 16 + 14 + 14.
Why the math works: The corner groups already cover the row ends of Rows 1 and 16. That’s why each side has 14 sc and not 16. Across the width, the 18 panel stitches become 20 border stitches: 20 sts ÷ 5 sts per in = 4.0 in (10.2 cm). For the height, 16 rows plus one border row at the top and one at the bottom make 18 rows: 18 ÷ 6 rows per in = 3.0 in (7.6 cm).
Finishing the Details
Heart: Center the heart over the V point so it covers the middle of the Trim Row. Its bottom point should sit just above where the diagonal lines meet. Pin it, then whipstitch around the outer edge with the pink tail. Sew through the pocket layer only so the card can still slide behind it.
Loop: Fold the strip in half. On the WS of the back panel, overlap the two ends by 0.25 in (0.6 cm), centered behind sts 9 and 10 of the top edge. Sew them down firmly through the back panel only. About 1.5 in (3.8 cm) of loop should stand above the envelope.
Final Blocking
- Slide a gift card or card-sized cardstock into the pocket to hold the shape.
- Mist the envelope until it’s damp but not wet.
- Lay it flat on a blocking mat or folded towel.
- Pin the four corners to a 4 x 3 in (10.2 x 7.6 cm) rectangle.
- Use your fingers to straighten the V trim and the diagonal lines.
- Shape the heart so it has rounded tops and a sharp bottom point.
- Shape the loop into a smooth teardrop.
- Let it dry completely before you remove the pins and card.
Final Quality-Control Checklist
- The envelope measures 4 x 3 in (10.2 x 7.6 cm).
- The border has 72 sc, with 3 sc at each corner.
- The pocket is closed on the sides and bottom and open at the top.
- The V point sits at the horizontal center.
- Both diagonal lines are 8 stitches long and mirror each other.
- The heart is centered on the V point and sewn through the pocket only.
- The loop is centered and secure.
- A 3.375 x 2.125 in (8.6 x 5.4 cm) card slides in and out easily.
- All ends are woven in on the WS.
Troubleshooting
The card won’t fit. Your gauge is too tight. Remake the panels with a larger hook so the inside is at least 3.5 in (8.9 cm) wide.
The V is off center. One half has the wrong stitch count. Recount each half: 8 sts on Row 9 and 2 sts on Row 15.
The diagonal lines pucker. The surface slip stitches are too tight. Pull them out and work them more loosely, or use a hook one size larger for this step only.
The sides of the border ruffle. You worked more than one sc per row end. Each side should have exactly 14 sc between the corner groups.
The corners are rounded. Check that each corner has 3 sc in one stitch, then pin the corners square when you block.
The heart is lopsided. Recount Rnd 2 against the 22-stitch list and make sure the point is worked in st 7.
Care
Hand wash in cool water with mild soap and lay flat to dry. Reshape the corners and heart while the envelope is still damp.
Final Notes
Each measurement builds on the one before it. A gauge of 5 sc and 6 rows to 1 in (2.5 cm) gives an 18-stitch, 16-row back panel of 3.6 x 2.67 in (9.1 x 6.8 cm). The front pocket matches that width and reaches the same height at its tips. A 72-stitch border then joins the two layers and brings the envelope to 4 x 3 in (10.2 x 7.6 cm). Check your size at each stage and every gift card will slip in neatly.
Happy crocheting!